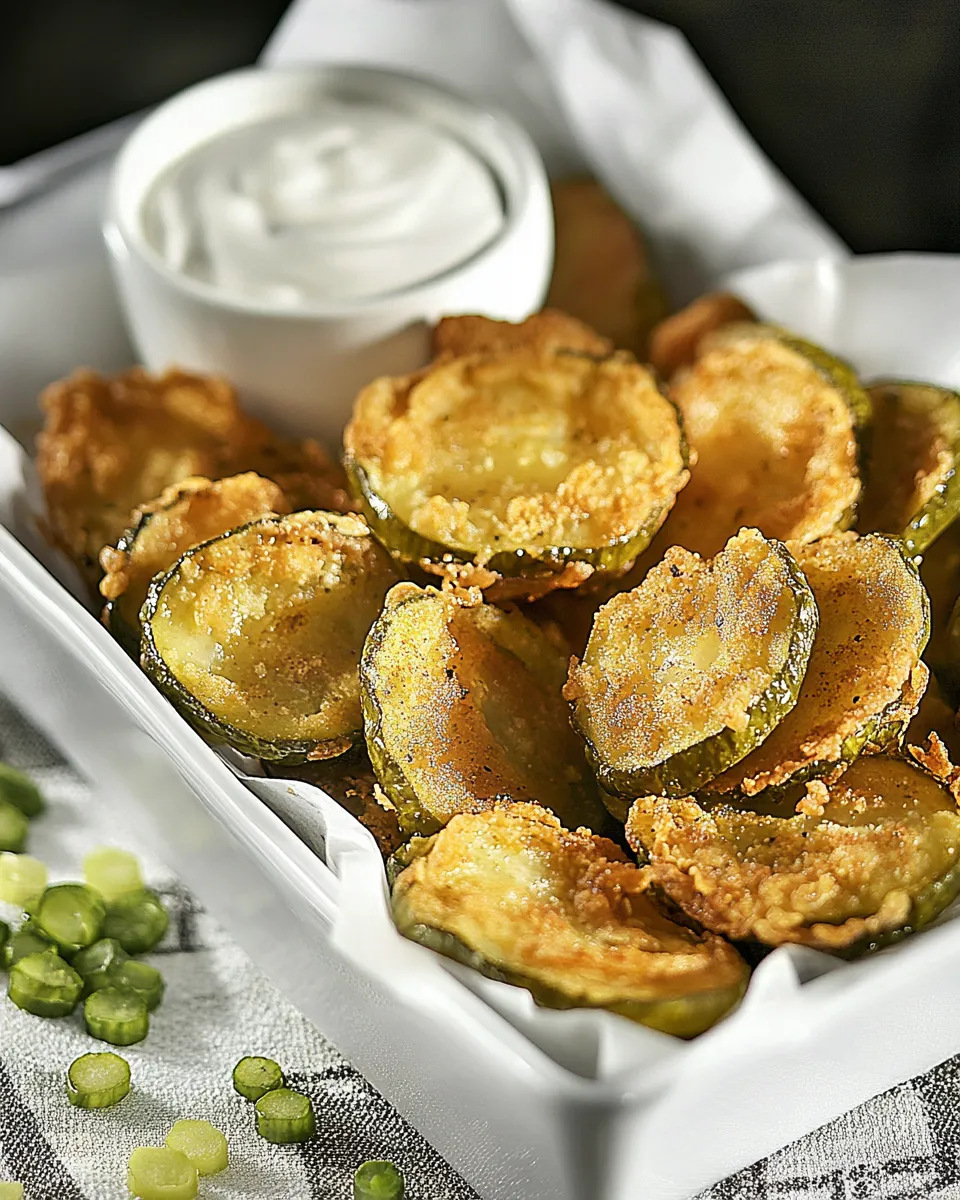
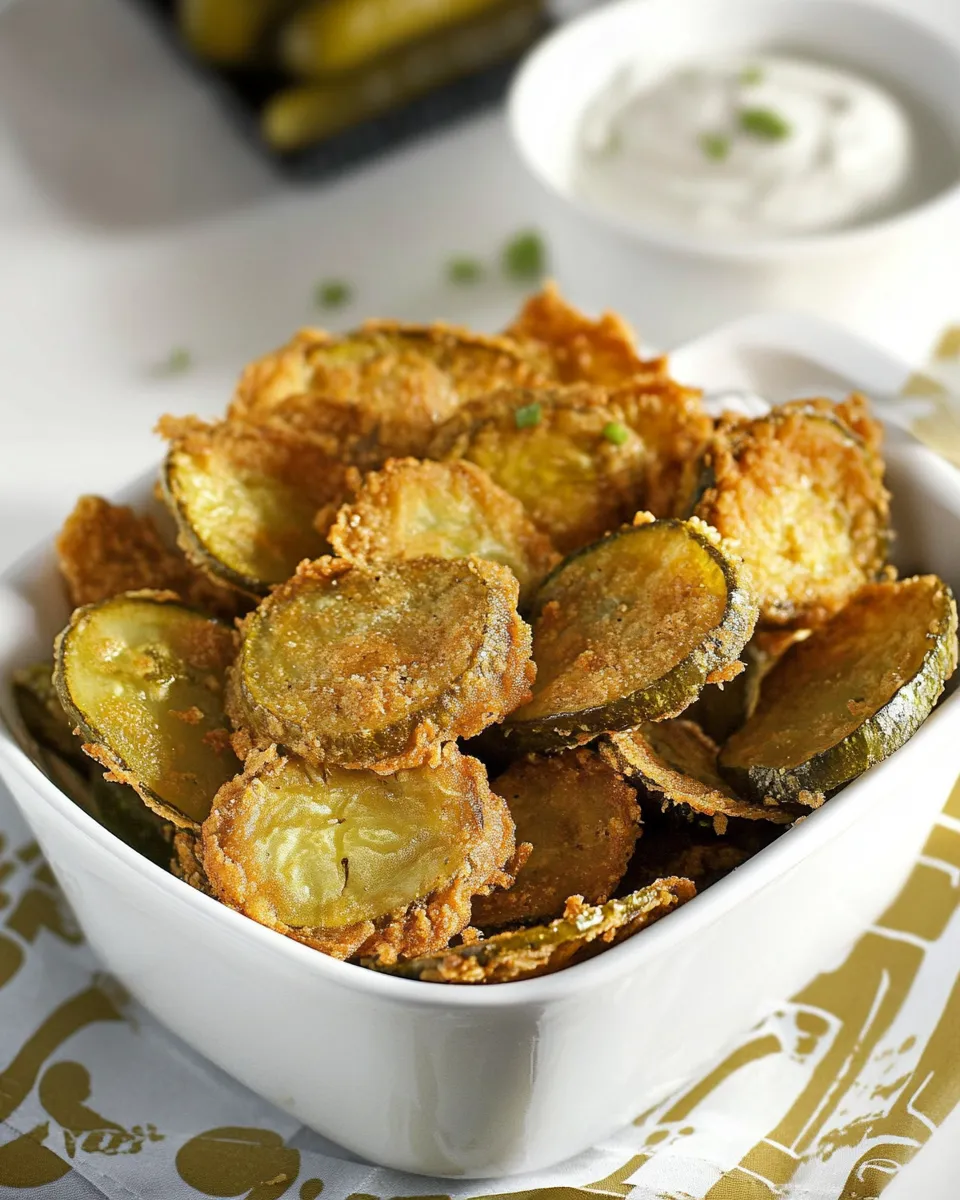
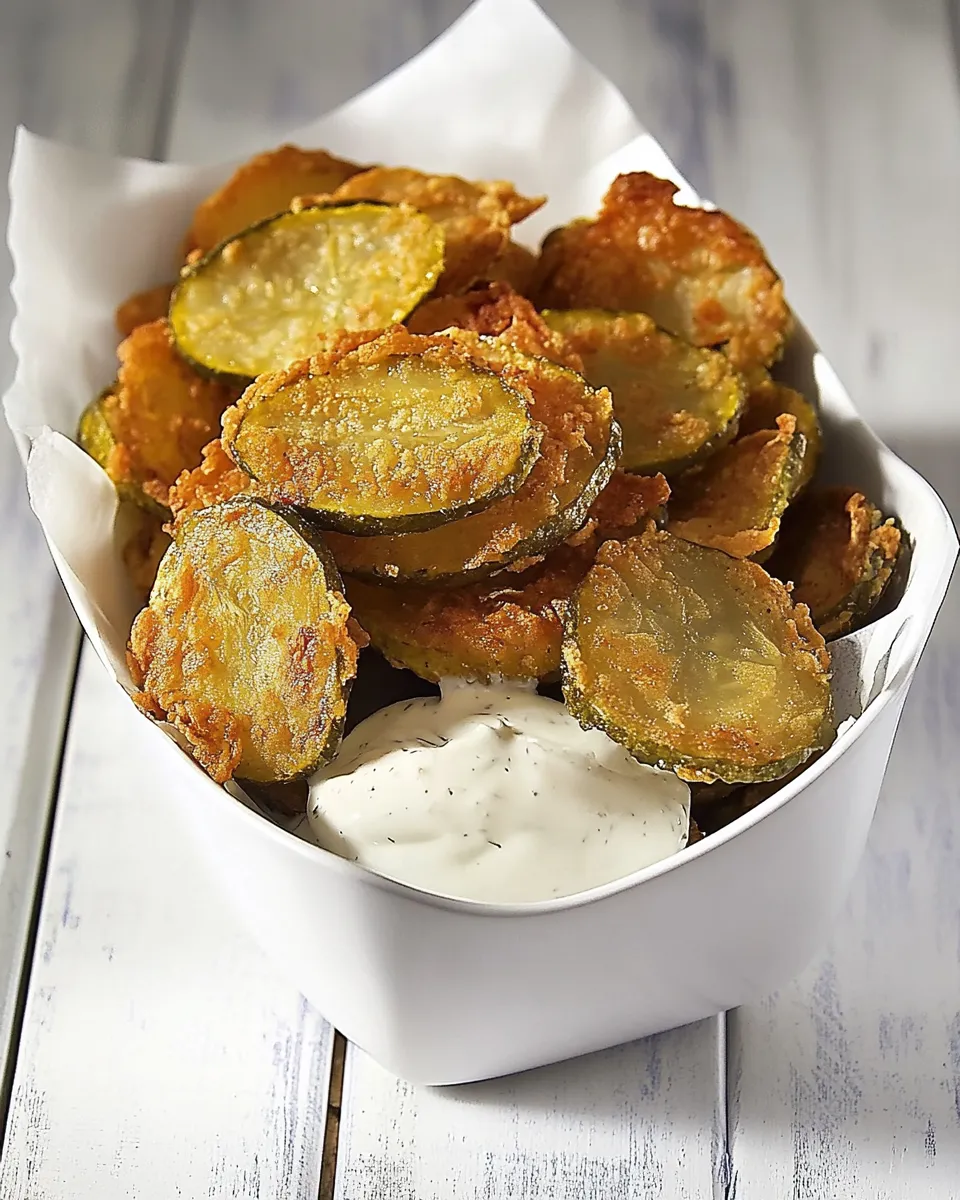
Hooters Fried Pickles Recipe
I love a snack that arrives hot, crisp, and a little bit cheeky. Fried pickles are exactly that — tangy, crunchy, and utterly addictive. This version follows the method that gets you close to the Hooters classic: a simple wet-dry coating, quick fry, and a bright, vinegary center. It’s straightforward and forgiving, which I appreciate when I want something satisfying without fuss.
In this post I’ll walk you through everything from the ingredients on your counter to the exact pan and safety notes I use every time. I test small batches first, so I can call out the trouble spots and how to avoid them. You’ll get a crisp exterior, not a soggy one, and pickle slices that still taste like pickles — not like fried bread.
Read through the steps before you start. Frying is fast and requires attention, but it’s also very rewarding. With a little prep and the right oil temperature, you’ll have golden, crunchy pickles to share (or not). Let’s get into it.
What You’ll Gather

Ingredients
- 2 quarts vegetable oil — for deep frying; vegetable oil has a high smoke point and neutral flavor.
- 16 ounces dill pickle chips — the star of the dish; drain them well to avoid excess splatter.
- 2 cups buttermilk — acid and moisture to help the flour coating adhere and add tang.
- 2 cups whole-wheat flour — adds body and nuttiness to the crust; helps absorb moisture from the pickles.
- 1 cup all-purpose flour — lightens the coating so it crisps up nicely.
- 2 teaspoons salt — seasons the coating; adjust slightly if your pickles are very salty.
- 1 teaspoon paprika — gives color and a mild, smoky warmth.
- 1/4 teaspoon cayenne pepper — a touch of heat; optional if you prefer no spice.
From Start to Finish: Hooters Fried Pickles
- Pour 2 quarts vegetable oil into a large, heavy pot and heat to 350°F (use a deep-fry thermometer). Line a platter with a few layers of paper towels and set near the stove for draining fried pickles.
- Drain 16 ounces dill pickle chips in a colander to remove excess brine. Transfer the drained pickles to a medium bowl and pour 2 cups buttermilk over them so they are covered; set aside while you prepare the coating.
- In a separate large bowl, stir together 2 cups whole-wheat flour, 1 cup all-purpose flour, 2 teaspoons salt, 1 teaspoon paprika, and 1/4 teaspoon cayenne pepper until evenly combined.
- Working in small batches, use tongs or a fork to lift a handful of pickle chips from the buttermilk, letting excess buttermilk drip back into the bowl for a moment.
- Dredge the pickles in the seasoned flour mixture, coating each piece completely. Shake off excess flour so the coating is not clumpy.
- Carefully place the coated pickles into the hot oil in a single layer, being careful not to overcrowd the pot (fry in batches as needed). Maintain the oil temperature near 350°F; reduce heat if it rises too high.
- Fry the pickles until golden brown and crisp, about 1–3 minutes per batch (times may vary by pot and stove). Use a slotted spoon to remove the fried pickles.
- Transfer the fried pickles to the paper-towel–lined platter to drain. Repeat steps 4–7 with the remaining pickles and coating until all are fried.
- Let the fried pickles drain briefly on the platter, then serve warm.
Top Reasons to Make Hooters Fried Pickles
- Crisp contrast — you get a crunchy exterior and a bright, tangy interior in every bite.
- Fast cooking — the frying itself takes minutes; prep is the only part to plan for.
- Shareable snack — they’re perfect for parties, game day, or a casual appetizer.
- Minimal ingredients — there’s no complex batter and no long marinating; what you see is what you need.
- Customizable heat — the cayenne pepper is modest; bump it up or leave it out to suit your crowd.
International Equivalents
- United States — Fried pickles are a Southern bar snack turned national favorite.
- United Kingdom — Think of similar fried pub snacks like onion rings; flavor contrasts and textures are the same idea.
- South Asia — Tempura-style vegetables offer a similar crisp-light batter approach, though seasoning differs.
- Mediterranean — Fried zucchini or eggplant slices deliver the same satisfying crunch-to-soft ratio.
Equipment & Tools
Must-haves
- Large, heavy pot — to hold 2 quarts of oil safely and maintain steady temperature.
- Deep-fry thermometer — crucial for keeping oil at 350°F for consistent crunch.
- Slotted spoon or spider skimmer — to lift fried pickles out cleanly.
- Colander — for draining the pickle chips before soaking in buttermilk.
- Medium and large bowls — one for the buttermilk soak, one for the seasoned flour.
- Platter lined with paper towels — simple draining station to keep pickles crisp.
Troubles You Can Avoid
- Soggy coating — don’t overcrowd the pot. Frying too many at once drops the oil temperature and makes the crust absorb oil instead of crisping.
- Burnt coating — watch your thermometer. Oil that runs hotter than 350°F browns the crust before it crisps.
- Excess brine splatter — drain pickle chips well and let excess buttermilk drip off before dredging.
- Clumpy batter — shake off excess flour after dredging so the coating stays even and crisp.
- Safety risks — use a heavy pot, keep oil below the rim, and never leave hot oil unattended.
Make It Fit Your Plan
- Batch cooking — fry in small, consistent batches so every piece finishes in the same 1–3 minute window.
- Serving size — 16 ounces of pickle chips makes a good-sized appetizer for 3–4 people as part of a spread.
- Timing — start heating oil only when your prep is nearly done; you don’t want oil waiting too long on the heat.
- Pairing — serve warm straight from the platter. A cool dip is optional, but they’re also bold enough to enjoy solo.
Author’s Commentary
I test fried pickles with a few small adjustments each time. What matters most is temperature control and good drainage on the pickles. Whole-wheat flour brings a pleasant texture and color, while the all-purpose flour keeps the crust light. I like the subtle smokiness of paprika and the controlled lift from the cayenne — just enough to make the tang of the pickle pop.
When I make these for guests, I fry one batch to taste-test the oil temperature and seasoning. If the first batch looks pale, I’ll give the oil a bit more heat; if it browns too quickly, I’ll reduce it. Little adjustments like that make a big difference in the final product.
Storage & Reheat Guide

- Short-term storage — keep fried pickles loosely covered at room temperature for up to 2 hours. For longer, place them in a single layer in the fridge for up to 24 hours, but expect a loss in crispness.
- Reheating — reheat in a 350°F oven or in a toaster oven on a wire rack for a few minutes until warmed through and crisped. Avoid microwaving; it makes them soggy.
- Freezing — not recommended. Frying and pickles don’t freeze-and-thaw well for texture preservation.
Your Top Questions
- Q: How do I keep the coating from falling off? — A: Shake off excess buttermilk and excess flour. Press lightly if needed, but the wet-dry system here adheres well when you give the dredged pieces a quick, gentle shake.
- Q: Can I use a different vegetable oil? — A: Yes; the recipe calls for vegetable oil for its neutral flavor and high smoke point. Other neutral high-smoke-point oils can work, but stick to those characteristics.
- Q: Are thicker pickles okay? — A: The recipe uses dill pickle chips. Thicker spears will take longer to fry and may require adjustments to time and coating consistency.
- Q: How do I know when the oil is ready? — A: Use a deep-fry thermometer and bring the oil to 350°F. If you don’t have a thermometer, a small piece of coated flour should sizzle and float immediately without burning.
- Q: Can I make this less spicy? — A: Reduce or omit the cayenne pepper. The paprika provides color without heat.
The Takeaway
These Hooters-style fried pickles are a reliable, fun appetizer that delivers on crunch and tang. The method is direct: soak briefly, dredge, and fry at 350°F. Respect the oil temperature, work in small batches, and drain properly for the best results. With a short ingredient list and a quick cook time, they’re a great pick for game day, casual gatherings, or an indulgent weeknight snack.
Make a test batch, adjust as needed, and enjoy the satisfying crunch. If you try them, let me know how yours turned out — I always love hearing what small tweaks people make at home.

Hooters Fried Pickles Recipe
Ingredients
Ingredients
- 2 quartsvegetable oil
- 16 ouncesdill pickle chips
- 2 cupsbuttermilk
- 2 cupswhole-wheat flour
- 1 cupall-purpose flour
- 2 teaspoonssalt
- 1 teaspoonpaprika
- 1/4 teaspooncayenne pepper
Instructions
Instructions
- Pour 2 quarts vegetable oil into a large, heavy pot and heat to 350°F (use a deep-fry thermometer). Line a platter with a few layers of paper towels and set near the stove for draining fried pickles.
- Drain 16 ounces dill pickle chips in a colander to remove excess brine. Transfer the drained pickles to a medium bowl and pour 2 cups buttermilk over them so they are covered; set aside while you prepare the coating.
- In a separate large bowl, stir together 2 cups whole-wheat flour, 1 cup all-purpose flour, 2 teaspoons salt, 1 teaspoon paprika, and 1/4 teaspoon cayenne pepper until evenly combined.
- Working in small batches, use tongs or a fork to lift a handful of pickle chips from the buttermilk, letting excess buttermilk drip back into the bowl for a moment.
- Dredge the pickles in the seasoned flour mixture, coating each piece completely. Shake off excess flour so the coating is not clumpy.
- Carefully place the coated pickles into the hot oil in a single layer, being careful not to overcrowd the pot (fry in batches as needed). Maintain the oil temperature near 350°F; reduce heat if it rises too high.
- Fry the pickles until golden brown and crisp, about 1–3 minutes per batch (times may vary by pot and stove). Use a slotted spoon to remove the fried pickles.
- Transfer the fried pickles to the paper-towel–lined platter to drain. Repeat steps 4–7 with the remaining pickles and coating until all are fried.
- Let the fried pickles drain briefly on the platter, then serve warm.
Equipment
- Equipment
- Deep Fryer
- Wire Rack
- Baking Sheet