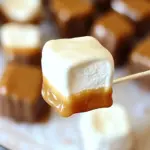
Dark Chocolate Salted Caramel Dipped Marshmallows
These are the kind of little treats I make when I want something homey but a touch special — marshmallows dressed up in salted caramel and dark chocolate, finished with a buttery graham crunch. They travel well, keep for a few days if you store them right, and they’re utterly kid-friendly while still sophisticated enough for grown-up dessert plates.
The technique is straightforward: chill the marshmallows so coatings set cleanly, dip twice — first in caramel, then in chocolate — and finish with crushed graham crackers for texture. Timing and temperature are the only things that matter here. Get those right and you’ll have neat, glossy, not-too-sticky bites.
I’ll walk you through gear, timing, and quick fixes, plus why this combo works so well. No fluff. Just practical steps and the small tips that save you from sticky fingers and cracked chocolate.
What You’ll Gather

Ingredients
- 16 oz bag of large marshmallows — the base; large size gives a satisfying bite and a good surface for coatings.
- 2 batches of Six-Minute Salted Caramel Sauce (link to recipe in post) — provides the sticky, salty-sweet layer that the chocolate seals in.
- 8 ounces dark chocolate, melted — the final coating; pick a dark you enjoy eating since its flavor dominates.
- 2 teaspoons coconut or canola oil — thins the melted chocolate slightly for smooth dipping and better sheen.
- 1/4 cup crushed graham cracker crumbs — adds crunch and a toasty flavor contrast to the marshmallow and chocolate.
Dark Chocolate Salted Caramel Dipped Marshmallows Cooking Guide
- Line a large baking sheet with parchment paper or a silicone baking mat.
- Arrange the marshmallows in a single layer on the prepared baking sheet, spacing them so they do not touch. Place the pan in the freezer for 15 minutes.
- While the marshmallows chill, make two batches of Six-Minute Salted Caramel Sauce according to the linked recipe. Allow the caramel to cool slightly until it is thickened but still pourable (not piping-hot).
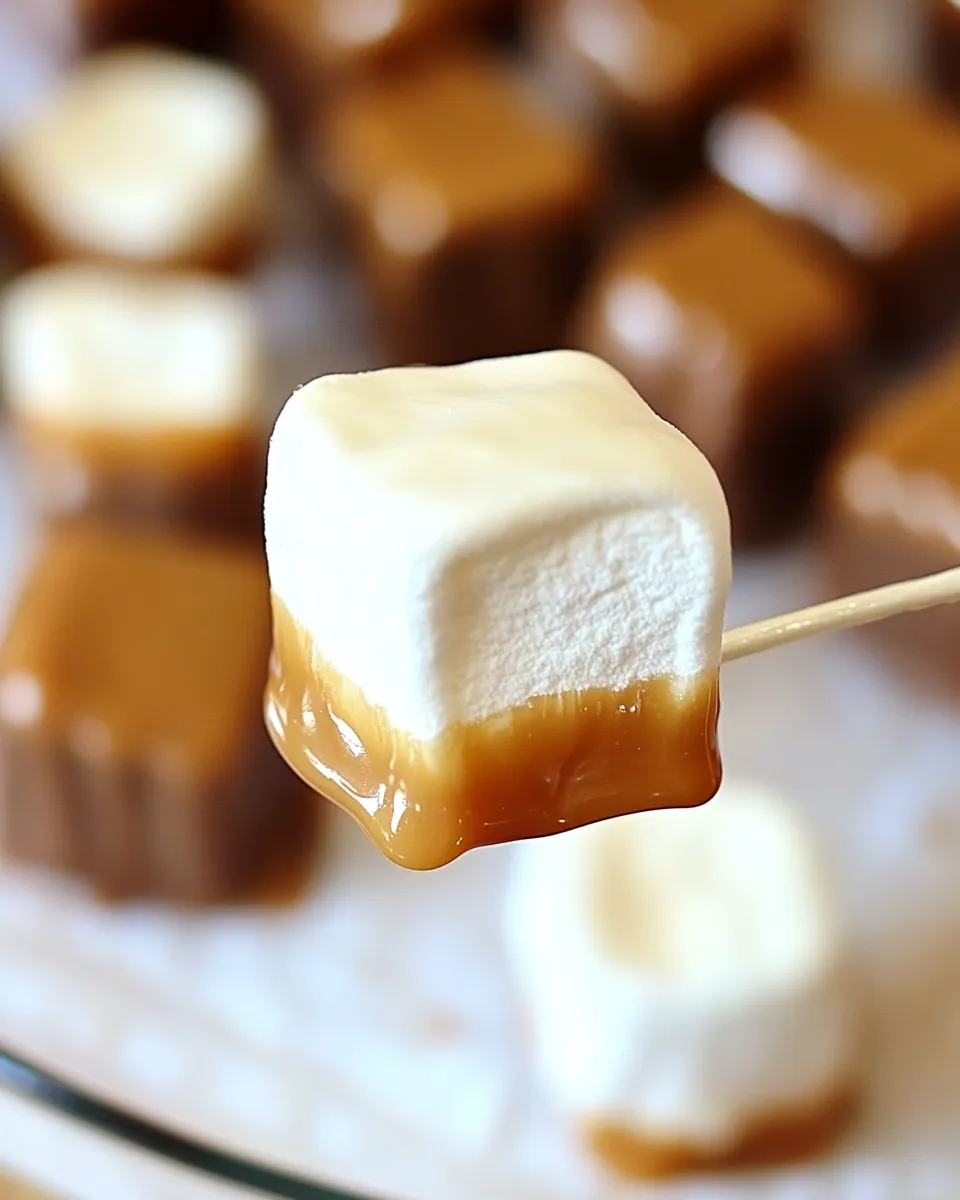
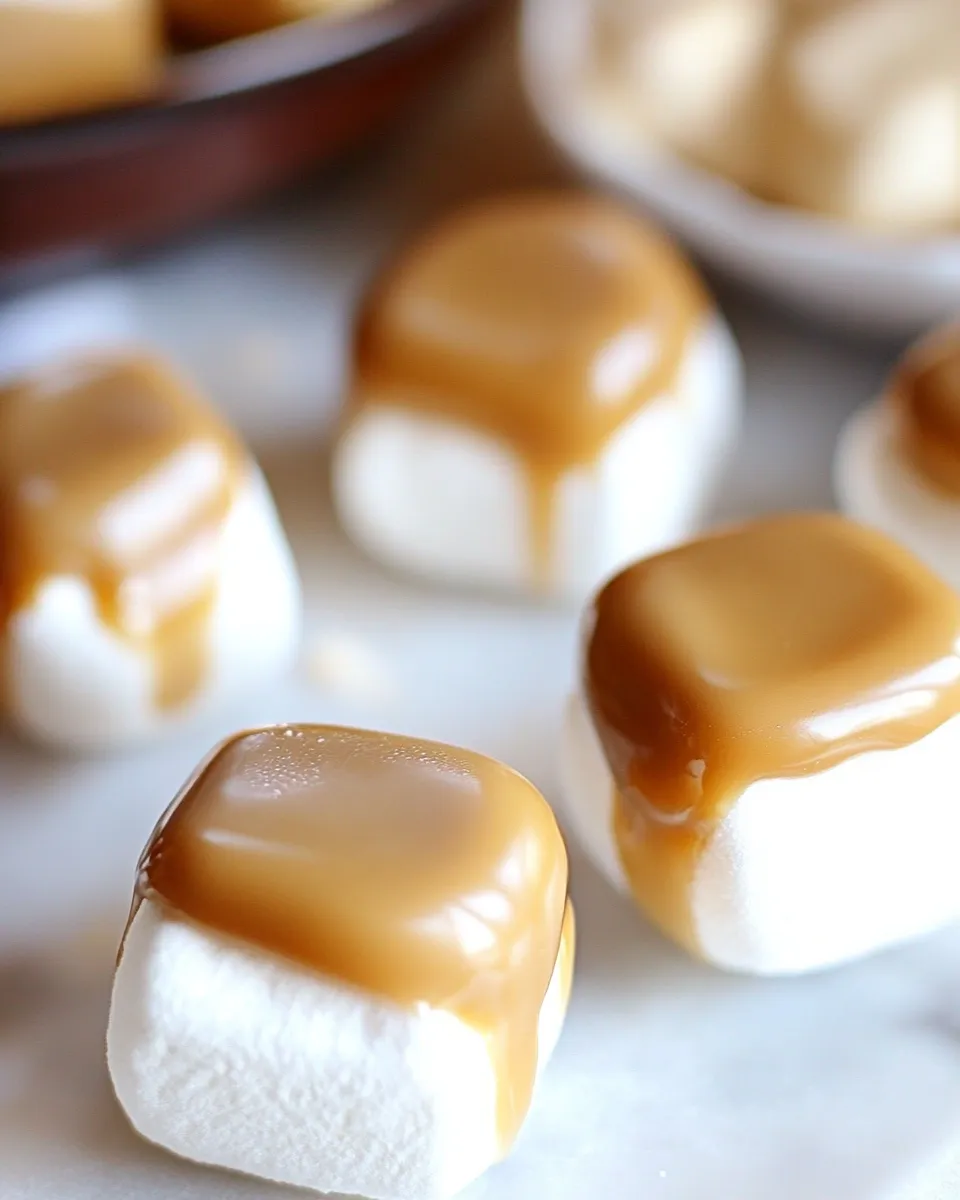
- Remove the pan from the freezer. Hold each marshmallow by hand or with a fork/tongs, dip one end of each marshmallow into the cooled caramel to coat the end, and return it to the lined baking sheet. Repeat with all marshmallows.
- Place the caramel-dipped marshmallows back in the freezer for about 15 minutes, until the caramel is firm.
- While the caramel sets, melt the chocolate: put the 8 ounces dark chocolate in a small microwave-safe bowl, add the 2 teaspoons coconut or canola oil, and heat in 30-second increments on low, stirring between each increment, until the chocolate is completely melted and smooth. Let the chocolate cool slightly if it is very hot.
- Remove the pan from the freezer. Dip each caramel-coated end of the marshmallows into the melted chocolate so the caramel is covered, then return them to the lined baking sheet.
- Use any remaining melted chocolate to drizzle over the tops of the marshmallows (a spoon or fork works well). Immediately sprinkle the 1/4 cup crushed graham cracker crumbs over the chocolate before it sets.
- Allow the chocolate to set completely before serving — either at room temperature or place the pan in the refrigerator for about 10–15 minutes until the chocolate is firm.
Top Reasons to Make Dark Chocolate Salted Caramel Dipped Marshmallows
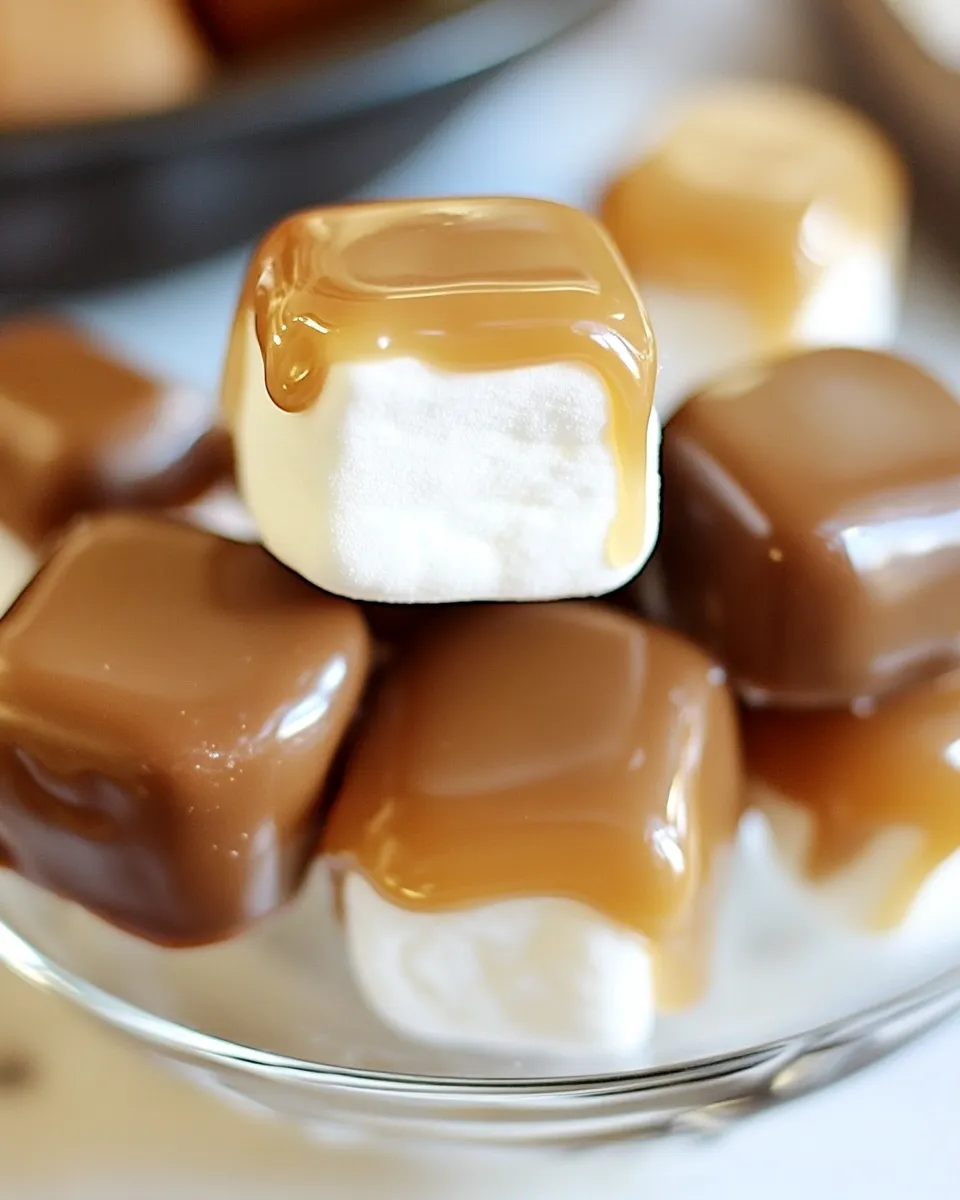
These marshmallows are quick to pull together but feel luxurious. The contrast — pillowy marshmallow, silky caramel, bitter-sweet chocolate, and crunchy graham — hits multiple textures and flavors in one bite. They’re small, portable, and impressive on a dessert board.
They’re particularly good when you want to: gift something homemade without a ton of effort, add a playful element to a party spread, or make a fun after-school treat with kids (they’ll love dipping and decorating). Plus, if you already know how to make the six-minute caramel, this is almost as fast as melting chocolate and dunking.
No-Store Runs Needed
- Marshmallows: If you keep a bag in the pantry for s’mores, you’re already halfway there.
- Chocolate and oil: Many kitchens have a bar of chocolate and neutral oil; substitute just once if needed but keep the dark chocolate for balance.
- Cracker crumbs: If you don’t have graham crackers, a plain biscuit or cookie crushed fine will work in a pinch; but try to stick to the listed ingredient if you can for authentic flavor.
Kitchen Gear Checklist
- Large baking sheet — for arranging marshmallows and letting coatings set.
- Parchment paper or silicone mat — prevents sticking and makes cleanup a breeze.
- Freezer space — you’ll need a level surface where the pan can chill uninterrupted.
- Small microwave-safe bowl — for melting chocolate.
- Forks or tongs — for dipping without burning fingers.
- Spoon or fork for drizzling chocolate and a small bowl for crushed graham crackers.
Steer Clear of These
- Using piping-hot caramel — it will liquefy the marshmallow and make a mess. Cool until thick but still pourable.
- Skipping the chill steps — both the initial freeze and the post-caramel freeze matter. They keep coatings tidy and prevent sagging.
- Overheating the chocolate — scorch or seize will ruin the sheen. Heat gradually and stir between increments.
- Not spacing marshmallows — they expand slightly and stick if too close during freezing or setting.
Spring to Winter: Ideas
Serve these at spring picnics for an unexpected sweet, or box them up for holiday gifts at winter gatherings. In cooler months, pair with hot cocoa for an indulgent sipper. In warmer months, keep them chilled and serve alongside fresh fruit to cut sweetness.
For themed parties: add a light dusting of flaky sea salt instead of mixing in salted caramel flavors, or swap dark chocolate for milk if you want a sweeter profile. The core method stays the same — chill, dip, set.
Behind the Recipe
This recipe lives at the intersection of comfort and technique. Marshmallows are fragile when warm and shockingly resilient when chilled. Chilling gives you clean lines; the caramel adheres better when the marshmallow surface is cold, and the chocolate seals the caramel, preventing oozing. The coconut or canola oil is a small trick that smooths melted chocolate, making it easier to dip and giving a glossy finish once it firms.
I originally made these to bring to a picnic where transport and handling were concerns. The double-dip method makes them sturdier and keeps caramel contained, which turned out to be the difference between a sticky mess and a tidy treat. That’s why the freeze steps are non-negotiable if you want neat results.
Make Ahead Like a Pro
Storage
Keep finished marshmallows in an airtight container layered with parchment to prevent sticking. Store at room temperature for up to 48 hours. If your kitchen is warm, refrigerate for up to 5 days — the chocolate may bloom slightly but will still taste great. Let refrigerated pieces sit at room temperature for 10–15 minutes before serving for best texture.
Prep Ahead
You can make the Six-Minute Salted Caramel ahead and refrigerate it in the jar for up to a week. Reheat gently before dipping so it’s pourable but not hot. You can also melt the chocolate and keep it warm in a thermos for short stretches if you’re assembling at a party. But I do not recommend dipping many hours ahead of serving; the coatings stay best when recently set.
Handy Q&A
Q: Can I use mini marshmallows?
A: Yes, but sizing and chill times change. Mini marshmallows offer bite-size pieces but will take less time to chill and can be fiddly to dip. Use a skewer or sandwich in pairs for a similar presentation.
Q: My chocolate seized. Now what?
A: If it seizes after overheating, you can sometimes rescue it with a little more warm oil or a small amount of hot water while stirring vigorously. If it remains grainy, start with fresh chocolate. Always heat in short increments and stir thoroughly to avoid this.
Q: Can I skip the oil?
A: Technically yes, but the oil makes the chocolate smoother and easier to work with. Without it, your chocolate may be thicker and less glossy; dipping will be messier and the chocolate may set with a dull finish.
Q: How do I transport these?
A: Use a shallow, airtight container lined with parchment. Arrange in a single layer or separate layers with parchment. Keep out of direct sun and heat. If it’s warm, transport in a small cooler with a cold pack for short periods.
Save & Share
If you loved these, save the recipe and pin a photo for later. They make excellent homemade gifts — pack a dozen in a small box with parchment and a ribbon. Share them at gatherings: they’re small, shareable, and everyone reaches for more than one.
If you make these, I’d love to see your results. Tag a photo with your favorite dipper (fork, tongs, or hands) and tell me whether you used coconut or canola oil in the chocolate — the tiny choices matter and I’m always curious which trick you prefer.
Dark Chocolate Salted Caramel Dipped Marshmallows
Ingredients
Ingredients
- 1 16 oz bag of large marshmallows
- 2 batches of Six-Minute Salted Caramel Sauce (link to recipe in post)
- 8 ouncesdark chocolate melted
- 2 teaspoonscoconut or canola oil
- 1/4 cupcrushed graham cracker crumbs
Instructions
Instructions
- Line a large baking sheet with parchment paper or a silicone baking mat.
- Arrange the marshmallows in a single layer on the prepared baking sheet, spacing them so they do not touch. Place the pan in the freezer for 15 minutes.
- While the marshmallows chill, make two batches of Six-Minute Salted Caramel Sauce according to the linked recipe. Allow the caramel to cool slightly until it is thickened but still pourable (not piping-hot).
- Remove the pan from the freezer. Hold each marshmallow by hand or with a fork/tongs, dip one end of each marshmallow into the cooled caramel to coat the end, and return it to the lined baking sheet. Repeat with all marshmallows.
- Place the caramel-dipped marshmallows back in the freezer for about 15 minutes, until the caramel is firm.
- While the caramel sets, melt the chocolate: put the 8 ounces dark chocolate in a small microwave-safe bowl, add the 2 teaspoons coconut or canola oil, and heat in 30-second increments on low, stirring between each increment, until the chocolate is completely melted and smooth. Let the chocolate cool slightly if it is very hot.
- Remove the pan from the freezer. Dip each caramel-coated end of the marshmallows into the melted chocolate so the caramel is covered, then return them to the lined baking sheet.
- Use any remaining melted chocolate to drizzle over the tops of the marshmallows (a spoon or fork works well). Immediately sprinkle the 1/4 cup crushed graham cracker crumbs over the chocolate before it sets.
- Allow the chocolate to set completely before serving — either at room temperature or place the pan in the refrigerator for about 10–15 minutes until the chocolate is firm.
Equipment
- Baking Sheet
- Parchment paper or silicone baking mat
- freezer
- Microwave-safe bowl
- Microwave
- Spoon or fork
- Tongs
Notes
*When dipping the marshmallows in the caramel, don't let too much caramel drip off before transferring it to the baking sheet. The caramel will make a little pool around the bottom of the marshmallow when cooled, making it easy to peel off the silicon sheet.
*If you don't like dark chocolate, you can use milk chocolate or semi-sweet chocolate, but the marshmallows may be cloying sweet with a sweeter chocolate.
*This is a recipe for sweet teeth 🙂 The salt and dark chocolate help balance out the sweetness, but even with those ingredients the end result is a very sweet treat.