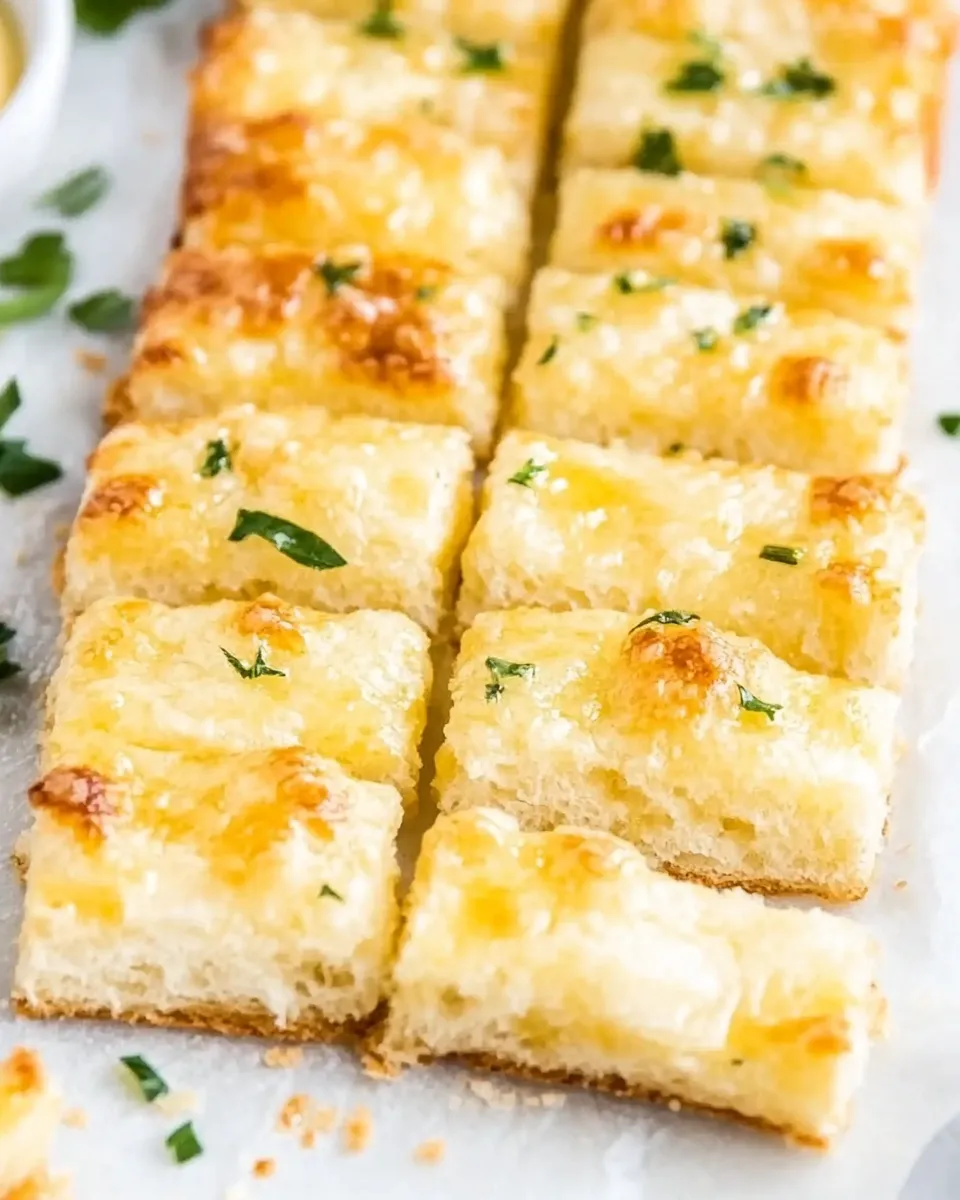
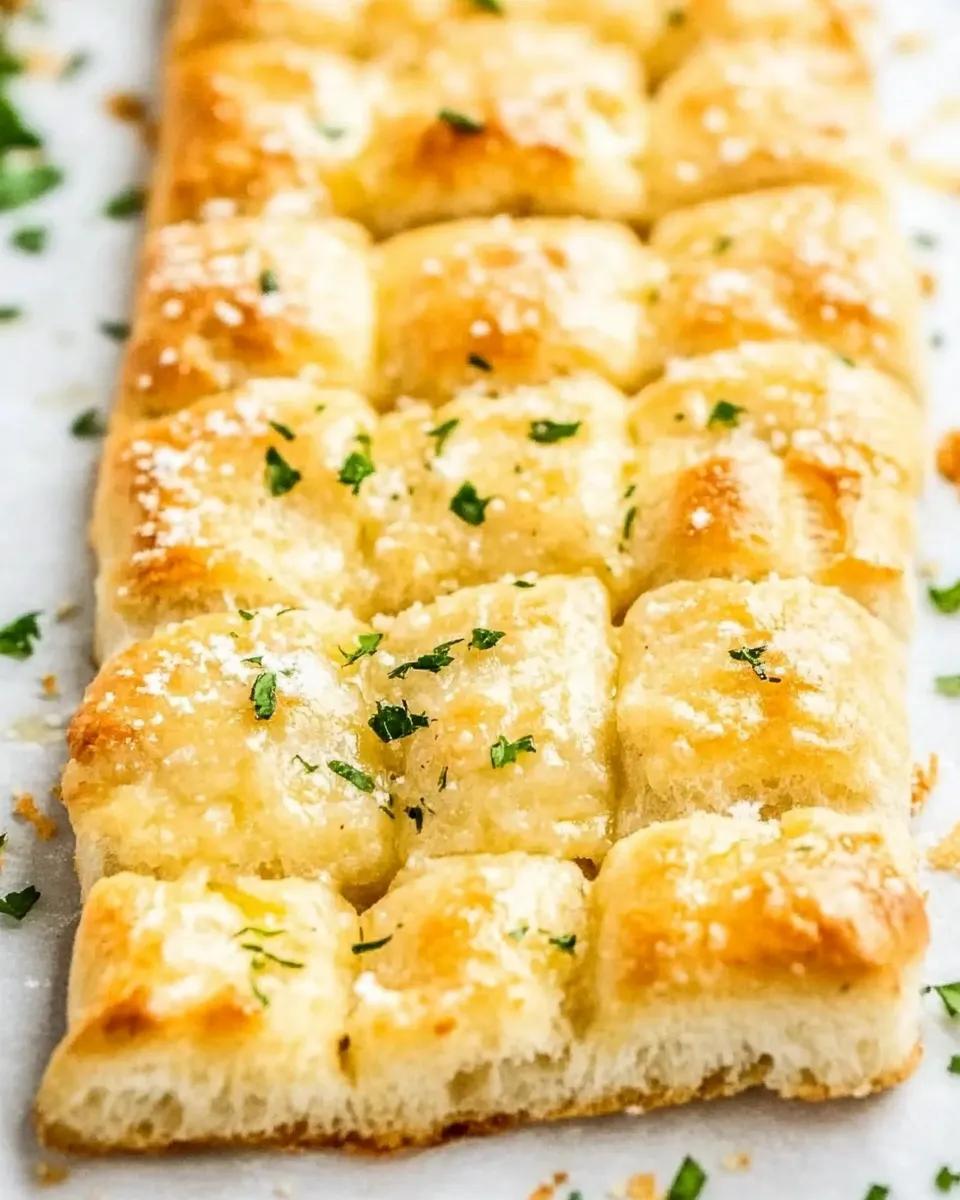
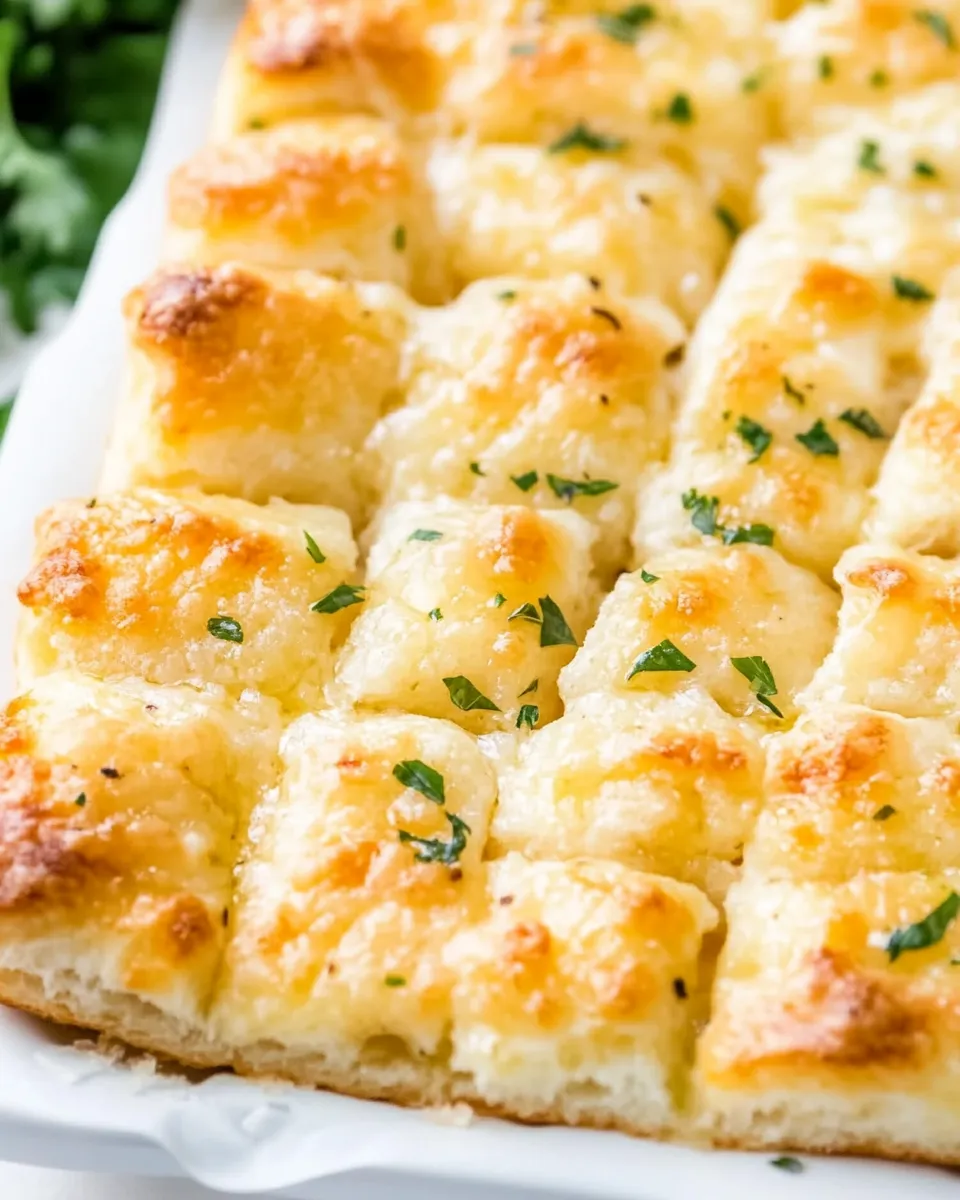
Garlic Breadsticks
I make a batch of these garlic breadsticks whenever I want something warm, simple, and reliably crowd-pleasing. They come out soft inside, with a golden crust and that unmistakable buttery-garlic finish. No fuss, just a modest bit of attention and good timing.
This recipe is practical for a weeknight dinner or for feeding a crowd at a party. The dough is forgiving; the technique is straightforward. If you’ve worked with yeast before, you’ll find the timing familiar. If you haven’t, I’ll walk you through what to watch for.
Below you’ll find a clear ingredients list, the exact step-by-step directions, troubleshooting tips, and sensible make-ahead and storage advice. Read once, then get your hands floury—these breadsticks reward a little care in the early stages and bake fast at the end.
What You’ll Need

Ingredients
- 5½ to 5¾cups(688 to 719 grams) all-purpose flour, divided — The backbone of the dough; measure as instructed and add the optional bit only if needed for handling.
- ¼cup(50 grams) granulated sugar — Feeds the yeast and helps the crust color.
- 4¼teaspoons(12.75 grams) kosher salt — Seasoning for the dough.
- 1(0.25-ounce) package (7 grams) instant yeast* — The leavening agent; instant yeast can be mixed straight into the dry ingredients.
- 1?cups(320 grams) plus 1 tablespoon (15 grams) water, divided — Warm water goes into the milk mixture; reserve the 1 tablespoon for the egg wash.
- ½cup(120 grams) whole milk — Adds tenderness and flavor.
- ¼cup(56 grams) olive oil — Keeps the interior soft and gives a little flavor.
- 2tablespoons(28 grams) unsalted butter, softened — Incorporated into the warm milk mixture for richness.
- 1 large egg (50 grams), lightly beaten — Used for the egg wash to give the breadsticks their glossy finish.
- ¼cup(57 grams) unsalted butter, melted — Brushed on after baking with the seasonings for true garlic-bread flavor.
- ½teaspoon(3 grams) garlic salt — Seasoned butter component.
- ½teaspoondried Italian seasoning — Adds aromatic herb note to the finishing butter.
- Garnish: grated fresh Parmesan cheese — Optional, for a savory finish.
Garlic Breadsticks in Steps
- Fit a stand mixer with the paddle attachment. Add 2 cups (250 grams) of the all-purpose flour, granulated sugar (¼ cup / 50 g), kosher salt (4¼ teaspoons / 12.75 g), and the instant yeast (7 g). Beat at medium-low speed just until combined.
- Measure out the water called for in the ingredient list (1? cups (320 grams) plus 1 tablespoon (15 grams), divided). Reserve the 1 tablespoon (15 g) for the egg wash. In a medium saucepan, combine the remaining 1? cups (320 g) water, whole milk (½ cup / 120 g), olive oil (¼ cup / 56 g), and the softened unsalted butter (2 tablespoons / 28 g). Cook over medium heat, stirring frequently, until the butter is melted and an instant-read thermometer reads 120°F to 130°F (49°C to 54°C). Remove from heat.
- With the mixer running at medium-low, pour the warm milk mixture into the flour mixture. Beat about 1 minute until combined, stopping once to scrape the sides of the bowl.
- With the mixer on low speed, gradually add 3½ cups (438 grams) of the all-purpose flour, beating just until combined.
- Replace the paddle with the dough hook. Beat at medium-low speed for 4 to 6 minutes, stopping occasionally to scrape the bowl and dough hook, until a soft, slightly sticky dough forms. If the dough is too sticky to handle, add up to the remaining ¼ cup (31 grams) flour, 1 tablespoon (8 grams) at a time, until the dough is soft and passes the windowpane test (it may still stick slightly to the sides of the bowl).
- Lightly spray a large bowl with cooking spray. Transfer the dough to the bowl and turn to grease the top. Cover and let the dough rise in a warm, draft-free place (about 75°F / 24°C) until doubled in size, about 40 minutes to 1 hour.
- Position an oven rack in the top third of the oven and preheat the oven to 425°F (220°C). Line 3 rimmed baking sheets with parchment paper.
- Punch down the dough and cover it; let it rest for 10 minutes. On a lightly floured clean surface, divide the dough into 24 equal portions (about 51 grams each). Keep the portions covered with plastic wrap while you work.
- Shape each portion into a ball, then cover and let the balls rest 10 minutes. After resting, gently flatten each ball to release large air bubbles and shape each into an even 9- to 10-inch rope (very lightly flour your surface or hands if needed). Place each rope seam side down on the prepared pans, spacing them about 1 inch apart. (The ropes will shrink to about 7 to 8 inches; press in any pointed ends to round the ropes if needed.)
- Cover the pans and let the shaped breadsticks rise in a warm, draft-free place (about 75°F / 24°C) until puffed and the dough holds an indentation when poked, about 25 to 35 minutes.
- In a small bowl, whisk together the lightly beaten large egg (50 g) and the reserved 1 tablespoon (15 g) water. Brush the egg wash evenly over the risen dough.
- Bake one pan at a time on the top-third rack until the breadsticks are golden brown, 10 to 12 minutes. Remove the pan from the oven and let the breadsticks cool on the pan for 5 minutes.
- In a small bowl, stir together the melted unsalted butter (¼ cup / 57 g), garlic salt (½ teaspoon / 3 g), and dried Italian seasoning (½ teaspoon). Brush the warm breadsticks with this butter mixture. Garnish with grated fresh Parmesan cheese if desired and serve warm.
Why Garlic Breadsticks is Worth Your Time
These breadsticks are worth the effort because they combine speed and comfort. The dough rises twice in a short, predictable rhythm, and the active work time is mostly shaping. You get something that feels homemade—soft interior, light chew, buttery garlic on the outside—in about an hour and a half from start to finish.
They play well with many meals: a bowl of soup, a saucy Italian night, or as an appetizer with dips. They also hold up well for serving at gatherings because you can bake a pan at a time and keep extras warm in a low oven.
Low-Carb/Keto Alternatives
If you’re aiming to lower carbs, take a technique-focused approach rather than trying to substitute cup-for-cup. This recipe relies on gluten development and yeast fermentation. Low-carb flours and mixes behave very differently during kneading and proofing. Consider making a separate, dedicated low-carb dough that’s designed for yeast, or use small, individual low-carb sides alongside these breadsticks instead of trying to rework this exact recipe.
Toolbox for This Recipe
- Stand mixer with paddle and dough hook — The paddle starts the mix; the hook finishes the dough.
- Instant-read thermometer — To check the warmed milk mixture at 120°F–130°F (49°C–54°C).
- Medium saucepan — To warm the milk, water, oil, and butter together.
- Rimmed baking sheets and parchment paper — For even baking and easy cleanup.
- Plastic wrap and cooking spray — For covering rises and greasing the bowl.
- Bench scraper or knife — Helpful for dividing the dough into 24 equal portions.
Pitfalls & How to Prevent Them
Dense or Underproofed Dough
Problem: Breadsticks that are tight and dense usually come from underproofing. Prevention: Let the dough double in a warm, draft-free spot and watch for a clear doubling rather than relying only on time. After shaping, look for a puffed dough that springs back slowly and holds a slight indentation when poked.
Soggy or Heavy Crumb
Problem: Adding too much extra flour when handling can make a heavy interior. Prevention: Follow the direction to add the remaining ¼ cup (31 grams) flour only a tablespoon at a time and stop as soon as the dough passes the windowpane test and is soft but manageable.
Too Dark or Not Brown Enough
Problem: Ovens bake differently. Prevention: Use the top third rack as directed and check at 10 minutes. If you routinely have hot spots, rotate the pan or reduce the time slightly. The egg wash helps with color—don’t skip it.
Adaptations for Special Diets
Gluten-free and vegan approaches require recipes tailored to those needs. This particular set of instructions calls for wheat flour, milk, butter, and egg. To adapt for different diets, work from a tested gluten-free or egg-free dough recipe rather than swapping single items into this one. For dairy-free results, you can use a plant-based milk and omit or replace the finishing butter—but again, adjust using established substitutes and techniques rather than swapping here without testing.
Recipe Notes & Chef’s Commentary
Texture and timing: Expect the ropes to shrink slightly after shaping; that’s normal. The recipe instructs shaping to 9–10 inches so they finish around 7–8 inches. The extra initial flour (2 cups) plus the later 3½ cups creates a dough that starts manageable and firms up during mixing—this staged addition is the key to an even, soft crumb.
Flavor: The finishing butter is where the garlic character happens. Garlic salt plus dried Italian seasoning is a simple, dependable combo; grated fresh Parmesan at the end adds savory brightness and texture contrast. If you want more garlic, consider serving a warm garlic butter on the side for dipping rather than increasing salt directly in the dough.
Prep Ahead & Store
Make ahead: You can prepare the dough through the first rise, then cover and refrigerate overnight to slow the fermentation. Bring the dough to room temperature before dividing and shaping for the second rise. This gives you fresh-baked timing for the day you plan to serve.
Storage: Cool the breadsticks completely, then store in a resealable bag or airtight container at room temperature for 2 days. Reheat in a 350°F (175°C) oven for 5–7 minutes to refresh the crust.
Freezing: Once baked and cooled, freeze on a tray until solid, then transfer to a freezer bag. Reheat from frozen in a low oven until warmed through, brushing with a little extra melted butter after reheating to restore flavor.
Ask & Learn
Q: What temperature should the milk mixture reach before mixing with the flour? A: The directions specify 120°F to 130°F (49°C to 54°C). Use an instant-read thermometer to be precise—too hot can kill the yeast, too cool slows the rise.
Q: My dough keeps sticking—what now? A: Add flour sparingly, 1 tablespoon (8 grams) at a time, up to the remaining ¼ cup (31 grams). You’re aiming for a soft dough that can form a thin windowpane when stretched.
Q: Can I bake all pans at once? A: The recipe recommends baking one pan at a time on the top-third rack for even color. If you must bake multiple pans, rotate them and watch closely for even browning.
See You at the Table
These garlic breadsticks are a dependable, straight-forward addition to weeknight dinners and weekend gatherings alike. The method is forgiving, the payoff is big, and the steps are repeatable. If you follow the temperatures and timing in the recipe, you’ll get soft, golden breadsticks with a seasoned buttery finish every time.
Make a tray, brush them hot from the oven, and hand them around. They disappear fast—ask for help or you’ll eat the whole pan yourself.

Garlic Breadsticks
Ingredients
Ingredients
- 5 1/2 to 5 3/4 cups 688 to 719 grams all-purpose flour, divided
- 1/4 cup 50 grams granulated sugar
- 4 1/4 teaspoons 12.75 grams kosher salt
- 1 0.25-ounce package (7 grams) instant yeast*
- 1 ?cups 320 grams plus 1 tablespoon (15 grams) water, divided
- 1/2 cup 120 grams whole milk
- 1/4 cup 56 grams olive oil
- 2 tablespoons 28 grams unsalted butter, softened 1 large egg (50 grams), lightly beaten
- 1/4 cup 57 grams unsalted butter, melted
- 1/2 teaspoon 3 grams garlic salt
- 1/2 teaspoondried Italian seasoning
- Garnish: grated fresh Parmesan cheese
Instructions
Instructions
- Fit a stand mixer with the paddle attachment. Add 2 cups (250 grams) of the all-purpose flour, granulated sugar (¼ cup / 50 g), kosher salt (4¼ teaspoons / 12.75 g), and the instant yeast (7 g). Beat at medium-low speed just until combined.
- Measure out the water called for in the ingredient list (1? cups (320 grams) plus 1 tablespoon (15 grams), divided). Reserve the 1 tablespoon (15 g) for the egg wash. In a medium saucepan, combine the remaining 1? cups (320 g) water, whole milk (½ cup / 120 g), olive oil (¼ cup / 56 g), and the softened unsalted butter (2 tablespoons / 28 g). Cook over medium heat, stirring frequently, until the butter is melted and an instant-read thermometer reads 120°F to 130°F (49°C to 54°C). Remove from heat.
- With the mixer running at medium-low, pour the warm milk mixture into the flour mixture. Beat about 1 minute until combined, stopping once to scrape the sides of the bowl.
- With the mixer on low speed, gradually add 3½ cups (438 grams) of the all-purpose flour, beating just until combined.
- Replace the paddle with the dough hook. Beat at medium-low speed for 4 to 6 minutes, stopping occasionally to scrape the bowl and dough hook, until a soft, slightly sticky dough forms. If the dough is too sticky to handle, add up to the remaining ¼ cup (31 grams) flour, 1 tablespoon (8 grams) at a time, until the dough is soft and passes the windowpane test (it may still stick slightly to the sides of the bowl).
- Lightly spray a large bowl with cooking spray. Transfer the dough to the bowl and turn to grease the top. Cover and let the dough rise in a warm, draft-free place (about 75°F / 24°C) until doubled in size, about 40 minutes to 1 hour.
- Position an oven rack in the top third of the oven and preheat the oven to 425°F (220°C). Line 3 rimmed baking sheets with parchment paper.
- Punch down the dough and cover it; let it rest for 10 minutes. On a lightly floured clean surface, divide the dough into 24 equal portions (about 51 grams each). Keep the portions covered with plastic wrap while you work.
- Shape each portion into a ball, then cover and let the balls rest 10 minutes. After resting, gently flatten each ball to release large air bubbles and shape each into an even 9- to 10-inch rope (very lightly flour your surface or hands if needed). Place each rope seam side down on the prepared pans, spacing them about 1 inch apart. (The ropes will shrink to about 7 to 8 inches; press in any pointed ends to round the ropes if needed.)
- Cover the pans and let the shaped breadsticks rise in a warm, draft-free place (about 75°F / 24°C) until puffed and the dough holds an indentation when poked, about 25 to 35 minutes.
- In a small bowl, whisk together the lightly beaten large egg (50 g) and the reserved 1 tablespoon (15 g) water. Brush the egg wash evenly over the risen dough.
- Bake one pan at a time on the top-third rack until the breadsticks are golden brown, 10 to 12 minutes. Remove the pan from the oven and let the breadsticks cool on the pan for 5 minutes.
- In a small bowl, stir together the melted unsalted butter (¼ cup / 57 g), garlic salt (½ teaspoon / 3 g), and dried Italian seasoning (½ teaspoon). Brush the warm breadsticks with this butter mixture. Garnish with grated fresh Parmesan cheese if desired and serve warm.
Equipment
- Stand mixer
- Paddle Attachment
- dough hook
- Medium Saucepan
- Instant-read thermometer
- Large Bowl
- Cooking Spray
- rimmed baking sheets
- Parchment Paper
- Plastic Wrap
- Small Bowl
- Pastry brush
Notes
*We used
Platinum® Yeast
from
Red Star®
.
Note:
To use the windowpane test to check dough for proper gluten development, lightly flour hands and pinch off (don’t tear) a small piece of dough. Slowly pull the dough out from the center. If the dough is ready, you will be able to stretch it until it’s thin and translucent like a windowpane. If the dough tears, it’s not quite ready. Beat for 1 minute, and test again.