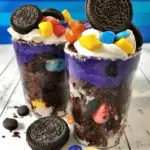
Walking Dirt Cups with Oreos
These Walking Dirt Cups with Oreos are one of those recipes that look like a party trick but take minutes to assemble. Think mini Oreo snack packs transformed into little dirt cups—chocolate pudding, whipped cream mixed for a lighter texture, a gummy worm on top, and a sprinkle of crushed Oreo to finish. They’re portable, kid-friendly, and oddly satisfying to hand out at gatherings.
I love this recipe because it’s straightforward and forgiving. You don’t need special molds, fancy piping tips, or a long ingredient list. The mini snack packs act as both container and garnish supply, which keeps cleanup minimal. If you’re hosting a classroom party, a picnic, or just want a fun after-school snack, this is a reliable choice.
Below I outline exactly what you need, the step-by-step directions from start to finish, and practical tips for variation, storage, and troubleshooting. Follow the steps as written for consistent results; there’s room for small swaps if you want to play with flavor.
Ingredient Checklist

Ingredients
- 12 mini Oreo snack packs (1 oz each) — the snack packs double as cups and provide the crushed-cookie “dirt” when you remove two cookies from each.
- 3.9 oz instant chocolate pudding mix — the base for the chocolate filling; instant sets quickly with milk.
- 2 cups milk — liquid to whisk into the pudding mix; use the milk you prefer for richness.
- 8 oz whipped topping, thawed — folded into the pudding to lighten texture and make filling pipeable; thaw completely before mixing.
- 12 gummy worms, cut in half — two halves per cup create the “walking worm” topper; cut them before assembly.
How to Prepare (Walking Dirt Cups with Oreos)
- Using scissors, cut each mini Oreo snack pack open at the short end. From each pack, remove 2 cookies and place those removed cookies in a bowl for crushing. Keep the opened packs for filling.
- Roll the top of each opened pack down about 1½ inches so each pack can stand upright. Arrange the 12 packs upright on a tray or baking sheet.
- Place the reserved cookies in a sealable plastic bag or a bowl and crush them to fine crumbs with a rolling pin or tamper. Set the crumbs aside.
- Pour 2 cups milk into a medium bowl. Add the 3.9 oz instant chocolate pudding mix and whisk for 2 minutes, until combined and beginning to thicken.
- Refrigerate the pudding for 5 minutes to set slightly.
- Remove the pudding from the refrigerator and fold the 8 oz thawed whipped topping into the pudding until fully combined and smooth.
- Transfer the pudding mixture to a large pastry bag fitted with a 1/2-inch snip, or use a spoon. Divide the mixture evenly and fill each prepared Oreo pack.
- Cut the 12 gummy worms in half. Place two gummy-worm halves on top of each filled pack.
- Sprinkle about 1 teaspoon of the crushed reserved cookies over each pack as a final “dirt” topping. Chill or serve immediately.
Why It Deserves a Spot
This recipe earns a place in your rotation because it’s fast, visually fun, and kid-approved. It looks like effort went into it, but assembly is quick and predictable. Using snack packs as serving vessels keeps things tidy and lets you make individual portions without extra dishes.
It’s also hugely practical. You can prep components in stages—crush the cookies and make the pudding ahead—then finish assembly when you need them. Plus, the end result is portable and stable for a few hours, which is perfect for parties or potlucks.
Flavor-Forward Alternatives
- Swap gummy worms for gummy spiders or colorful candy critters for a different theme—no quantities needed; just pick what you like.
- Use vanilla instant pudding instead of chocolate and stir in cocoa nibs or mini chocolate chips for texture.
- For a more adult spin, add a splash of coffee or espresso to the milk when whisking the pudding to deepen the chocolate flavor.
- For a fruitier take, top with a spoonful of cherry pie filling or raspberry preserves just under the gummy worm for a sweet-tart contrast.
Essential Tools for Success
- Pastry bag (or a sturdy zip-top bag with the corner snipped) — it makes filling neat and even, but a spoon works if you don’t have one.
- Rolling pin or tamper for crushing cookies — a wine bottle will do in a pinch.
- Tray or baking sheet to keep the packs upright while filling — prevents spills and makes transport easier.
- Mixing bowls and whisk — one medium bowl for pudding, one for folding in the whipped topping if you prefer separate handling.
Steer Clear of These
- Overfilling the snack packs — leave a bit of room at the top so the gummy worms sit without tipping the pack or squishing the top.
- Using hot pudding — always chill the pudding briefly before folding in whipped topping. Warm pudding will deflate the whipped topping and make the texture runny.
- Skipping the roll-down step — without rolling the tops down about 1½ inches the packs won’t stand upright reliably and will be awkward to fill.
- Crushing the cookie pieces too coarsely for the “dirt” — aim for fine crumbs so the top looks like soil and sits evenly on the pudding.
In-Season Flavor Ideas
These little dirt cups adapt to seasons with simple swaps. In spring, use pastel gummy candies or edible flowers beside the worms for a garden party vibe. Summer calls for fresh berries tucked beside or under the worm for brightness. Fall is the perfect time to fold in a pinch of pumpkin pie spice into the pudding and top with candied pecans (place them sparingly so the pack still closes). Winter brings an opportunity for peppermint extract or crushed candy cane on top for a holiday twist.
Flavor Logic
The recipe’s balance is straightforward: the instant chocolate pudding provides a dense, intensely chocolate base; the whipped topping lightens and aerates that base so it pipes smoothly and feels more mousse-like; the crushed Oreos recreate “dirt” visually and texturally; the gummy worms are whimsical and slightly chewy to contrast the creamy filling. Each element is there for texture, appearance, or ease of assembly.
Prep Ahead & Store
Prep in stages to save time on the day of serving. You can crush the reserved Oreo cookies and store the crumbs in an airtight container at room temperature for a day or two. Make and chill the pudding mixture (through step 5) up to one day ahead; hold the whipped topping separate until just before folding, or make the full pudding-whipped topping mix up to the morning of serving and keep it refrigerated.
Once filled, these are best consumed within 24 hours. If you need to store completed cups, keep them chilled in a single layer in the fridge and cover loosely with plastic wrap so the gummy worms don’t pick up condensation. Avoid freezing—the whipped topping and pudding won’t thaw back to the same texture.
Quick Questions
- Can I use regular-size Oreo packs instead of mini snack packs? — Yes, but you’ll need larger containers or to cut down the cookies; the assembly and proportions are designed around the 1 oz snack pack size.
- What if I don’t have instant pudding? — Instant pudding is called for here because it sets quickly with milk. Using cooked pudding changes texture and timing; you’d need to cool it completely before folding in whipped topping.
- Can kids help assemble? — Absolutely. Kids can cut gummy worms, roll the pack tops down, and sprinkle crumbs. Have an adult handle the cutting of pack tops with scissors if needed.
- How do I make them less sweet? — Reduce the amount of crushed Oreo used as a topping, or choose a less sweet whipped topping if available. You can also swap to low-sugar milk or pudding mixes, but note texture may shift.
The Takeaway
Walking Dirt Cups with Oreos are a quick, playful dessert that looks impressive without demanding a lot of time or fancy equipment. The recipe uses pantry-friendly ingredients and results in tidy individual servings that are easy to transport and serve. Follow the steps in order, mind the small practical tips—like rolling down pack tops and chilling the pudding briefly—and you’ll have a crowd-pleasing snack ready in under an hour.
Make them as written for consistent results, or use the flavor alternatives section for small seasonal tweaks. They’re one of my go-to solutions when I need a dessert that’s both cute and practically effortless.
Walking Dirt Cups with Oreos
Ingredients
Ingredients
- 12 mini Oreo snack packs1 oz each
- 3.9 oz instant chocolate pudding
- 2 cupsmilk
- 8 oz.whipped toppingthawed
- 12 gummy wormscut in half
Instructions
Instructions
- Using scissors, cut each mini Oreo snack pack open at the short end. From each pack, remove 2 cookies and place those removed cookies in a bowl for crushing. Keep the opened packs for filling.
- Roll the top of each opened pack down about 1½ inches so each pack can stand upright. Arrange the 12 packs upright on a tray or baking sheet.
- Place the reserved cookies in a sealable plastic bag or a bowl and crush them to fine crumbs with a rolling pin or tamper. Set the crumbs aside.
- Pour 2 cups milk into a medium bowl. Add the 3.9 oz instant chocolate pudding mix and whisk for 2 minutes, until combined and beginning to thicken.
- Refrigerate the pudding for 5 minutes to set slightly.
- Remove the pudding from the refrigerator and fold the 8 oz thawed whipped topping into the pudding until fully combined and smooth.
- Transfer the pudding mixture to a large pastry bag fitted with a 1/2-inch snip, or use a spoon. Divide the mixture evenly and fill each prepared Oreo pack.
- Cut the 12 gummy worms in half. Place two gummy-worm halves on top of each filled pack.
- Sprinkle about 1 teaspoon of the crushed reserved cookies over each pack as a final “dirt” topping. Chill or serve immediately.
Equipment
- scissors
- rolling pin or tamper
- sealable plastic bag or bowl for crushing
- Medium Bowl
- Whisk
- pastry bag or spoon
- tray or baking sheet
Notes
For a softer, more cake-like cookie texture, make the dirt in a bag cups a few hours ahead of time and refrigerate. The moisture from the filling will naturally soften the Oreos as they sit.
When made ahead, cover the tray with foil or plastic wrap and store upright in the fridge to keep everything in place.