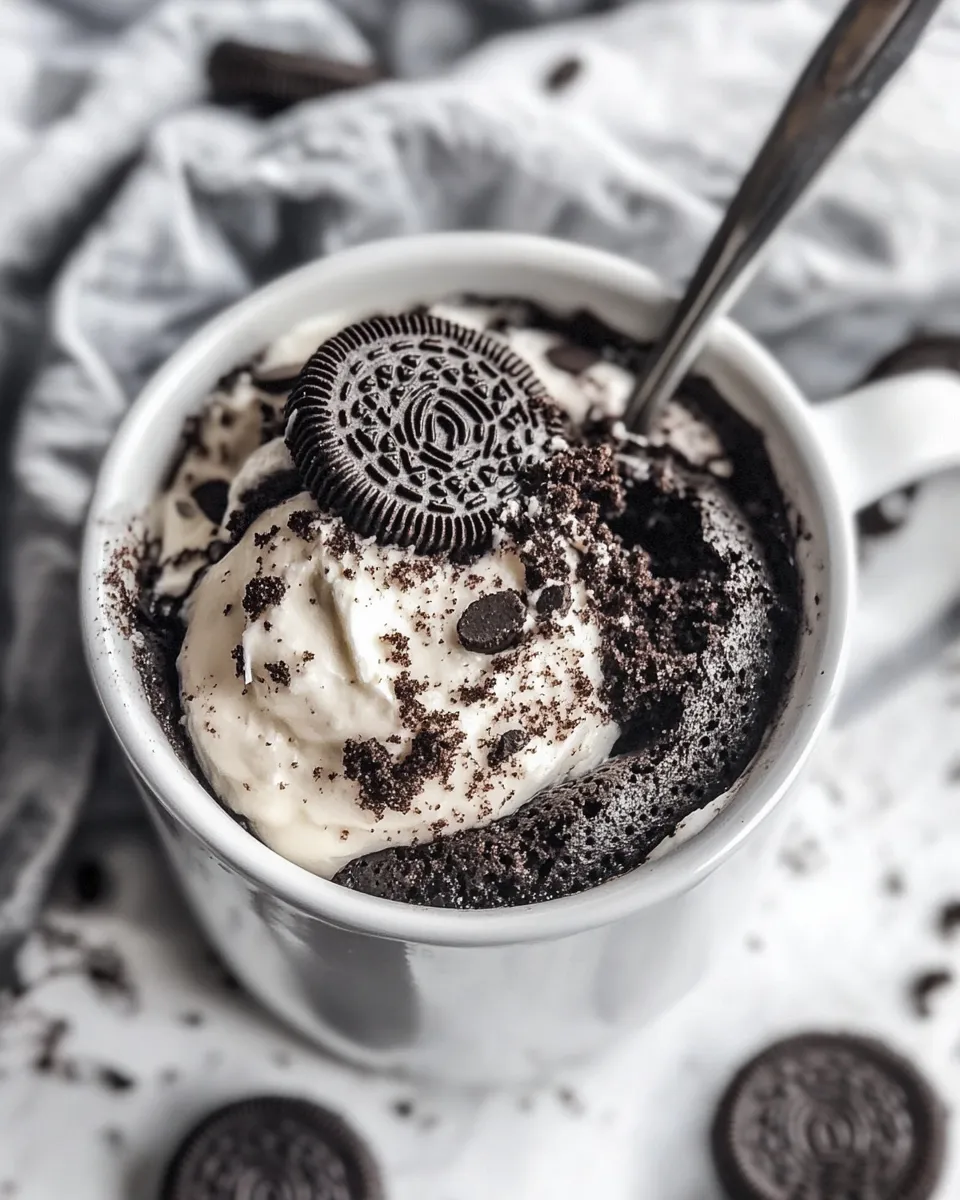
Oreo Mug Cake
Five minutes, one mug, and a tiny jar of patience will get you to dessert. This Oreo Mug Cake is the kind of thing I make when I want something sweet but don’t want to start a full baking project. It’s fast, comforting, and reliably chocolatey — thanks to the cookies doing double duty as crumb and flavor boost.
There’s no bowl to wash beyond the mug, no recipe scaling, and no careful oven watching. You break, mash, microwave, and you’re done. Simple steps, predictable results. That’s a win on busy weeknights and lazy weekends alike.
I’ll walk you through the exact ingredients and steps, what to watch for, useful gear, and small tweaks that make this feel deliberate rather than thrown together. Keep a mug and a fork handy. We’ll be eating in under 10 minutes.
Ingredients at a Glance

- 7 Oreo cookies — the base: crumbs, chocolate, and that signature cream give structure and flavor.
- 1/3 cup milk — hydrates the crumbs and creates a batter-like texture; use whatever milk you have on hand.
- ¼ teaspoon baking powder — a small lift so the cake sets with a light crumb instead of becoming dense.
Step-by-Step: Oreo Mug Cake
- Place 7 Oreo cookies into a microwave-safe mug and break them into small pieces.
- Pour in 1/3 cup milk.
- Use a fork to mash and stir the cookies and milk together until there are no large chunks and the mixture is relatively smooth.
- Stir in 1/4 teaspoon baking powder until evenly combined.
- Microwave on high (100% power) for 70–90 seconds, until the cake is just set but still slightly shiny on top.
- Let the mug rest undisturbed for 1 minute before eating; the mug and cake will be hot.
Why This Recipe Belongs in Your Rotation
This recipe is the definition of utility dessert. It uses pantry staples and a single mug. If you crave chocolate often but don’t want to commit to full-size cakes, this is the habit-forming middle ground. It’s dense and cookie-forward, with the Oreo flavor carrying through in every spoonful.
It’s also forgiving. Overdo the microwave by a few seconds and you still get an edible result (though aim for the lower end of the time window if you’re testing your microwave first). No need for specialized skills: break, mix, heat. The best recipes remove friction, and this does exactly that.
Finally, it’s a fantastic base for small upgrades. A quick drizzle, a dollop, or a sprinkle elevates it without adding work. You can keep it as an emergency treat or turn it into a mini-ceremony — your call.
If You’re Out Of…
If you don’t have the exact ingredient on hand, you can usually improvise in a pinch. Any chocolate sandwich cookie will do in place of the Oreos; the texture and sweetness will be similar. If you’re low on milk, most substitutes work: any dairy or plant-based milk will hydrate the crumbs. If you don’t have baking powder, the cake will still come together but won’t have that tiny lift—expect a denser, more fudgy result.
One more practical note: if you’re completely out of cookies, this recipe won’t translate directly to flour-based mug cakes without adjusting quantities and adding fat and sugar. It’s designed around the Oreo’s structure, so plan substitutions conservatively.
Gear Checklist

- Microwave-safe mug — roomy enough for mixing without spilling.
- Fork — for mashing the cookies into a smooth-ish batter.
- Measuring cups and spoons — 1/3 cup and 1/4 teaspoon are the only measures you need.
- Microwave — high (100%) power setting for 70–90 seconds.
Avoid These Traps
Overcooking is the most common mistake. Microwaves vary; start at 70 seconds and check. The cake should be set but slightly shiny on top. If it looks wet and jiggly, add 5–10 seconds at a time. If you overcook it too much, it dries out or becomes rubbery.
Don’t skip the resting minute after microwaving. The cake continues to steam and set inside the mug; removing it immediately can leave the center gummy and the mug too hot to hold. One minute makes a noticeable difference.
Avoid using a mug that’s too small. You’ll have a mess when stirring, and the heated milk may bubble over in the microwave. Use a sturdy, tall mug with a comfortable rim.
Holiday & Seasonal Touches
Small additions make this feel special. For winter, a few crushed peppermint candies stirred in or sprinkled on top bring a bright, festive note. In summer, top with a scoop of ice cream or a spoonful of cold whipped cream for contrast. A scatter of chopped toasted nuts adds texture and a richer mouthfeel.
For more chocolate intensity, add a pinch of cocoa powder before microwaving, or drop in a small piece of chocolate so it melts into a gooey center. Nothing here requires rewriting the recipe — just a pinch or a spoonful makes a big difference.
Cook’s Notes
Size and power matter. Microwaves can be underpowered or extremely strong. If it’s your first time, treat 70 seconds as the baseline and increase slowly. The goal: set top, slightly glossy finish.
Mashing technique guides texture. Break the Oreos into small pieces first, then mash thoroughly with a fork. The aim is a relatively smooth batter with no large chunks. Some tiny bits are fine; they give texture.
Use the right mug. A ceramic mug works best because it holds heat evenly. Thin glass can heat too quickly; metal is a no-go. Leave enough room in the mug to stir without spilling.
Serving direct from the mug is convenient and cozy. If you prefer to plate it, let the cake cool for a couple of minutes before inverting. It will be softer and may not hold a perfect shape, but it will still taste the same.
Leftovers & Meal Prep
This recipe is intended to be eaten right away. The texture and temperature are part of the appeal. If you do have leftovers, cover the mug and refrigerate for up to 24 hours. Reheat briefly in the microwave (10–15 seconds) until warm through. Expect a denser texture after refrigeration; a quick heat softens it back up.
This isn’t a make-ahead dessert for meal prep in the conventional sense, because the magic is in the immediate warmth and texture. If you want multiple servings, plan to mix and microwave each mug separately rather than trying to scale the recipe into a larger dish.
Common Qs About Oreo Mug Cake
-
Can I use fewer Oreo cookies?
Yes, but the cake will be less dense and may need slightly less milk. The quantities here are tuned for balance; deviating changes texture and may require timing adjustments.
-
Is it safe to microwave Oreos?
Yes. Microwaving cookies with milk in a mug is safe. The microwave heats the milk and softens the cookies, allowing the mixture to set into a cake-like texture.
-
Why is baking powder included?
The small amount of baking powder gives the cake a little lift and prevents it from ending up as a dense, entirely fudgy mass. It’s subtle but improves the bite.
-
Can I bake this in the oven?
You could transfer the mixed batter to a small ramekin and bake, but you’ll need to adjust temperature and time. This recipe is optimized for the microwave’s quick, moist-heat environment.
-
What if my cake is still raw in the center?
Return it to the microwave for 5–10 second bursts until set. Microwaves heat unevenly; short increments help you avoid overcooking the edges while finishing the center.
-
Can I add mix-ins?
Yes. Small bits like chocolate chips or chopped nuts work well. Add them sparingly so they don’t throw off the moisture balance.
Final Bite
This Oreo Mug Cake is the kind of dessert that feels indulgent and effortless at once. It’s a dependable little treat that won’t demand time, specialized tools, or a big cleanup. Follow the steps, mind the microwave time, and you’ll have a warm, chocolatey bite with minimal effort.
Keep this recipe bookmarked for nights when you want something easy and comforting. A single mug, a fork, and a few Oreos: that’s all it takes to brighten an evening.

Oreo Mug Cake
Ingredients
Ingredients
- 7 Oreo cookies
- 1/3 cupmilk
- 1/4 teaspoonbaking powder
Instructions
Instructions
- Place 7 Oreo cookies into a microwave-safe mug and break them into small pieces.
- Pour in 1/3 cup milk.
- Use a fork to mash and stir the cookies and milk together until there are no large chunks and the mixture is relatively smooth.
- Stir in 1/4 teaspoon baking powder until evenly combined.
- Microwave on high (100% power) for 70–90 seconds, until the cake is just set but still slightly shiny on top.
- Let the mug rest undisturbed for 1 minute before eating; the mug and cake will be hot.
Equipment
- Microwave-safe mug
- Fork
- Microwave