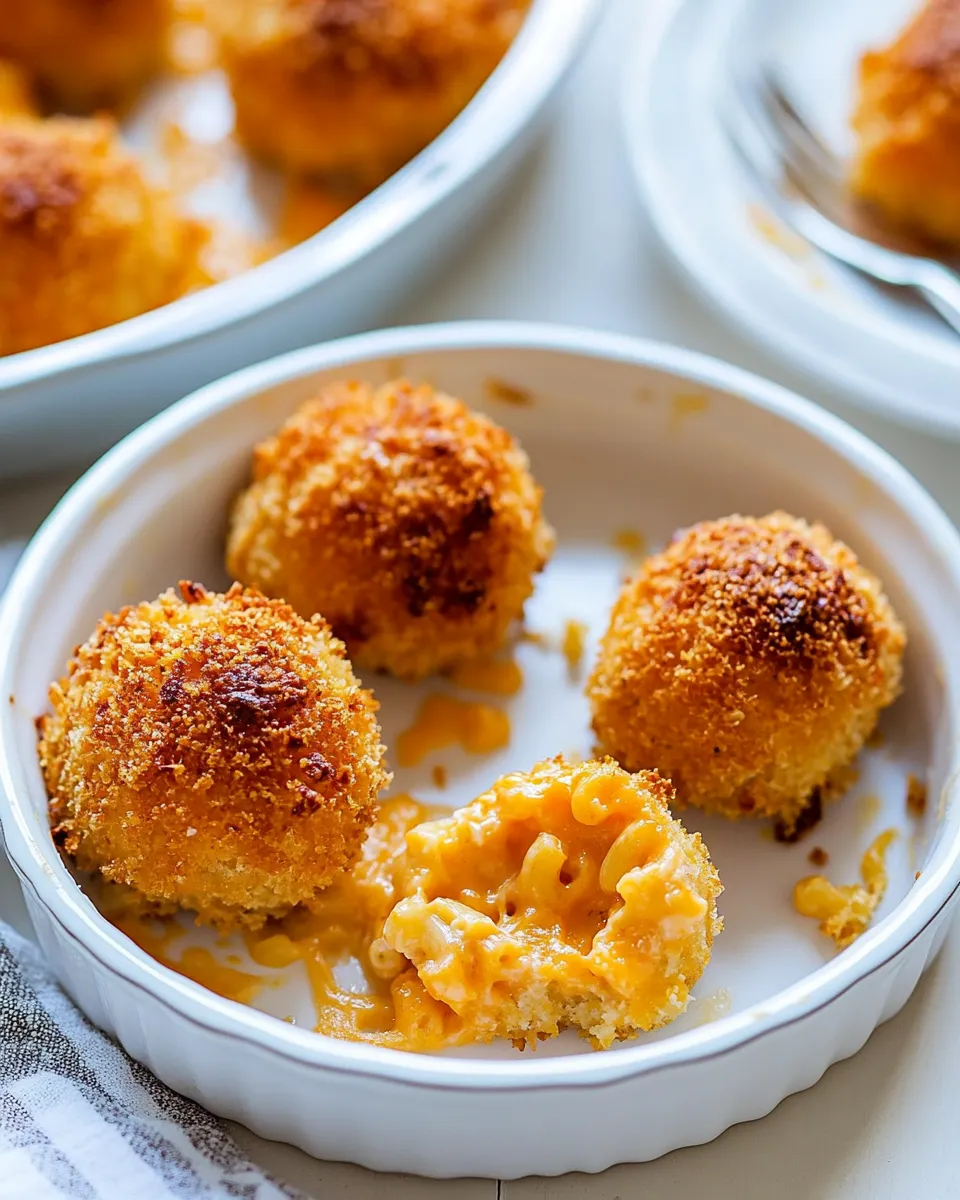
Macaroni and Cheese Baked Cheese Balls
These baked macaroni and cheese balls turn leftover or freshly made mac ‘n’ cheese into a crispy, handheld snack that disappears fast. They’re simple to assemble, forgiving to shape, and bake up golden and crunchy while keeping a creamy, cheesy center. I like making a batch when I have extra mac ‘n’ cheese — they elevate it from side dish to party-ready finger food.
There are two small tricks that make all the difference: chill the mac ‘n’ cheese so it firms up, and give the trays a mid-bake drizzle of oil to get even browning. Beyond that, the recipe is straightforward. No complicated steps. Just a little patience at the chilling stage and a reliable breading station.
If you’re feeding a crowd, these are perfect for little plates, tailgates, or a kid-friendly dinner. They reheat well, freeze easily, and use pantry basics. Read on for the ingredient checklist, a strict step-by-step guide, troubleshooting tips, and make-ahead ideas so you can serve them hot and crisp every time.
Ingredient Checklist

- 1 batch macaroni and cheese, prepared as directed and well chilled (1 box store-bought or your favorite homemade recipe, I used one 5.5-ounce box Kraft) — Chilled mac ‘n’ cheese is essential so the balls hold their shape while you bread and bake them.
- ½ cup all-purpose flour — A dry layer to help the egg cling and create a barrier that keeps the center creamy.
- 2 large eggs, beaten — Binds the breading to the mac ‘n’ cheese and gives a uniform crust once baked.
- about 1 cup breadcrumbs, seasoned if preferred; I used Trader Joe’s which are unseasoned — Provides the crisp exterior. Panko or seasoned crumbs change texture and flavor.
- 4 tablespoons olive oil, divided — Used to coat the baking sheets before and during baking so the crumbs crisp instead of steaming.
Macaroni and Cheese Baked Cheese Balls: Step-by-Step Guide
- Prepare 1 batch macaroni and cheese according to your recipe or package directions. Transfer to an airtight container and refrigerate at least 12 hours and up to 3 days so the mac ‘n’ cheese firms and dries slightly.
- About 15 minutes before you plan to shape the balls, place the chilled mac ‘n’ cheese container in the freezer for a quick cold blast.
- Preheat the oven to 425°F (220°C). Line two baking sheets with parchment paper, silicone mats, or aluminum foil.
- Drizzle 1 tablespoon olive oil onto each prepared baking sheet (2 tablespoons total) and spread it around to lightly coat the surface; set the sheets aside.
- Set up a breading station with three shallow bowls: 1/2 cup all-purpose flour in the first bowl, the 2 large eggs beaten in the second bowl, and about 1 cup breadcrumbs in the third bowl.
- Remove the mac ‘n’ cheese from the freezer. Using a 1-inch cookie scoop or a tablespoon-sized scoop (or your hands), portion out balls about 1 inch in diameter before breading. If the noodles don’t hold together, gently press and shape with your hands to form compact balls.
- For each ball: roll it in the flour to coat, dip it briefly in the beaten eggs, then roll it in the breadcrumbs to fully coat. Place the coated balls on the prepared baking sheets, spacing them apart (about 10 balls per sheet).
- Bake the trays on the middle oven racks for 10 minutes.
- Remove the trays from the oven. Add the remaining olive oil (1 tablespoon to each tray — 2 tablespoons total), spread it over the tray surfaces, flip each ball so the unbrowned side is up, and return the trays to the oven.
- Bake an additional 7 to 10 minutes, or until the balls are evenly browned and crisp. Remove from the oven and serve immediately.
Reasons to Love Macaroni and Cheese Baked Cheese Balls
They’re crispy on the outside and soft and cheesy inside. That contrast sells the whole idea. You get comfort-food flavor in a portable form — perfect for snacking or as an appetizer. They’re also extremely forgiving: if the mac ‘n’ cheese is a touch loose, chilling and a quick freezer blast help it bind enough to shape.
These balls are also an efficient use of leftovers. Leftover mac ‘n’ cheese rarely gets stale when repurposed into bites like this. Make a batch for game day or a casual dinner; they travel well and sit happily on a buffet without losing their appeal.
Finally, they’re customizable. Swap the breadcrumbs, adjust the seasonings in the mac, or stuff one with a cube of extra cheese for an ooey-gooey center. Little changes make them fit any menu or occasion.
Vegan & Vegetarian Swaps

Vegetarian eaters are already covered if your mac ‘n’ cheese uses dairy but no meat. For vegan versions, swap the mac ‘n’ cheese base for a vegan alternative that sets up when chilled (store-bought or homemade). Replace the eggs with a vegan binder — a thick aquafaba dip, commercial egg replacer, or a flax egg mixed to a thicker consistency — to help the crumbs stick.
Use vegan breadcrumbs or panko and a plant-based oil for brushing. The bake times and temperatures remain the same, though you may need a slightly longer chill time if the vegan mac is softer.
Tools of the Trade

Prep and braiding station
- Shallow bowls (three) — one for flour, one for beaten eggs, one for breadcrumbs.
- 1-inch cookie scoop or tablespoon-sized scoop — for consistent sizing and quicker work.
- Quiet workspace with a rimmed tray or cutting board — gives you a clean place to roll and stage balls.
Cooking and finishing
- Baking sheets (two) — you need two so there’s room between the balls for even browning.
- Parchment paper, silicone baking mats, or aluminum foil — helps crisp and makes cleanup easier.
- Oven preheated to 425°F (220°C) — high heat helps the crumbs brown fast without overcooking the interior.
- Spatula or tongs — for flipping the balls mid-bake carefully.
Slip-Ups to Skip
Don’t skip the chilling. If the mac ‘n’ cheese is warm or only slightly cool, the balls will fall apart as you shape them. Likewise, don’t overcrowd the baking sheet. If the balls are too close, they steam instead of crisping.
A common error is under-breading or skipping the flour step. The three-stage breading — flour, egg, crumbs — gives the most reliable crust. Also, don’t be stingy with that mid-bake oil drizzle; it’s exactly what pushes slow, uneven color into an even, professional-looking brown.
Finally, use the right size scoop. Too large and the center won’t get warm enough by the time the crust browns; too small and they’ll dry out. The guideline in the recipe — about 1 inch in diameter — hits the sweet spot for texture and bake time.
Smart Substitutions
If you’re out of plain breadcrumbs, panko works well for extra crunch. If you prefer a more rustic crust, pulse stale bread in the food processor for fresh breadcrumbs. Seasoned crumbs add a flavor lift; unseasoned lets you control the seasoning in the mac ‘n’ cheese itself.
Butter instead of olive oil will brown the crust differently and add rich flavor, but olive oil keeps things simple and reliable. If the mac ‘n’ cheese is extremely loose, stir in an extra tablespoon or two of cooked pasta or a small handful of crushed crackers to help bind before chilling.
What I Learned Testing
First: chilling time matters more than most people think. I tested balls after only four hours in the fridge and after a full 12-hour chill. The longer-chilled batches were far easier to scoop and kept their shape better during breading. The quick freezer blast right before shaping is a small but powerful trick — it firms up the surface just enough to let you work quickly.
I also experimented with crumb types. Panko gives a lighter, flakier crunch while traditional breadcrumbs produce a denser, more uniform crust. Both are tasty; pick the texture you want. The mid-bake oil addition made the biggest difference in color and mouthfeel. Balls brushed only at the start browned but stayed pale on one side; the oil halfway through gave full, even color.
Finally, sizing matters for reheating and for keeping the center molten. The 1-inch size bakes through quickly and maintains a creamier center. Larger balls need longer and risk a dry interior unless you reduce oven heat and lengthen time — but then the crust can overbake. Stick with the guideline for reliable results.
Storage & Reheat Guide
Cool completely, then store baked balls in an airtight container in the refrigerator for up to 3–4 days. To reheat, place them on a baking sheet and warm at 350°F (175°C) for 8–10 minutes until heated through and crisped. Avoid microwaving unless you don’t mind a softer crust — the microwave will make the coating soggy.
For longer storage, freeze the baked balls on a tray until solid, then transfer to a freezer bag for up to 1 month. Reheat from frozen by baking at 375°F (190°C) for 12–18 minutes, checking periodically until hot and crisp. If you prefer to freeze before baking, flash-freeze shaped, breaded balls on a tray then transfer to bags; bake straight from frozen, increasing bake time to ensure the center heats through.
Ask the Chef

Q: Can I make these without eggs?
A: Yes. Use a thick binder like aquafaba, a commercial egg replacer, or a thickened flax “egg” (1 tablespoon ground flax + 3 tablespoons water, chilled) to help crumbs stick. Results vary; aquafaba closely mimics the egg’s adhesion.
Q: Will they fall apart if I don’t use the freezer blast?
A: They may be trickier to shape, but if your mac ‘n’ cheese was thoroughly chilled overnight and is firm, you can likely skip the 15-minute freezer blast. The blast just makes shaping cleaner and faster.
Q: Can I add fillings?
A: Yes. Small cubes of extra cheddar or a spoon of pulled pork work well. Be conservative with fillings so the ball remains compact and doesn’t leak during baking.
Let’s Eat
Serve fresh from the oven with a simple dipping sauce — marinara, ranch, or a spicy mayo all pair nicely. They make an excellent party starter or a whimsical side to a weeknight meal. With an easy breading station and the chilling step done ahead, these Macaroni and Cheese Baked Cheese Balls come together quickly when you’re ready to bake.
Make a batch. Watch them disappear. And if you try any swaps, tell me what worked — I love hearing how these adapt to different kitchens.

Macaroni and Cheese Baked Cheese Balls
Ingredients
Ingredients
- 1 batch macaroni and cheese prepared as directed and well chilled (1 box store-bought or your favorite homemade recipe, I used one 5.5-ounce box Kraft
- 1/2 cupall-purpose flour
- 2 large eggs beaten
- about 1 cup breadcrumbs seasoned if preferred; I used Trader Joe's which are unseasoned
- 4 tablespoonsolive oil divided
Instructions
Instructions
- Prepare 1 batch macaroni and cheese according to your recipe or package directions. Transfer to an airtight container and refrigerate at least 12 hours and up to 3 days so the mac 'n' cheese firms and dries slightly.
- About 15 minutes before you plan to shape the balls, place the chilled mac 'n' cheese container in the freezer for a quick cold blast.
- Preheat the oven to 425°F (220°C). Line two baking sheets with parchment paper, silicone mats, or aluminum foil.
- Drizzle 1 tablespoon olive oil onto each prepared baking sheet (2 tablespoons total) and spread it around to lightly coat the surface; set the sheets aside.
- Set up a breading station with three shallow bowls: 1/2 cup all-purpose flour in the first bowl, the 2 large eggs beaten in the second bowl, and about 1 cup breadcrumbs in the third bowl.
- Remove the mac 'n' cheese from the freezer. Using a 1-inch cookie scoop or a tablespoon-sized scoop (or your hands), portion out balls about 1 inch in diameter before breading. If the noodles don’t hold together, gently press and shape with your hands to form compact balls.
- For each ball: roll it in the flour to coat, dip it briefly in the beaten eggs, then roll it in the breadcrumbs to fully coat. Place the coated balls on the prepared baking sheets, spacing them apart (about 10 balls per sheet).
- Bake the trays on the middle oven racks for 10 minutes.
- Remove the trays from the oven. Add the remaining olive oil (1 tablespoon to each tray — 2 tablespoons total), spread it over the tray surfaces, flip each ball so the unbrowned side is up, and return the trays to the oven.
- Bake an additional 7 to 10 minutes, or until the balls are evenly browned and crisp. Remove from the oven and serve immediately.
Equipment
- Oven
- Baking Sheets
- parchment paper or silicone mat or aluminum foil
- Three Shallow Bowls
- Cookie scoop or tablespoon
- freezer