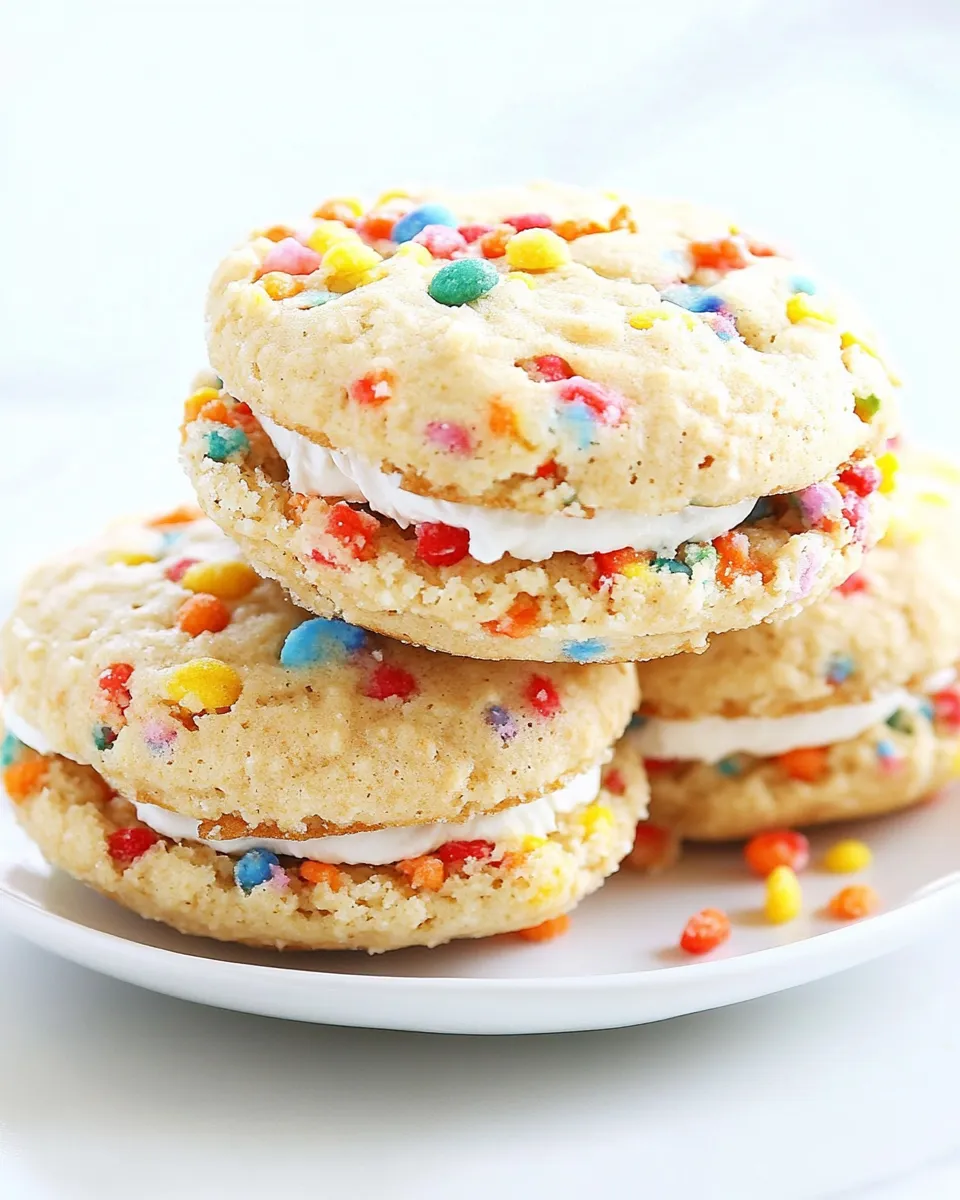
Fruity Pebbles Whoopie Pies
These Fruity Pebbles Whoopie Pies feel like a little pocket of childhood—bright, slightly crunchy, and satisfyingly sweet. They’re more than nostalgia; they’re a reliable crowd-pleaser for parties, school events, or an afternoon pick-me-up. The combo of tender cake rounds and marshmallow buttercream is easy to execute once you have a rhythm at the mixer and the oven.
I keep this recipe on rotation when I want something colorful but not fussy. The cakes puff up quickly and bake in under ten minutes, and the filling comes together while the cakes cool. You don’t need high-end ingredients to get great results—attention to temperature, timing, and gentle folding will take you far.
Below I’ll break down the ingredients, walk you through the exact steps, offer practical swaps and troubleshooting, and explain how to store these so they stay fresh. If you want a playful, handheld dessert that’s fast to bake and makes people smile, this is it.
Ingredient Rundown

- ½ cup butter-flavored shortening — provides structure and that mild, familiar bakery note without dairy richness.
- 1 cup granulated sugar — sweetens and helps the cakes brown slightly.
- 1 egg — binds the batter and contributes to tenderness.
- 2 teaspoons vanilla extract — adds warm flavor in the batter.
- ½ cup buttermilk — adds tang and helps create a tender crumb.
- ½ cup hot water — loosens the batter for a soft cake; hot liquid develops tenderness.
- 2 ½ cups all-purpose flour — the structural base of the cakes.
- 1 ½ teaspoons baking soda — leavening that gives the cakes lift.
- ½ teaspoon salt — balances sweetness and enhances flavor.
- 1 cup Fruity Pebbles (lightly crushed) — folded into the batter for color, flavor, and a little crunch.
- ¾ cup unsalted butter (room temperature) — the base of the marshmallow buttercream; room temperature ensures smooth creaming.
- 1 ¼ cups powdered sugar (sifted) — sweetens and stabilizes the buttercream; sifting prevents lumps.
- 2 teaspoons vanilla extract — flavor for the filling.
- 1 7-ounce container marshmallow cream — gives the filling its light, fluffy marshmallow character and spreadability.
- ½ cup Fruity Pebbles (lightly crushed) — for rolling the assembled edges so each pie has a bright, crunchy rim.
Step-by-Step: Fruity Pebbles Whoopie Pies
- Preheat the oven to 400°F. Line baking sheets with parchment paper.
- In a medium bowl, whisk together 2 1/2 cups all-purpose flour, 1 1/2 teaspoons baking soda, and 1/2 teaspoon salt; set aside.
- In the bowl of a stand mixer fitted with the paddle attachment, or in a large bowl with an electric mixer, cream 1/2 cup butter-flavored shortening and 1 cup granulated sugar until light and fluffy.
- Add 1 egg, 2 teaspoons vanilla extract, 1/2 cup buttermilk, and 1/2 cup hot water to the creamed shortening and sugar. Mix until fully incorporated, scraping the bowl as needed.
- With the mixer on low, slowly add the dry ingredients to the wet ingredients and mix until just combined. Do not overmix.
- Gently fold 1 cup Fruity Pebbles (lightly crushed) into the batter with a rubber spatula.
- Use a medium cookie scoop (about 1.5 tablespoons) to drop rounded portions of batter onto the prepared baking sheets, spacing them about 2 inches apart.
- Bake the cakes for 8–9 minutes, until set. Remove from the oven and let the cakes cool on the baking sheets for 5 minutes, then transfer to wire racks to cool completely.
- While the cakes cool, make the filling: in the bowl of a stand mixer fitted with the paddle attachment, beat 3/4 cup unsalted butter (room temperature) on medium-high speed for 3–4 minutes until pale and creamy.
- Turn the mixer to low and gradually add 1 1/4 cups sifted powdered sugar until incorporated. Increase the mixer to medium-high and beat for 5 minutes.
- Add 2 teaspoons vanilla extract and the entire 7-ounce container of marshmallow cream. Beat for an additional 2 minutes until the filling is smooth and spreadable. Scrape the bowl as needed.
- To assemble, place half of the cooled cakes flat-side up. Spoon or pipe an even amount of the marshmallow buttercream onto each of those cake halves.
- Top each filled cake with the remaining cake halves, flat sides together, pressing gently to spread the filling to the edges.
- Place the remaining 1/2 cup Fruity Pebbles (lightly crushed) in a shallow bowl or on a plate. Roll the edges of each assembled whoopie pie in the Fruity Pebbles, pressing gently so they adhere.
The Upside of Fruity Pebbles Whoopie Pies
These whoopie pies are fast to make and impressive to serve. The batter comes together quickly; the bake time is under ten minutes, and the filling is flexible—you can spoon it or pipe it for a cleaner finish. The Fruity Pebbles bring a fun textural contrast: soft cake meets slight crunch on the edges. That contrast elevates a simple sandwich cookie into a playful dessert.
They’re portable, kid-friendly, and excellent for batch baking. Because the cakes are small and uniform, you can scale the recipe up for a crowd without changing the workflow. They also photograph well: the colorful rim and the rounded profile make for cheerful dessert platters.
Swap Guide

Want to adjust components? Here are straightforward swaps and what to expect.
- Shortening: swapping for unsalted butter will add richness and a butter flavor, but the texture will be slightly denser and more tender. If you swap, soften the butter first.
- Buttermilk: if you don’t have buttermilk, you can make a quick substitute by adding 1/2 teaspoon vinegar or lemon juice to the 1/2 cup milk and letting it sit for 5 minutes. Expect a similar tang and tenderness.
- Fruity Pebbles: use any small, crunchy cereal if you want a different flavor profile. Crush gently so pieces remain identifiable but mix evenly into the batter.
- Marshmallow cream in filling: swapping for stabilized American-style buttercream will give a thicker, less marshmallow-forward filling; you’ll lose that pillowy marshmallow texture but gain stability for warm climates.
Gear Checklist
- Stand mixer with paddle attachment or a good handheld mixer — for creaming and smooth filling.
- Medium bowl — to whisk dry ingredients.
- Rubber spatula — for gentle folding and scraping.
- Medium cookie scoop (about 1.5 tablespoons) — for even cakes and consistent baking.
- Baking sheets and parchment paper — prevents sticking and simplifies transfer to racks.
- Wire cooling racks — critical for even cooling so the filling doesn’t melt.
- Shallow bowl or plate — for the Fruity Pebbles edge roll.
Watch Outs & How to Fix
Common issues and quick fixes
- Dense cakes: overmixing once the flour is added will develop gluten. Fix: stop mixing as soon as the dry ingredients are incorporated; gently fold in the cereal.
- Flat or spread-out cakes: batter portions too warm or too soft can spread. Chill the scooped batter on the sheet for 5–10 minutes before baking, or reduce spacing if cakes spread slightly.
- Filling too thin: if your marshmallow buttercream seems loose, chill it for 10–15 minutes, then re-whip briefly. Cold temperatures will firm the butter and help the filling hold shape.
- Fruity Pebbles not sticking to edges: press gently and ensure the filling reaches the edge when assembling. If necessary, add a little extra marshmallow filling at the edge to act as glue.
- Cakes sticking to parchment: ensure parchment is flat on the sheet and the oven temperature is accurate. Use an oven thermometer if your oven runs hot or cool.
Dietary Customizations
These whoopie pies are not naturally gluten-free or vegan, but you can adapt with care.
- Gluten-free: use a 1:1 gluten-free all-purpose flour blend that contains xanthan gum. The batter may be slightly more fragile, so handle gently and expect small texture differences.
- Dairy-free: replace the unsalted butter in the filling with a dairy-free stick butter, and use a dairy-free milk with vinegar for the buttermilk swap. Note that marshmallow cream often contains gelatin; check labels for vegan marshmallow spread if needed.
- Egg-free: a commercially available egg replacer can work, but expect a difference in structure and chew. These cakes rely on an egg for binding, so proceed with caution and test one batch first.
Behind-the-Scenes Notes
I developed this recipe around the idea of convenience and vibes. Butter-flavored shortening is in the ingredient list because it delivers consistent volume and bench stability; it keeps the cakes softer at room temperature compared with straight butter. The hot water thins the batter so the cakes bake up tender without being cakey-heavy. The marshmallow cream creates a light, cloud-like filling that pairs well with the crunch of cereal at the edges.
Mini tips from experience: crush the cereal lightly. If you pulverize it, you lose that distinctive crunch and color pockets. Also, cool the cakes completely before assembling. Warm cakes will soften the filling and make rolling the edges messy.
Shelf Life & Storage
Stored in an airtight container at room temperature, these whoopie pies will keep for 1–2 days. Because the filling contains butter and marshmallow cream, refrigeration will extend life to 4–5 days but can slightly firm the filling and reduce tenderness. If you refrigerate, bring to room temperature for 20–30 minutes before serving for best texture.
For longer storage, freeze assembled whoopie pies in a single layer on a baking sheet until firm, then transfer to a freezer-safe container with parchment layers between. Freeze up to 1 month. Thaw in the refrigerator, then bring to room temperature before serving.
Ask the Chef
Q: Can I make the cakes ahead of time?
A: Yes. Bake the cake rounds, cool completely, and store them in an airtight container for up to 24 hours before assembling. If storing longer, freeze the rounds on a sheet pan, then transfer to a container. Assemble with fresh filling when ready.
Q: How can I make the edges neater when rolling in Fruity Pebbles?
A: Make sure the filling reaches the edge of the cake when you sandwich the halves. If the filling doesn’t reach the edge, pipe a small ring of filling around the perimeter before topping and then roll the edge in cereal.
Serve & Enjoy
These are most charming when served on a simple platter arranged in rows so the colorful rims show. Pair them with a tall glass of milk for a classic combo, or pack them into individual boxes for gifts. They travel well to potlucks if kept cool on the way.
Make a batch on a slow afternoon, and you’ll have a dessert that’s equal parts playful and dependable. The steps are straightforward, the results are crowd-pleasing, and the cleanup is minimal. Now, preheat the oven and get scooping—these are best eaten within a couple of days of making.

Fruity Pebbles Whoopie Pies
Ingredients
Ingredients
- 1/2 cupbutter flavored shortening
- 1 cupgranulated sugar
- 1 egg
- 2 teaspoonsvanilla extract
- 1/2 cupbuttermilk
- 1/2 cuphot water
- 2 1/2 cupsall-purpose flour
- 1 1/2 teaspoonsbaking soda
- 1/2 teaspoonsalt
- 1 cupFruity Pebbleslightly crushed
- 3/4 cupunsalted butterroom temperature
- 1 1/4 cupspowdered sugarsifted
- 2 teaspoonsvanilla extract
- 1 7- ouncecontainer marshmallow cream
- 1/2 cupFruity Pebbleslightly crushed
Instructions
Instructions
- Preheat the oven to 400°F. Line baking sheets with parchment paper.
- In a medium bowl, whisk together 2 1/2 cups all-purpose flour, 1 1/2 teaspoons baking soda, and 1/2 teaspoon salt; set aside.
- In the bowl of a stand mixer fitted with the paddle attachment, or in a large bowl with an electric mixer, cream 1/2 cup butter-flavored shortening and 1 cup granulated sugar until light and fluffy.
- Add 1 egg, 2 teaspoons vanilla extract, 1/2 cup buttermilk, and 1/2 cup hot water to the creamed shortening and sugar. Mix until fully incorporated, scraping the bowl as needed.
- With the mixer on low, slowly add the dry ingredients to the wet ingredients and mix until just combined. Do not overmix.
- Gently fold 1 cup Fruity Pebbles (lightly crushed) into the batter with a rubber spatula.
- Use a medium cookie scoop (about 1.5 tablespoons) to drop rounded portions of batter onto the prepared baking sheets, spacing them about 2 inches apart.
- Bake the cakes for 8–9 minutes, until set. Remove from the oven and let the cakes cool on the baking sheets for 5 minutes, then transfer to wire racks to cool completely.
- While the cakes cool, make the filling: in the bowl of a stand mixer fitted with the paddle attachment, beat 3/4 cup unsalted butter (room temperature) on medium-high speed for 3–4 minutes until pale and creamy.
- Turn the mixer to low and gradually add 1 1/4 cups sifted powdered sugar until incorporated. Increase the mixer to medium-high and beat for 5 minutes.
- Add 2 teaspoons vanilla extract and the entire 7-ounce container of marshmallow cream. Beat for an additional 2 minutes until the filling is smooth and spreadable. Scrape the bowl as needed.
- To assemble, place half of the cooled cakes flat-side up. Spoon or pipe an even amount of the marshmallow buttercream onto each of those cake halves.
- Top each filled cake with the remaining cake halves, flat sides together, pressing gently to spread the filling to the edges.
- Place the remaining 1/2 cup Fruity Pebbles (lightly crushed) in a shallow bowl or on a plate. Roll the edges of each assembled whoopie pie in the Fruity Pebbles, pressing gently so they adhere.
Equipment
- Oven
- Baking Sheets
- Parchment Paper
- Stand mixer
- Paddle Attachment
- Electric Mixer
- Rubber spatula
- medium cookie scoop (about 1.5 tablespoons)
- Wire Rack
- Shallow Bowl
Notes
To lightly crush the Fruity Pebbles, place them into a ziptop and gently crush the cereal pieces with your hands.