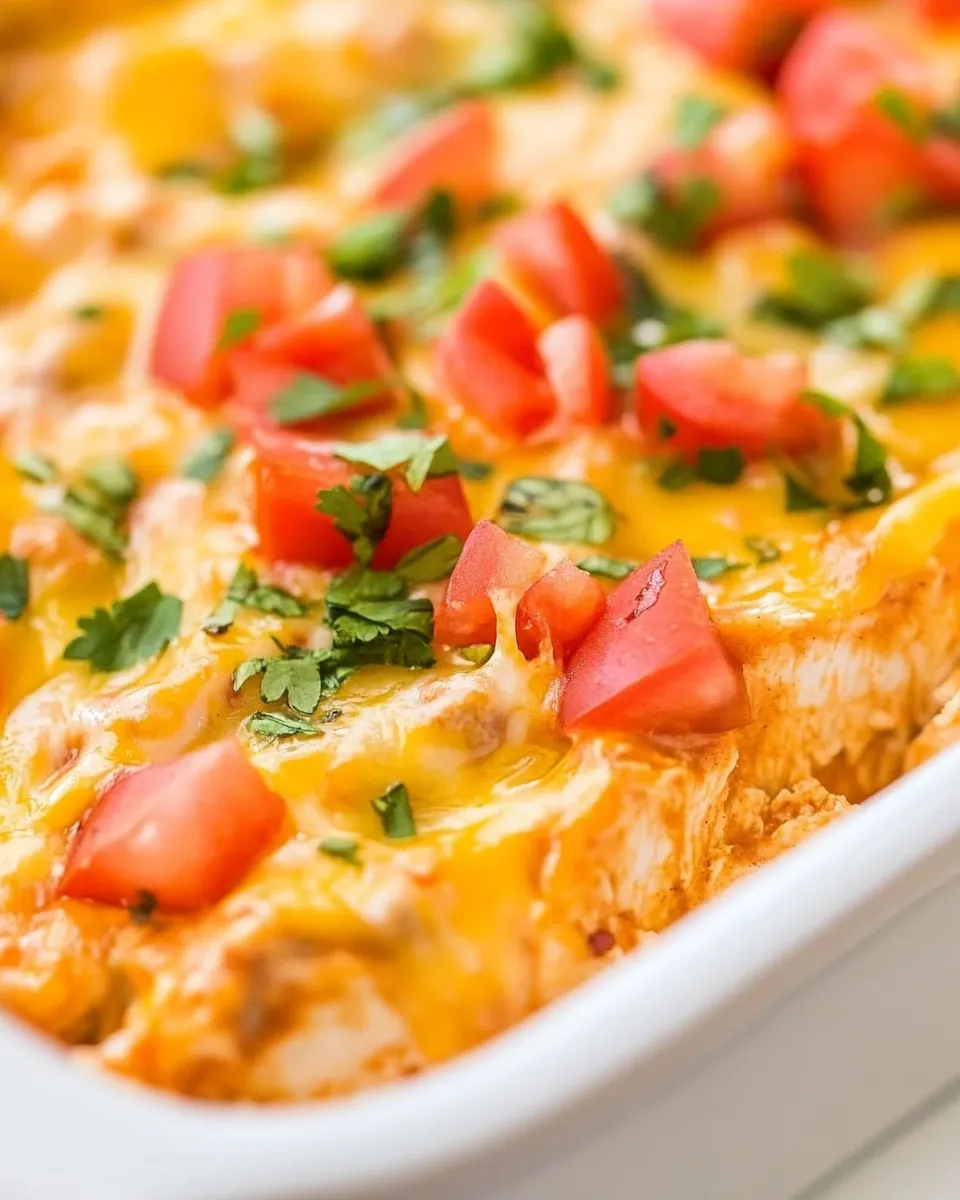
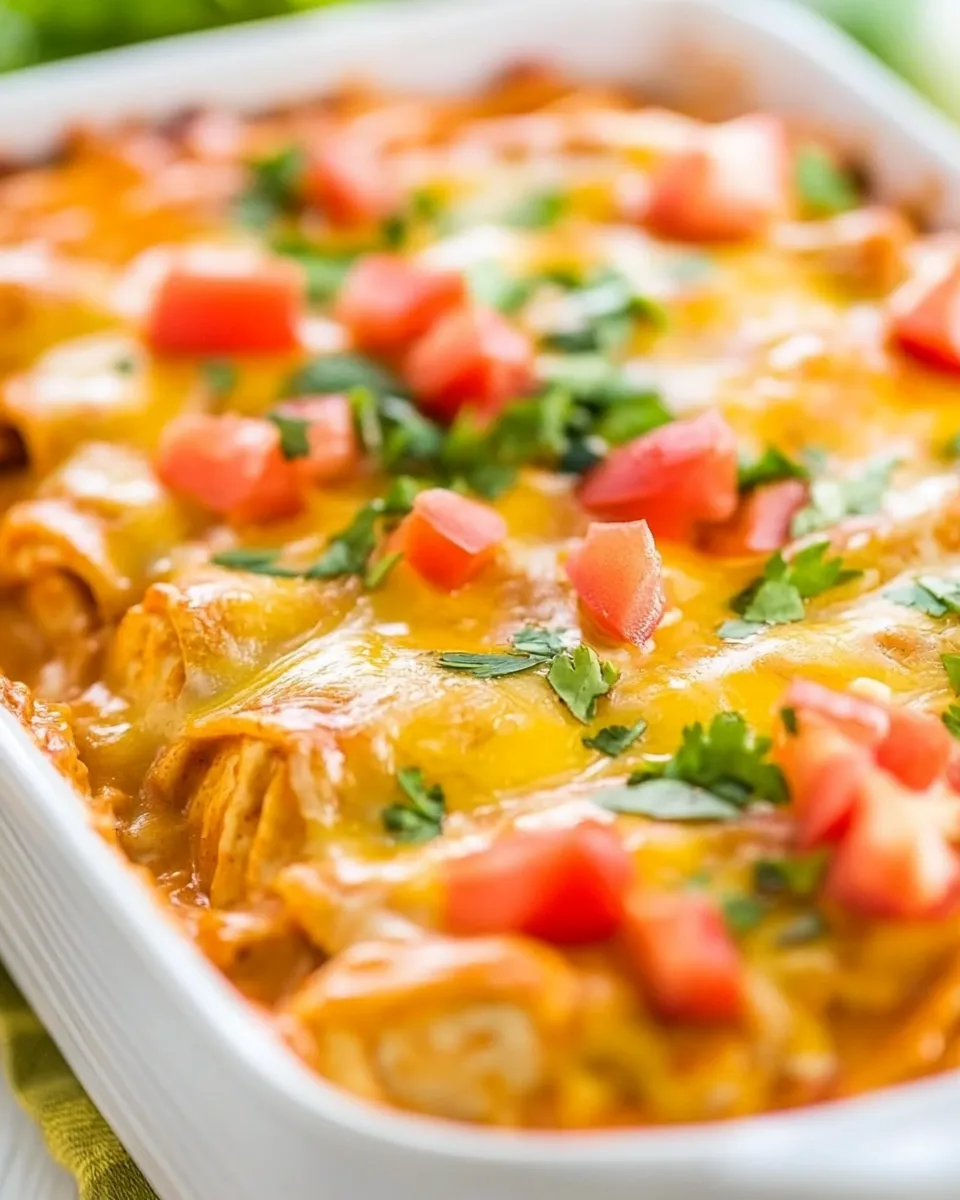
Easy Chicken Enchilada Bake
I make this Chicken Enchilada Bake on weeknights when I want dinner to feel like a celebration without the fuss. It’s forgiving, quick to assemble, and scales well if you’re feeding a crowd. Use rotisserie chicken or shredded leftovers and you can have it in the oven in under 10 minutes.
The layers are straightforward: tortillas, a creamy chicken mixture, salsa, tomatoes, and plenty of melty cheese. It bakes up bubbly and golden, and leftovers reheat beautifully, which is a must in my house. I keep the optional toppings simple—sour cream, guacamole, extra salsa—and let everyone garnish their own plate.
This recipe is practical, reliable, and flexible. Below I walk you through the exact ingredients, step-by-step directions, useful gear, and the small details that make it taste homemade every time. No fluff—just what you need to get dinner on the table.
What You’ll Gather

This dish relies on simple pantry and fridge staples. Gather the chicken, a creamy binder (Greek yogurt or sour cream), taco seasoning, salsa, tortillas, tomatoes and cheese. Optional items like cilantro, black olives, and green chiles let you customize the flavor.
Prep a baking dish and set your oven to 400°F while you mix. Read through the steps once before you start so everything flows—assembly is quick and you want your oven hot when you put the pan in.
Ingredients
- 2 heaping cups cooked and shredded chicken — use rotisserie chicken or leftover chicken to save time.
- 1 cup plain Greek yogurt or sour cream — acts as the creamy binder (pick whichever you prefer).
- 2 tablespoons taco seasoning — I used medium heat; adjust for milder or spicier tastes.
- 2 cups (16 ounces) salsa, divided — I used a chunky medium heat and recommend a chunkier salsa; use less if yours is thinner.
- 8 flour or corn tortillas — I used flour; either works depending on texture you want.
- 4 Roma tomatoes, chopped — fresh tomatoes add brightness and texture.
- 2 cups shredded Mexican cheese blend — Monterey Jack, cheddar, etc., shredded is easiest for even melting.
- Cilantro, black olives, green chiles — optional and to taste; great for topping a finished portion.
- Sour cream, guacamole, salsa — optional for serving and layering extra flavor on the plate.
Chicken Enchilada Bake in Steps
- Preheat oven to 400°F (200°C). Use a 9×9-inch baking pan or a similar-sized dish (an 8×11-inch dish also works).
- In a large bowl, combine 2 heaping cups cooked, shredded chicken; 1 cup plain Greek yogurt or sour cream; 2 tablespoons taco seasoning; and 1 1/2 cups of the salsa. Stir until evenly mixed. Set the chicken mixture aside.
- Pour the remaining 1/2 cup salsa into the bottom of the prepared baking dish and spread it into an even layer.
- Arrange 4 of the tortillas (half of the 8) over the salsa in the dish, slightly overlapping as needed to cover the surface.
- Spread half of the chicken mixture evenly over the tortillas.
- Sprinkle half of the chopped tomatoes, half of the 2 cups shredded Mexican cheese blend, and any optional ingredients (cilantro, black olives, green chiles) over the chicken layer.
- Repeat the layers: place the remaining 4 tortillas, spread the remaining chicken mixture, then top with the remaining tomatoes, remaining cheese, and any remaining optional ingredients.
- If not baking now, wrap the assembled dish tightly with foil and refrigerate for up to 2 days. If baking immediately, proceed to the next step.
- Bake uncovered at 400°F for about 20 minutes, or until the cheese is bubbly and lightly golden.
- Let the bake rest for a few minutes, then cut into portions and serve. Top with optional sour cream, guacamole, or additional salsa if desired.
Why I Love This Recipe
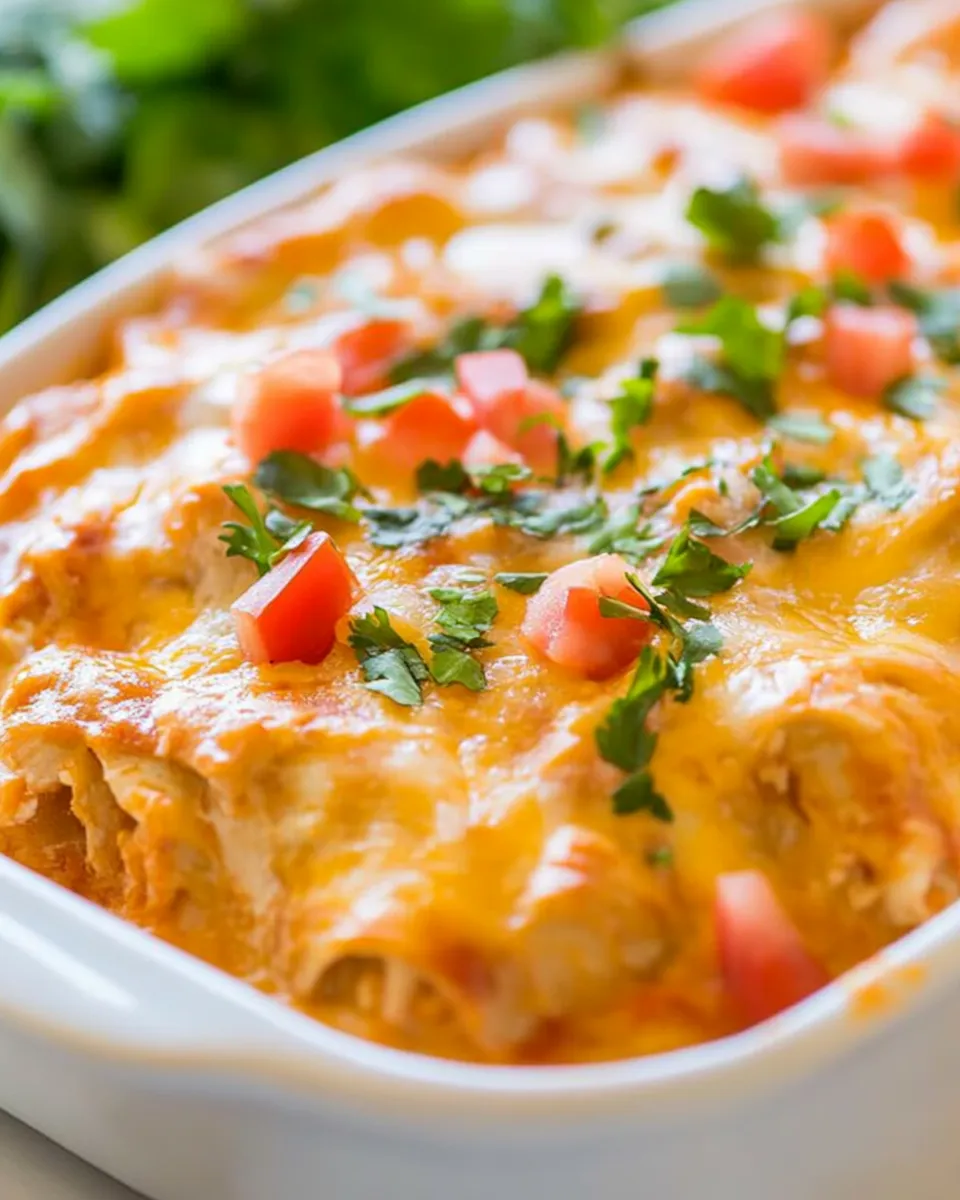
It’s honest comfort food that doesn’t overcomplicate dinner. You get bright salsa, creamy chicken, fresh tomatoes, and gooey cheese in every bite. The texture contrast—soft tortillas, melty cheese, and little tomato pops—keeps it from feeling one-note.
Another reason: it’s forgiving. Miss a spice level or skip an optional ingredient? No problem. Swap the yogurt for sour cream or use whatever cheese you have. It still delivers on flavor and satisfies picky eaters and enthusiasts alike.
Low-Carb/Keto Alternatives
- Replace the 8 flour or corn tortillas with low-carb tortillas or large lettuce leaves. Both keep the layering method intact while cutting carbs.
- Use full-fat plain Greek yogurt or sour cream (already an ingredient choice) to keep fat and flavor higher while minimizing carbs.
- Skip the tomatoes or use fewer tomatoes if you’re watching carb count; load up on cilantro and green chiles instead for freshness and heat.
Gear Up: What to Grab
You don’t need fancy tools. A few basics make assembly faster and cleanup easy.
Must-haves
- 9×9-inch baking pan (or 8×11-inch) — the recipe is written for these sizes; depth matters for even baking.
- Large mixing bowl — to combine the chicken, yogurt/sour cream, taco seasoning, and salsa.
- Spatula or spoon — for spreading the layers cleanly.
- Knife and cutting board — for chopping the tomatoes and any optional toppings.
Easy-to-Miss Gotchas
- Don’t over-thin your salsa. If it’s very watery, the tortillas can get soggy. The recipe calls for 2 cups divided; use less if your salsa is thin.
- Layer coverage matters. Slightly overlap the tortillas so the chicken mixture doesn’t spill through gaps and bake unevenly.
- Let it rest before cutting. Cutting too soon will cause the layers to slide; a short 5-minute rest helps it set.
- If refrigerating assembled pans, wrap tightly. Keeping air out prevents the tortillas from drying or absorbing too much moisture.
Better-for-You Options
Small swaps make this dish lighter without losing satisfaction. Use plain Greek yogurt for more protein and a tangy lift in place of sour cream. Pick a salsa that’s lower in sodium and free of added sugar. Add more vegetables—spinach, sautéed peppers, or a handful of corn—if you want extra fiber and color.
Choose a reduced-fat cheese if needed, but remember that fat carries flavor. I usually keep the full 2 cups of cheese and trim elsewhere (fewer tortillas or smaller portions) to maintain taste while managing calories.
Behind-the-Scenes Notes
Why 9×9 or 8×11? Those sizes give just the right depth for two tortilla layers and even baking. If you use a much larger or smaller pan, baking time and texture will change. A deeper pan means thicker layers and possibly a few extra minutes to heat through; a wider pan will bake faster and might dry out the edges.
I prefer a chunky salsa because it adds texture and pockets of brightness. Smooth salsas work too—just reduce the amount used for layering if it seems runny. The recipe’s divided salsa approach ensures a saucy bottom layer and enough salsa in the chicken mix to keep it moist.
Cooling, Storing & Rewarming
- Cooling: Let the bake rest about 5 minutes after coming out of the oven. This helps it set so you can cut cleaner portions.
- Refrigerating: Store in an airtight container for up to 3–4 days. If you assembled and refrigerated the pan before baking, follow the recipe note—assemble up to 2 days ahead.
- Freezing: You can freeze individual portions after baking. Wrap tightly and freeze for up to 2 months. Thaw in the refrigerator overnight before reheating.
- Reheating: Microwave single portions for 1–2 minutes until heated through, or reheat in a 350°F oven for 15–20 minutes (covered) to retain moisture. Add fresh toppings after reheating.
Ask the Chef
Q: Can I make this spicier?
A: Yes—use a hotter taco seasoning, add diced jalapeño to the chicken mix, or pick a spicy salsa. I recommend testing heat in small increments so it doesn’t overpower the other flavors.
Q: Can I use corn tortillas only?
A: Absolutely. Corn tortillas will give a more traditional flavor but can be stiffer; to prevent cracking, warm them briefly in a skillet or microwave so they bend easily when layering.
Q: How can I make it vegetarian?
A: Substitute the chicken with seasoned, shredded roasted vegetables or a canned, drained bean like black beans. Keep the other quantities the same and adjust seasoning to taste.
That’s a Wrap
This Chicken Enchilada Bake is the kind of recipe I come back to when I want reliable, crowd-pleasing food with minimal fuss. It balances comfort with freshness, reheats well, and tolerates substitutions. Prep once and enjoy leftovers for a couple of meals, or double it for a potluck.
Make it your own—swap cheeses, add a little heat, or keep it simple. Either way, it’s a dependable weeknight winner.

Easy Chicken Enchilada Bake
Ingredients
Ingredients
- 2 heaping cups cooked and shredded chicken use rotisserie chicken or leftover chicken to save time
- 1 cupplain Greek yogurt or sour cream
- 2 tablespoonstaco seasoning I used medium heat
- 2 cups16 ounces salsa divided (I used a chunky medium heat and recommend a chunkier salsa; use less if yours is thinner)
- 8 flour or corn tortillas I used flour
- 4 roma tomatoes chopped
- 2 cupsshredded Mexican cheese blend Monterey Jack, cheddar, etc.
- cilantro black olives, green chiles, optional and to taste
- sour cream guacamole, salsa, optional for serving
Instructions
Instructions
- Preheat oven to 400°F (200°C). Use a 9×9-inch baking pan or a similar-sized dish (an 8×11-inch dish also works).
- In a large bowl, combine 2 heaping cups cooked, shredded chicken; 1 cup plain Greek yogurt or sour cream; 2 tablespoons taco seasoning; and 1 1/2 cups of the salsa. Stir until evenly mixed. Set the chicken mixture aside.
- Pour the remaining 1/2 cup salsa into the bottom of the prepared baking dish and spread it into an even layer.
- Arrange 4 of the tortillas (half of the 8) over the salsa in the dish, slightly overlapping as needed to cover the surface.
- Spread half of the chicken mixture evenly over the tortillas.
- Sprinkle half of the chopped tomatoes, half of the 2 cups shredded Mexican cheese blend, and any optional ingredients (cilantro, black olives, green chiles) over the chicken layer.
- Repeat the layers: place the remaining 4 tortillas, spread the remaining chicken mixture, then top with the remaining tomatoes, remaining cheese, and any remaining optional ingredients.
- If not baking now, wrap the assembled dish tightly with foil and refrigerate for up to 2 days. If baking immediately, proceed to the next step.
- Bake uncovered at 400°F for about 20 minutes, or until the cheese is bubbly and lightly golden.
- Let the bake rest for a few minutes, then cut into portions and serve. Top with optional sour cream, guacamole, or additional salsa if desired.
Equipment
- 1 Large Bowl
- 1 (9×9 inch) Baking Dish
Notes
Storage:
Leftovers will keep in an airtight container in the fridge for up to 4 days or in the freezer for up to 3 months.