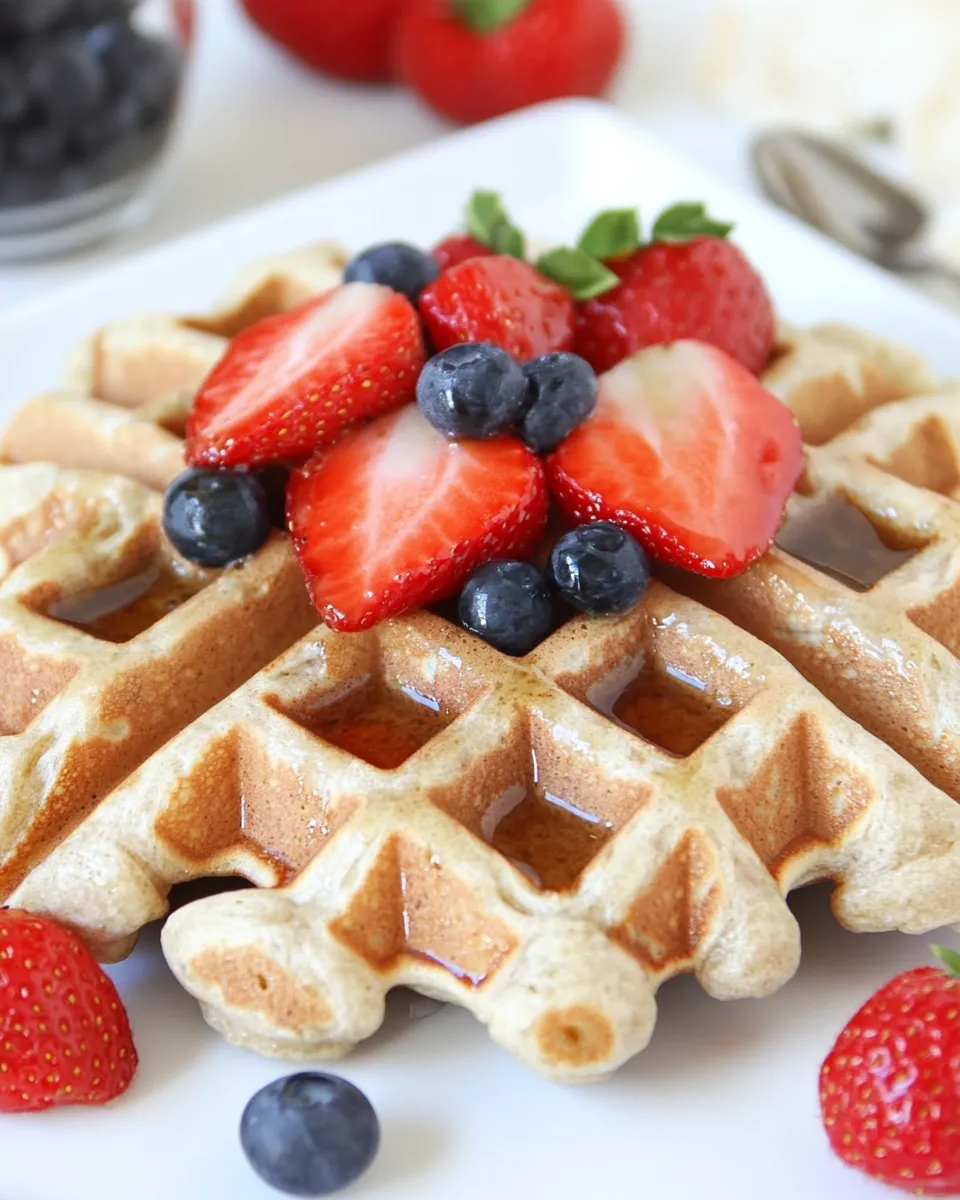
Vegan Gluten-Free Waffles (Oil-Free!)
These waffles are the kind of recipe I reach for when I want breakfast that feels indulgent but actually plays nice with my pantry and my appetite. They’re crisp at the edges, tender inside, and made without oil — which keeps them lighter and easier to reheat later. The batter is forgiving and quick to pull together, so you can be flipping waffles while the coffee finishes brewing.
I test waffles until the rhythm makes sense: whisk wet, fold dry, rest briefly, then let the waffle iron do the rest. This version uses ground flaxseed as the binder and a combo of gluten-free all-purpose flour and super-fine almond flour for structure and a subtle, nutty softness. A small splash of maple and vanilla keeps the flavor rounded without turning these into a dessert, so toppings decide the level of sweetness at the table.
Below you’ll find ingredient notes, the exact step-by-step directions I used in testing, helpful swaps, tools, and practical tips to avoid the usual waffle-day mistakes. Read the Ingredients section carefully — each line has a short note on why it’s there and how to get the best result.
Ingredient Notes

Start with the dairy-free milk you use for drinking — its thickness will affect batter viscosity. Thicker milks yield slightly denser waffles; thinner milks make a lighter batter. The ground flaxseed acts as the egg replacement when mixed with liquid: it thickens and helps hold the waffle together once cooked.
The flour pairing is intentional. The gluten-free all-purpose flour provides a neutral base and structure, while the super-fine almond flour contributes tenderness and a fine crumb without needing oil. Baking powder is the only leavening agent here, so fresh powder and gentle mixing are important for lift.
Cinnamon and salt are small but essential: they deepen the flavor and balance the sweetness. The maple syrup is optional, but a tablespoon in the batter adds a roundness that pairs beautifully with warm fruit or extra syrup on top. Finally, resting the batter while your waffle iron heats up helps hydrated flours settle and makes for a more consistent cook.
Ingredients
- 1 1/2 cups dairy-free milk — hydrates the flours and activates the ground flaxseed; choose unsweetened for better control over sweetness.
- 2 Tbsp ground flaxseed — acts as the vegan binder (flax “egg”) and adds a bit of body to the batter.
- 1 Tbsp pure maple syrup (optional) — light sweetener and flavor enhancer; omitting it keeps the batter neutral for savory toppings.
- 1 tsp vanilla extract — rounds and lifts the flavor without adding sweetness.
- 1 cup gluten-free all-purpose flour* — the primary structure builder; use a blend that contains xanthan gum if your brand requires it.
- 1 cup almond flour** (super-fine) — gives tenderness and a fine crumb; super-fine grinds produce the best texture.
- 1 Tbsp baking powder — the leavening agent; make sure it’s fresh for good rise.
- 1/4 tsp ground cinnamon — a subtle warming note; omit if you prefer a fully neutral batter.
- 1/4 tsp salt — enhances all the other flavors; don’t skip it.
Cook Vegan Gluten-Free Waffles (Oil-Free!) Like This
- In a large bowl whisk together 1 1/2 cups dairy-free milk, 2 Tbsp ground flaxseed, 1 Tbsp pure maple syrup (optional), and 1 tsp vanilla extract until combined.
- In a separate bowl stir together 1 cup gluten-free all-purpose flour, 1 cup super-fine almond flour, 1 Tbsp baking powder, 1/4 tsp ground cinnamon, and 1/4 tsp salt.
- Add the dry ingredients to the wet ingredients and whisk until just combined; do not overmix—the batter may be slightly lumpy.
- Let the batter rest for a few minutes while you preheat the waffle iron.
- Preheat the waffle iron to your desired setting (medium to medium-high is recommended) and prepare the surface according to the manufacturer’s instructions.
- Using a 1/2-cup measuring cup, scoop batter into the center of the hot waffle iron. Do not overfill—leave a small border from the edge.
- Close the waffle iron and cook without opening for 5–7 minutes, or until steam has completely stopped.
- Carefully remove the cooked waffle and repeat with the remaining batter, reheating or preparing the waffle iron surface as needed between batches.
Why This Recipe is a Keeper
It balances simplicity and reliability. The ratio of gluten-free all-purpose flour to almond flour produces waffles that crisp at the edges but stay tender inside — a texture many gluten-free recipes miss. Using ground flaxseed instead of store-bought egg replacers keeps the ingredient list short and economical, and the oil-free approach means these waffles are less greasy and reheat beautifully in the oven or toaster.
Timing is forgiving. The recipe’s 5–7 minute cook window is long enough to develop color and dismiss excess steam, which means you get consistency across batches even if your iron’s timer isn’t precise. The batter’s slight lumpiness is normal; overmixing flattens lift. Finally, it’s adaptable: the optional tablespoon of maple syrup allows you to dial sweetness up or down without changing structure.
Easy Ingredient Swaps
- Milk: Use any dairy-free milk you have on hand; thicker milks will yield a slightly denser waffle but the cooking method stays the same.
- To make nut-free: Omit the almond flour and increase the gluten-free all-purpose flour by the same volume (1 cup more). Expect a slightly different crumb and a less tender bite.
- Sweetener: Skip the maple syrup in the batter if you prefer to sweeten at the table. The flavor will still be pleasant and versatile.
- Flour blends: If your gluten-free blend already contains almond or other nut flours, adjust the ratio as needed, but keep the total dry volume the same.
Essential Tools for Success
- Waffle iron — a reliable surface with adjustable temperature makes all the difference.
- Two mixing bowls — one for wet, one for dry keeps things tidy and reduces overmixing.
- Whisk and spatula — whisk to combine wet ingredients and a spatula to fold the batter gently.
- 1/2-cup measuring cup — consistent scoops give uniform waffles and prevent overflow.
- Cooling rack — let waffles rest on a rack instead of a plate so steam doesn’t soften the edges.
What Not to Do
- Don’t overmix the batter. Vigorous mixing destroys the little air pockets that help waffles rise and leads to dense results.
- Don’t open the waffle iron early. Steam is your indicator; wait until it stops, or the waffle will split and lose crispiness.
- Don’t overfill the iron. Leave a border so excess batter doesn’t escape and make a mess or undercook the center.
- Don’t skip resting the batter while the iron heats. Hydrating the flours prevents dry pockets and improves texture.
- Don’t stack cooked waffles immediately on a plate. Stacking traps steam and softens the crust — use a cooling rack instead.
Dietary Customizations
These waffles are already vegan and gluten-free. For nut-free needs, replace the almond flour with an equal volume of gluten-free all-purpose flour (see swaps above) and understand the texture will be a bit less tender. If you’re avoiding added sweeteners, omit the maple syrup in the batter and use fruit or a spread at the table. If you need a lower-sodium option, reduce the salt slightly, but taste will be impacted — salt helps the flavors sing.
For extra protein, serve with a scoop of plain dairy-free yogurt or a nut-free alternative on the side. For a kid-friendly boost, fold a small amount of mashed banana into the wet mix (note: this is an addition to consider carefully; it will change moisture and may require slightly longer cooking). In every case, maintain the batter consistency — it should be pourable but not runny.
What I Learned Testing
Across multiple irons and dozens of waffles, a few patterns stood out. First, preheating is non-negotiable: underheated plates produce pale, limp waffles. Second, 5–7 minutes is the sweet spot for a typical consumer waffle iron — but watch the steam. When steam stops, the exterior has set and the interior has finished. Third, the batter benefits from a short rest; even five minutes smooths the texture and lets the flaxseed swell properly.
I also confirmed that almond flour grind matters. Super-fine almond flour integrates into the batter more smoothly and gives a delicate crumb. Coarser almond meal can make waffles a bit gritty and heavier. Finally, reheating in a hot oven or toaster yields better results than microwaving: the oven restores crispness.
Prep Ahead & Store
Batter can rest for a short period while you get the iron ready; I wouldn’t recommend making it hours ahead unless you plan to stir gently before cooking. If you do refrigerate the batter for up to 24 hours, expect thicker consistency and add a splash of dairy-free milk to loosen it before scooping.
Cooked waffles freeze very well. Cool completely on a rack, then flash-freeze on a sheet tray before transferring to an airtight container or bag. Reheat straight from the freezer in a toaster or oven at 375°F until hot and crisp (about 8–12 minutes depending on appliance).
Your Questions, Answered
- Can I make the batter ahead? You can refrigerate it briefly, but it will thicken. Stir in a little dairy-free milk to reach the proper scooping consistency if needed.
- Why did my waffles come out soggy? Likely causes: underheated iron, opening the iron too soon, or stacking waffles while hot. Use a rack and wait until steam stops.
- Can I double the recipe? Yes. Work in batches and keep cooked waffles warm on a rack in a low oven while finishing the rest.
- How do I get crispier waffles? Use a slightly higher iron setting, ensure steam has stopped, and avoid stacking. Reheating in a hot oven also crisps them back up.
Bring It Home
This recipe gives you a reliable base for breakfast that fits vegan and gluten-free needs without compromise. The waffles come together quickly, suit both sweet and savory toppings, and play well with make-ahead routines. Once you know your iron’s behavior, the process becomes second nature: whisk, rest, scoop, close, wait for steam, and serve. Little changes to the batter — a dash more cinnamon, less maple, a different milk — are easy to test and make it yours.
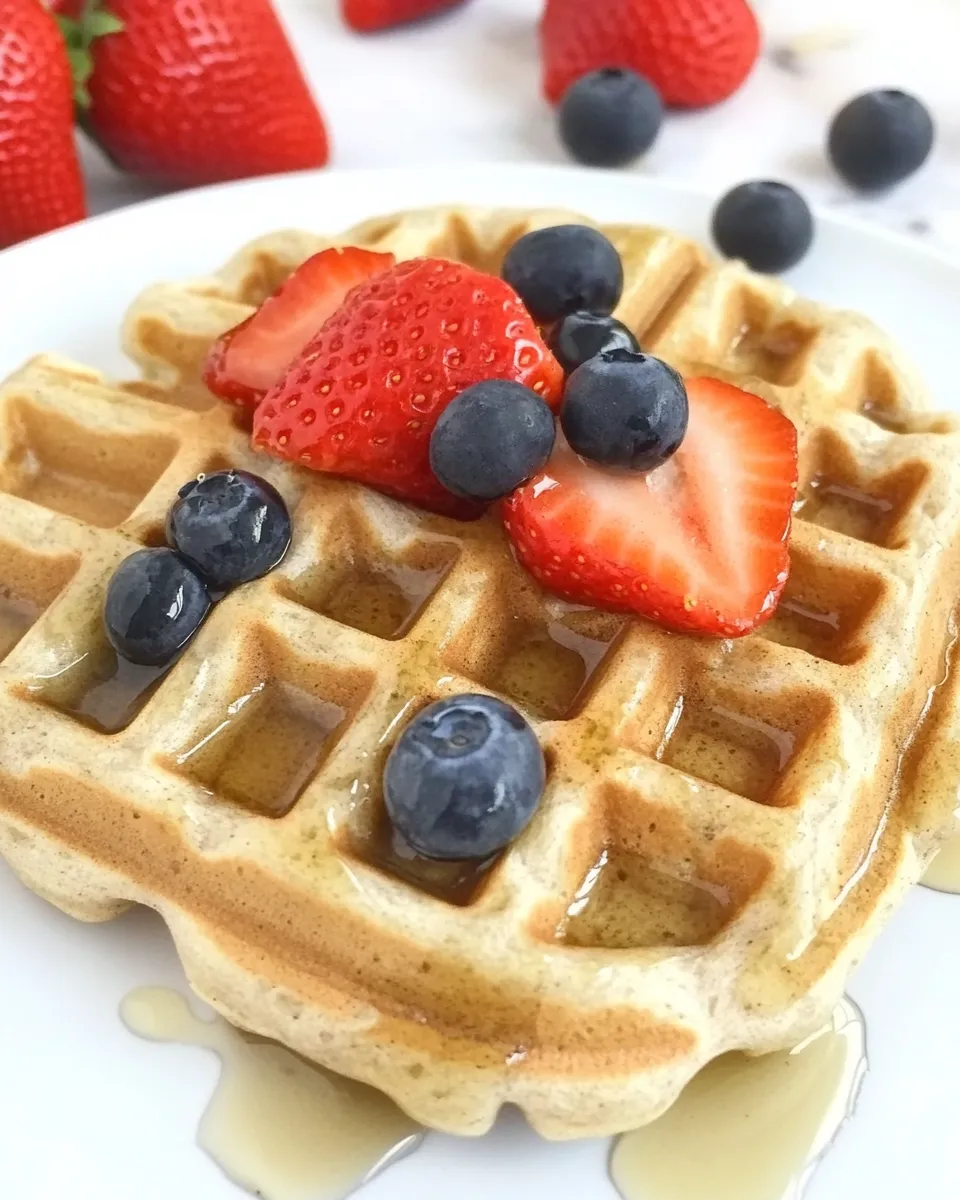
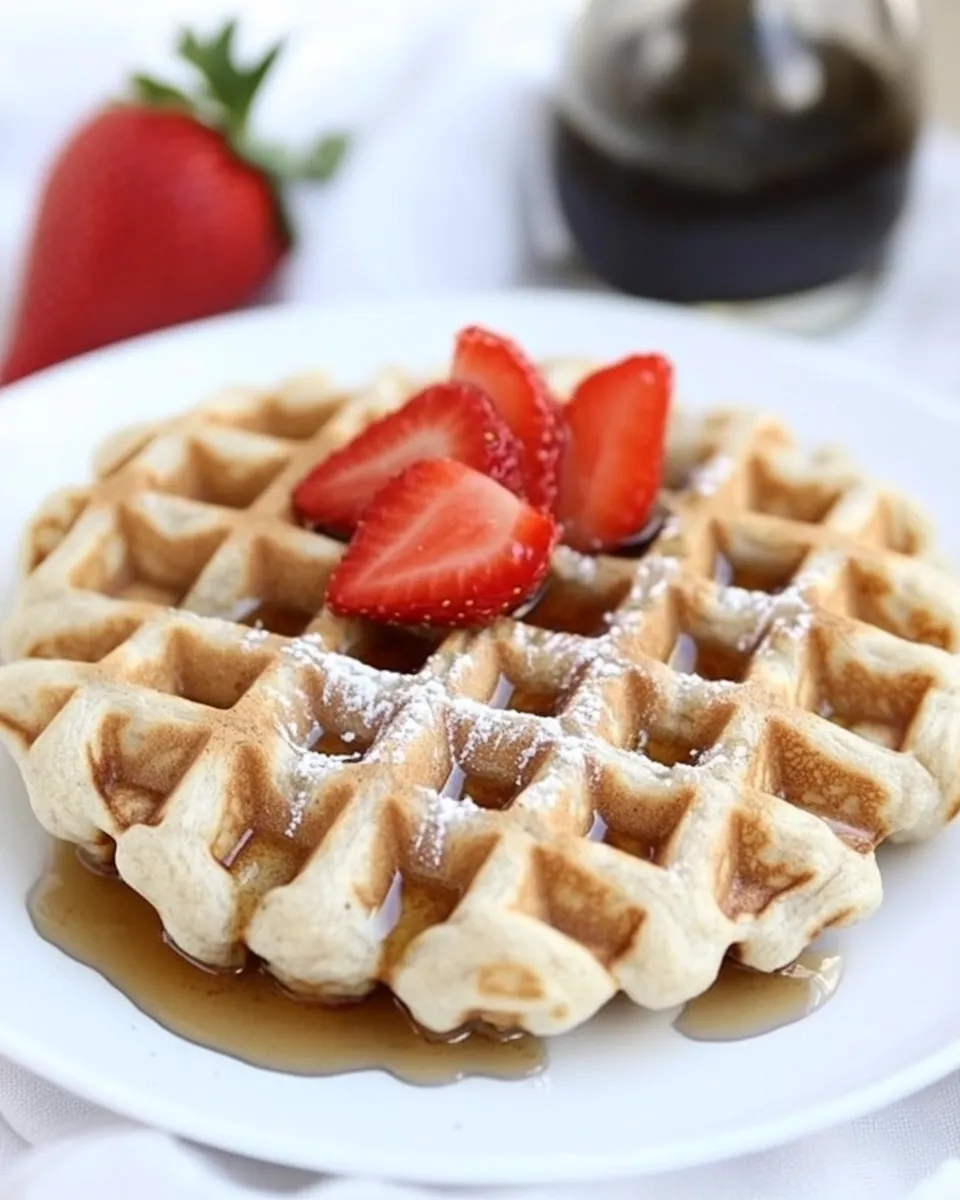
Serve warm with maple on the side, fresh fruit, or a dollop of dairy-free yogurt. Keep a batch in the freezer for busy mornings. These waffles are practical, forgiving, and exactly the kind of recipe I turn to again and again.

Vegan Gluten-Free Waffles (Oil-Free!)
Ingredients
Ingredients
- 1 1/2 cupsdairy-free milk
- 2 Tbsp.ground flaxseed
- 1 Tbsp.pure maple syrup optional
- 1 tsp.vanilla extract
- 1 cupgluten-free all-purpose flour*
- 1 cupalmond flour** super-fine
- 1 Tbsp.baking powder
- 1/4 tsp.ground cinnamon
- 1/4 tsp.salt
Instructions
Instructions
- In a large bowl whisk together 1 1/2 cups dairy-free milk, 2 Tbsp ground flaxseed, 1 Tbsp pure maple syrup (optional), and 1 tsp vanilla extract until combined.
- In a separate bowl stir together 1 cup gluten-free all-purpose flour, 1 cup super-fine almond flour, 1 Tbsp baking powder, 1/4 tsp ground cinnamon, and 1/4 tsp salt.
- Add the dry ingredients to the wet ingredients and whisk until just combined; do not overmix—the batter may be slightly lumpy.
- Let the batter rest for a few minutes while you preheat the waffle iron.
- Preheat the waffle iron to your desired setting (medium to medium-high is recommended) and prepare the surface according to the manufacturer's instructions.
- Using a 1/2-cup measuring cup, scoop batter into the center of the hot waffle iron. Do not overfill—leave a small border from the edge.
- Close the waffle iron and cook without opening for 5–7 minutes, or until steam has completely stopped.
- Carefully remove the cooked waffle and repeat with the remaining batter, reheating or preparing the waffle iron surface as needed between batches.
Equipment
- Large Bowl
- Mixing Bowl
- Whisk
- Measuring cup
- Waffle Iron
Notes
*Flour:
I use Bob's Red Mill gluten-free all-purpose flour. You can substitute oat flour with the all-purpose, but we found them to be slightly crumbly this way.
**Nut-free version:
Omit the almond flour and all-purpose flour, and use 2 cups oat flour for your base. We find this results in denser (but still very tasty!) waffles.
Flavors:
Adjust flavoring as desired (more vanilla extract, cinnamon, or add a touch of almond extract.)
Waffle iron:
My 7-inch round Belgian waffle iron is non-stick and doesn't require oil or spray. Be sure to lightly spray yours if your machine requires it.
Pancake option:
This batter also works well for pancakes!