Smoked Beef Chuck Roast
I’ve been making this Smoked Beef Chuck Roast for years when I want deep, beefy flavor that feeds a crowd without drama. It’s one of those dependable recipes: simple ingredients, patient technique, and a big payoff. If you like a great bark, a tender interior you can slice or pull, and a smoke profile that doesn’t shout but lingers, this roast will become a go-to.
This method leans on time and temperature rather than fancy marinades. You’ll season, smoke low and slow, then wrap and finish to tender perfection. The steps are straightforward, and the few tricks I include will save you stress and give you consistent results.
I write this from test-kitchen experience and late-weekend dinners where timing and taste both mattered. Read through the notes and troubleshooting so you can plan the day around the cook instead of improvising at the last minute.
What Goes Into Smoked Beef Chuck Roast

Ingredients
- 3-4 lb chuck roast — the workhorse of this recipe; plenty of marbling means the roast stays juicy and develops great texture when smoked.
- 2 tablespoons kosher salt — seasons through and supports the dry-brine; kosher salt dissolves and penetrates the meat better than table salt for this application.
- 2 tablespoons ground black pepper — builds the peppery crust; coarse grind gives better texture but use what you have.
Smoked Beef Chuck Roast: How It’s Done
- Place the 3–4 lb chuck roast on a cutting board. Evenly rub 2 tablespoons kosher salt and 2 tablespoons ground black pepper over all sides of the roast.
- If possible, leave the seasoned roast uncovered in the refrigerator for 2 hours up to 24 hours to dry-brine. (This step is optional but improves flavor and bark.)
- If you plan to truss the roast, do so now with butcher’s twine to help it hold shape. Then remove the roast from the refrigerator 45–60 minutes before cooking to come closer to room temperature.
- Preheat your smoker to 225°F. If your smoker has a water pan, fill it with water. Add wood or pellets according to your smoker’s instructions.
- Place the roast on the smoker grate and smoke at 225°F. Begin checking the internal temperature after about 3 hours by inserting a probe into the thickest part of the roast (avoid touching fat or bone). Continue until the roast reaches 160–165°F.
- Remove the roast from the smoker and wrap it tightly in two layers of butcher paper or aluminum foil. Return the wrapped roast to the smoker (place seam-side down).
- Continue smoking the wrapped roast until the internal temperature reaches 208–210°F. Times will vary; monitor the temperature with your probe.
- When the roast reaches 208–210°F, remove it from the smoker and keep it wrapped. Let it rest, wrapped, for 1 hour in an insulated cooler or on a cutting board. The internal temperature will fall during this rest.
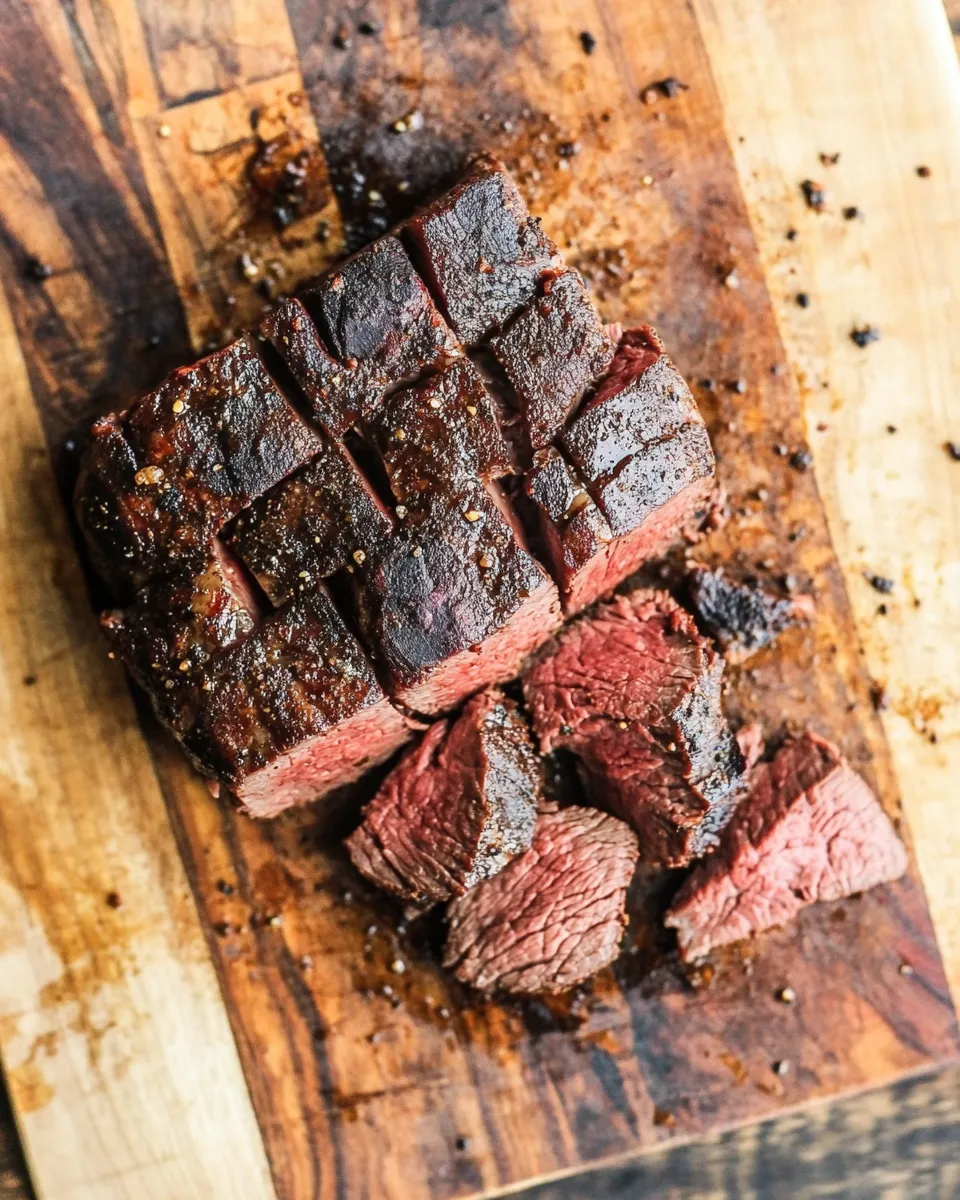
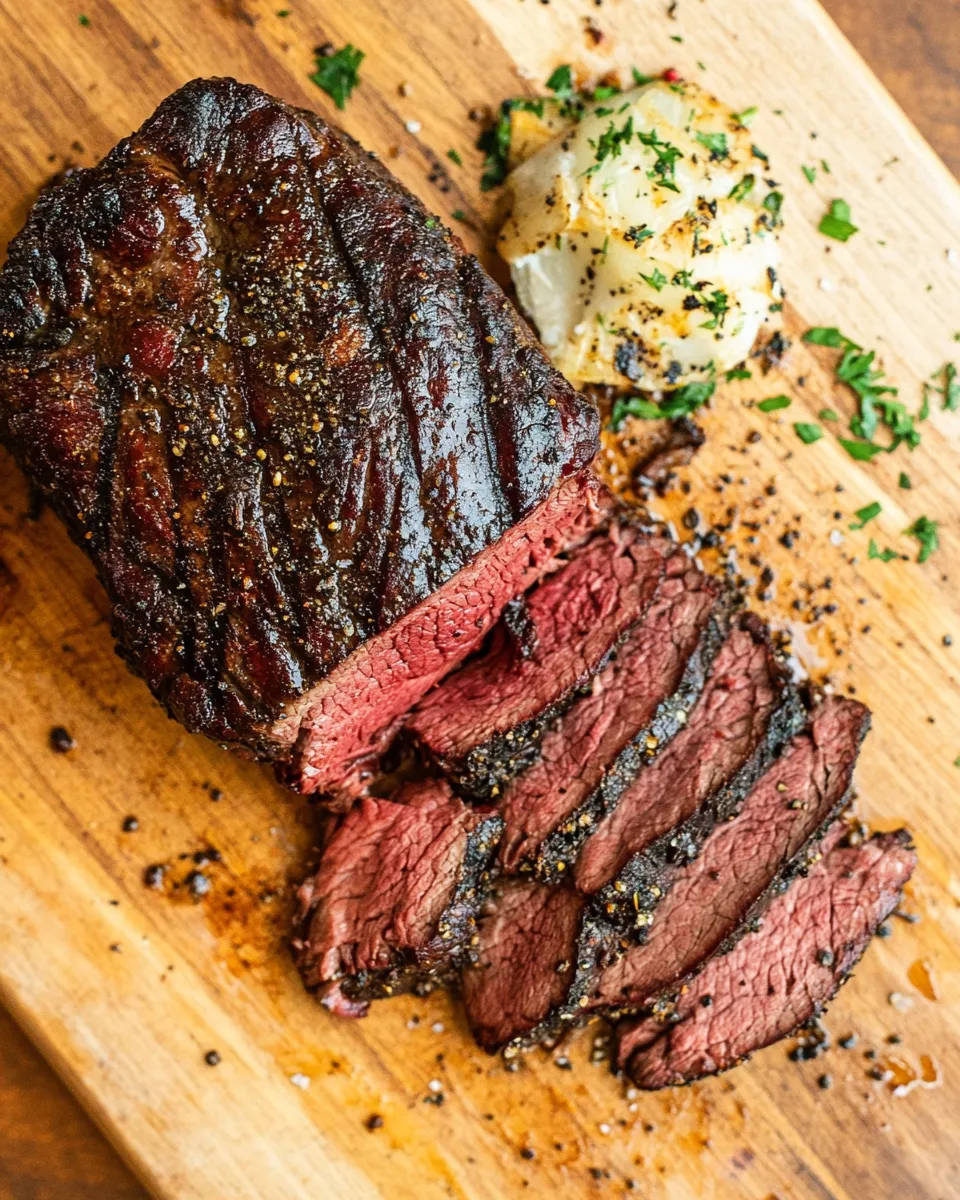
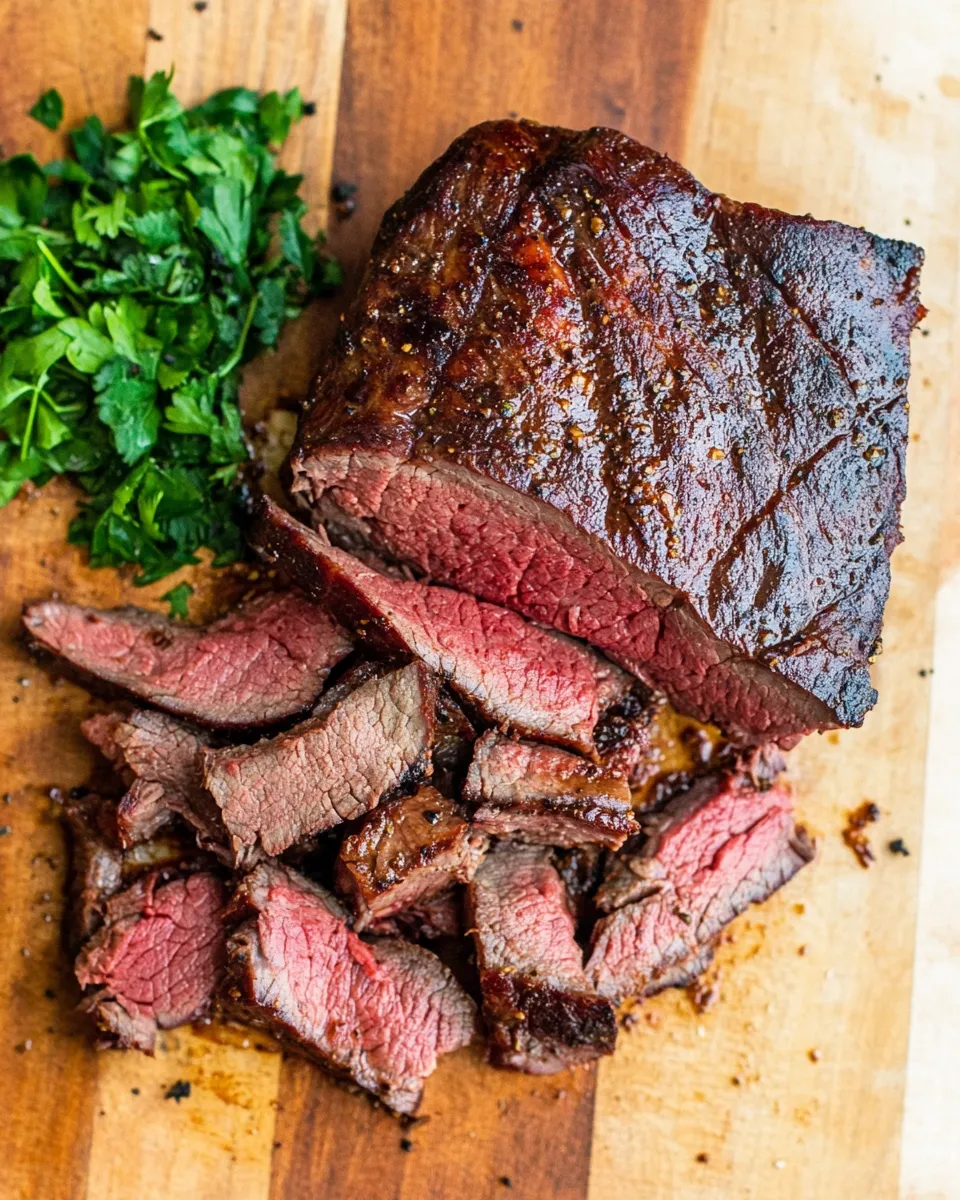
- After resting, unwrap the roast, slice or shred as desired, and serve.
Top Reasons to Make Smoked Beef Chuck Roast
This roast hits several marks at once: it’s economical, forgiving, and offers a lot of flavor for the effort. Chuck roast is fattier than a trimmed roast, which translates to richness and moisture after a long, low smoke. You don’t need fancy ingredients—salt and pepper are enough—but the smoking transforms them into a deep, beefy crust.
It’s also flexible. Serve it sliced for a classic roast dinner, shredded on sandwiches, or chopped into tacos. One roast feeds many and reheats well, which makes it perfect for weekend gatherings or meal prep. Finally, the method scales: a larger or smaller piece follows the same steps, just allow for longer or shorter smoke time.
If You’re Out Of…
No butcher’s twine? Don’t let that stall you. A chuck roast will hold its shape reasonably well without trussing; trussing is only for more even slices and neater presentation. If you’re out of a water pan or your smoker doesn’t have one, monitor the fire and wood so it doesn’t run hot—moisture helps slow evaporation but isn’t mandatory.
Out of butcher paper or foil for wrapping? Use what you have: two layers of foil are fine. Butcher paper breathes better and helps preserve bark; foil will give slightly softer edges on the crust because it traps moisture.
Equipment & Tools
Good tools make this cook predictable. You’ll want a reliable smoker or pellet grill that holds steady at 225°F. A probe thermometer with a long cable or wireless probe is worth the investment; this recipe depends on internal temperature rather than clock time.
Other helpful items: a sturdy cutting board, butcher’s twine if you’ll truss, and either butcher paper or heavy-duty aluminum foil for wrapping. If your smoker has a water pan, use it—it helps maintain stable temps and a humid environment which can slow the drying of the meat surface during the first phase.
Slip-Ups to Skip
Common mistakes and how to avoid them
Don’t rush the smoking phase by increasing the temperature. Higher temps can dry the meat and make it tough instead of tender. Stick to the 225°F target and trust the probe.
Another frequent error is wrapping too early or not wrapping at all. If you wrap before the roast has a good smoke color and reached the 160–165°F range, you’ll stall development of the bark and flavor. Leave it until the specified temperature range.
Avoid probing in different spots repeatedly. Each poke releases juices and can prolong cooking time. Insert the probe into the thickest part once in the early checks and then rely on that same measurement or use a second probe for backup.
Dietary Customizations
This recipe is naturally low in ingredients and high in flexibility. For a low-sodium version, reduce the salt in the initial rub, but know that the salt is part of the dry-brine that enhances texture and flavor; if you cut salt, consider a slightly longer dry-brine time to compensate.
The dish is not suitable for a vegetarian or vegan diet for obvious reasons, but if you’re serving guests with different preferences, smoked vegetables or smoked mushrooms cooked alongside or separately can echo the flavor profile and stand in as hearty mains.
Testing Timeline
Plan for variable timing. At 225°F, an unwrapped chuck roast typically takes about 3 hours before it reaches the 160–165°F range and ready-to-wrap stage, but this can change with roast size, fat content, and smoker performance. Expect a total cook time that often ranges between 6–10 hours depending on those factors, plus a 1-hour rest.
Key checkpoints:
- After seasoning: optional 2–24 hour dry-brine in the refrigerator.
- Pre-smoke: bring to near room temperature for 45–60 minutes.
- First temperature check: begin at about 3 hours, looking for 160–165°F.
- Finish temperature: wrapped, continue until 208–210°F.
- Rest: 1 hour wrapped to redistribute juices.
Leftovers & Meal Prep
Leftover smoked chuck roast is one of the most useful items in the fridge. Slice it thinly for sandwiches, dice it into stews, or shred it for tacos and nachos. The smoke flavor holds up well, and the fat content helps it reheat without drying out.
Store cooled leftovers in airtight containers in the refrigerator for up to 4 days. For longer storage, freeze in meal-sized portions; vacuum-sealed or tightly wrapped slices resist freezer burn better. Reheat gently: low oven (275–300°F) wrapped in foil, or in a skillet with a splash of stock or pan juices to keep things moist. Avoid microwaving straight from frozen; if you must, thaw first for more even reheating.
Troubleshooting Q&A
Q: The roast hit 208°F but the bark seems soft after resting. What happened?
A: If you wrapped in foil and the meat rested in a warm, humid place, the foil can steam the crust. For a firmer bark, unwrap and rest on a rack or use butcher paper which lets the roast breathe. But don’t unwrap too early—resting is crucial for juiciness.
Q: The internal temp stalled for hours around 150–160°F. Is it done?
A: That’s common and called the “stall.” Collagen is breaking down, and evaporative cooling slows temperature rise. Wrapping in paper or foil helps push through the stall; that’s why the recipe tells you to wrap when you reach 160–165°F.
Q: The roast tastes under-seasoned after cooking.
A: For stronger seasoning next time, either give a longer dry-brine (up to 24 hours) or add a finishing sprinkle of salt to slices before serving. Remember that meat seasoned too close to cooking without time to penetrate can taste surface-salty, so adjust based on your experience.
Q: My smoker won’t hold 225°F steady. Now what?
A: Stabilize the smoker as best you can: add a water pan to reduce temperature swings, use fewer vents to control oxygen, or use a secondary heat source like an oven for part of the cook and finish on the smoker for flavor. Alternatively, target a slightly different stable temp and monitor internal temperature closely—consistency matters more than the exact number.
Bring It to the Table
When it’s time to serve, think about texture and temperature. Slice against the grain for the most tender pieces. If you want pulled meat, use forks or your hands to shred while still warm. Keep any jus or pan drippings on hand for a quick au jus or to moisten slices.
Serve with simple sides that let the roast shine: roasted potatoes, a crisp slaw, or charred vegetables. Bread and pickles make excellent accompaniment for shredded sandwiches. If you want to dress up the plate, a spoonful of horseradish cream or chimichurri complements the smoke and beefiness without overwhelming it.
Final practical note: give yourself time. This roast rewards patience. Start early, monitor the temperature rather than the clock, and use the rest period as your friend. The result is reliably rich, deeply flavored beef that feeds a group and makes great leftovers. Enjoy.
Smoked Beef Chuck Roast
Ingredients
Ingredients
- ?3-4 lbchuck roast
- ?2 tablespoonskosher salt
- ?2 tablespoonsground black pepper
Instructions
Instructions
- Place the 3–4 lb chuck roast on a cutting board. Evenly rub 2 tablespoons kosher salt and 2 tablespoons ground black pepper over all sides of the roast.
- If possible, leave the seasoned roast uncovered in the refrigerator for 2 hours up to 24 hours to dry-brine. (This step is optional but improves flavor and bark.)
- If you plan to truss the roast, do so now with butcher’s twine to help it hold shape. Then remove the roast from the refrigerator 45–60 minutes before cooking to come closer to room temperature.
- Preheat your smoker to 225°F. If your smoker has a water pan, fill it with water. Add wood or pellets according to your smoker’s instructions.
- Place the roast on the smoker grate and smoke at 225°F. Begin checking the internal temperature after about 3 hours by inserting a probe into the thickest part of the roast (avoid touching fat or bone). Continue until the roast reaches 160–165°F.
- Remove the roast from the smoker and wrap it tightly in two layers of butcher paper or aluminum foil. Return the wrapped roast to the smoker (place seam-side down).
- Continue smoking the wrapped roast until the internal temperature reaches 208–210°F. Times will vary; monitor the temperature with your probe.
- When the roast reaches 208–210°F, remove it from the smoker and keep it wrapped. Let it rest, wrapped, for 1 hour in an insulated cooler or on a cutting board. The internal temperature will fall during this rest.
- After resting, unwrap the roast, slice or shred as desired, and serve.
Equipment
- Probe
- Butcher paper or foil
- Tongs
Notes
Avoid placing the smoker under direct sun on a hot day as probing might give you false readings. Reposition the smoker to a shaded or cloudy area.
We used oak wood for this recipe.
I usually season with equal parts of salt and pepper for Texas-style BBQ flavor, and sometimes add garlic powder. But if I’m doing for a barbecue0style rub, I use paprika, cayenne, brown sugar, mustard powder, garlic and onion powders.
Low and slow is the best way to smoke meats. This really allows the flavor of the seasonings and the wood to penetrate into the meat and it becomes packed full of flavor.
Always make sure to check the steam pot and fill it with water as needed. It is important to maintain a high moisture level within the smoker.