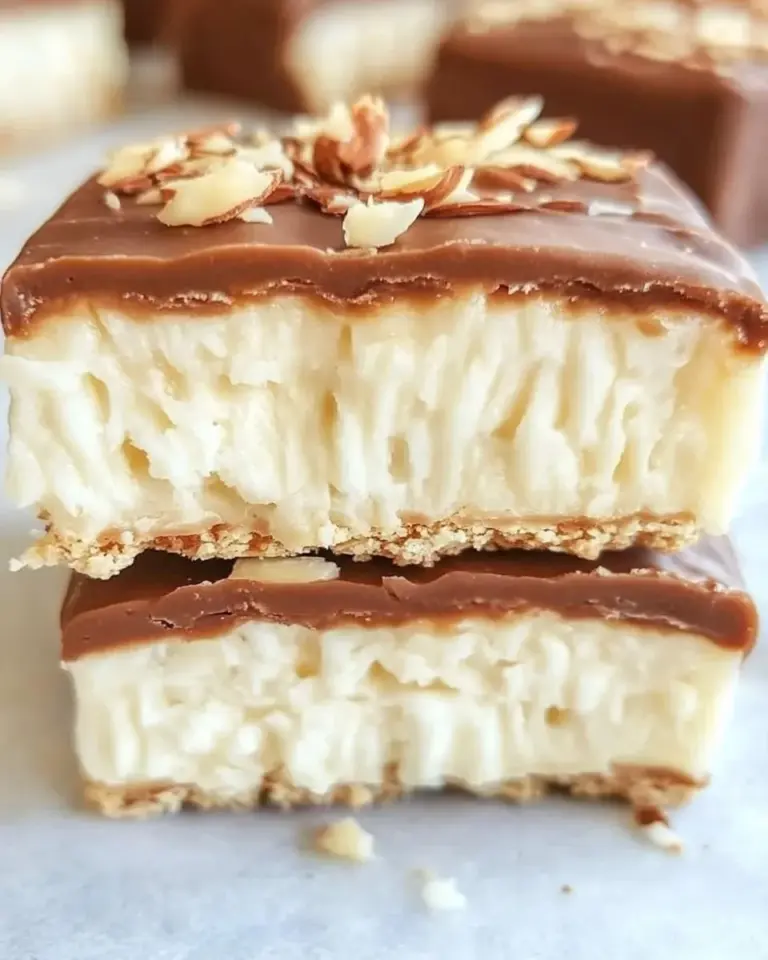
Red Velvet Oreo Fudge
This Red Velvet Oreo Fudge is the kind of no-fuss, crowd-pleasing treat I reach for when I need something festive without hours in the kitchen. It dresses up classic sweetened condensed milk fudge with white and semi-sweet chocolate, mini marshmallows, and a generous amount of crushed Oreos. The result is creamy, slightly chewy, and studded with cookie crunch — bright red and impossible to ignore.
I test recipes on real timelines: busy weeknights, last-minute party prep, and school bake sales. This fudge is forgiving. It asks for patience while it sets, but not precision while cooking. If you can melt, fold, and press, you’ll get reliably good results. I’ll walk you through everything from ingredients and gear to troubleshooting so you can make a perfect batch the first time.
Scroll down for clear, numbered steps and a dedicated ingredients list. I keep tips practical and short: what to watch for, what to avoid, and quick fixes when the texture or color isn’t cooperating. Let’s get to it — you’re one pan away from a plate full of red velvet Oreo magic.
The Essentials

Before you start, gather the ingredients and equipment. The recipe relies on melting chocolate and marshmallows slowly into sweetened condensed milk, then folding in crushed Oreos. Temperature control is the key: low and steady heat prevents scorching and keeps the texture silky.
Make sure your Oreos are mostly uniform crumbs, and reserve some for a crunchy topping. An 8×8-inch pan makes a slab that’s easy to slice; use parchment with an overhang for clean removal. The chill time is significant — plan for about 4 hours in the fridge so the fudge firms up properly.
Ingredients
- 1 can sweetened condensed milk, 14 oz. — the sweet, creamy base that gives fudge its dense, chewy texture; do not substitute evaporated milk.
- 2 c white chocolate chips — melts into a smooth, sweet matrix and helps set the red velvet color.
- 1 c semi-sweet chocolate chips — adds a touch of chocolate depth so the sweetness isn’t one-dimensional.
- 2 c mini marshmallows — contribute to chewiness and help create a glossy, set surface once melted.
- 2 T unsalted butter, sliced into smaller pieces — adds shine and a silkier mouthfeel; use unsalted to control salt level.
- ½ tsp vanilla extract — brightens flavors and balances the sweetness.
- 1 tsp red food coloring, more or less as desired — gives that classic red velvet hue; add gradually to reach your preferred color.
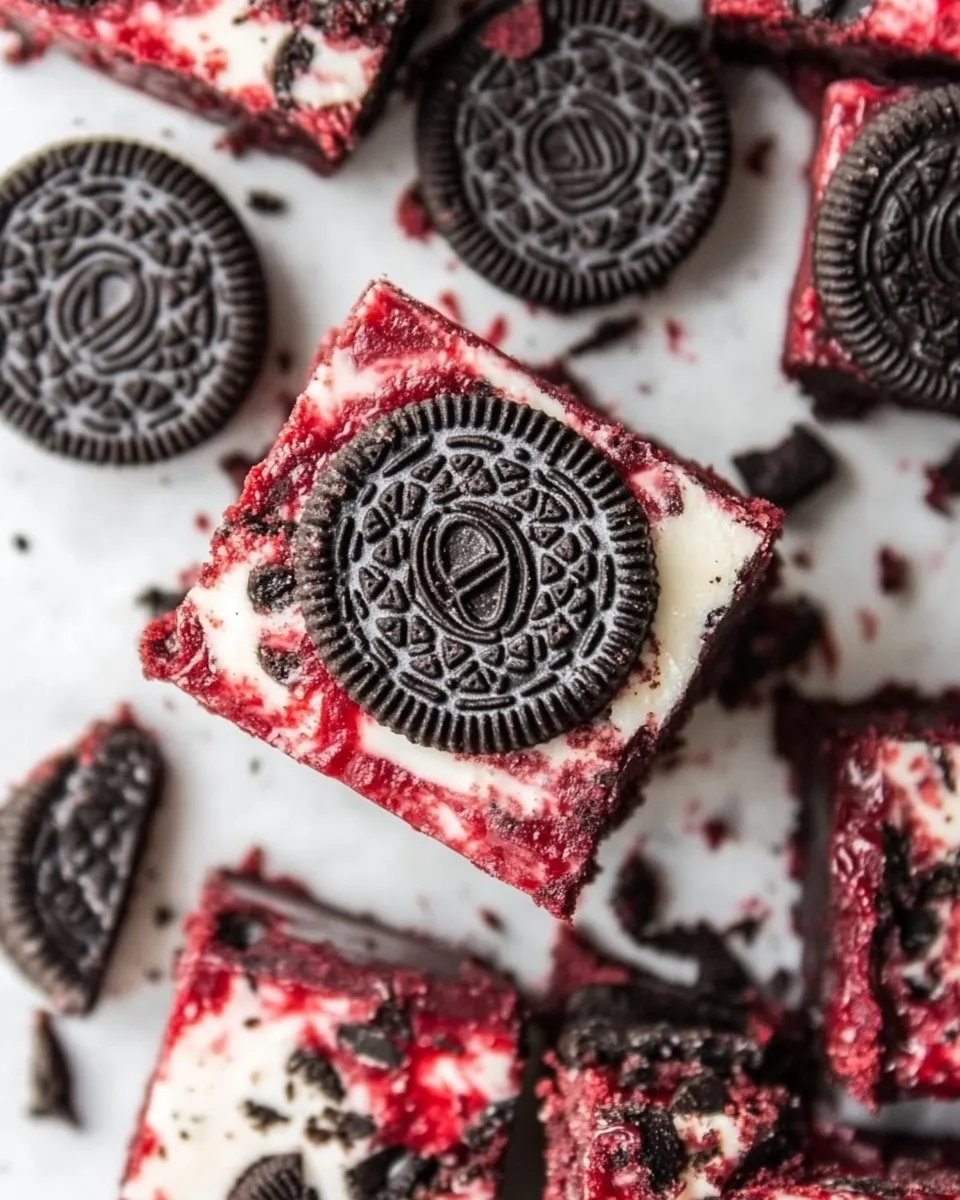
- 2½ c crushed Oreos (about 24-28 Oreos), more as desired — provides the cookie crunch throughout; reserve about ½ cup for topping.
Red Velvet Oreo Fudge: From Prep to Plate
- Line an 8×8-inch baking pan with parchment paper, leaving an overhang on two opposite sides for easy removal; set the pan aside.
- Place the Oreos in a sturdy, resealable plastic bag and crush them with a rolling pin or a heavy spoon until mostly uniform crumbs. Measure out 2½ cups crushed Oreos (about 24–28 Oreos). Reserve about ½ cup for the topping and set the remaining ~2 cups aside for the fudge mixture.
- In a medium saucepan, combine 1 can (14 oz) sweetened condensed milk, 2 cups white chocolate chips, 1 cup semi-sweet chocolate chips, 2 cups mini marshmallows, and 2 tablespoons unsalted butter (sliced into smaller pieces). Note: do not use evaporated milk.
- Heat the saucepan over low to medium-low heat. Stir constantly and scrape the bottom and sides with a heatproof spatula until all chips and marshmallows are fully melted and the mixture is smooth, about 8–10 minutes. Keep the heat low to prevent scorching.
- Remove the pan from the heat. Stir in ½ teaspoon vanilla extract and 1 teaspoon red food coloring (add more or less as desired), mixing until the color is evenly distributed.
- Fold the reserved ~2 cups crushed Oreos into the melted mixture until evenly incorporated.
- Pour the mixture into the prepared parchment-lined pan and spread it evenly with a spatula. Tap the pan gently on the counter a few times to remove air pockets and help it settle.
- Sprinkle the reserved ~½ cup crushed Oreos evenly over the top and gently press them into the surface so they adhere.
- Refrigerate the pan for about 4 hours, or until the fudge is fully set and firm.
- Use the parchment overhang to lift the fudge from the pan. Place on a cutting board and slice into desired pieces. (If you cut 1-inch pieces, you can get about 64 pieces.) Enjoy.
Why You’ll Love This Recipe
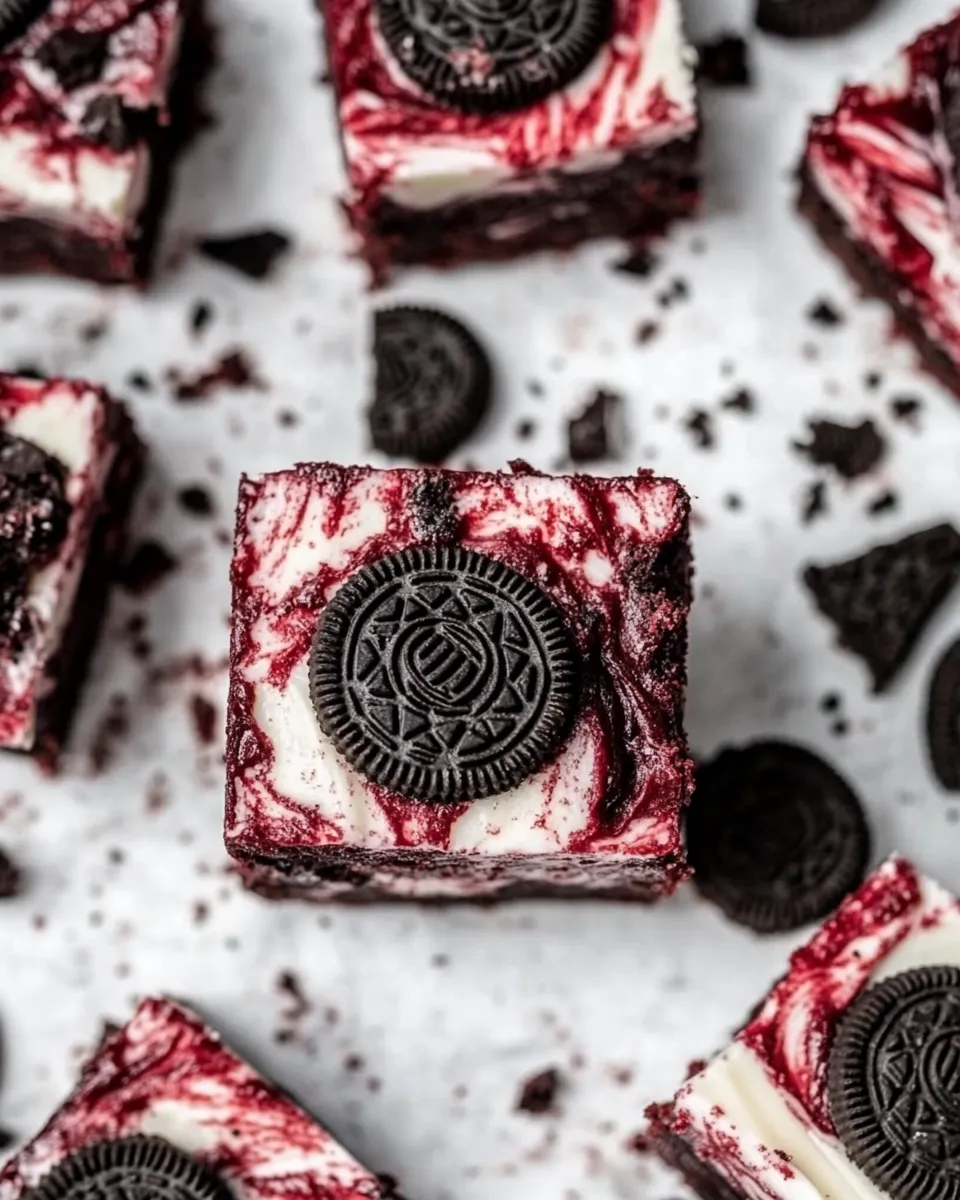
This fudge hits a satisfying balance of textures: silky base, signature chew from marshmallows, and Oreo crunch throughout. The white chocolate keeps the flavor bright so the red food coloring isn’t just cosmetic — the candy-like sweetness is real but countered by semi-sweet chips and cookies.
It’s also extremely adaptable. The steps are straightforward and forgiving: controlled melting and a gentle fold is all you need. There’s no tempering, no baking, and no precision timing beyond the chill. That makes it ideal for beginner bakers, busy hosts, or anyone who wants an impressive plate of sweets without the stress.
International Equivalents
I like to keep these conversions practical rather than obsessively precise. If you prefer metric, use the common equivalents people rely on in home kitchens:
- 1 can sweetened condensed milk (14 oz) ≈ 394–397 grams.
- 1 cup (c) ≈ 240 milliliters by volume. So 2 cups white chocolate chips ≈ 480 ml by volume; keep in mind weight can vary by chip shape.
- For the Oreos, count by pieces: 24–28 Oreos ≈ 2½ cups crushed. If you’re using kitchen scales, start with roughly 240–300 grams of cookies and adjust by eye.
These are approximations for home use. If you bake professionally or need precise weights, weigh your ingredient packages the first time and note them for future batches.
Kitchen Gear Checklist
- 8×8-inch baking pan — for an even slab that slices neatly.
- Parchment paper — with an overhang for easy removal.
- Medium saucepan — heavy-bottomed to prevent hot spots and burning.
- Heatproof spatula — for constant scraping while melting.
- Resealable plastic bag and rolling pin or heavy spoon — to crush Oreos evenly.
- Measuring cups and spoons — accurate portions matter for texture.
- Refrigerator space — you’ll need about 4 hours for the fudge to set.
Watch Outs & How to Fix
Heat too high: if the chocolate or milk scalds, you’ll notice a grainy texture or burnt smell. Fix: transfer the mixture to a cool bowl and stir vigorously to help smooth it. If that fails, salvage what you can by folding in a small extra splash of sweetened condensed milk (if you have another can) over very low heat.
Too thin: if your mixture seems runny after cooling slightly, it may simply need more time in the fridge. If it’s still loose after several hours, return it to very low heat and stir in a small handful of white chocolate chips until it thickens, then pour back into the pan.
Lumps of unmelted chips or marshmallows: keep stirring and scraping the bottom; steady, gentle heat will smooth them. If marshmallow bits remain, a quick whisk off heat can help, but avoid aerating the mixture too much — you want density, not fluff.
Color too pale or uneven: add more red food coloring in small increments and stir thoroughly. Gel food colors give more vibrant results with less liquid, which helps texture.
Holiday-Friendly Variations
Think of this recipe as a template. Here are simple, season-ready swaps or additions you can make without changing the structure:
- Valentine’s Day: press heart-shaped sprinkles into the top along with the reserved Oreos for visual flair.
- Christmas: fold in a tablespoon of crushed peppermint candies with the Oreos or top with candy cane pieces for a minty contrast.
- Halloween: use black sanding sugar on top instead of the reserved Oreos, and reduce the red food coloring for a darker, spooky slab.
These tweaks are optional and don’t alter cooking times. Keep additions light so they don’t interfere with setting.
Method to the Madness
Melting & combining
Patience is the method here. Low to medium-low heat and constant stirring are the only non-negotiables. The mini marshmallows act as a binder and glossy component; the butter softens the texture so the fudge isn’t stiff. Remove from heat as soon as everything is melted and smooth — residual heat will finish the job.
Folding & setting
Fold the crushed Oreos in gently but thoroughly so they distribute without clumping. Pressing the top with a spatula after sprinkling the reserved crumbs helps them adhere and gives you a neat finish. The fridge does the rest: four hours is the standard, longer if your fridge is warm or the slab is thick.
Store, Freeze & Reheat
Store: Keep fudge chilled in an airtight container. It will hold well in the refrigerator for up to 2 weeks; bring to room temperature briefly before serving for a softer bite.
Freeze: For longer storage, wrap individual pieces in plastic wrap, then place them in a freezer-safe container or bag for up to 3 months. Thaw overnight in the refrigerator and bring to room temperature before serving.
Reheat: Fudge isn’t meant to be reheated like brownies. If you prefer a softer texture, let pieces sit at room temperature for 20–30 minutes. Avoid microwaving unless you want a melty, spoonable version; heat in 5–10 second bursts and watch it closely.
Helpful Q&A
Q: Can I use full-size marshmallows instead of mini? A: Yes. Use the same volume; extra-large marshmallow pieces may need a bit more time to melt. Tear them into smaller pieces for faster, even melting.
Q: Can I skip the semi-sweet chocolate chips? A: You can, but the semi-sweet chips balance the sweetness of the white chocolate and condensed milk. If you omit them, the fudge will be sweeter and less complex.
Q: What if I don’t have red food coloring? A: The fudge will still be tasty without the red color — it will be a pinkish/ivory hue depending on how many chocolate chips you included. For true red velvet color, gel or concentrated food coloring works best.
The Last Word
If you want a showy, sharable treat that’s simple to pull together, this Red Velvet Oreo Fudge delivers. It’s forgiving, fast on active time, and easy to scale. I like to make a double batch in a 9×13-inch pan for larger gatherings, but the 8×8 keeps portion control friendly and makes gifting manageable.
Make it your own with a few small mix-ins or decorative toppings, but start with the recipe as written the first time. Follow the low-and-slow melting method, give it the chill time it needs, and you’ll have glossy, sliceable fudge with Oreo surprise in every bite. Happy baking — and even happier sharing.
Red Velvet Oreo Fudge
Ingredients
Ingredients
- 1 can sweetened condensed milk 14 oz.
- 2 cwhite chocolate chips
- 1 csemi-sweet chocolate chips
- 2 cmini marshmallows
- 2 Tunsalted butter sliced into smaller pieces
- 1/2 tspvanilla extract
- 1 tspred food coloring more or less as desired
- 2 1/2 ccrushed Oreos about 24-28 Oreos, more as desired
Instructions
Instructions
- Line an 8×8-inch baking pan with parchment paper, leaving an overhang on two opposite sides for easy removal; set the pan aside.
- Place the Oreos in a sturdy, resealable plastic bag and crush them with a rolling pin or a heavy spoon until mostly uniform crumbs. Measure out 2½ cups crushed Oreos (about 24–28 Oreos). Reserve about ½ cup for the topping and set the remaining ~2 cups aside for the fudge mixture.
- In a medium saucepan, combine 1 can (14 oz) sweetened condensed milk, 2 cups white chocolate chips, 1 cup semi-sweet chocolate chips, 2 cups mini marshmallows, and 2 tablespoons unsalted butter (sliced into smaller pieces). Note: do not use evaporated milk.
- Heat the saucepan over low to medium-low heat. Stir constantly and scrape the bottom and sides with a heatproof spatula until all chips and marshmallows are fully melted and the mixture is smooth, about 8–10 minutes. Keep the heat low to prevent scorching.
- Remove the pan from the heat. Stir in ½ teaspoon vanilla extract and 1 teaspoon red food coloring (add more or less as desired), mixing until the color is evenly distributed.
- Fold the reserved ~2 cups crushed Oreos into the melted mixture until evenly incorporated.
- Pour the mixture into the prepared parchment-lined pan and spread it evenly with a spatula. Tap the pan gently on the counter a few times to remove air pockets and help it settle.
- Sprinkle the reserved ~½ cup crushed Oreos evenly over the top and gently press them into the surface so they adhere.
- Refrigerate the pan for about 4 hours, or until the fudge is fully set and firm.
- Use the parchment overhang to lift the fudge from the pan. Place on a cutting board and slice into desired pieces. (If you cut 1-inch pieces, you can get about 64 pieces.) Enjoy.
Equipment
- 8x8-inch baking pan
- Parchment Paper
- Resealable Plastic Bag
- rolling pin or heavy spoon
- Medium Saucepan
- heatproof spatula
- Spatula
- Cutting Board
Notes
Do not step away from the stove.This red velvet Oreo fudge is fairly foolproof but if you walk away from it, you are playing with fire. If the chocolate gets too hot, it’s not going to work out. Stay by the oven and stir it constantly so that you don’t risk the chocolate burning in any way.
While you could make this in the microwave, I don’t recommend it.There are lots of fudge recipes that use the microwave to melt it all. You technically could use a microwave safe bowl and follow the directions but using 25 second bursts and stirring in between. I find it not as safe of an option as its more likely to overcook.