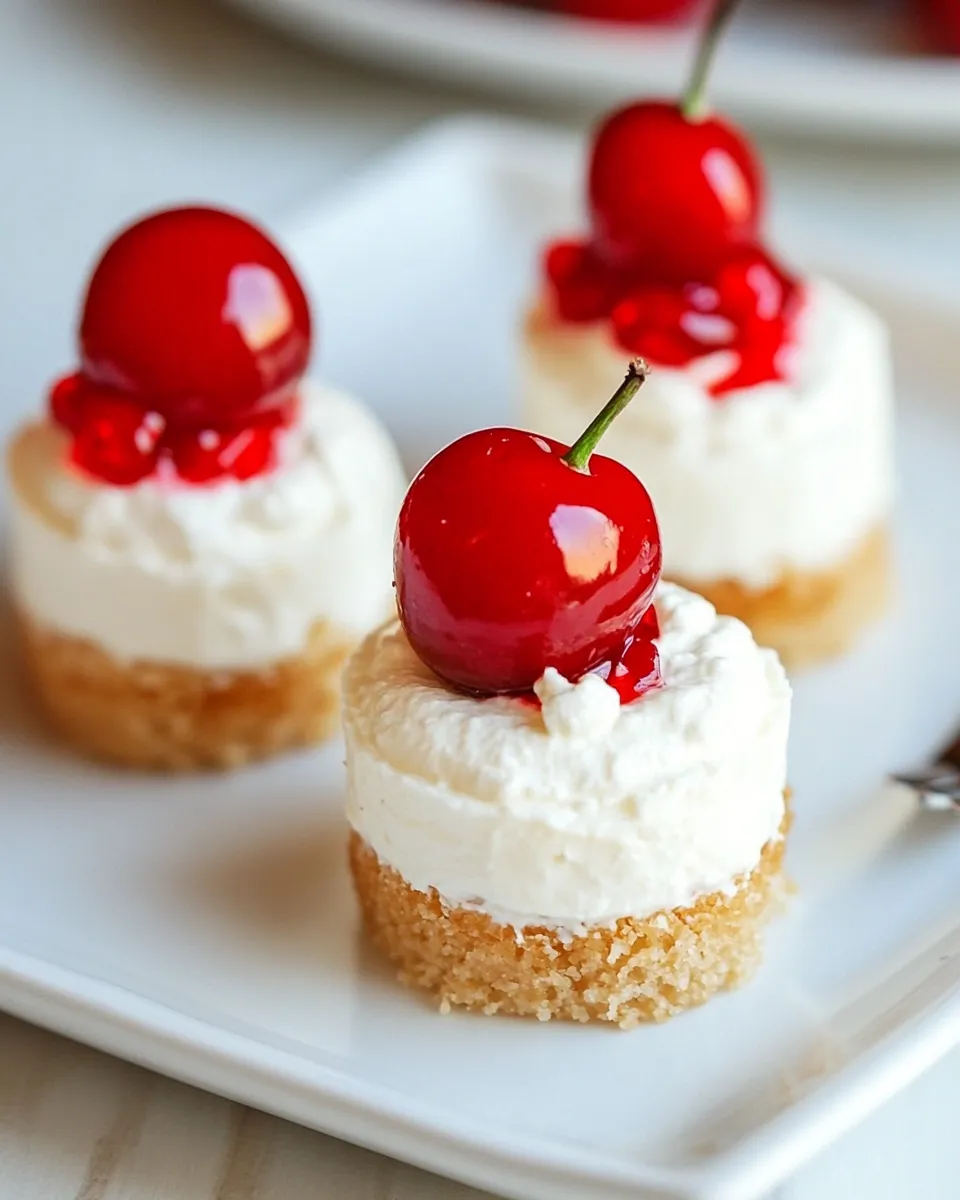
No-Bake Mini Cheesecakes Recipe
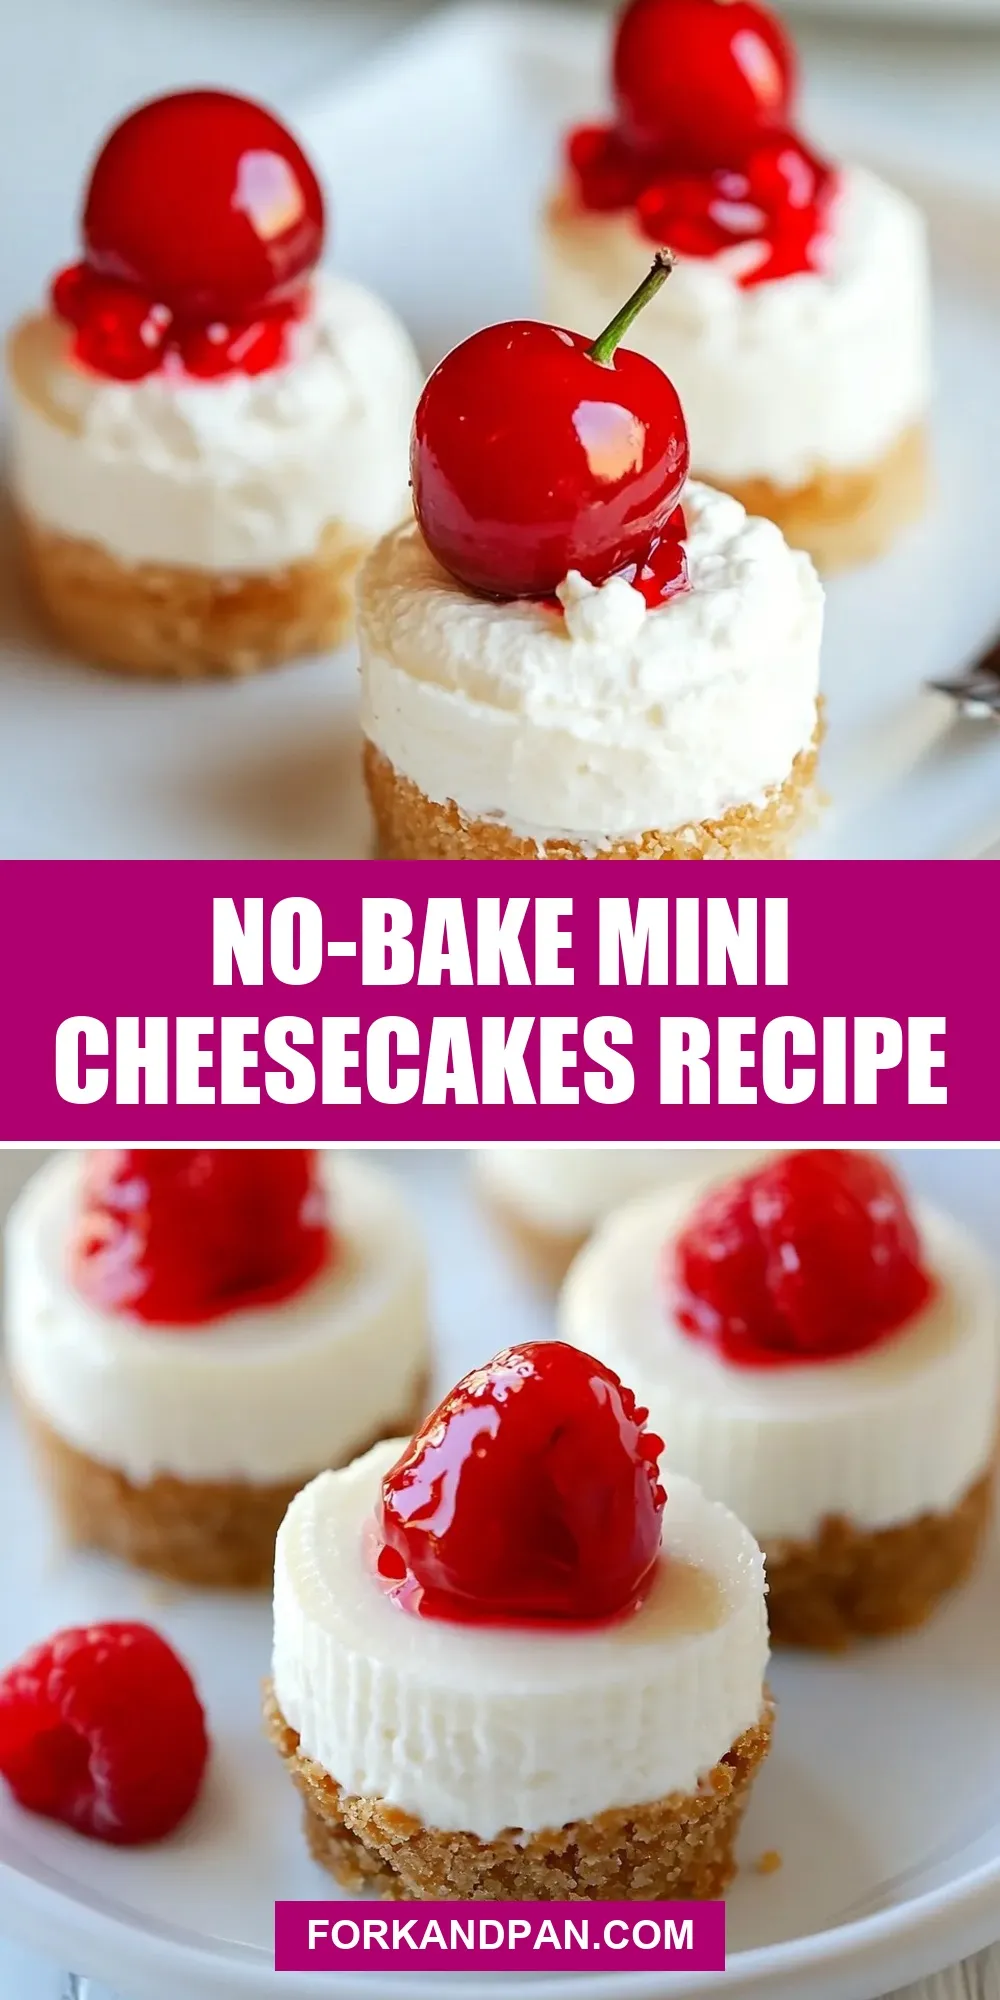
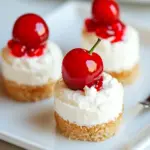
These no-bake mini cheesecakes are a small-batch celebration: creamy, reliably simple, and easy to refrigerate ahead. I turn to this recipe when I need an elegant dessert without firing up the oven. The texture is smooth and light, the crust holds up, and the cherry topping is the familiar, bright finish everyone reaches for first.
I like making them in a muffin tin with paper liners — they travel well and look neat on a platter. The recipe is forgiving: room-temperature cream cheese, a whipped cream fold, and a short chilling window do most of the work. You don’t need a springform pan or special skills; just attention to a few details.
Below you’ll find the exact ingredient list and step-by-step directions I use every time, plus practical tips for substitutions, storage, presentation, and troubleshooting. Read the cooking guide once through, then work straight through the ordered steps.
What We’re Using

Short, practical list of what appears in the recipe and why. This section bridges the pantry to the method — think crust, cream base, and topping. If you’ve got all these on hand, you’ll be moving fast.
Ingredients
- 1 1/2 cups graham cracker crumbs, 12 whole crackers — the base for the crust; the crumbs should be fine but not powdery for better texture.
- 1 Tbsp granulated sugar — sweetens the crust and helps it bind with butter.
- 8 Tbsp unsalted butter, 1 stick, melted — moistens and sets the crust when chilled; use unsalted to control salt level.
- 16 oz cream cheese, (2) 8-oz blocks, room temperature — the main flavor and structure; room temperature prevents lumps.
- 2/3 cup granulated sugar — sweetens the filling; adjust slightly to taste but stick to the recipe for best texture.
- 2 Tbsp sour cream — adds tang and loosens the filling for a creamier mouthfeel.
- 2 Tbsp lemon juice, freshly squeezed — brightens the filling and balances richness.
- 1 cup heavy whipping cream — whipped and folded in to lighten the cheesecake filling.
- Cherry Topping — ready-made or homemade topping to spoon over each cheesecake before serving.
Mini Cheesecakes Cooking Guide
- Line a muffin tin with paper liners (one liner per cheesecake). If you don’t have space for all the cheesecakes in the tin, place the extra ones in small ramekins.
- In a medium bowl, combine 1 1/2 cups graham cracker crumbs and 1 Tbsp granulated sugar. Add 8 Tbsp melted unsalted butter and stir until the crumbs are evenly moistened.
- Divide the crumb mixture evenly among the lined muffin cups (a trigger-release ice cream scoop or a 2 Tbsp measure can help). Press the crumbs firmly and evenly into the bottom of each liner to form the crust.
- In a large bowl, beat 16 oz cream cheese (two 8-oz blocks at room temperature) and 2/3 cup granulated sugar with an electric hand mixer on medium‑high speed for about 3 minutes, until smooth and fluffy, scraping down the bowl as needed.
- Add 2 Tbsp sour cream and 2 Tbsp freshly squeezed lemon juice to the cream cheese mixture and beat for about 1 minute until well incorporated.
- In a separate large, clean bowl, beat 1 cup heavy whipping cream on medium‑high speed until stiff peaks form (about 3 minutes).
- Gently fold the whipped cream into the cream cheese mixture with a spatula until fully combined, scraping the bottom of the bowl as you fold.
- Divide the cheesecake filling evenly among the prepared crusts, smoothing the tops so the filling is about level with the tops of the liners.
- Refrigerate the mini cheesecakes for at least 6 hours or overnight. After about 2 hours in the refrigerator, loosely cover the pan with plastic wrap to prevent drying.
- Prepare the Cherry Topping, set it aside to cool to room temperature, then cover and refrigerate until ready to serve.
- To serve, remove the liners from the mini cheesecakes, spoon the cooled cherry topping over each, and enjoy.
Why This Recipe is a Keeper
This no-bake method gives reliably smooth texture without oven time or water baths. The whipped cream fold keeps the filling light so the mini format never feels heavy. It’s also scalable: make a few for a small dinner party or a whole tray when you need crowd-pleasing ease.
The components are familiar and pantry-friendly: graham crumbs, butter, cream cheese, and whipped cream. That makes substitutions straightforward, and the assembly is fast once the crusts are pressed. If you double the batch, the most time-consuming part is waiting for the chill — but you can prepare the crusts and filling separately the day before.
Healthier Substitutions

If you want a lighter version, consider these swaps. Keep in mind texture and set may change, so I recommend testing on a small batch first.
- Light cream cheese — reduces fat but can be slightly less stable; chill thoroughly before serving.
- Greek yogurt in place of sour cream — similar tang with added protein; use full-fat or 2% for better texture.
- Reduced-fat whipped topping — can replace heavy cream but expect a softer structure and slightly different mouthfeel.
- Whole-grain or oat crackers for crumbs — substitutes for graham crackers for more fiber; flavor will be nuttier.
Kitchen Gear Checklist
- Muffin tin — standard 12-cup works well for uniform minis.
- Paper liners — make removal easy and keep cheesecakes tidy.
- Electric hand mixer — speeds up creaming the cheese and whipping cream.
- Mixing bowls — at least two: one for crust, one for filling, and another for whipping if you like to keep things separate.
- Spatula and spoon/ice cream scoop — a trigger-release scoop or 2 Tbsp measure helps portion evenly.
- Measuring cups and spoons — accurate measuring helps texture and set.
What Not to Do
Avoid these common mistakes that ruin texture or presentation:
- Don’t use cold cream cheese. Cold blocks lump and won’t whip smooth; let them sit at room temperature.
- Don’t overbeat the whipped cream. Overwhipping will become grainy and butter-like; stop when stiff peaks form.
- Don’t skip pressing the crust firmly. Loose crumbs fall apart when serving; press evenly for a stable base.
- Don’t rush the chill time. The filling needs time to set; less than 6 hours and the minis may be too soft to remove cleanly.
- Don’t add the topping while it’s hot. Warm topping can melt the filling and create a soggy top; cool the topping first.
Year-Round Variations
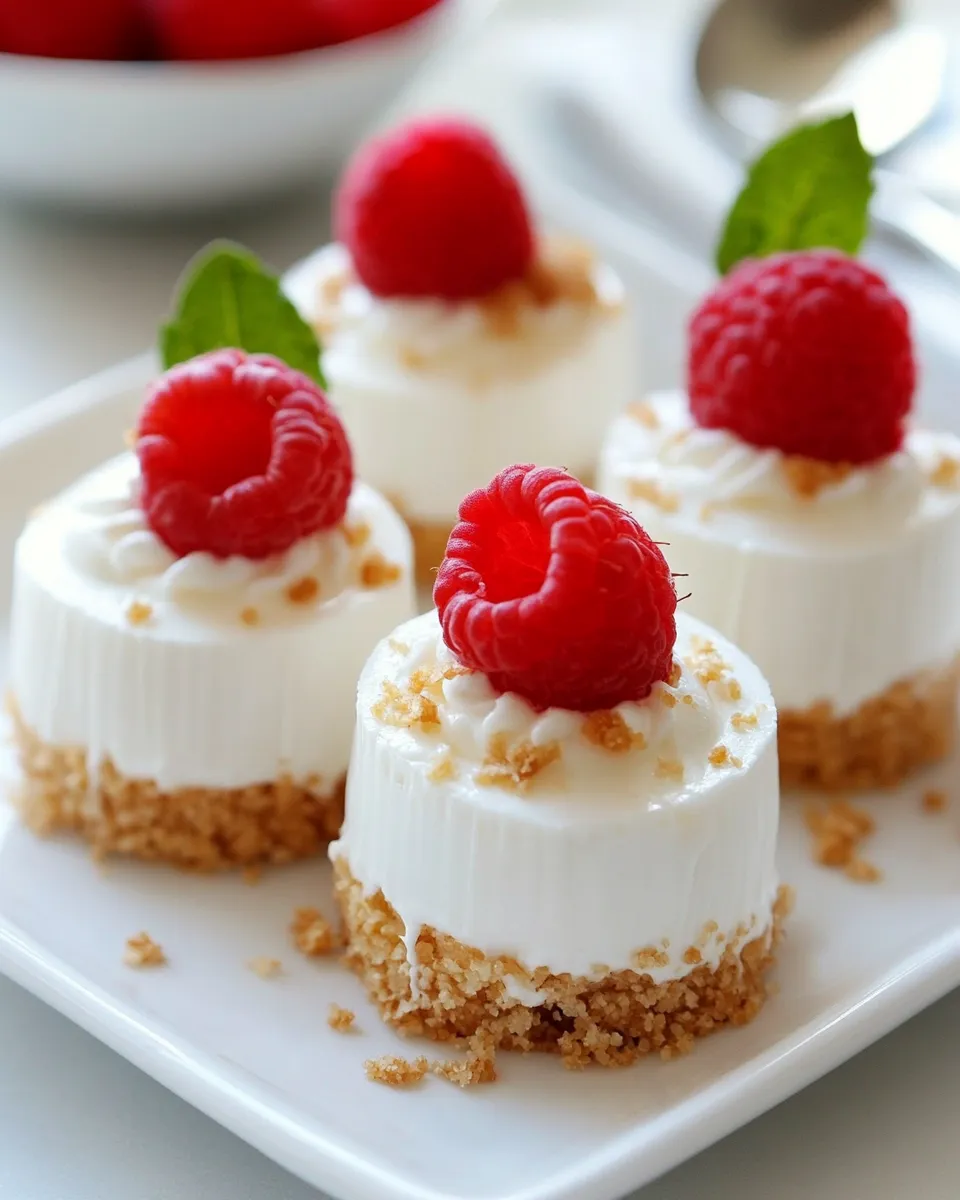
Mini cheesecakes are a great canvas. Change the topping or a small component to reflect the season without changing the method.
- Summer — fresh berry compote, sliced peaches, or mixed berries with a drizzle of honey.
- Fall — spiced apple topping with a pinch of cinnamon and nutmeg over the cream filling.
- Winter — cranberry-orange compote or a chocolate ganache spooned over each mini.
- Spring — lemon curd or a rhubarb compote for bright, tangy contrast.
Author’s Commentary
I rely on this recipe when I want something pretty but low-effort. The trick is in the details: very soft cream cheese, properly whipped cream, and a chilled set. Once I started using a trigger-release scoop to portion the crusts and filling, the minis came out uniform every time. Presentation is effortless — remove the liners, top with cherries, and you’ve got little desserts that look like you spent hours.
When I teach friends this recipe, I emphasize rhythm: make crusts, set them while you beat the filling, fold the whipped cream gently, then assemble and refrigerate. It’s a calm, satisfying flow that makes dessert feel doable on a busy night.
Storing, Freezing & Reheating
Storing: Keep mini cheesecakes refrigerated, covered, for up to 4 days. If you’ve added the cherry topping, store them in a single layer so the topping doesn’t smear. If you need to stack, place parchment between layers.
Freezing: You can freeze the cheesecakes before topping. Place the assembled minis (in liners) on a sheet pan, freeze until solid, then transfer to an airtight container or freezer bag for up to 1 month. Thaw in the refrigerator overnight, then add the cherry topping before serving.
Reheating: These are served cold; no reheating required. If you prefer the texture slightly less chilled, let them sit at room temperature for 10–15 minutes before serving.
Common Qs About Mini Cheesecakes
Can I make the crust with whole crackers instead of crumbs? Yes. Place the whole graham crackers in a sealed bag and crush with a rolling pin or pulse in a food processor to get the crumbs. You want about 1 1/2 cups of crumbs total.
What if my filling is lumpy? Lumps usually come from cold cream cheese or under-beating. Let the cream cheese soften fully at room temperature and beat until very smooth before adding sour cream and lemon.
Can I skip the sour cream? The sour cream adds tang and helps texture. If you don’t have it, you can omit it, but the filling will be slightly less tangy and a touch denser.
How do I make the cherry topping? The directions refer to a cherry topping; you can use store-bought cherry pie filling or make a quick compote by simmering cherries with a little sugar and cornstarch to thicken, then cool before using.
How many mini cheesecakes does this recipe make? A standard 12-cup muffin tin will produce 12 mini cheesecakes with these quantities. If you have more or fewer cups, adjust accordingly or use ramekins for any extras.
Bring It to the Table
For serving, remove liners gently and place the minis on a platter. Spoon a small pool of cherry topping on each so you still see the creamy edges — it looks inviting and keeps portions balanced. Garnish sparingly with a mint leaf or a light dusting of finely grated lemon zest to echo the lemon in the filling.
These mini cheesecakes travel well to potlucks and make a polished finish to weeknight dinners. Plate a few with fresh berries and coffee, or arrange them on a tiered stand for a party. They’re small, effortless to eat, and almost always the first thing gone from the dessert table.
No-Bake Mini Cheesecakes Recipe
Ingredients
Ingredients
- 1 1/2 cupsgraham cracker crumbs 12 whole crackers
- 1 Tbspgranulated sugar
- 8 Tbspunsalted butter 1 stick, melted
- 16 ozcream cheese (2) 8-oz blocks, room temperature
- 2/3 cupgranulated sugar
- 2 Tbspsour cream
- 2 Tbsplemon juice freshly squeezed
- 1 cupheavy whipping cream
- Cherry Topping
Instructions
Instructions
- Line a muffin tin with paper liners (one liner per cheesecake). If you don’t have space for all the cheesecakes in the tin, place the extra ones in small ramekins.
- In a medium bowl, combine 1 1/2 cups graham cracker crumbs and 1 Tbsp granulated sugar. Add 8 Tbsp melted unsalted butter and stir until the crumbs are evenly moistened.
- Divide the crumb mixture evenly among the lined muffin cups (a trigger-release ice cream scoop or a 2 Tbsp measure can help). Press the crumbs firmly and evenly into the bottom of each liner to form the crust.
- In a large bowl, beat 16 oz cream cheese (two 8-oz blocks at room temperature) and 2/3 cup granulated sugar with an electric hand mixer on medium‑high speed for about 3 minutes, until smooth and fluffy, scraping down the bowl as needed.
- Add 2 Tbsp sour cream and 2 Tbsp freshly squeezed lemon juice to the cream cheese mixture and beat for about 1 minute until well incorporated.
- In a separate large, clean bowl, beat 1 cup heavy whipping cream on medium‑high speed until stiff peaks form (about 3 minutes).
- Gently fold the whipped cream into the cream cheese mixture with a spatula until fully combined, scraping the bottom of the bowl as you fold.
- Divide the cheesecake filling evenly among the prepared crusts, smoothing the tops so the filling is about level with the tops of the liners.
- Refrigerate the mini cheesecakes for at least 6 hours or overnight. After about 2 hours in the refrigerator, loosely cover the pan with plastic wrap to prevent drying.
- Prepare the Cherry Topping, set it aside to cool to room temperature, then cover and refrigerate until ready to serve.
- To serve, remove the liners from the mini cheesecakes, spoon the cooled cherry topping over each, and enjoy.
Equipment
- Muffin Tin
- Paper liners
- ramekins (optional)
- Mixing Bowls
- Electric hand mixer
- Spatula
- Measuring Cups
- Measuring Spoons
- ice cream scoop or 2 Tbsp measure
- Plastic Wrap
Notes
Please Note: Nutrition info is for the mini cheesecakes only without the topping.