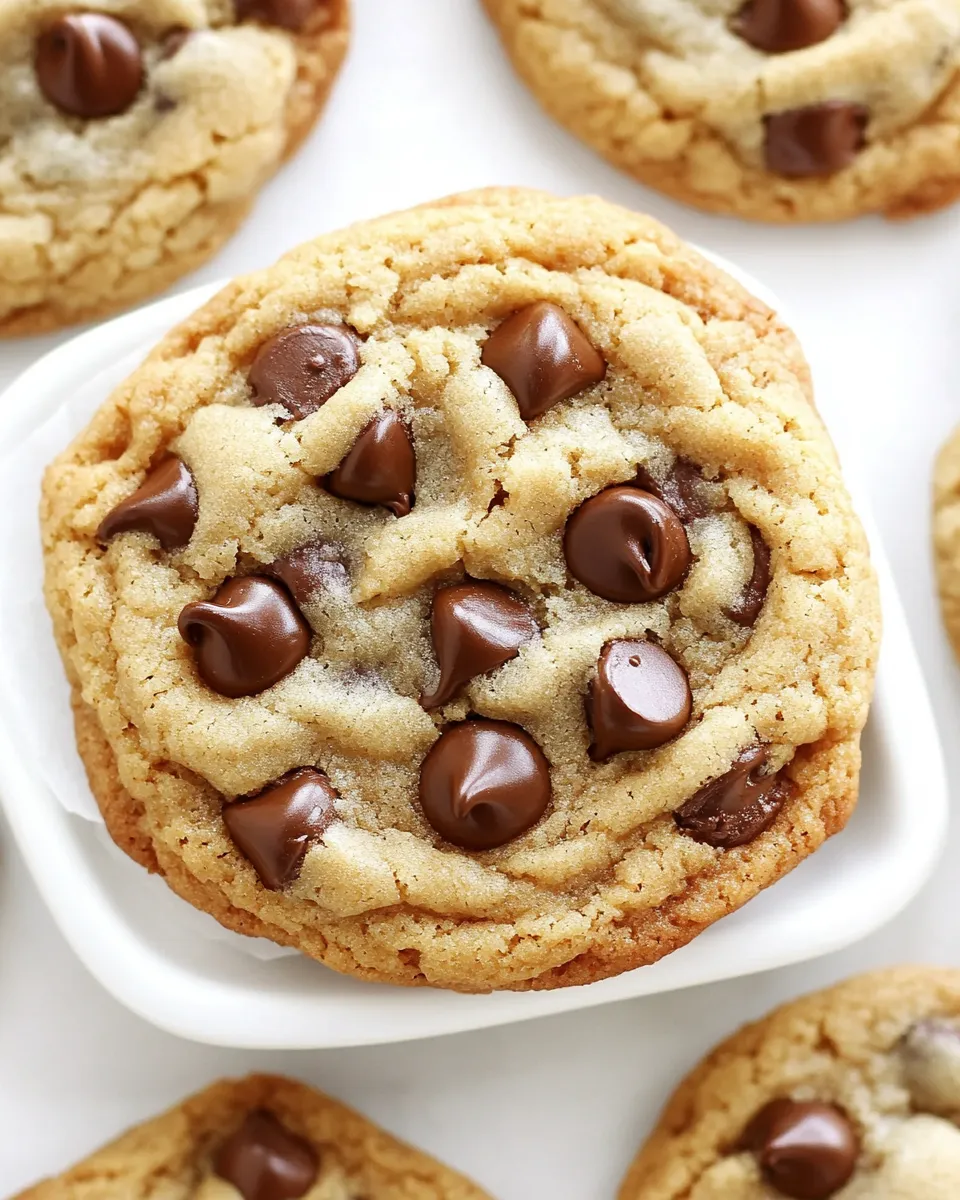
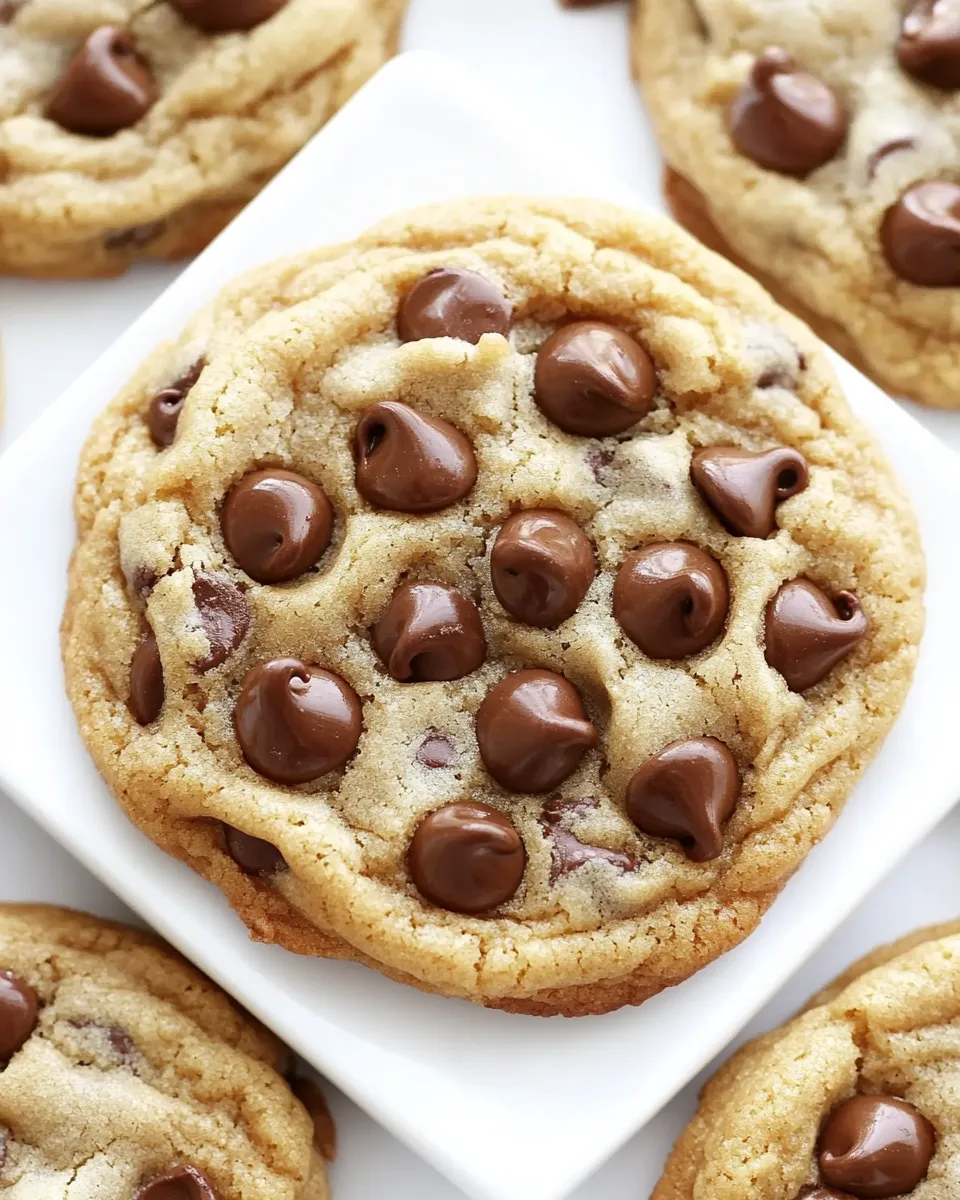
My Big, Fat, Chewy Chocolate Chip Cookies
These are the cookies I reach for when I want something simple, dependable, and reliably chewy. They bake up with golden edges and soft, puffy centers — the kind of cookie that stays tender even a day later. No complicated steps. No special equipment. Just a straightforward dough and a little patience.
I like them big and tall, the kind you can pull apart and watch the chocolate stretch. They’re forgiving: the dough can be scooped warm or chilled, and the cookies will still turn out well. I’ll walk you through the exact ingredients and the tested process so you won’t waste time guessing.
Read through the whole post before you start. I’ve included the exact ingredient notes, the step-by-step bake, troubleshooting, storage tips, and smart swaps if you need them. Let’s get these in the oven.
What You’ll Gather

This recipe uses pantry-stable ingredients you probably have on hand. The list below covers everything that goes into the dough and a few short notes so you understand why each item matters. Gather them before you start; it speeds things up and keeps the process relaxed.
Ingredients
- 2 cups all-purpose flour — provides the cookie’s structure; see the high-altitude note in the directions.
- 1/2 teaspoon baking soda — leavens the dough slightly so the centers stay puffy.
- 1/2 teaspoon salt — balances sweetness and enhances flavor.
- 3/4 cup unsalted butter, melted and slightly cooled — a key to chewiness; cooling it a bit prevents cooking the eggs when mixed.
- 1 cup packed brown sugar — adds moisture and that deep caramel flavor for chew.
- 1/2 cup white sugar — lightens the texture and aids spreading.
- 1 tablespoon vanilla extract — flavor anchor; don’t skip it.
- 1 egg — provides structure and steam for lift.
- 1 egg yolk — extra fat for richness and chew.
- 2 cups semisweet chocolate chips — the mix-ins; feel free to use chunks if you prefer larger pockets of melted chocolate.
Cooking (My Big, Fat, Chewy Chocolate Chip Cookies): The Process
- Preheat the oven to 325°F (165°C). Line cookie sheets with parchment paper.
- In a bowl sift together 2 cups all-purpose flour, 1/2 teaspoon baking soda, and 1/2 teaspoon salt; set aside. If baking at high altitude, add 2 tablespoons of flour to this mixture.
- In a medium bowl, combine 3/4 cup unsalted butter (melted and slightly cooled), 1 cup packed brown sugar, and 1/2 cup white sugar; mix until well blended.
- Beat in 1 tablespoon vanilla extract, 1 egg, and 1 egg yolk until the mixture is light and slightly thickened.
- Gradually add the sifted dry ingredients to the wet ingredients and mix until just combined; avoid overmixing.
- Stir in 2 cups semisweet chocolate chips by hand with a wooden spoon.
- If the dough is very wet because the butter was still hot, let it rest at room temperature for a few minutes or chill in the refrigerator until firm enough to scoop.
- Portion the dough: for big cookies, form 1/4-cup balls; for small cookies, form 1 1/2-tablespoon balls. Shape each portion into a tall mound (taller than wide) and place on the prepared cookie sheets, leaving space between cookies for spreading.
- Bake, reversing the position of the cookie sheets halfway through baking, until the outer edges are light golden brown and the centers are still soft and puffy — about 11–14 minutes for 1/4-cup cookies or 8–10 minutes for 1 1/2-tablespoon cookies. Do not overbake; the cookies will continue to cook as they cool.
- Let the cookies cool on the baking sheets until they are firm enough to lift without breaking, then transfer them to a wire rack to cool completely.
Why My Big, Fat, Chewy Chocolate Chip Cookies is Worth Your Time

These cookies are worth the effort because they hit the texture trifecta: crisp edges, soft centers, and deep flavor. The combination of brown and white sugar gives them chew without making them doughy. Adding an extra egg yolk is a small step with a big payoff — you get richer flavor and a more tender crumb.
They’re also versatile. Make them large and impressive for guests, or small and snackable for lunchboxes. The dough tolerates a short chill if you need to pause mid-batch. And they reheat beautifully: a few seconds in the microwave or a minute in a low oven brings back that freshly-baked feel.
Finally, the method is forgiving. You don’t need perfect creaming or precise timing. Melted butter is used here to streamline mixing and produce a chewier texture than fully creamed cold butter. The recipe is reliable for weeknight baking and uncomplicated enough for a crowd.
Low-Carb/Keto Alternatives
If you need a lower-carb option, you can adapt the idea without following the exact measurements. Swap the all-purpose flour for a blend made with almond flour and a small amount of coconut flour — almond flour gives structure while coconut flour soaks up moisture, so use them cautiously and adjust texture by feel rather than exact volume. Replace the brown and white sugars with a granular erythritol or monk-fruit blend made for baking; these mimic sweetness without sugar.
For chocolate, choose unsweetened or low-sugar dark chocolate chips that fit your carb goals. Keep in mind that when you change the base flour and sugars, baking time and texture will change, so watch the first tray closely and expect a denser, more delicate cookie.
Before You Start: Equipment
- Mixing bowls (one medium for dry, one medium/large for wet).
- Measuring cups and spoons — accurate flour measurement matters.
- Wooden spoon or sturdy spatula for folding in chips.
- Baking sheets lined with parchment paper to prevent sticking and promote even browning.
- Wire rack for cooling so cookies stop baking from residual heat on the pan.
- Scoop or measuring cup for portioning dough: 1/4-cup scoop for big cookies; tablespoon for small cookies.
Optional but helpful
- Silicone baking mats — they provide even heat and easy cleanup.
- Chilled shallow tray to rest hot cookie sheets on if you rotate pans.
Things That Go Wrong
Here are common problems and how to fix them quickly.
- Cookies spread too much: Your butter was too hot when mixed. Let the dough chill until firm or add a touch more flour (a tablespoon at a time) to firm up the dough.
- Cookies are flat and greasy: Over-melting the butter or using too much butter will cause excess spread. Measure the butter carefully and let it cool slightly before mixing.
- Centers are hard or dry: You overbaked them. Remove at the earliest suggested time when centers are still soft and puffy; they’ll set while cooling on the sheet.
- Cookies are dense: You overmixed after adding the dry ingredients. Mix only until the flour disappears.
- Uneven browning: Rotate pans halfway through baking and avoid crowding the oven. Use parchment or a light-colored baking sheet for more even color.
Make It Year-Round
These cookies adapt well to seasonal tweaks without changing the core method. In winter, fold in a handful of chopped walnuts and a pinch of cinnamon for warmth. In summer, add chopped toasted pecans and a sprinkle of flaky sea salt right out of the oven. For a festive twist, swap half the chocolate chips for butterscotch or toffee chips around the holidays.
Serve warm with ice cream in the summer. In cooler months, pair them with a mug of hot coffee or cocoa. The base dough plays nicely with mix-ins, but keep total mix-ins roughly the same volume as the 2 cups of chocolate chips the recipe calls for to preserve texture and spread.
What I Learned Testing
I baked this recipe multiple times to dial in timing for both the 1/4-cup and the 1 1/2-tablespoon sizes. A few notes from testing:
- Let melted butter cool. When I skipped that, the dough became runny and the cookies flattened. A five-minute rest makes a big difference.
- Shaping into tall mounds is intentional. Taller scoops yield chewier centers; if you flatten before baking, you’ll get a crisper cookie.
- Reversing sheet positions mid-bake gives consistent color across racks. My oven has hot spots, but this little extra step fixed uneven browning.
- I preferred the texture after a short rest on the sheet. It allows the outside to set while the centers finish without overbaking.
Store, Freeze & Reheat
Store cooled cookies in an airtight container at room temperature for up to 4 days. Place a slice of bread or a folded paper towel in the container to help retain softness — the cookies will absorb moisture and stay chewier.
To freeze baked cookies: freeze them flat on a tray until solid, then transfer to a sealed freezer bag for up to 3 months. Thaw at room temperature for 20–30 minutes. Refresh them in a 300°F (150°C) oven for 5 minutes if you want that just-baked texture.
To freeze dough: portion dough balls onto a tray, freeze until firm, then move to a bag. Bake from frozen; add a minute or two to the baking time and watch closely.
Troubleshooting Q&A
- Q: My cookies are browning too quickly but still raw in the middle. What gives?
A: Your oven temperature may be too high or you’re using dark baking sheets that absorb more heat. Use lighter pans, lower the oven by 10–15°F, or move racks lower to slow browning. - Q: The dough is crumbly, not cohesive. Any fixes?
A: You may have measured too much flour. Add a teaspoon of water or milk at a time until the dough comes together, or press and work the dough gently to bring it into a cohesive ball. - Q: Can I mix different types of chocolate?
A: Yes. Swap some semisweet chips for bittersweet or milk chocolate. Larger chopped chocolate pieces will give molten pockets; chips will retain their shape more. - Q: Should I refrigerate dough overnight?
A: You can. Chilling concentrates flavor and reduces spread. Bring scooped dough back to slightly softened before baking if it’s very firm.
Bring It Home
These cookies are the kind you make when you want something impressive that doesn’t require fuss. They’re reliable, forgiving, and delicious warm or room-temperature. Follow the steps, mind the butter temperature, and choose your cookie size based on how indulgent you want to be. Make a batch, share them, and keep a few for yourself — they’re that good.
If you bake a batch, tell me how you sized them and whether you added any mix-ins. Happy baking.
My Big, Fat, Chewy Chocolate Chip Cookies
Ingredients
Ingredients
- 2 cupsall-purpose flour
- 1/2 teaspoonbaking soda
- 1/2 teaspoonsalt
- 3/4 cupunsalted butter melted and slightly cooled
- 1 cuppacked brown sugar
- 1/2 cupwhite sugar
- 1 tablespoonvanilla extract
- 1 egg
- 1 egg yolk
- 2 cupssemisweet chocolate chips
Instructions
Instructions
- Preheat the oven to 325°F (165°C). Line cookie sheets with parchment paper.
- In a bowl sift together 2 cups all-purpose flour, 1/2 teaspoon baking soda, and 1/2 teaspoon salt; set aside. If baking at high altitude, add 2 tablespoons of flour to this mixture.
- In a medium bowl, combine 3/4 cup unsalted butter (melted and slightly cooled), 1 cup packed brown sugar, and 1/2 cup white sugar; mix until well blended.
- Beat in 1 tablespoon vanilla extract, 1 egg, and 1 egg yolk until the mixture is light and slightly thickened.
- Gradually add the sifted dry ingredients to the wet ingredients and mix until just combined; avoid overmixing.
- Stir in 2 cups semisweet chocolate chips by hand with a wooden spoon.
- If the dough is very wet because the butter was still hot, let it rest at room temperature for a few minutes or chill in the refrigerator until firm enough to scoop.
- Portion the dough: for big cookies, form 1/4-cup balls; for small cookies, form 1 1/2-tablespoon balls. Shape each portion into a tall mound (taller than wide) and place on the prepared cookie sheets, leaving space between cookies for spreading.
- Bake, reversing the position of the cookie sheets halfway through baking, until the outer edges are light golden brown and the centers are still soft and puffy — about 11–14 minutes for 1/4-cup cookies or 8–10 minutes for 1 1/2-tablespoon cookies. Do not overbake; the cookies will continue to cook as they cool.
- Let the cookies cool on the baking sheets until they are firm enough to lift without breaking, then transfer them to a wire rack to cool completely.
Equipment
- Oven
- Mixing Bowls
- Wooden Spoon
- cookie sheets
- Parchment Paper
- Wire Rack
Notes
Source:
Allrecipes