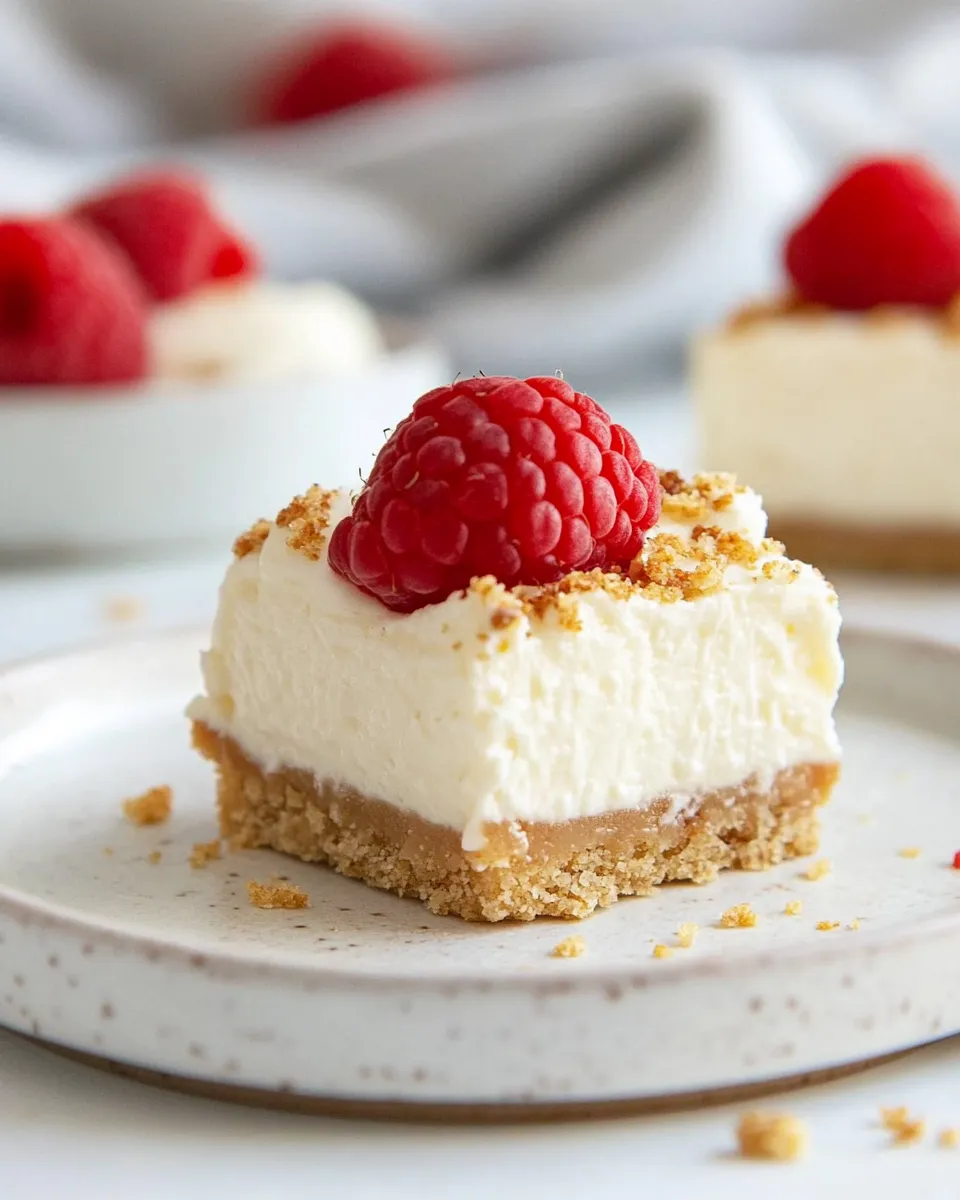
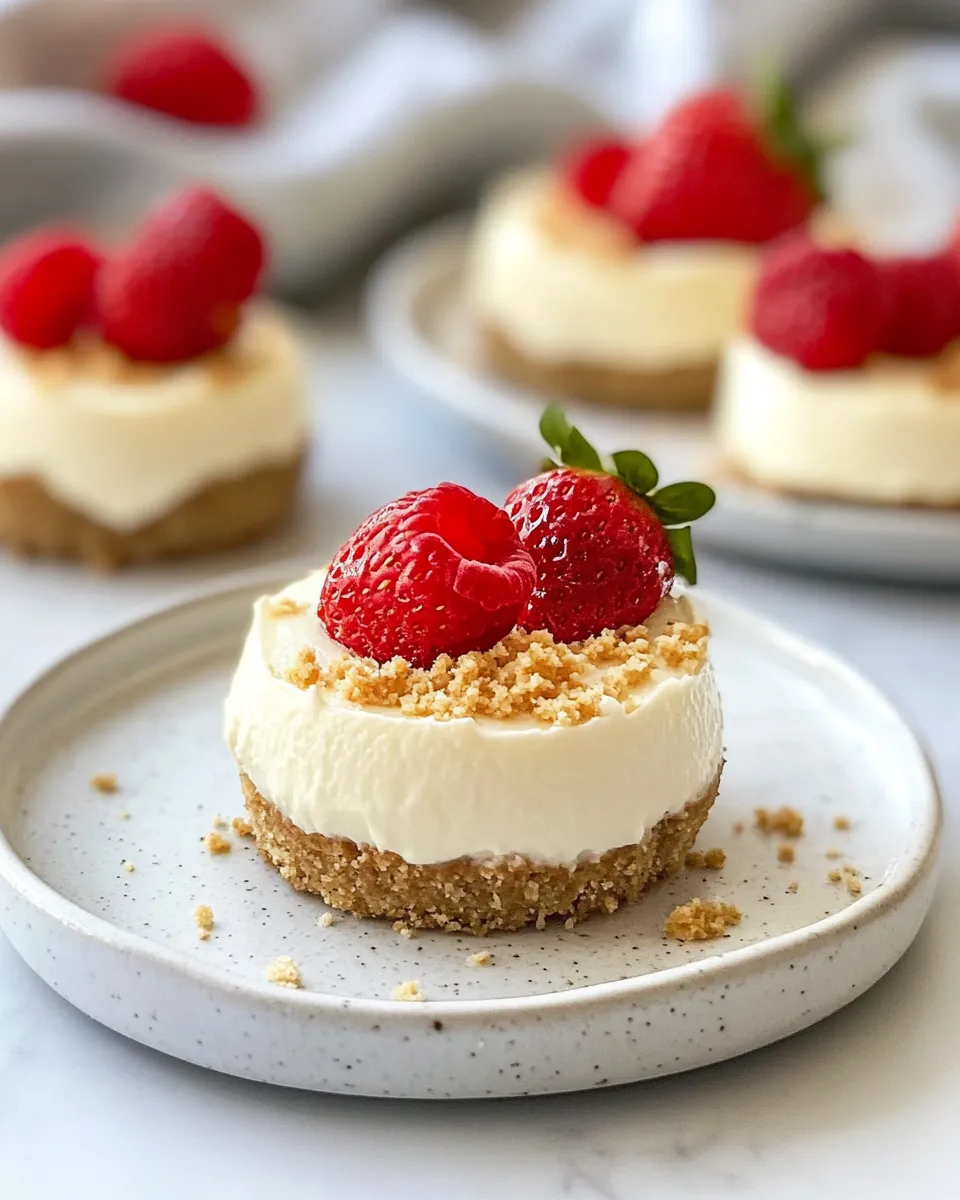
Mini Cheesecake Recipe
These little cheesecakes are my go-to when I want dessert that looks special but doesn’t demand a full afternoon in the kitchen. They’re portable, shareable, and hit that creamy, tangy note every time. I love how a single tray can turn into a mix of flavors with simple toppings—fresh berries, a dollop of whipped cream, or a spoonful of jam.
What I’ll show you here is practical and dependable: straightforward steps, clear timing, and small tips that keep the texture silky and the crust firm. You don’t need fancy tactics—just a few pantry staples and attention to a couple of key moments in the process.
Follow the method below and you’ll have a dozen perfectly portioned mini cheesecakes ready to chill, serve, and disappear fast. I’ll also walk through common pitfalls, equipment that helps, and storage notes so every batch comes out the way you want.
What You’ll Need

- 1 1/2 cups graham cracker crumbs — the base texture for the crust; pulse to fine crumbs for even compaction.
- 5 tablespoons unsalted butter, melted — binds and flavors the crust; helps it hold together after baking.
- 1 1/2 tablespoons granulated sugar — sweetens and tones down the cracker’s saltiness in the crust.
- 16 ounces cream cheese — softened to room temperature; this is the body of the cheesecake and determines creaminess.
- 3/4 cup granulated sugar — sweetens the filling; dissolves better when mixed with room-temp cream cheese.
- 3 tablespoons sour cream — adds tang and smooths the texture of the filling.
- 1 1/4 teaspoons vanilla extract — rounds and deepens the flavor.
- 2 large eggs — room temperature eggs help the batter emulsify and bake evenly.
- Whipped cream — for serving (optional); keeps presentation light.
- Fresh fruit — for serving (optional); brightens each bite and adds freshness.
Mini Cheesecake in Steps
- Preheat the oven to 350°F. Line a muffin pan with cupcake liners.
- In a medium bowl, combine 1 1/2 cups graham cracker crumbs, 5 tablespoons melted unsalted butter, and 1 1/2 tablespoons granulated sugar. Stir until the crumbs are evenly moistened.
- Divide the crust mixture among the liners, pressing about 1 1/2 tablespoons into the bottom of each liner and compacting it evenly. Bake the crusts for 5–7 minutes, until set. Remove the pan from the oven.
- Reduce the oven temperature to 325°F.
- In a large bowl, beat 16 ounces softened cream cheese with an electric mixer until smooth and lump-free.
- Add 3/4 cup granulated sugar and beat until combined. Mix in 3 tablespoons sour cream and 1 1/4 teaspoons vanilla extract until smooth.
- Add 2 large room-temperature eggs one at a time, mixing on low speed and scraping the bowl after each addition. Mix just until the eggs are incorporated; do not overmix.
- Spoon the cheesecake batter over the baked crusts, filling each liner about 3/4 full and smoothing the tops.
- Bake at 325°F for 16–20 minutes, until the edges are set and the centers have a slight jiggle.
- Remove the pan from the oven and let the mini cheesecakes cool at room temperature for 30 minutes. Then refrigerate the pan and chill for at least 1 hour before serving.
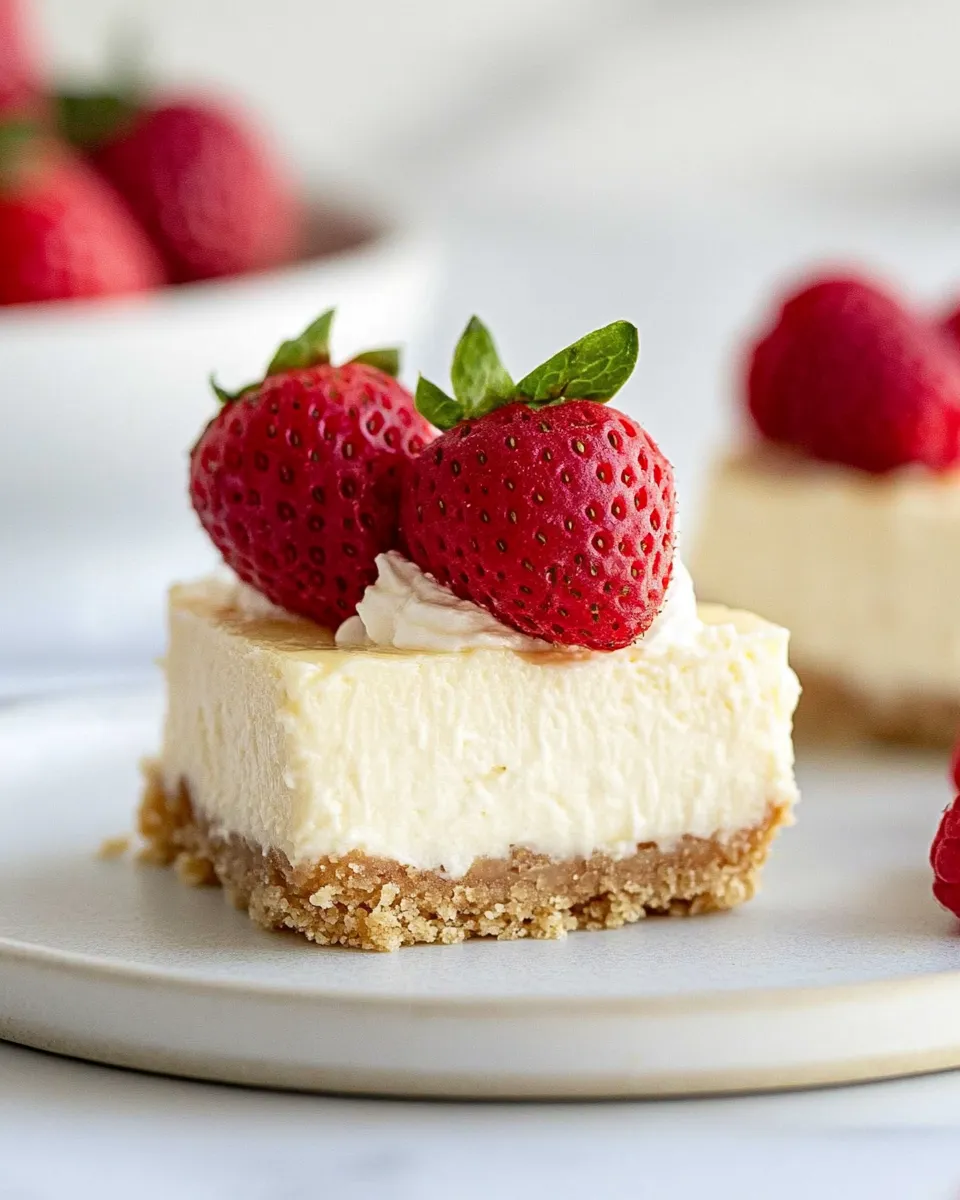
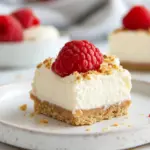
- Serve chilled, topped with whipped cream and/or fresh fruit if desired.
Why It Deserves a Spot
Mini cheesecakes are one of those desserts that feel celebratory but are very forgiving. A single tray yields tidy portions, making them ideal for parties, potlucks, or a simple weeknight treat. The flavor is classic—rich cream cheese balanced with a little sour cream and vanilla—so they appeal to most palates.
Because they’re small, they chill faster than a full-sized cheesecake and are easier to get right. If you’re short on oven space or want a dessert that travels well, these are perfect. And visually, they look charming: little golden edges, smooth tops, and room to make each one different with a topping.
No-Store Runs Needed
This recipe is deliberately pantry-friendly. The crust relies on graham cracker crumbs and melted butter—both are common staples. The filling uses cream cheese, eggs, sugar, sour cream, and vanilla—all ingredients that are often on hand in many kitchens. If you have those, you can make these without an extra trip to the store.
If you’re missing graham crackers, substitute with any neutral cookie or cracker crumbs you already have—digestive biscuits, plain shortbread, or even crushed pretzels for a salty contrast. For toppings, frozen berries thawed slightly or a spoonful of jam work well if fresh fruit isn’t available.
Hardware & Gadgets
- Muffin pan — standard 12-cup works perfectly for this recipe.
- Cupcake liners — make removal and serving much easier; they also keep the cheesecakes from sticking to the pan.
- Electric mixer — a hand mixer speeds up achieving a lump-free cream cheese base. A stand mixer works too.
- Mixing bowls — at least one medium bowl for the crust and a large bowl for the filling.
- Measuring spoons and cups — accurate measurements help the texture stay consistent.
- Spoon or small ice cream scoop — handy for portioning batter evenly into liners.
Pitfalls & How to Prevent Them
Cracked tops
Overbaking or baking at too high a temperature causes cracks. Bake at 325°F as directed and remove the cheesecakes when the edges are set but the centers still have a slight jiggle. Letting them cool gradually—first on the counter, then chilled—helps prevent cracking.
Lumpy filling
Cold cream cheese is the main culprit. Soften the 16 ounces of cream cheese to room temperature before you start. Beat until smooth and lump-free before adding the sugar and other ingredients. Scrape the sides and bottom of the bowl as you go to ensure even mixing.
Soggy crust
Press and compact about 1 1/2 tablespoons of crust into each liner and bake the crusts for 5–7 minutes until set—this seals the crust and keeps it crisp under the filling. Let the crust cool slightly after baking before adding the batter.
Overmixed batter
Add the eggs one at a time and mix on low speed, scraping after each addition. Mix just until the eggs are incorporated; overmixing adds extra air, which can cause puffing and then sinking as the cheesecakes cool.
Nutrition-Minded Tweaks
If you want to reduce calories or fat slightly, consider these small swaps while keeping the recipe structure intact. Use reduced-fat cream cheese in place of full-fat; the texture will be slightly less rich but still enjoyable. You can also reduce the crust butter by 1 tablespoon and add a touch of applesauce to help bind crumbs, though this changes the mouthfeel.
For sweetness control, stick with the 3/4 cup granulated sugar called for in the filling but consider reducing it by 1–2 tablespoons if you prefer a less sweet finish. Serving with a small amount of fresh fruit rather than generous whipped cream lowers added sugars while giving a bright finish.
Little Things that Matter
Room temperature ingredients are the quiet MVP here. Softened cream cheese and room-temperature eggs help the batter come together smoothly and bake with an even texture. Also, filling each liner about 3/4 full keeps the perfect balance between crust and filling and prevents overflow.
When pressing the crust, aim for even thickness so each mini cheesecake bakes uniformly. And when it comes time to chill, don’t skip the refrigerator step; chilling for at least 1 hour firms the custard and improves slicing and presentation.
Meal Prep & Storage Notes
These mini cheesecakes are ideal for advance prep. After cooling and chilling them at least 1 hour as directed, store them in an airtight container in the refrigerator for up to 4 days. If you want to make them further ahead, freeze the cooled mini cheesecakes (without delicate toppings) on a sheet tray until firm, then transfer to a freezer-safe container for up to 1 month. Thaw in the refrigerator before serving and add whipped cream or fresh fruit just before serving.
For transport, keep them in a shallow, airtight container with a layer of parchment between layers to prevent sticking. Add toppings at the last minute to maintain texture and appearance.
Common Qs About Mini Cheesecake
- Can I use a water bath? You can, but for minis it’s usually unnecessary. The smaller size bakes quickly and evenly at 325°F. If you’re concerned about cracking, a gentle water bath can help, but be sure your liners are secure so water doesn’t seep in.
- Why are my cheesecakes still jiggly after the max time? Centers should have a slight jiggle when done. If the entire center seems liquid, they may need another minute or two; check that your oven temperature is accurate.
- Can I freeze them with toppings? Avoid freezing with whipped cream or fresh fruit; those toppings don’t thaw well. Freeze plain, then top after thawing.
- Can I make mini cheesecakes without liners? Liner makes removal easier. If you skip liners, grease the cups well and allow the cheesecakes to cool thoroughly before removing, but liners are recommended.
- How do I get a smooth top? Smooth the batter gently with the back of a spoon or offset spatula before baking and tap the pan lightly on the counter to settle the batter and remove air bubbles.
Hungry for More?
If you enjoyed this method, try variations: fold a tablespoon of lemon zest into the batter for brightness, or drop a thin ribbon of chocolate ganache over the cooled tops for a simple chocolate twist. You can also experiment with crusts—graham cracker is classic, but crushed shortbread or gingersnaps add character.
Make a double batch and freeze extras for quick entertaining, or scale down for a small household treat. These mini cheesecakes are flexible, forgiving, and exactly what you need when you want a reliable crowd-pleaser without fuss.
Mini Cheesecake Recipe
Ingredients
Ingredients
- 1 1/2 cupsgraham cracker crumbsfor crust
- 5 tablespoonsunsalted buttermelted for crust
- 1 1/2 tablespoonsgranulated sugarfor crust
- 16 ouncescream cheesesoftened to room temperature
- 3/4 cupgranulated sugar
- 3 tablespoonssour creamat room temperature
- 1 1/4 teaspoonsvanilla extract
- 2 large eggsat room temperature
- Whipped creamfor serving optional
- Fresh fruitfor serving optional
Instructions
Instructions
- Preheat the oven to 350°F. Line a muffin pan with cupcake liners.
- In a medium bowl, combine 1 1/2 cups graham cracker crumbs, 5 tablespoons melted unsalted butter, and 1 1/2 tablespoons granulated sugar. Stir until the crumbs are evenly moistened.
- Divide the crust mixture among the liners, pressing about 1 1/2 tablespoons into the bottom of each liner and compacting it evenly. Bake the crusts for 5–7 minutes, until set. Remove the pan from the oven.
- Reduce the oven temperature to 325°F.
- In a large bowl, beat 16 ounces softened cream cheese with an electric mixer until smooth and lump-free.
- Add 3/4 cup granulated sugar and beat until combined. Mix in 3 tablespoons sour cream and 1 1/4 teaspoons vanilla extract until smooth.
- Add 2 large room-temperature eggs one at a time, mixing on low speed and scraping the bowl after each addition. Mix just until the eggs are incorporated; do not overmix.
- Spoon the cheesecake batter over the baked crusts, filling each liner about 3/4 full and smoothing the tops.
- Bake at 325°F for 16–20 minutes, until the edges are set and the centers have a slight jiggle.
- Remove the pan from the oven and let the mini cheesecakes cool at room temperature for 30 minutes. Then refrigerate the pan and chill for at least 1 hour before serving.
- Serve chilled, topped with whipped cream and/or fresh fruit if desired.
Equipment
- Oven
- muffin pan
- Cupcake Liners
- Mixing Bowls
- Electric Mixer
- Measuring Cups and Spoons
- Spatula