Lemon Curd With Buttermilk Biscuits
I love recipes that feel like a small act of kindness on a plate. Lemon curd is one of those things: bright, silky, and improbable given how few ingredients it needs. Paired with warm buttermilk biscuits, it becomes a quick, special breakfast or a simple dessert that feels like a hug.
This post focuses on making the lemon curd from scratch using a gentle double-boiler method. The curd is reliable, glossy, and freezes well. I’ll walk you through the exact steps, why they matter, what to avoid, and how to keep the curd tasting its best.
No complicated tricks. Just attention to temperature, good lemons, and a few practical tips so your curd turns out every time. If you’re serving this with biscuits, split them while warm and spoon the curd into the center. It’s that simple — and the result is worth the tiny bit of patience.
Ingredient List

- 3 large eggs — provide structure and help the curd set as it cooks; whisk well before heating.
- 3/4 cup granulated sugar — sweetens and stabilizes the curd; dissolves during whisking and cooking.
- 1/3 cup fresh lemon juice (from 2–3 lemons) — the primary flavor; use only fresh lemon juice — do not use bottled lemon juice.
- 4 Tablespoons unsalted butter — room temperature and cut into chunks — adds silkiness and sheen when stirred in off the heat.
- 1 Tablespoon lemon zest — brightens the lemon flavor; stir in at the end for fresh aromatics.
Mastering Lemon Curd With Buttermilk Biscuits: How-To
- Set up a double boiler: pour 1–2 inches of water into a saucepan and bring to a gentle simmer over medium-low heat. Use a non-reactive heatproof bowl (metal or glass) that will sit on the saucepan rim without touching the water.
- In the heatproof bowl, whisk together 3 large eggs, 3/4 cup granulated sugar, and 1/3 cup fresh lemon juice (from 2–3 lemons) until fully combined.
- Place the bowl over the simmering water. Whisk constantly and briskly, making sure to scrape the bottom and sides, until the mixture thickens and resembles hollandaise sauce—about 8–10 minutes. If using a candy thermometer, the curd should reach 160°F; without a thermometer, it should coat the back of a spoon and hold a line when you run your finger through it.
- Remove the bowl immediately from the heat as soon as it reaches the proper thickness/temperature.
- Pour the hot curd through a fine-mesh strainer into a clean bowl to catch any cooked egg bits.
- Add the 4 tablespoons unsalted butter (room temperature, cut into chunks) a few pieces at a time, stirring constantly until each addition is fully incorporated and the curd is smooth and glossy.
- Stir in 1 tablespoon lemon zest until evenly distributed.
- Press a piece of plastic wrap directly onto the surface of the curd to prevent a skin from forming. Let the curd cool to room temperature, then refrigerate until chilled before using.
Why It’s Crowd-Pleasing
Lemon curd hits a very satisfying balance: tartness from the lemons, sweetness from the sugar, and a buttery richness that makes it spoonable and luxurious. Texturally it’s creamy but not heavy, which pairs beautifully with the flaky, slightly tangy crumb of a buttermilk biscuit. Guests often compliment the brightness first — that pop of citrus wakes the palate and feels fresh even after a rich meal.
It’s also versatile. Serve it on warm biscuits for breakfast, dollop it on yogurt or vanilla ice cream for dessert, or spread it between layers of a simple sponge for an easy cake. Its bright flavor contrasts well with richer elements, so even simple pairings feel elevated.
Texture-Safe Substitutions

- Egg handling — Use pasteurized eggs if you have concerns about raw eggs. They behave the same in the curd but reduce food-safety worries.
- Butter alternatives — If you prefer a different fat, a high-quality European-style butter gives extra richness. If you must use a butter substitute, expect a slightly different mouthfeel and flavor.
- Consistency adjustments — For a looser curd, remove it from the heat a little earlier, when it lightly coats a spoon. For a firmer curd, continue cooking just a touch longer (watch carefully to avoid overcooking).
- Flavor intensity — If your lemons are mild, increase the lemon zest slightly for more aroma rather than adding more juice, which can thin the curd.
Tools & Equipment Needed

- Small saucepan — to hold the simmering water for the double boiler.
- Heatproof bowl (metal or glass) — should sit on the pan rim without touching the water.
- Whisk — a sturdy whisk that’s comfortable to hold and can handle steady whisking for 8–10 minutes.
- Fine-mesh strainer — catches any curdled egg bits so the final curd is silky.
- Candy thermometer (optional) — helpful to hit the 160°F mark precisely.
- Rubber spatula — for scraping and stirring in butter.
- Plastic wrap — pressed onto the hot curd to prevent a skin while cooling.
- Clean bowl and storage jars — for chilling and storing the curd.
What Not to Do
There are a few small mistakes that derail lemon curd. First, don’t let the bowl touch the simmering water — overheating will scramble the eggs. Don’t stop whisking while the mixture is on the heat; constant motion prevents curdled bits.
Don’t substitute bottled lemon juice. The recipe explicitly calls for fresh lemon juice because bottled juice lacks the volatile aromatics you get from fresh fruit and often tastes flat. And don’t skip the straining step; it’s an easy move that makes the curd perfectly smooth.
Finally, avoid adding cold butter straight from the fridge. It will take longer to incorporate and can break the emulsion. Cut it into chunks and bring it to room temperature first.
In-Season Flavor Ideas
When lemons are at their best, keep things simple: a sprinkle of extra finely grated zest over the spoonfuls you serve. Late spring and early summer berries — strawberries, raspberries, or blueberries — pair beautifully with lemon curd on biscuits.
Try topping the curd with a few torn basil leaves for a subtle herbal lift, or drizzle a tiny bit of honey if your lemons are punchedingly tart. For autumn, a dusting of toasted almond crumbs adds a warm contrast without masking the citrus.
Pro Tips & Notes
Before you start
- Room temperature ingredients: Bring the butter to room temperature and use room-temperature eggs to help the mixture come together smoothly.
- Zest carefully: Use a microplane for fine zest so there’s no bitter pith in the curd.
- Control heat: Keep the water at a gentle simmer. A vigorous boil will overheat and create hotspots under the bowl.
During cooking
- Whisking rhythm: A steady, brisk whisking motion that covers the entire base of the bowl prevents eggs from cooking into lumps.
- Thermometer use: If you own a thermometer, 160°F is a reliable finish point. Without one, rely on the spoon-coating test described in the instructions.
Finishing touches
- Strain every time: Even if it looks smooth, pour it through the sieve — it guarantees a silky mouthfeel.
- Chill properly: Plastic wrap directly on the surface prevents an ugly skin and keeps the curd glossy.
Keep It Fresh: Storage Guide
Store the lemon curd in a clean, airtight container in the refrigerator. Properly chilled, it keeps for up to two weeks. Always use a clean spoon to remove portions — double-dipping shortens shelf life.
For longer storage, freeze curd in a freezer-safe container for up to three months. Leave a little headspace to allow for expansion. Thaw overnight in the refrigerator and gently stir before serving; the texture will return close to fresh after stirring. If you want to freeze small portions, consider using an ice cube tray and then transferring frozen cubes to a bag — convenient for quick dollops on yogurt or biscuits.
Buttermilk biscuits are best stored separately. Keep baked biscuits in a paper bag or loosely covered to maintain a flaky exterior; they’re best the day they’re made. Reheat split biscuits briefly in a warm oven before filling with chilled curd.
Your Questions, Answered

- Can I use bottled lemon juice? No. The recipe specifies fresh lemon juice because bottled juice lacks bright volatile oils and will result in a flatter flavor.
- Is the curd safe to eat? Yes, when cooked to 160°F the eggs reach a safe temperature. Use a candy thermometer if you want that assurance.
- Can I make this ahead? Absolutely. The curd can be made several days ahead and chilled. It’s also freezer-friendly for longer storage.
- What if my curd splits? If the curd looks broken after adding butter, whisk vigorously off the heat and it will usually come back together. If not, a quick immersion blender pulse can unify it.
- How do I rewarm chilled curd? Warm gently in a bowl over simmering water, stirring constantly until just loose enough to spread. Do not overheat.
In Closing
This lemon curd recipe is one of my go-to small-batch wins: few ingredients, forgiving technique, and consistently excellent results when you follow the temperature and whisking steps. Serve it with warm buttermilk biscuits, spoon it over plain yogurt, or use it as a bright cake filling. The bright lemon flavor feels homemade and thoughtful, and it’s the kind of recipe that earns you repeat requests from friends and family.
If you try it, let me know how your first batch turns out — and what you served it with. Small details, like the lemon variety or biscuit texture, make every batch a little different. Enjoy the process; this curd rewards patience and care.
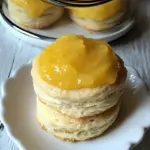
Lemon Curd With Buttermilk Biscuits
Ingredients
Ingredients
- 3 large eggs
- 3/4 cupgranulated sugar
- 1/3 cupfresh lemon juice2-3 lemons. Do not use bottled lemon juice.
- 4 Tablespoonsunsalted butterroom temperature and cut in chunks
- 1 Tablespoonlemon zest
Instructions
Instructions
- Set up a double boiler: pour 1–2 inches of water into a saucepan and bring to a gentle simmer over medium-low heat. Use a non-reactive heatproof bowl (metal or glass) that will sit on the saucepan rim without touching the water.
- In the heatproof bowl, whisk together 3 large eggs, 3/4 cup granulated sugar, and 1/3 cup fresh lemon juice (from 2–3 lemons) until fully combined.
- Place the bowl over the simmering water. Whisk constantly and briskly, making sure to scrape the bottom and sides, until the mixture thickens and resembles hollandaise sauce—about 8–10 minutes. If using a candy thermometer, the curd should reach 160°F; without a thermometer, it should coat the back of a spoon and hold a line when you run your finger through it.
- Remove the bowl immediately from the heat as soon as it reaches the proper thickness/temperature.
- Pour the hot curd through a fine-mesh strainer into a clean bowl to catch any cooked egg bits.
- Add the 4 tablespoons unsalted butter (room temperature, cut into chunks) a few pieces at a time, stirring constantly until each addition is fully incorporated and the curd is smooth and glossy.
- Stir in 1 tablespoon lemon zest until evenly distributed.
- Press a piece of plastic wrap directly onto the surface of the curd to prevent a skin from forming. Let the curd cool to room temperature, then refrigerate until chilled before using.
Equipment
- Saucepan
- heatproof bowl (metal or glass)
- Whisk
- Fine Mesh Strainer
- Candy thermometer (optional)
- Spoon
- Plastic Wrap
Notes
Cut the butter into chunks and place on top of the flour in a large mixing bowl. Cut butter into flour using a pastry knife or use two knifes until crumbly. Add buttermilk and stir just until the dry ingredients are incorporated. If dough is too wet, add a little more flour. On a lightly floured surface, knead dough 3-4 times, adding more flour as needed (hands are super gooey about now. Isn’t this fun?! :)) Pat the dough down to about 3/4 inch thickness forming a rectangle. Fold one third over the center portion, and then fold the opposite third portion over those two layers. Repeat The patting and folding of the dough 1 more time.
Pat dough into 1/2 inch rectangle on a floured surface; cut with a 2 inch round biscuit cutter (or use a glass like I did), place on a parchment lined or greased baking sheet. Bake for 12-15 minutes or until lightly browned.