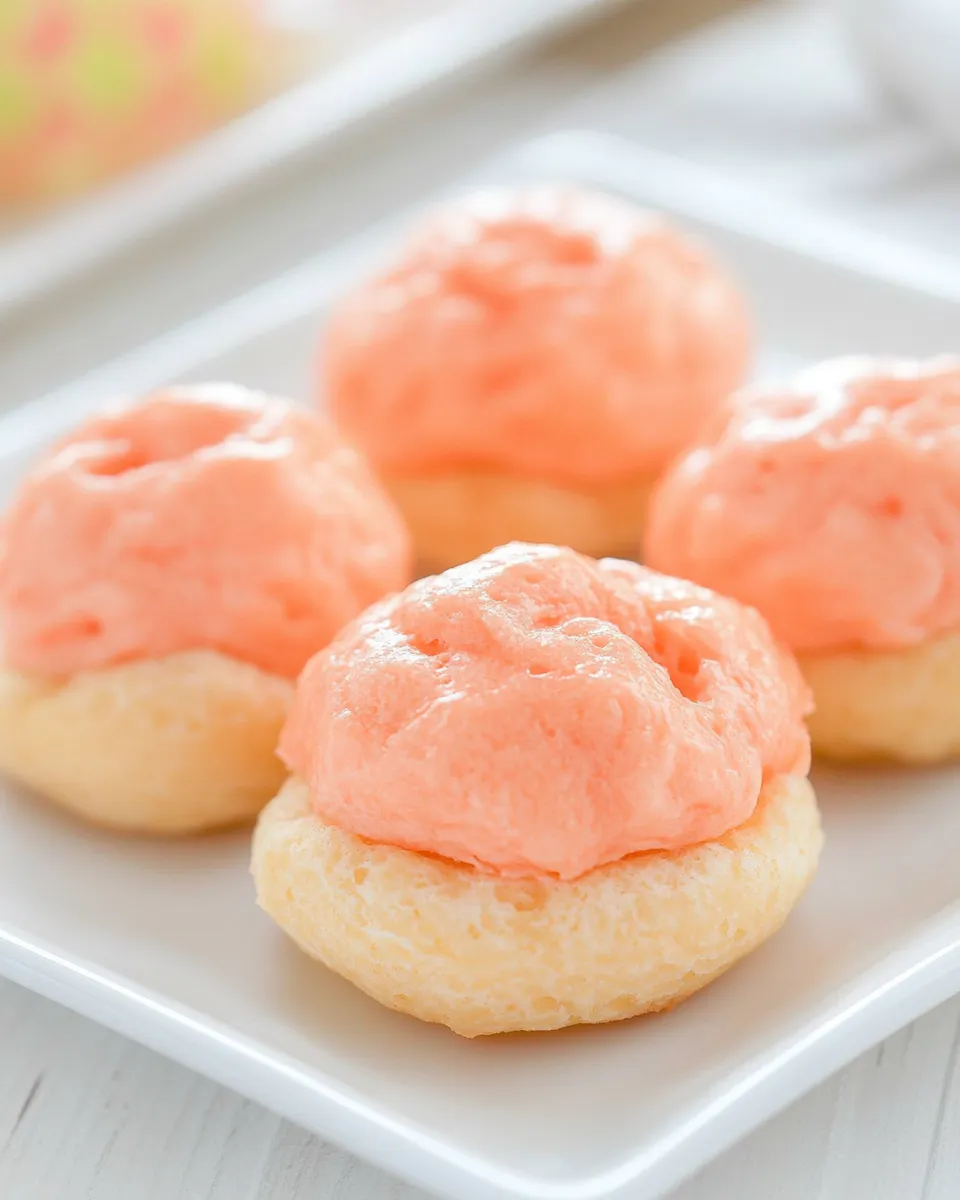
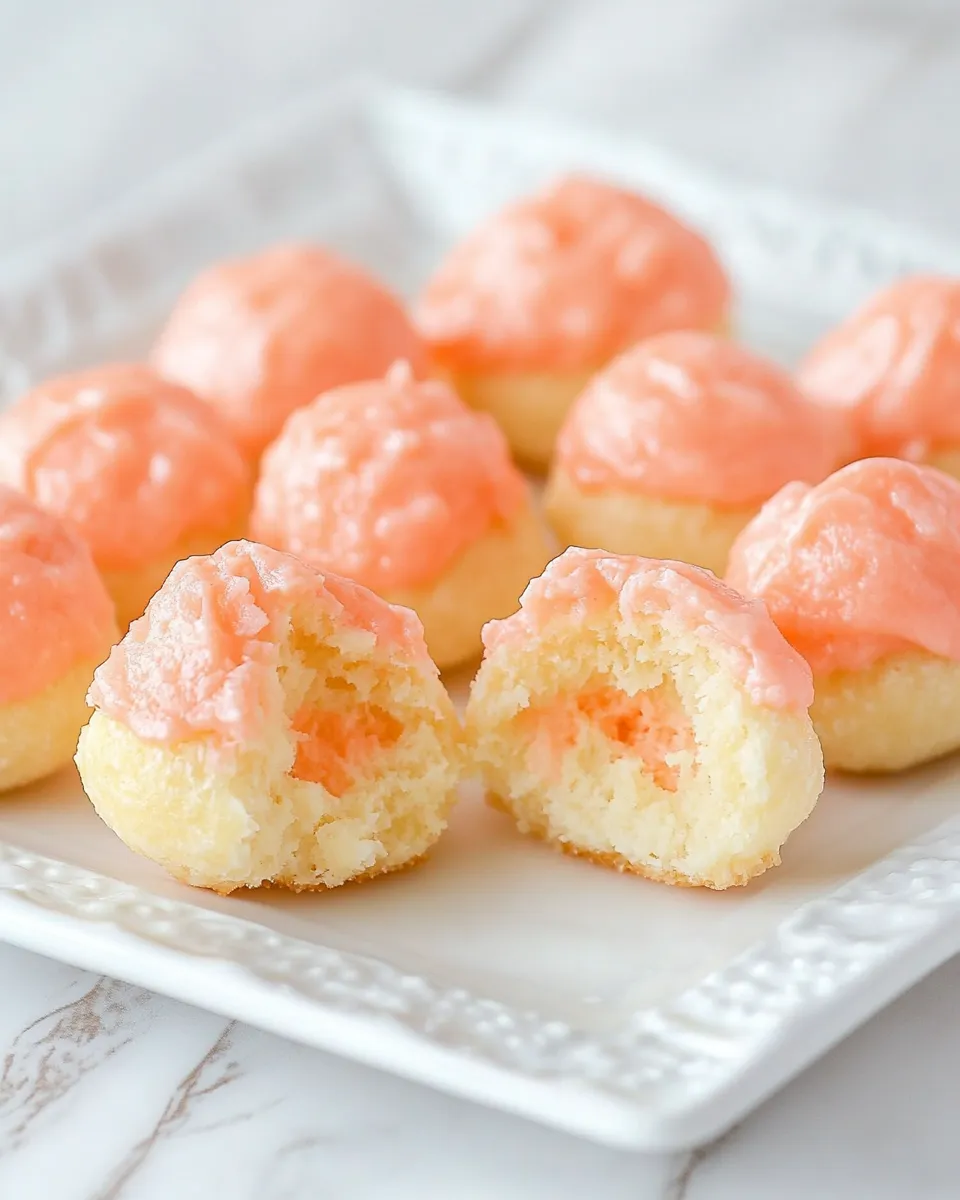
Jigglypuff Pink Cream Puffs
These pink cream puffs are playful, light, and exactly what you want when a dessert needs to be cute and reliable. I named them Jigglypuff Pink Cream Puffs because the color and the soft cream inside feel whimsical, but the technique is straightforward. You’ll get crisp choux shells with a pillowy interior and a silky pastry cream that holds its shape without being heavy.
I write recipes that respect your time and attention: clear steps, genuine tips, and the things I wish someone had told me back when I burned my first batch. You won’t find fluff here—just what to do, why it works, and how to rescue it if it doesn’t. These puffs are a great make-ahead treat for a party, and they travel well in a cooler.
Shopping List

Ingredients
- 1cupmilkany percentage — base for the pastry cream; whole milk gives richness, lower percentages make a lighter filling.
- 1/2cupheavy cream — adds silkiness and body to the pastry cream.
- 1/2cup(100g) granulated sugar — sweetens the pastry cream; keep measured accurately for proper texture.
- 2tablespoonscornstarch — thickener for the pastry cream; ensures a stable, pipeable filling.
- 1/4teaspoonsalt — balances sweetness in the cream.
- 4large egg yolks — provide structure and richness to the pastry cream.
- 1teaspoonvanilla extract — flavor lift; add at the end off the heat to preserve aroma.
- 1/2cupwater — used in the choux dough for steam and structure.
- 1/4cup(2oz) unsalted butterdiced — fat for the choux; diced butter melts evenly into the water.
- 1teaspoonsugar — a small amount in the choux to round the flavor.
- 1/4teaspoonsalt — essential to bring out flavor in the dough.
- 1/2cup(60g) all-purpose flour — the dry structure for the choux; measure accurately and add all at once.
- 2to3drops red food coloring — gives the dough its pink Jigglypuff hue; add gradually to control intensity.
- 2large eggs — incorporated into the choux to create lift and a glossy texture.
- 1large egg — for the egg wash that helps the puffs brown evenly.
- 1tablespoonwater — mixed with the egg for the egg wash.
Jigglypuff Pink Cream Puffs: Step-by-Step Guide
- Make the pastry cream: in a medium saucepan, combine 1 cup milk and 1/2 cup heavy cream and heat over medium until just before simmering (small bubbles forming at the edge). Remove from heat and set aside.
- In a medium bowl, whisk together 1/2 cup (100 g) granulated sugar, 2 tablespoons cornstarch, 1/4 teaspoon salt, and 4 large egg yolks until smooth and pale.
- With the whisk running, slowly drizzle about one-quarter of the hot milk/cream into the egg-yolk mixture to temper the eggs, then continue dripping in the remaining hot milk/cream while whisking constantly until fully combined.
- Pour the tempered egg mixture back into the same saucepan. Cook over medium heat, whisking constantly, until the mixture thickens, comes to a gentle boil, and reaches the consistency of thick pudding (about 3–6 minutes). Keep whisking vigorously until smooth.
- Remove from heat and stir in 1 teaspoon vanilla extract. Immediately pour the pastry cream through a fine-mesh strainer into a medium bowl, using the whisk or a spatula to push it through to remove any cooked bits.
- Press a piece of plastic wrap directly onto the surface of the pastry cream to prevent a skin, then refrigerate until completely chilled, at least 1 hour.
- Preheat the oven to 375°F (190°C). Line a baking sheet with parchment paper or a silicone baking mat.
- Make the choux dough: in a medium saucepan, combine 1/2 cup water, 1/4 cup (2 oz) diced unsalted butter, 1 teaspoon sugar, and 1/4 teaspoon salt. Bring to a rolling boil over medium-high heat, stirring occasionally.
- As soon as the butter is melted and the mixture is boiling, add 1/2 cup (60 g) all-purpose flour all at once. Stir vigorously with a wooden spoon until the flour is fully incorporated and the dough pulls away from the sides and forms a thin film on the bottom of the pan.
- Transfer the dough to a large bowl and let it cool for about 4 minutes, until it is no longer hot to the touch.
- Add 2 to 3 drops red food coloring to the cooled dough, then add the first of the 2 large eggs. Stir with the wooden spoon until the egg and coloring are fully incorporated and the dough is smooth. Add the second egg and stir until the dough is glossy and just holds its shape when lifted.
- Transfer the dough to a pastry bag fitted with a 5/8-inch tip. Pipe mounds about 1 1/2 inches in diameter on the prepared baking sheet, leaving about 1 inch between each mound. If any peaks form, wet your fingertip and gently smooth them to prevent burning.
- In a small bowl, whisk together 1 large egg and 1 tablespoon water to make the egg wash. Gently brush the tops of each piped puff with the egg wash.
- Bake in the preheated oven for 25 minutes without opening the oven door. After 25 minutes, check the puffs: they should be lightly browned. If they are not, bake an additional 2–5 minutes until lightly golden. Remove from the oven and cool completely on a wire rack before filling.
- To fill: poke a small hole in the bottom or side of each cooled cream puff with a chopstick or small sharp knife. If the pastry cream has firmed too much in the fridge, whisk it for about 30 seconds until smooth and pipeable.
- Transfer the chilled pastry cream to a piping bag fitted with a 1/8-inch round tip and fill each cream puff through the hole until generously filled.
- Serve immediately or keep filled cream puffs refrigerated until serving.
Why It’s Crowd-Pleasing
There are a few very human reasons people love these: the shells are delicate and crisp, the filling is creamy but not heavy, and the color makes them feel special without any extra fuss. Textural contrast always wins—light, airy choux against a smooth pastry cream is an instant crowd-pleaser. They’re easy to serve and eat by hand, which is great for parties.
Beyond texture, the flavor profile is familiar and comforting. Vanilla-forward pastry cream appeals to most palates, and the sweetness level is moderate so the puffs don’t overpower other desserts or coffee. Visually, pink puffs read fun and festive, so they work for birthdays, baby showers, or just because you want a little extra charm at the table.
Vegan & Vegetarian Swaps

Vegetarian: this recipe is already vegetarian-friendly if you eat dairy and eggs (lacto-ovo). No swaps are strictly necessary unless you avoid eggs.
Vegan: achieve a similar result by replacing dairy and eggs with plant-based counterparts and selecting a vegan egg substitute for the choux. In the pastry cream, use a plant-based milk and a rich alternative in place of heavy cream; rely on your starch (the cornstarch) for body. For the choux dough, replace butter and liquid with plant-based versions and use a commercial egg replacer or a homemade one designed to mimic the binding and steam-building properties of eggs. Note: vegan choux can be trickier because eggs play a big role in rise and texture; take it slow and test a small batch first.
Before You Start: Equipment
- Medium saucepan — for heating milk/cream and later cooking the pastry cream.
- Medium bowl — for the egg-yolk and sugar mixture.
- Whisk — for smooth pastry cream and tempering eggs.
- Fine-mesh strainer — traps cooked bits for the smoothest pastry cream.
- Plastic wrap — press directly on cream to prevent a skin.
- Wooden spoon — ideal for working the hot choux dough.
- Large bowl — to cool and finish the choux dough.
- Pastry bag and tips (5/8-inch and 1/8-inch) — for piping shells and filling.
- Baking sheet and parchment/silicone mat — for even baking and easy cleanup.
- Wire rack — to cool puffs thoroughly.
- Chopstick or small sharp knife — to make the filling hole.
Easy-to-Miss Gotchas
- Tempering eggs: drizzle about one-quarter of the hot milk first. If you rush this, you’ll end up with scrambled yolks in the cream.
- Straining pastry cream: don’t skip it. Any cooked bits make the texture gritty rather than silky.
- Choux dough temperature: let the dough cool for about 4 minutes before adding eggs. Too-hot dough will cook the egg and ruin texture.
- Egg incorporation: add eggs one at a time and watch for the dough holding its shape. Over- or under-beating changes the final rise and shell structure.
- Oven door timing: do not open the oven in the first 25 minutes. Sudden loss of heat collapses the puffs.
- Filling too early: fill only when shells are completely cool. Warm shells steam the filling and go soggy quickly.
Holiday & Seasonal Touches
These puffs are a great canvas. For spring or bridal showers, keep them bright pink and dust lightly with powdered sugar just before serving. For winter holidays, switch the vanilla to a warmer extract or fold in a touch of spice into the pastry cream. You can also serve with a small seasonal fruit on the side—keep the puff itself unchanged so it stays stable on a buffet.
Remember: any extra decoration should be non-wet (like dusting or a light glaze) so the shells don’t become soggy if they sit out for a bit. Small edible decorations on top are cute, but avoid heavy toppings that will collapse the delicate shells.
Insider Tips

Pastry Cream Tricks
- Whisk constantly while cooking the cream to avoid lumps and scorching. The corralling of heat prevents sudden scrambling.
- Press plastic wrap directly on the surface while warm to stop a skin from forming; that skin is hard to reincorporate and changes texture.
- If your pastry cream is too firm after chilling, whisk it briefly until smooth and pipeable—this rescues over-chilled custard without adding heat.
Choux Dough Tricks
- When the dough pulls away and forms a film on the pan bottom, that’s the moment the flour is cooked enough to form structure. Don’t skip this step.
- Add food coloring after cooling four minutes. Too-hot dough can change the color and can cook the egg when added.
- Pipe consistent mounds and leave space—these expand and need room for even browning and rise.
Keep-It-Fresh Plan
Unfilled choux shells store well in an airtight container at room temperature for a day — longer and they can soften. For longer storage, freeze cooled, unfilled shells in a single layer in a freezer-safe box; thaw at room temperature and fill shortly before serving.
Filled cream puffs must be refrigerated. Keep them in a covered container and consume within 24–36 hours for best texture. If you need to prepare ahead, make the pastry cream and shells separately the day before, then fill just before serving to keep shells crisp.
Your Questions, Answered
- Q: Can I make the pastry cream ahead? A: Yes—chill it for up to 2 days, pressing wrap on the surface. Whisk briefly before piping.
- Q: Why didn’t my choux puff? A: Check egg incorporation and oven temperature; eggs add steam and structure, so under- or over-added eggs affect rise.
- Q: Can I color the filling instead of the dough? A: Yes. Coloring the filling keeps shells neutral while still giving you a pink interior if that suits your presentation.
- Q: Can I swap the vanilla? A: You can use other flavorings, but add them off the heat like the vanilla to preserve their aroma.
Make It Tonight
Plan on about 2 to 2.5 hours from start to finish if you make both shells and pastry cream now: 30–40 minutes active time and about 1 hour for chilling and baking steps. Start with the pastry cream so it has at least an hour to chill while you make and bake the choux. Cool the shells completely, fill, and serve. If you’re short on time, make the cream in the morning and bake the shells in the evening—assemble just before guests arrive.
Follow the steps carefully, keep an eye on the oven, and you’ll have charming Jigglypuff Pink Cream Puffs that look like effort and taste like love. Enjoy making them—and even more, enjoy sharing them.

Jigglypuff Pink Cream Puffs
Ingredients
Ingredients
- 1 cupmilkany percentage
- 1/2 cupheavy cream
- 1/2 cup 100 g granulated sugar
- 2 tablespoonscornstarch
- 1/4 teaspoonsalt
- 4 large egg yolks
- 1 teaspoonvanilla extract
- 1/2 cupwater
- 1/4 cup 2 oz unsalted butterdiced
- 1 teaspoonsugar
- 1/4 teaspoonsalt
- 1/2 cup 60 g all-purpose flour
- 2 to3 drops red food coloring
- 2 large eggs
- 1 large egg
- 1 tablespoonwater
Instructions
Instructions
- Make the pastry cream: in a medium saucepan, combine 1 cup milk and 1/2 cup heavy cream and heat over medium until just before simmering (small bubbles forming at the edge). Remove from heat and set aside.
- In a medium bowl, whisk together 1/2 cup (100 g) granulated sugar, 2 tablespoons cornstarch, 1/4 teaspoon salt, and 4 large egg yolks until smooth and pale.
- With the whisk running, slowly drizzle about one-quarter of the hot milk/cream into the egg-yolk mixture to temper the eggs, then continue dripping in the remaining hot milk/cream while whisking constantly until fully combined.
- Pour the tempered egg mixture back into the same saucepan. Cook over medium heat, whisking constantly, until the mixture thickens, comes to a gentle boil, and reaches the consistency of thick pudding (about 3–6 minutes). Keep whisking vigorously until smooth.
- Remove from heat and stir in 1 teaspoon vanilla extract. Immediately pour the pastry cream through a fine-mesh strainer into a medium bowl, using the whisk or a spatula to push it through to remove any cooked bits.
- Press a piece of plastic wrap directly onto the surface of the pastry cream to prevent a skin, then refrigerate until completely chilled, at least 1 hour.
- Preheat the oven to 375°F (190°C). Line a baking sheet with parchment paper or a silicone baking mat.
- Make the choux dough: in a medium saucepan, combine 1/2 cup water, 1/4 cup (2 oz) diced unsalted butter, 1 teaspoon sugar, and 1/4 teaspoon salt. Bring to a rolling boil over medium-high heat, stirring occasionally.
- As soon as the butter is melted and the mixture is boiling, add 1/2 cup (60 g) all-purpose flour all at once. Stir vigorously with a wooden spoon until the flour is fully incorporated and the dough pulls away from the sides and forms a thin film on the bottom of the pan.
- Transfer the dough to a large bowl and let it cool for about 4 minutes, until it is no longer hot to the touch.
- Add 2 to 3 drops red food coloring to the cooled dough, then add the first of the 2 large eggs. Stir with the wooden spoon until the egg and coloring are fully incorporated and the dough is smooth. Add the second egg and stir until the dough is glossy and just holds its shape when lifted.
- Transfer the dough to a pastry bag fitted with a 5/8-inch tip. Pipe mounds about 1 1/2 inches in diameter on the prepared baking sheet, leaving about 1 inch between each mound. If any peaks form, wet your fingertip and gently smooth them to prevent burning.
- In a small bowl, whisk together 1 large egg and 1 tablespoon water to make the egg wash. Gently brush the tops of each piped puff with the egg wash.
- Bake in the preheated oven for 25 minutes without opening the oven door. After 25 minutes, check the puffs: they should be lightly browned. If they are not, bake an additional 2–5 minutes until lightly golden. Remove from the oven and cool completely on a wire rack before filling.
- To fill: poke a small hole in the bottom or side of each cooled cream puff with a chopstick or small sharp knife. If the pastry cream has firmed too much in the fridge, whisk it for about 30 seconds until smooth and pipeable.
- Transfer the chilled pastry cream to a piping bag fitted with a 1/8-inch round tip and fill each cream puff through the hole until generously filled.
- Serve immediately or keep filled cream puffs refrigerated until serving.
Equipment
- Medium Saucepan
- Medium Bowl
- Whisk
- Wooden Spoon
- Large Bowl
- Pastry bag
- 5/8-inch tip
- 1/8-inch round tip
- Baking Sheet
- Parchment paper or silicone baking mat
- Fine Mesh Strainer
- Wire Rack
Notes
Cream puffs are best on the first day, but can be stored covered in the refrigerator for up to 3 days.