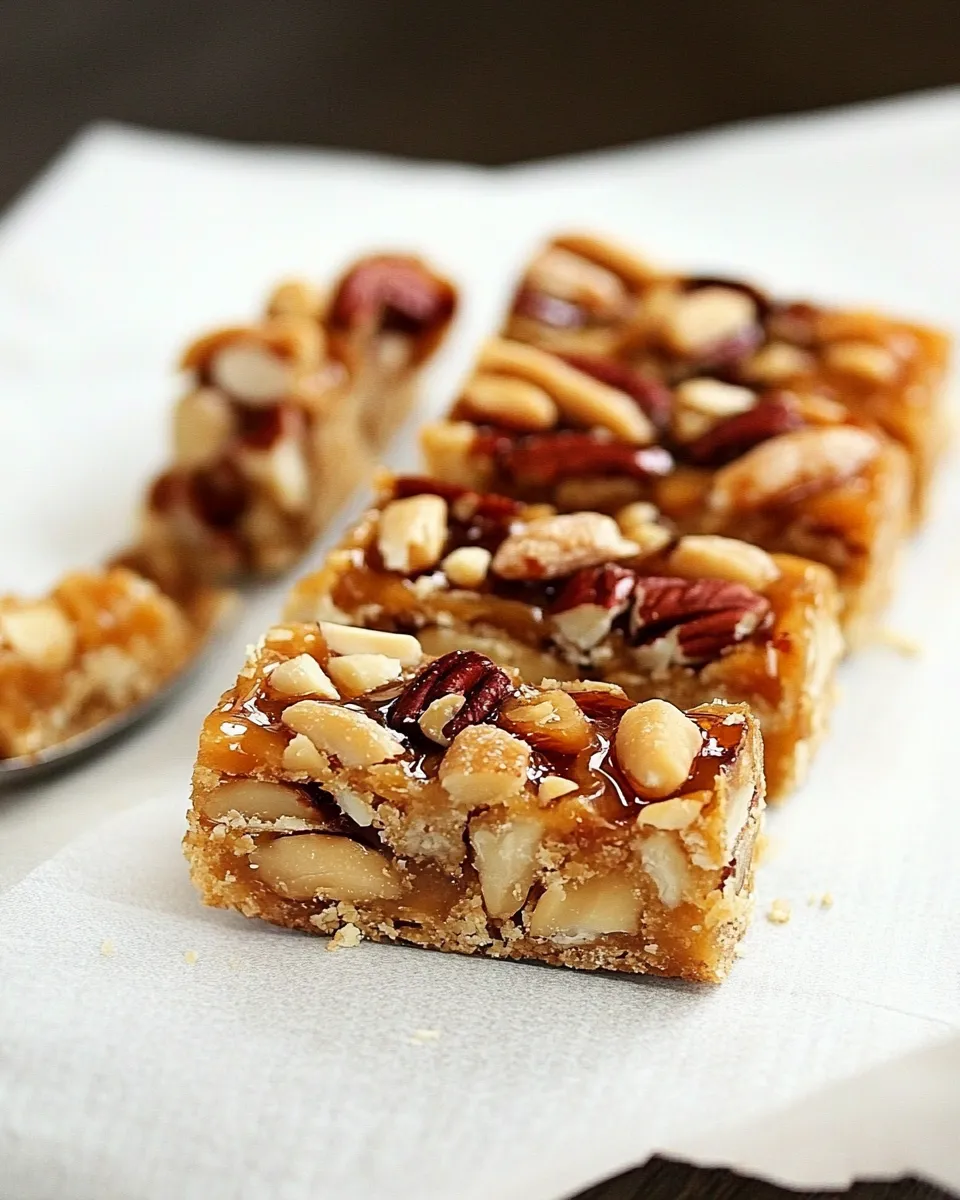
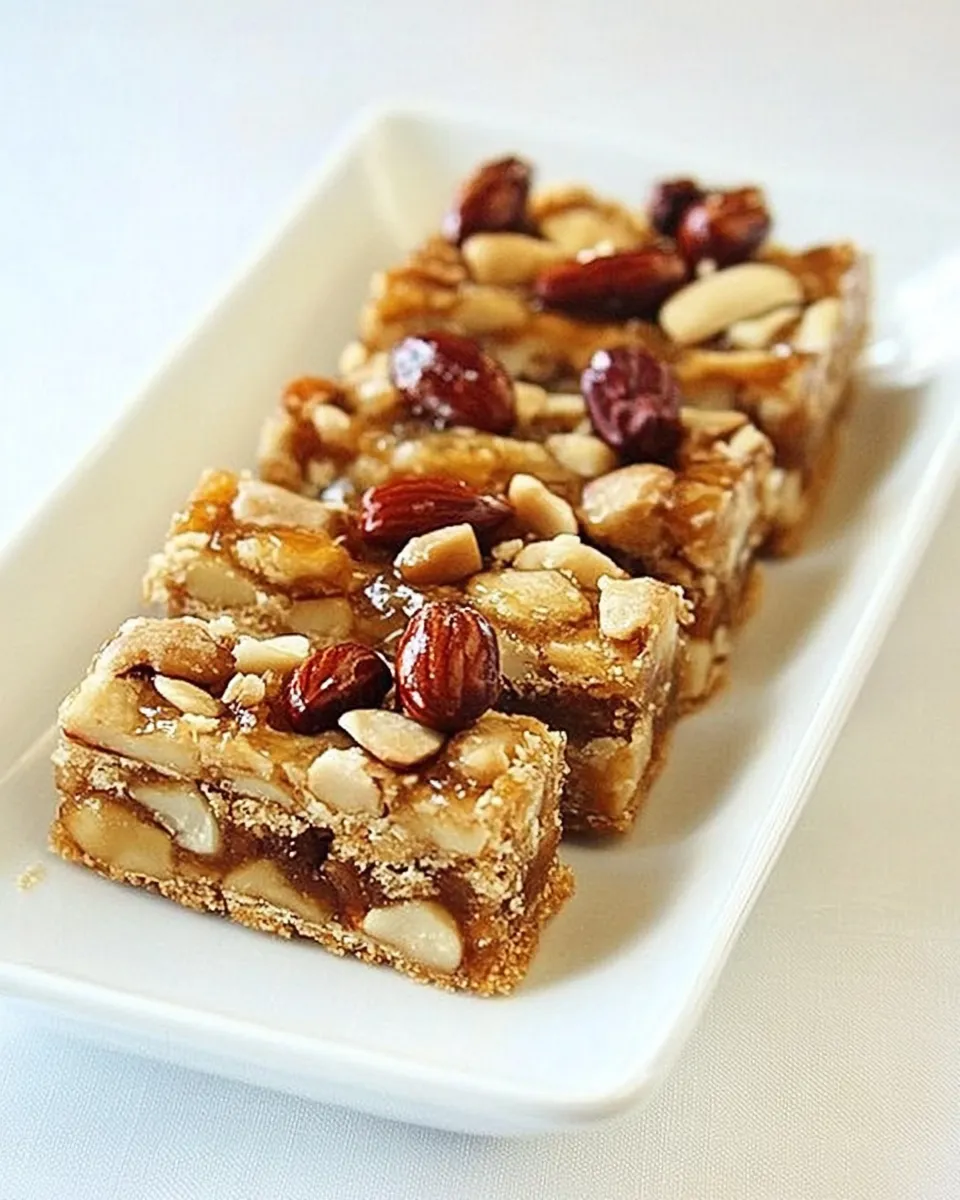
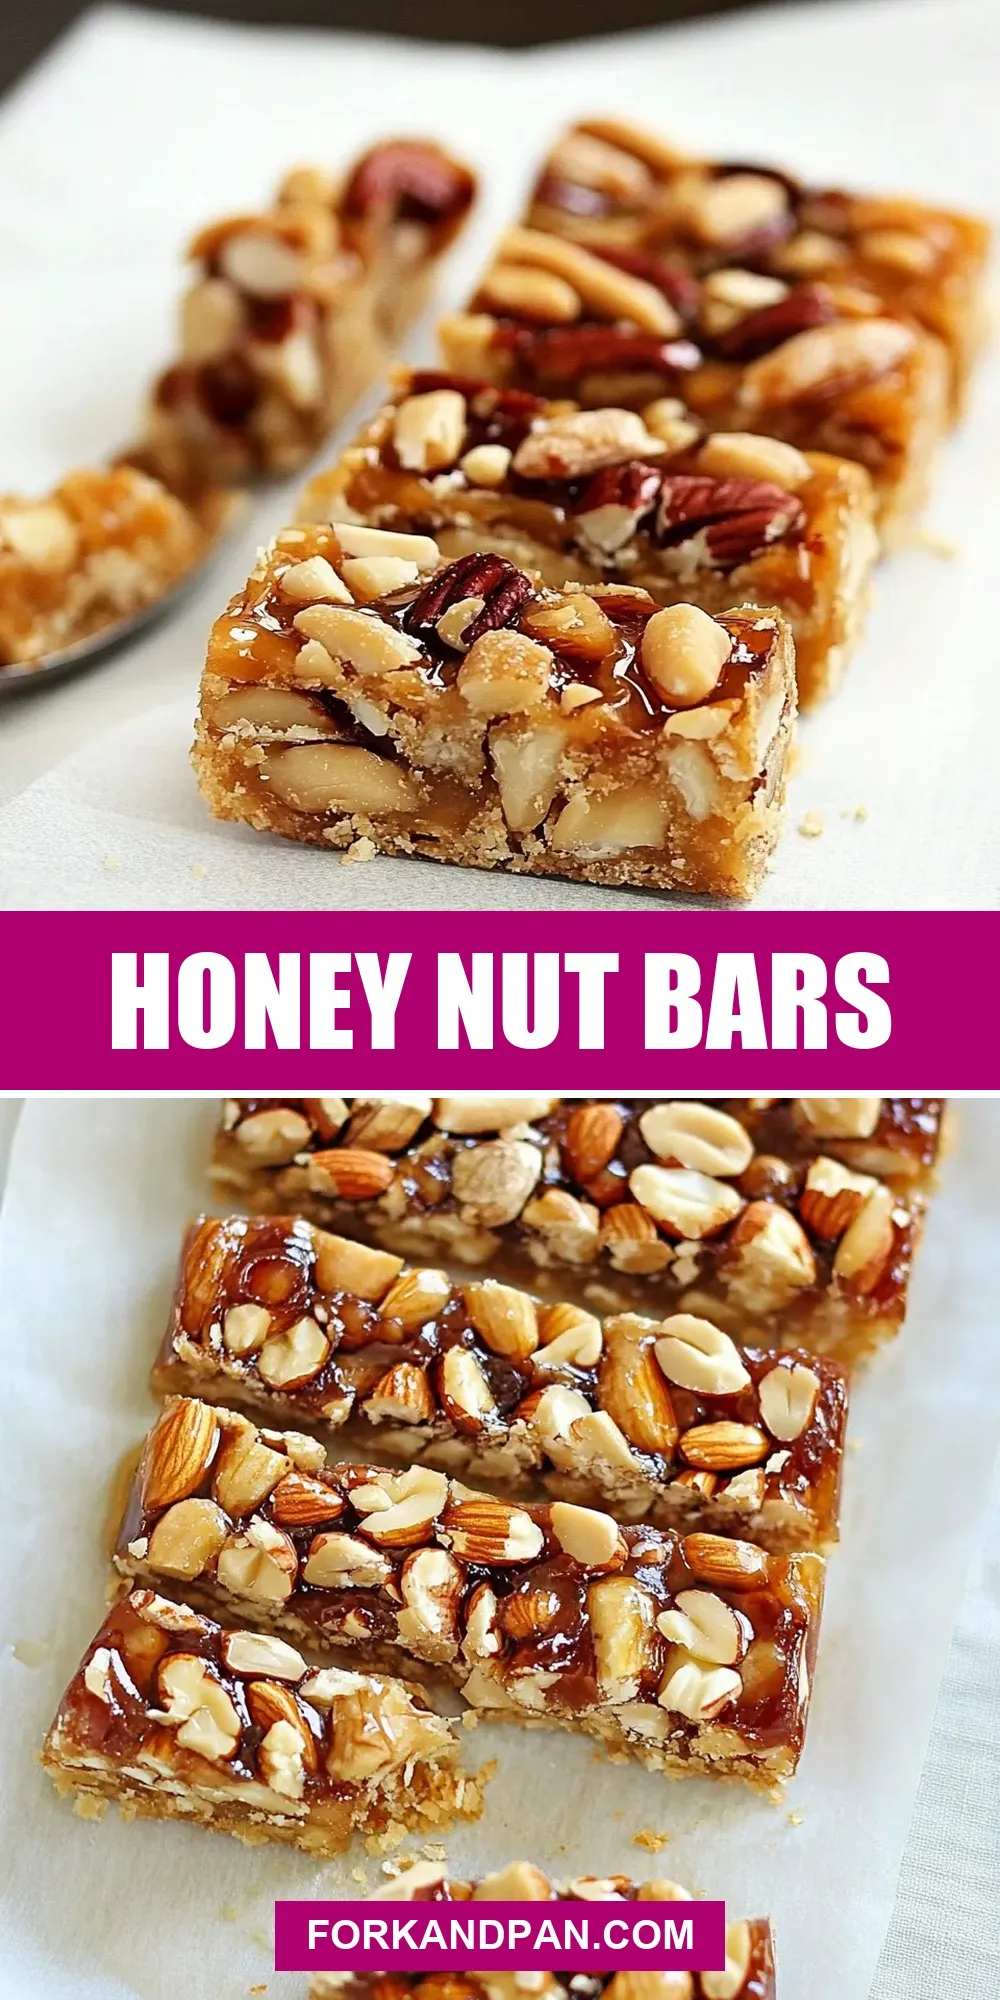
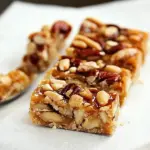
Honey Nut Bars
These honey nut bars are my go-to when I want something butter-forward, crunchy, and reliably crowd-pleasing. The base is a short, almond-studded crust that bakes up crisp and light. A sticky, caramelized honey-and-brown-sugar topping studded with toasted mixed nuts finishes the bars and gives you that crackly snap in every bite.
I like that this recipe runs on simple technique: pulse, press, bake, pour, bake again, cool, and cut. It’s methodical, which makes it easy to teach to friends or prep for a potluck. The steps are forgiving if you follow the key points—keep the butter cold, toast the nuts, and don’t rush the cooling.
Make these for a coffee morning or a holiday platter. They travel well and hold their shape, which is why I keep this recipe in regular rotation. If you want bars that balance a tender shortbread with a glossy nut caramel, this one delivers every time.
Ingredient Notes

Ingredients
- 1/2 cup whole blanched almonds, toasted — Adds almond flavor and texture to the crust; toasting intensifies the nutty notes.
- 1/2 cup granulated sugar — Sweetens and helps create a tender, slightly crisp shortbread texture.
- 11-1/4 oz. (2-1/2 cups) unbleached all-purpose flour — The structure for the crust; unbleached gives a bit more flavor than bleached.
- 1/2 tsp. baking powder — A small lift to keep the crust light, not cakey.
- 1/2 tsp. kosher salt — Balances sweetness and tightens the crust’s flavor.
- 6 oz. (3/4 cup) cold unsalted butter, cut into 1/2-inch pieces — Cold butter creates pea-sized pockets for a flaky, shortbread-like crust.
- 1 large egg, lightly beaten — Binds the crust and gives it pliability for pressing into the pan.
- 3/4 cup packed light brown sugar — Forms the caramel base for the topping with molasses undertones.
- 3 oz. (6 Tbs.) unsalted butter — Melts into the brown sugar to create a rich, buttery topping.
- 1/3 cup clover honey — Gives the topping its honeyed depth and glossy finish; clover is mild and reliable.
- 1/2 tsp. table salt — Tightens the caramel flavor; table salt dissolves quickly and distributes evenly.
- 2 Tbs. heavy cream — Adds silkiness and controls the caramel’s set; add carefully as it can splatter.
- 1 teaspoon pure vanilla extract — Rounds and brightens the topping; use pure for best flavor.
- 3 cups whole salted mixed nuts, toasted — The crunch element in the topping; toasted and salted nuts give the bars that irresistible contrast.
Honey Nut Bars: Step-by-Step Guide
- Position a rack in the center of the oven and preheat to 350°F. Line a 9×13-inch baking pan with aluminum foil, leaving a 1–2 inch overhang on the shorter sides to act as handles, and spray the foil with cooking spray.
- In a food processor, pulse the toasted whole blanched almonds and granulated sugar until finely ground.
- Add the unbleached all-purpose flour, baking powder, and kosher salt to the processor and pulse just to combine.
- Add the cold unsalted butter pieces and pulse in 1-second bursts (about 5–6 pulses) until the butter pieces are the size of small peas.
- Add the lightly beaten egg and pulse just until the dough begins to gather into large clumps.
- Using your fingertips, press the dough evenly into the bottom of the prepared pan and up the sides about 1 inch to form a crust approximately 1/4 inch thick. Use the tines of a fork to dock (prick) the crust evenly all over.
- Bake the crust until the edges are light golden brown and the center looks dry, 15–20 minutes. Remove from the oven and transfer the pan to a wire rack to cool while you make the topping.
- In a medium saucepan over medium-high heat, combine the packed light brown sugar, unsalted butter, honey, and table salt. Stir often and bring to a boil. Slowly and carefully add the heavy cream (stand back; it may splatter) and return the mixture to a gentle boil. Remove the pan from the heat and stir in the pure vanilla extract and the toasted whole salted mixed nuts until the nuts are evenly coated.
- Immediately pour the nut mixture over the cooled crust and spread it evenly with a spatula, tilting the pan as needed to reach the edges and corners. Return the pan to the oven and bake until the topping has just started to bubble slowly in the center, about 20 minutes.
- Remove the pan from the oven and place it on a wire rack to cool completely.
- Use the foil overhang to lift the cooled bars from the pan and place them on a cutting board. Peel the foil away from the bars before cutting. Cut into 16 bars with a sharp knife.
Why This Recipe Is Reliable
This recipe breaks the bar into two clear components: a shortbread-like crust and a hot, nutty caramel topping. That separation of tasks makes timing predictable. The crust bakes once, which prevents it from becoming soggy when you add the topping. Toasting the nuts ahead of time ensures they stay crisp and don’t leach moisture into the caramel.
The method also leaves little room for proportional errors. The crust ingredients are scaled to press into a 9×13 pan with a 1/4-inch thickness, and the topping quantity covers that area without drowning the base. The finish—a slow bubble in the center—signals doneness more reliably than a set time in many ovens, so you check visually rather than guessing.
Substitutions by Category
- Nuts: Swap the whole salted mixed nuts for an equal volume of pecans, walnuts, or a nut blend you prefer. If using unsalted nuts, increase the table salt in the topping by a pinch to keep balance.
- Sweeteners: If you want a rounder flavor, you can replace clover honey with a similarly measured mild honey or light maple syrup; expect a slightly different flavor profile. Avoid thin sweeteners that will make the topping runny.
- Dairy: The heavy cream helps stabilize the caramel. For a slightly lighter topping, use half-and-half, but the set will be a bit firmer. Butter swaps should remain unsalted to control salt precisely.
- Flour and texture: If you need gluten-free, use a 1:1 gluten-free flour blend in place of the all-purpose flour, but expect a slightly crumblier crust. Do not reduce the flour amount.
Prep & Cook Tools

- 9×13-inch baking pan — The recipe is scaled specifically for this pan size.
- Aluminum foil — Makes lifting and cutting the bars straightforward.
- Cooking spray — Prevents sticking and saves your foil.
- Food processor — For grinding the almonds and cutting the butter into the flour.
- Medium saucepan — For making the topping; use heavy-bottomed to prevent scorching.
- Spatula — For spreading the nut mixture evenly over the crust.
- Wire rack — For cooling the pan evenly.
- Sharp knife — For clean, straight cuts once the bars are fully cooled.
Avoid These Traps
- Warm butter: If the butter is too soft when you pulse it, the crust will be greasy and dense. Keep it cold and pulse in short bursts.
- Over-processing the almonds: Grind them until finely ground, but stop before turning them into paste; that will change the crust texture.
- Rushing the cream step: Add the heavy cream slowly while standing back; it can splatter when it hits hot sugar and butter.
- Skipping docking: Pricking the crust keeps it from puffing and ensures even baking.
- Cutting too soon: The topping needs to cool completely to set; cutting while warm yields messy bars.
Spring to Winter: Ideas
- Spring: Cut bars into smaller squares for tea trays. Add a scattering of flaky sea salt on top after baking for a fresher finish.
- Summer: Serve slightly chilled with a scoop of vanilla ice cream for a cool, crunchy dessert.
- Autumn: Swap half the mixed nuts for toasted pecans and serve alongside spiced coffee or cider.
- Winter: Use darker honey or a touch of molasses in the topping for deeper flavor. They’ll pair well with strong black coffee or nutmeg-sprinkled eggnog.
Notes from the Test Kitchen
We tested this recipe across a variety of ovens and found a consistent result when following two rules: keep the butter cold for the crust, and toast all nuts first. The crust held its shape well after baking and cooling; the topping set reliably when it reached that slow bubble in the center.
Yield: 16 bars. Cutting into 16 even pieces gives a satisfying balance of crust and topping in every serving. If you prefer chunkier pieces, cut into 12 instead. For clean cuts, run a sharp knife under hot water, dry it, then slice in one smooth motion between each cut.
Prep Ahead & Store
You can make the crust and refrigerate it wrapped for up to 24 hours before baking. Once baked and cooled, the bars store in an airtight container at room temperature for 3–4 days. If your kitchen is warm, keep them in the fridge; they’ll firm up and still taste excellent.
To freeze: wrap individual bars tightly in plastic wrap, then place them in a freezer bag for up to 2 months. Thaw at room temperature for about 30–60 minutes before serving.
Troubleshooting Q&A
- Q: My crust is soggy after baking the topping. Why?
A: The crust should be fully baked until dry in the center before adding the topping. If it looks underbaked, give it a few more minutes on the rack before topping.
- Q: The topping didn’t set—too sticky. What happened?
A: Either the topping didn’t reach a sufficient boil before finishing or it was cut too soon. Make sure the topping returns to a gentle boil after adding the cream, and cool completely before cutting.
- Q: The nuts lost crunch. Any fix?
A: Toast nuts before adding to the topping; they retain crunch better. If humidity is high, store in the fridge to keep them crisper longer.
The Takeaway
This Honey Nut Bars recipe is straightforward, dependable, and crowd-friendly. Work cold butter into the crust, toast your nuts, and be patient with the cooling. Follow the steps and you’ll have glossy, crunchy bars with a tender shortbread base every time. Make a batch for the week and you’ll understand why these are a keeper.
Honey Nut Bars
Ingredients
Ingredients
- 1/2 cup whole blanched almonds toasted1/2 cup granulated sugar11-1/4 oz. (2-1/2 cups) unbleached all-purpose flour1/2 tsp. baking powder1/2 tsp. kosher salt6 oz. (3/4 cup) cold unsalted butter, cut into 1/2-inch pieces1 large egg, lightly beaten
- 3/4 cup packed light brown sugar3 oz. 6 Tbs. unsalted butter1/3 cup clover honey1/2 tsp. table salt2 Tbs. heavy cream1 teaspoon pure vanilla extract3 cups whole salted mixed nuts, toasted
Instructions
Instructions
- Position a rack in the center of the oven and preheat to 350°F. Line a 9x13-inch baking pan with aluminum foil, leaving a 1–2 inch overhang on the shorter sides to act as handles, and spray the foil with cooking spray.
- In a food processor, pulse the toasted whole blanched almonds and granulated sugar until finely ground.
- Add the unbleached all-purpose flour, baking powder, and kosher salt to the processor and pulse just to combine.
- Add the cold unsalted butter pieces and pulse in 1-second bursts (about 5–6 pulses) until the butter pieces are the size of small peas.
- Add the lightly beaten egg and pulse just until the dough begins to gather into large clumps.
- Using your fingertips, press the dough evenly into the bottom of the prepared pan and up the sides about 1 inch to form a crust approximately 1/4 inch thick. Use the tines of a fork to dock (prick) the crust evenly all over.
- Bake the crust until the edges are light golden brown and the center looks dry, 15–20 minutes. Remove from the oven and transfer the pan to a wire rack to cool while you make the topping.
- In a medium saucepan over medium-high heat, combine the packed light brown sugar, unsalted butter, honey, and table salt. Stir often and bring to a boil. Slowly and carefully add the heavy cream (stand back; it may splatter) and return the mixture to a gentle boil. Remove the pan from the heat and stir in the pure vanilla extract and the toasted whole salted mixed nuts until the nuts are evenly coated.
- Immediately pour the nut mixture over the cooled crust and spread it evenly with a spatula, tilting the pan as needed to reach the edges and corners. Return the pan to the oven and bake until the topping has just started to bubble slowly in the center, about 20 minutes.
- Remove the pan from the oven and place it on a wire rack to cool completely.
- Use the foil overhang to lift the cooled bars from the pan and place them on a cutting board. Peel the foil away from the bars before cutting. Cut into 16 bars with a sharp knife.
Equipment
- 9x13 inch baking pan
- Aluminum Foil
- Cooking Spray
- Food Processor
- Medium Saucepan
- Wire Rack
- Spatula
- Fork
- Sharp Knife
- Oven