Creamy Lemon Crumb Squares
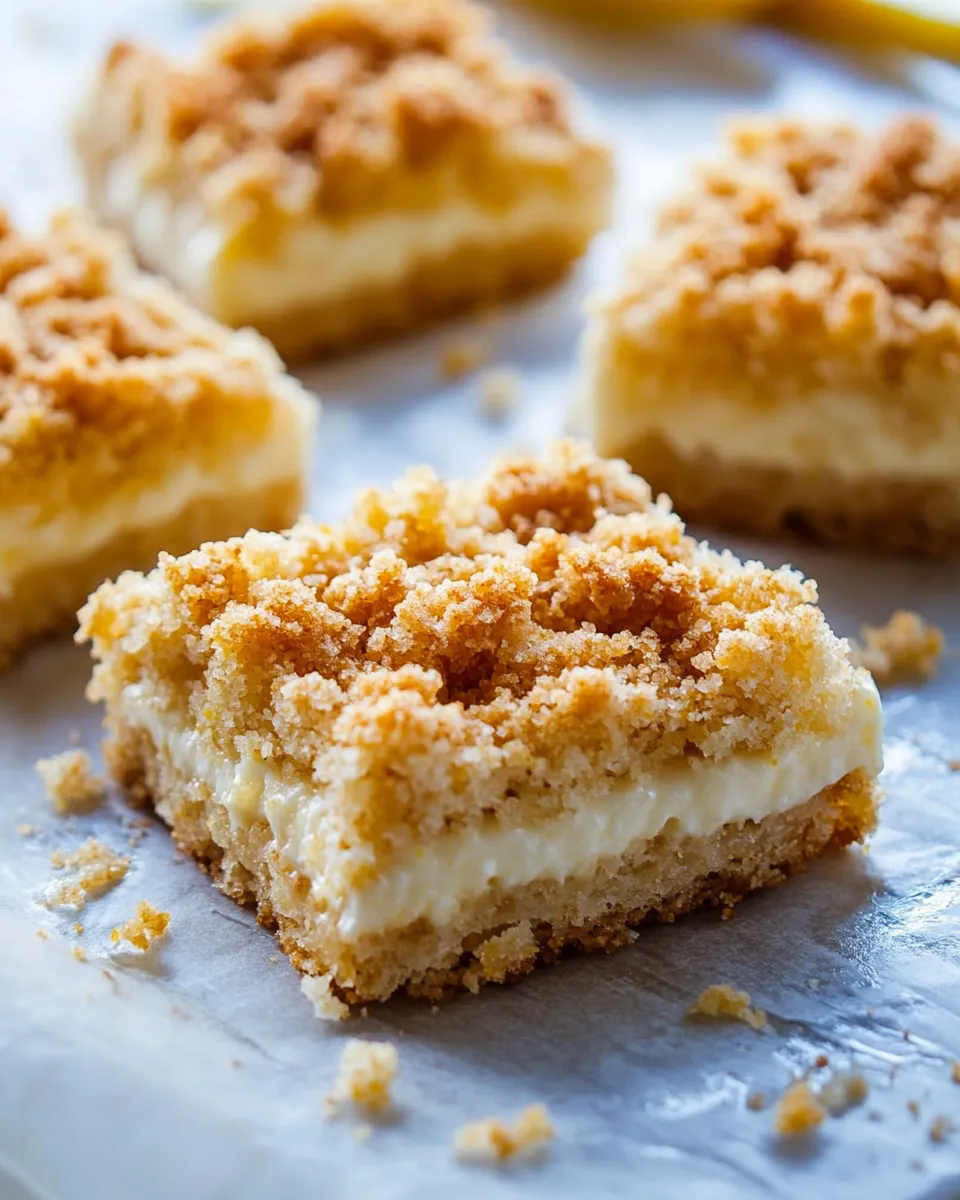
I love a dessert that looks like effort but mostly relies on good proportions and a few smart moves. These Creamy Lemon Crumb Squares are one of those recipes — a buttery oat crumb, a bright condensed-milk lemon filling, and a short bake that produces a tender, sliceable square. They’re bright enough for spring, but straightforward enough to make any time you want a reliable citrus bar without fuss.
What I appreciate most is the balance: the oats and brown sugar give texture and toastiness, while the condensed milk and lemon deliver a silky, tangy center. The topping is simply the other half of the crumb mixture, crumbled over the lemon layer — no rolling pin or fancy lattice work required.
Below I’ll walk you through exactly what’s in the recipe, step-by-step instructions from the original source, swaps for common allergies, troubleshooting, and storage so your squares stay perfect. This is written from the practical side of my kitchen: clear, usable, and generous with tips to help you nail the texture and flavor every time.
Ingredient Breakdown

These bars are essentially three components: a buttery oat crumble (used for both crust and topping), a glossy lemon-condensed milk filling, and a light bake to set everything. Understanding each component helps you adapt the texture and flavor without losing what makes these bars special.
Ingredients
- 1/2 cup unsalted butter, slightly softened — provides the fat that binds crumbs, adds richness and helps browning.
- 1 cup brown sugar, lightly packed — adds moisture, molasses flavor, and helps the crumb caramelize.
- 1 1/3 cup all-purpose flour — structure for the crust and topping; keeps crumbs tender when combined with oats.
- 1 cup old-fashioned oats — texture and chew; helps the crumb hold together while adding rustic bite.
- 1 teaspoon baking powder — lightens the crumb slightly so it isn’t too dense.
- ½ teaspoon salt — balances sweetness and enhances lemon flavor.
- 1 (14 ounce) can sweetened condensed milk — the creamy, sweet base for the lemon filling; contributes to a glossy, set center.
- ½ cup lemon juice — provides bright acidity to cut the sweetness; fresh-squeezed is best for flavor.
- zest of 1 lemon — concentrated lemon aroma and a layer of citrus oil that lifts the filling.
Step-by-Step: Creamy Lemon Crumb Squares
- Preheat oven to 350°F and spray an 8×11-inch baking pan with cooking spray.
- In a large bowl, beat 1/2 cup slightly softened unsalted butter and 1 cup lightly packed brown sugar until well combined.
- In a separate bowl, stir together 1 1/3 cups all-purpose flour, 1 cup old-fashioned oats, 1 teaspoon baking powder, and 1/2 teaspoon salt.
- Add the dry mixture to the butter–sugar mixture and stir until it forms a coarse crumb.
- Press half of the crumb mixture firmly and evenly into the bottom of the prepared pan to form the crust.
- In another bowl, whisk together 1 (14 ounce) can sweetened condensed milk, 1/2 cup lemon juice, and the zest of 1 lemon until smooth.
- Pour and spread the lemon-condensed milk mixture evenly over the pressed crust.
- Break the remaining crumb mixture into small clumps with your fingers or a fork and evenly crumble it over the lemon layer.
- Bake for 20 to 25 minutes, or until the top is golden brown and the filling is set.
- Remove the pan from the oven and let it sit at room temperature for 30 minutes.
- Refrigerate the pan for a couple of hours, or until the bars are completely chilled and firm.
- Cut into squares and serve cool.
Why Creamy Lemon Crumb Squares is Worth Your Time

These bars strike a rare balance: they’re simple enough for weeknight baking and pretty enough for a potluck. The technique is forgiving — press half the crumb for a stable base and break the rest for a rustic top — so you don’t need pastry skills. Yet the flavor payoff is high: the sweet condensed milk gives an almost custard-like richness while lemon juice and zest keep the bars bright and clean on the palate.
They’re also transport-friendly. Once chilled and cut, the squares hold their shape and travel well in a single-layer container, making them a dependable choice when you need a dessert that won’t collapse in transit. In short: low effort, high return.
Allergy-Friendly Substitutes
Here are practical swaps for common dietary restrictions. I’m focusing on straightforward ingredient swaps; always check labels for cross-contamination risks if allergies are severe.
- Dairy (butter) — Use a plant-based buttery spread at room temperature. It should be similar in water content to keep the crumb texture close to the original.
- Dairy (sweetened condensed milk) — Look for canned sweetened condensed coconut milk for a dairy-free alternative. Flavor will be slightly coconut-forward; use fresh lemon to keep brightness.
- Gluten — Substitute the all-purpose flour for a 1:1 gluten-free baking blend that contains xanthan gum, and confirm the oats are labeled gluten-free.
- Reduced sugar — You can try a light brown sugar substitute, but expect a shift in texture and browning. Because sweetened condensed milk drives a lot of sweetness and structure, reducing sugar here is tricky without changing the outcome.
Equipment Breakdown
You don’t need fancy gear. Here’s what I use and why each item matters:
- 8×11-inch baking pan — The specified pan size controls thickness. A larger or smaller pan will change baking time and texture.
- Mixing bowls — One for the butter–sugar mix, one for dry ingredients, and a small bowl for the lemon-condensed mix keeps things tidy.
- Hand mixer or sturdy spoon — A mixer speeds creaming butter and brown sugar, but a spoon or spatula works if you cream until combined.
- Citrus zester — For fine lemon zest that distributes evenly through the filling.
- Spatula or back of a measuring cup — Helpful for pressing the crumb firmly into the pan for an even crust.
- Refrigerator space — Chilling is essential to fully set the filling before cutting.
Watch Outs & How to Fix
A few things can go sideways, but each has a quick fix:
- Filling won’t set: If the center jiggles after baking, it likely needed the full bake time or a bit longer. Always let the pan sit at room temperature for 30 minutes and then chill for a couple of hours — the recipe relies on cooling to finish setting.
- Crust too crumbly: If crumbs fall apart after cooling, press the base more firmly before adding the filling next time, or slightly warm the butter to ensure it binds the dry ingredients better.
- Top burns before filling sets: Tent the pan loosely with foil halfway through the bake to prevent over-browning while allowing the center to continue setting.
- Oats too chewy: Old-fashioned oats provide texture by design. If you prefer a finer crumb, pulse oats once in a food processor before combining.
Dietary Customizations
Want to tailor these squares to a specific diet? Here are clear, practical routes that maintain the dessert’s integrity.
- Lower-sugar approach: Because sweetened condensed milk is integral to the filling, consider serving smaller squares instead of altering the recipe. This keeps texture and flavor intact while reducing per-serving sugar.
- Vegan version: Swap butter for a firm, buttery plant-based spread and use canned sweetened condensed coconut milk. Expect a slightly different flavor profile but similar structure once chilled.
- Gluten-free: Swap the all-purpose flour for a trusted 1:1 gluten-free blend and use certified gluten-free oats to avoid cross-contamination.
What I Learned Testing
Testing this recipe three times taught me how sensitive the texture is to pressing and chilling. When I pressed the base too lightly, the filling slipped during cutting and the bars lacked clean edges. Firm, even pressure on the bottom made a noticeable difference: cleaner slices and a more pronounced contrast between the crunchy base and silky center.
I also experimented with zest amounts. One lemon’s worth of zest gives a subtle brightness without bitterness. If you love punchy lemon, add an extra half-zest, but finely grate it so you don’t get large flakes in the filling.
Finally, chilling is non-negotiable. Skipping refrigeration results in under-set bars and a messier cut. Give them the time they need in the fridge — it’s part of the technique, not downtime you can skip.
Keep It Fresh: Storage Guide
Proper storage keeps these squares tasting their best:
- Room temperature: Not recommended after chilling; the filling remains soft and could become sticky at room temperature. If you must, keep covered for up to 24 hours.
- Refrigerator: Store in an airtight container for up to 5 days. Arrange squares in a single layer or separate layers with parchment to prevent sticking.
- Freezer: You can freeze individual squares wrapped tightly in plastic and placed in a freezer bag for up to 2 months. Thaw overnight in the refrigerator before serving.
Popular Questions
Can I use fresh lemon juice only? Yes. Fresh-squeezed lemon juice is the best option for bright, clean flavor. Bottled lemon juice will work in a pinch but will lack brightness.
Why is condensed milk used instead of eggs? The sweetened condensed milk creates a smooth, set filling without eggs, making the process simpler and less temperature-sensitive. It also gives a custard-like richness that pairs beautifully with lemon.
Can I make this in a different pan size? You can, but thickness will change. A smaller pan will make taller bars and may need longer baking; a larger pan will make thinner bars and require less bake time. Stick to the specified 8×11-inch for predictable results.
How do I get clean slices? Chill the pan fully, then use a sharp knife warmed under hot water and wiped dry between cuts. This helps slice through the glossy filling without tearing the crumb top.
In Closing
These Creamy Lemon Crumb Squares are the kind of recipe I reach for when I want a dessert that’s unfussy but satisfying. The technique is straightforward, the ingredients are pantry-friendly, and the result is a bright, creamy bar with a lovely oat-crumble contrast. Follow the pressing, baking, and chilling steps, and you’ll have neat, flavorful squares that are great for sharing — or keeping all to yourself.
If you try them, let me know how you like the balance of sweet and tart, and whether you stuck with the classic or tried one of the swaps. I find a little extra zest often makes them sing, but they’re forgiving, so make them your own and enjoy the process.
Creamy Lemon Crumb Squares
Ingredients
Ingredients
- 1/2 cupunsalted butter slightly softened
- 1 cupbrown sugar lightly packed
- 1 1/3 cupall-purpose flour
- 1 cupold-fashioned oats
- 1 teaspoonbaking powder
- 1/2 teaspoonssalt
- 1 14 ounce cansweetened condensed milk
- 1/2 cuplemon juice
- zest of 1 lemon
Instructions
Instructions
- Preheat oven to 350°F and spray an 8x11-inch baking pan with cooking spray.
- In a large bowl, beat 1/2 cup slightly softened unsalted butter and 1 cup lightly packed brown sugar until well combined.
- In a separate bowl, stir together 1 1/3 cups all-purpose flour, 1 cup old-fashioned oats, 1 teaspoon baking powder, and 1/2 teaspoon salt.
- Add the dry mixture to the butter–sugar mixture and stir until it forms a coarse crumb.
- Press half of the crumb mixture firmly and evenly into the bottom of the prepared pan to form the crust.
- In another bowl, whisk together 1 (14 ounce) can sweetened condensed milk, 1/2 cup lemon juice, and the zest of 1 lemon until smooth.
- Pour and spread the lemon-condensed milk mixture evenly over the pressed crust.
- Break the remaining crumb mixture into small clumps with your fingers or a fork and evenly crumble it over the lemon layer.
- Bake for 20 to 25 minutes, or until the top is golden brown and the filling is set.
- Remove the pan from the oven and let it sit at room temperature for 30 minutes.
- Refrigerate the pan for a couple of hours, or until the bars are completely chilled and firm.
- Cut into squares and serve cool.
Equipment
- 8x11-inch baking pan
- Cooking Spray
- Large Bowl
- Mixing Bowl
- Whisk
- Fork
- Oven
Notes
An 8x11 dish isn't one that everyone has. You can use a 9x13 baking dish but they will be really thin. My suggestion is to roll up foil and place it on one end of a 9x13 to make a barrier the size of an 8x11 if you don't have one.
Source:
The Pioneer Woman