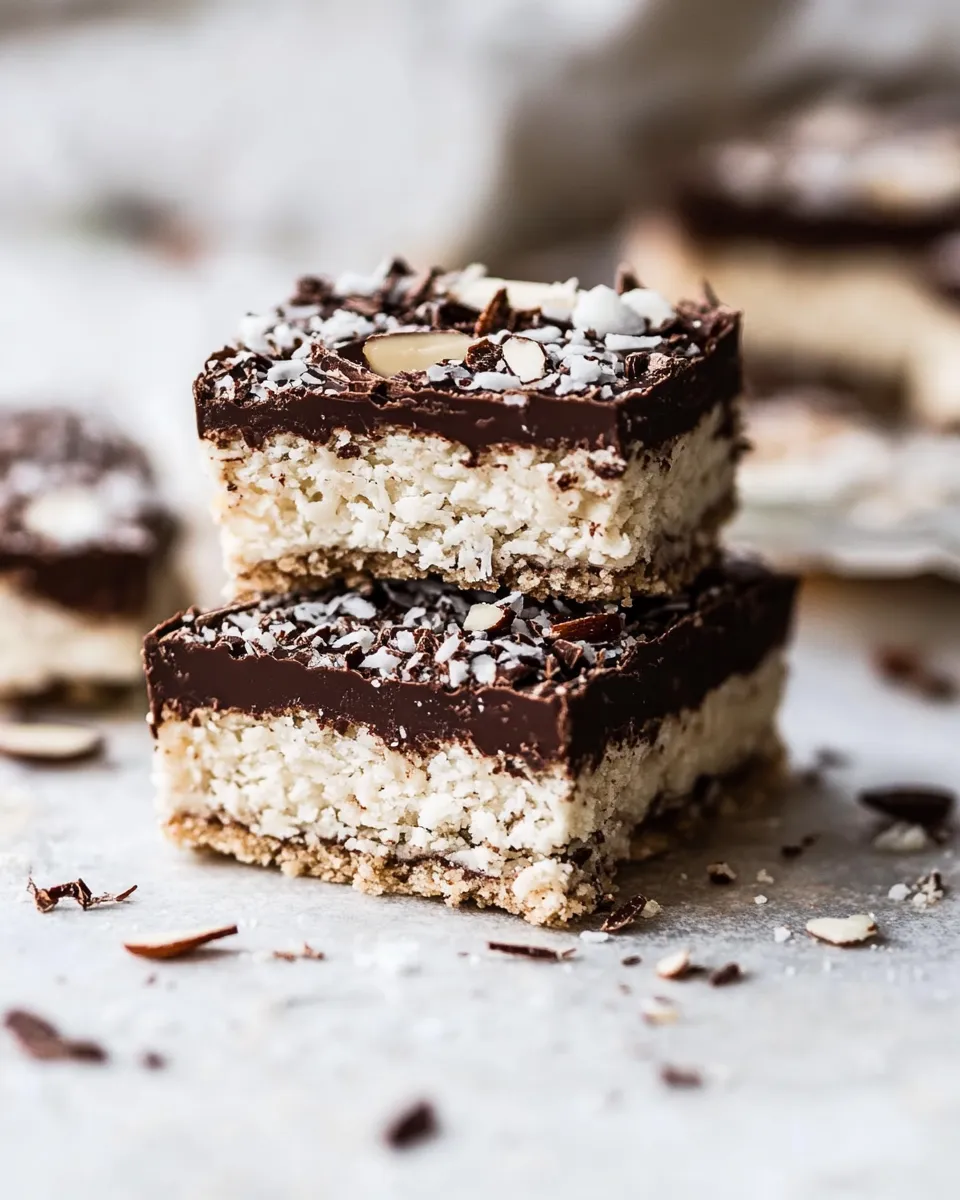
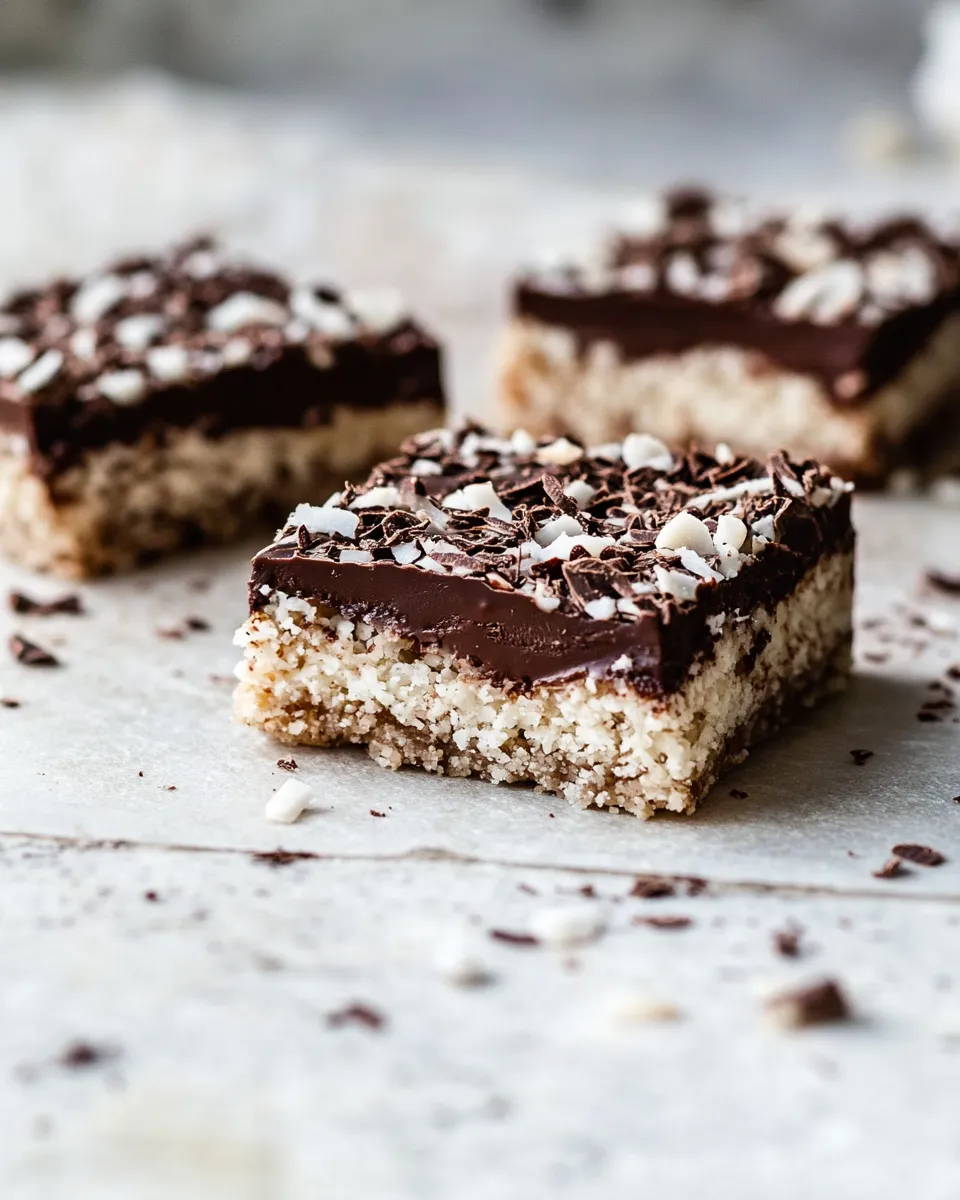
Chocolate Coconut Almond Bars.
These Chocolate Coconut Almond Bars are my kind of no-nonsense treat: straightforward to make, flexible in flavor, and reliably satisfying. They balance crunchy almonds, sweet dates, a creamy coconut layer, and a glossy chocolate finish. I keep the recipe on hand for last-minute guests, snack boxes, or a slice of something sweet after dinner.
I like desserts that travel well and don’t demand fuss. These bars come together with a food processor and a little patience for chilling. The result is dense and chewy with pockets of toasted coconut and the sharp snap of chocolate on top.
Below you’ll find what to buy, the ingredient list, precise step-by-step directions, and practical notes from my kitchen so you can make these bars with confidence.
What to Buy

Shop for whole, high-quality ingredients since the recipe highlights a few simple elements. Get plump Medjool dates, good dark or semi-sweet chocolate, and unsweetened shredded coconut so the sweetness level stays balanced. If you don’t already have canned coconut milk or coconut oil, pick brands you trust—those flavors are forward here.
Ingredients
- 1/2 cup raw almonds — provides crunch and a nutty base for the crust.
- 1 cup unsweetened flaked coconut — used in the almond-date base to add texture and coconut flavor.
- 12 plump medjool dates pitted — natural sweetener and binder for the base; choose soft, fresh dates.
- 2 teaspoons vanilla — lifts the sweetness and rounds flavors in the base.
- 1/4 cup coconut oil — helps the base bind and firms when chilled.
- 2 cups unsweetened flaked coconut — main component of the coconut layer; unsweetened keeps the sweet level balanced.
- 1/2 cup canned coconut milk — adds creaminess to the coconut layer; full-fat gives a richer texture.
- 2 tablespoons honey — sweetens and helps the coconut layer hold together.
- pinch of salt — enhances overall flavor and balances sweetness.
- 12 ounces dark chocolate chopped, or semi sweet — melts into the top layer; choose a quality bar for texture and flavor.
- 2 tablespoons rounded almond butter — swirled into the chocolate for a nutty marbled finish.
- cacao nibs + hemp seeds for topping (optional) — adds crunch and a pleasant bitter note; optional but pretty and textural.
Directions: Chocolate Coconut Almond Bars
- Line an 8×8-inch square baking pan with parchment paper, leaving a 1–2 inch overhang on two opposite sides to lift the bars out later.
- In the bowl of a food processor combine 1/2 cup raw almonds, 1 cup unsweetened flaked coconut, 12 pitted medjool dates, and 2 teaspoons vanilla. Pulse in short bursts until the mixture is finely chopped but still a bit chunky (not a smooth paste).
- Add 1/4 cup coconut oil to the processor and pulse just until the mixture holds together when pressed between your fingers. Avoid overprocessing.
- Press this base mixture evenly into the prepared pan using your fingers or the bottom of a measuring cup. Smooth and compact it well. Place the pan in the freezer while you make the coconut layer.
- In the same food processor (no need to wash it) combine 2 cups unsweetened flaked coconut, 1/2 cup canned coconut milk, 2 tablespoons honey, and a pinch of salt. Pulse until the mixture is evenly ground and holds together when pressed.
- Remove the pan from the freezer and press the coconut layer evenly over the almond-date base. Return the pan to the freezer and chill until the coconut layer is firm enough to hold its shape (about 15–30 minutes).
- Melt 12 ounces chopped dark or semi-sweet chocolate either over a double boiler or in the microwave in 30-second intervals, stirring between intervals, until smooth.
- Remove the pan from the freezer and immediately pour and spread the melted chocolate evenly over the frozen coconut layer.
- Drop 2 tablespoons rounded almond butter in small spoonfuls over the melted chocolate. Use a knife or skewer to swirl the almond butter into the chocolate to create a marbled effect. Sprinkle cacao nibs and hemp seeds on top if desired.
- Cover the pan and refrigerate for 30 minutes to 1 hour, or until the chocolate is fully set.
- Lift the set slab from the pan using the parchment overhang and place on a cutting board. Run a sharp knife briefly under hot water, dry it, and cut the slab into about 16 squares, wiping and reheating the knife between cuts if needed. If the chocolate layer separates from the coconut layer while cutting, press it back into place.
- Store the bars in a sealed container in the refrigerator.
Why It’s My Go-To
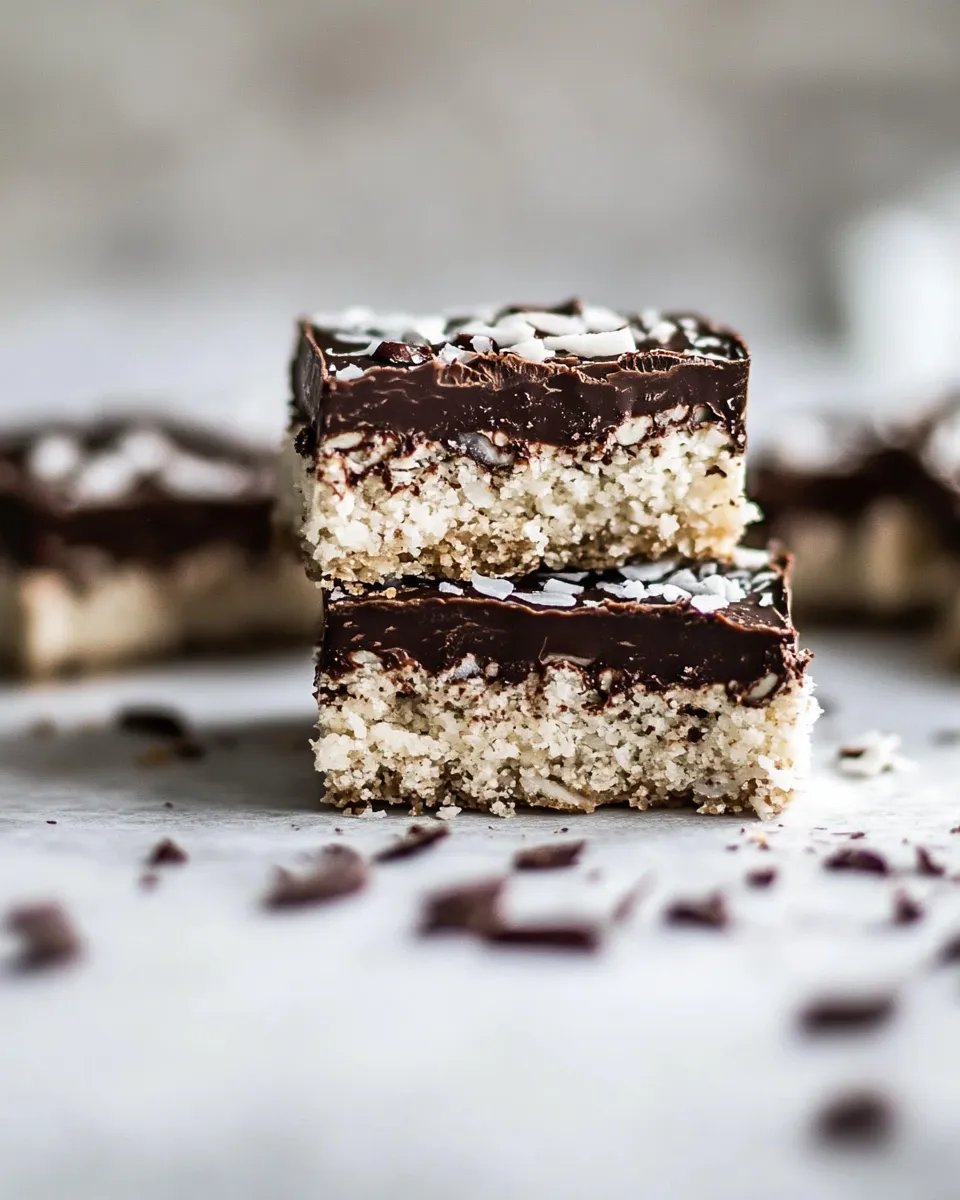
These bars hit multiple needs: they’re portable, naturally sweetened with dates and honey, and have a satisfying contrast of textures. The base is chewy and nut-forward, the middle layer is creamy coconut, and the chocolate gives a tidy finish that feels indulgent without being fussy.
I can make a batch in under an hour of active work time, and most of that is chilling time. That makes them perfect for when I need a crowd-pleasing dessert or a stash of snacks for the week. They also travel well to picnics or potlucks because the layered structure holds up.
Quick Replacement Ideas
- Almonds — swap for raw cashews if you prefer a milder base.
- Medjool dates — use other soft dates, but weight/quantity adjustments may be needed for drier varieties.
- Coconut milk — a thicker nut milk will change texture; full-fat coconut milk is best for the coconut layer.
- Dark chocolate — semi-sweet works fine; choose the cocoa percentage you like for sweetness balance.
- Almond butter — any nut butter will swirl nicely (peanut or cashew are fine substitutes).
- Cacao nibs + hemp seeds — swap for toasted sesame seeds or finely chopped toasted almonds for crunch.
Kitchen Gear Checklist
- 8×8-inch square baking pan
- Parchment paper
- Food processor (essential for texture and ease)
- Measuring cups and spoons
- Microwave-safe bowl or double boiler for melting chocolate
- Spatula and a knife for cutting
- Refrigerator and freezer space for chilling layers
Pitfalls & How to Prevent Them
Overprocessing the base. If you process the almond-date mixture until smooth paste, you lose the pleasant bits of texture that make the bars interesting. Pulse in short bursts and stop when it’s finely chopped but still a little chunky.
Chocolate seizing while melting. If you melt chocolate too quickly or with water present, it can seize. Use dry tools, keep water away, and melt slowly—either in 30-second microwave bursts, stirring in between, or over gentle steam in a double boiler.
Coconut layer not holding. If your coconut mixture looks too loose, pulse a bit more until it holds when pressed. Chilling the base before you press the coconut layer on ensures a clean separation and helps the layers set without mixing.
Year-Round Variations
Summer: Make smaller squares, pack them in a cooler, and skip heavy toppings. You can also use 70% dark chocolate for a lighter-sweet bite.
Fall/Winter: Add a pinch of cinnamon or cardamom to the coconut layer for warming spice notes. Swap almond butter for a maple-almond swirl for seasonal flavor.
Holidays: Top the bars with a sprinkle of flaky sea salt and chopped toasted almonds after swirling the nut butter into the chocolate. That contrast is festive and feels elevated.
Little Things that Matter
Toast the almonds briefly before processing if you want a deeper nutty flavor, but don’t let them get oily. Use a spatula to press the base firmly and evenly—compactness prevents the bars from crumbling when sliced. When pouring melted chocolate, work quickly: the frozen coconut layer helps the chocolate set evenly and reduces bleeding into the layer beneath.
Refrigerate, Freeze, Reheat
Refrigerate: Store in a sealed container in the refrigerator for up to 1 week. The bars keep their texture best chilled.
Freeze: You can freeze the bars for up to 2 months. Place parchment between layers when stacking to prevent sticking. Thaw in the refrigerator for a few hours before serving.
Reheat: These are best served cold or at room temperature. If you prefer softer chocolate, let a slice sit at room temperature for 10–15 minutes; avoid heating in the microwave or oven, which can affect texture.
Helpful Q&A
- Can I make these nut-free? Not without changing the recipe—almonds are central to the base and almond butter is used for the swirl. If you need nut-free, consider substituting seeds and a seed butter, but note texture and flavor will change.
- Do the dates need to be fresh? Fresh, plump Medjool dates are best because they bind easily. If yours are dry, soak them briefly in warm water and drain well before using.
- Can I use sweetened coconut? You can, but the bars will be noticeably sweeter. I prefer unsweetened to better control sugar levels.
- Why chill in the freezer rather than the fridge? The freezer firms layers faster and reduces the chance of mixing when pouring melted chocolate. Short, controlled freezes (15–30 minutes) work best.
Final Thoughts
These Chocolate Coconut Almond Bars are one of those recipes you make once and then tweak to taste. They’re easy to scale, visually appealing, and suited to many dietary preferences if you swap thoughtfully. Keep the ingredients simple and the process intentional: pulse rather than blitz, chill rather than rush, and use good chocolate. You’ll end up with neat squares that travel well, satisfy a sweet tooth, and look like you put in more effort than you did.
Make a double batch when you’re on a roll—the freezer-friendly nature of these bars makes them a great, ready-to-grab treat for busy days.

Chocolate Coconut Almond Bars.
Ingredients
Ingredients
- 1/2 cupraw almonds
- 1 cupunsweetened flaked coconut
- 12 plump medjool datespitted
- 2 teaspoonsvanilla
- 1/4 cupcoconut oil
- 2 cupsunsweetened flaked coconut
- 1/2 cupcanned coconut milk
- 2 tablespoonshoney
- pinch of salt
- 12 ouncesdark chocolatechopped or semi sweet
- 2 tablespoonsrounded almond butter
- cacao nibs + hemp seedsfor topping optional
Instructions
Instructions
- Line an 8x8-inch square baking pan with parchment paper, leaving a 1–2 inch overhang on two opposite sides to lift the bars out later.
- In the bowl of a food processor combine 1/2 cup raw almonds, 1 cup unsweetened flaked coconut, 12 pitted medjool dates, and 2 teaspoons vanilla. Pulse in short bursts until the mixture is finely chopped but still a bit chunky (not a smooth paste).
- Add 1/4 cup coconut oil to the processor and pulse just until the mixture holds together when pressed between your fingers. Avoid overprocessing.
- Press this base mixture evenly into the prepared pan using your fingers or the bottom of a measuring cup. Smooth and compact it well. Place the pan in the freezer while you make the coconut layer.
- In the same food processor (no need to wash it) combine 2 cups unsweetened flaked coconut, 1/2 cup canned coconut milk, 2 tablespoons honey, and a pinch of salt. Pulse until the mixture is evenly ground and holds together when pressed.
- Remove the pan from the freezer and press the coconut layer evenly over the almond-date base. Return the pan to the freezer and chill until the coconut layer is firm enough to hold its shape (about 15–30 minutes).
- Melt 12 ounces chopped dark or semi-sweet chocolate either over a double boiler or in the microwave in 30-second intervals, stirring between intervals, until smooth.
- Remove the pan from the freezer and immediately pour and spread the melted chocolate evenly over the frozen coconut layer.
- Drop 2 tablespoons rounded almond butter in small spoonfuls over the melted chocolate. Use a knife or skewer to swirl the almond butter into the chocolate to create a marbled effect. Sprinkle cacao nibs and hemp seeds on top if desired.
- Cover the pan and refrigerate for 30 minutes to 1 hour, or until the chocolate is fully set.
- Lift the set slab from the pan using the parchment overhang and place on a cutting board. Run a sharp knife briefly under hot water, dry it, and cut the slab into about 16 squares, wiping and reheating the knife between cuts if needed. If the chocolate layer separates from the coconut layer while cutting, press it back into place.
- Store the bars in a sealed container in the refrigerator.
Equipment
- 8x8-inch baking pan
- Parchment Paper
- Food Processor
- Measuring cup
- Measuring Spoons
- Double boiler or microwave-safe bowl
- Knife
- Spatula