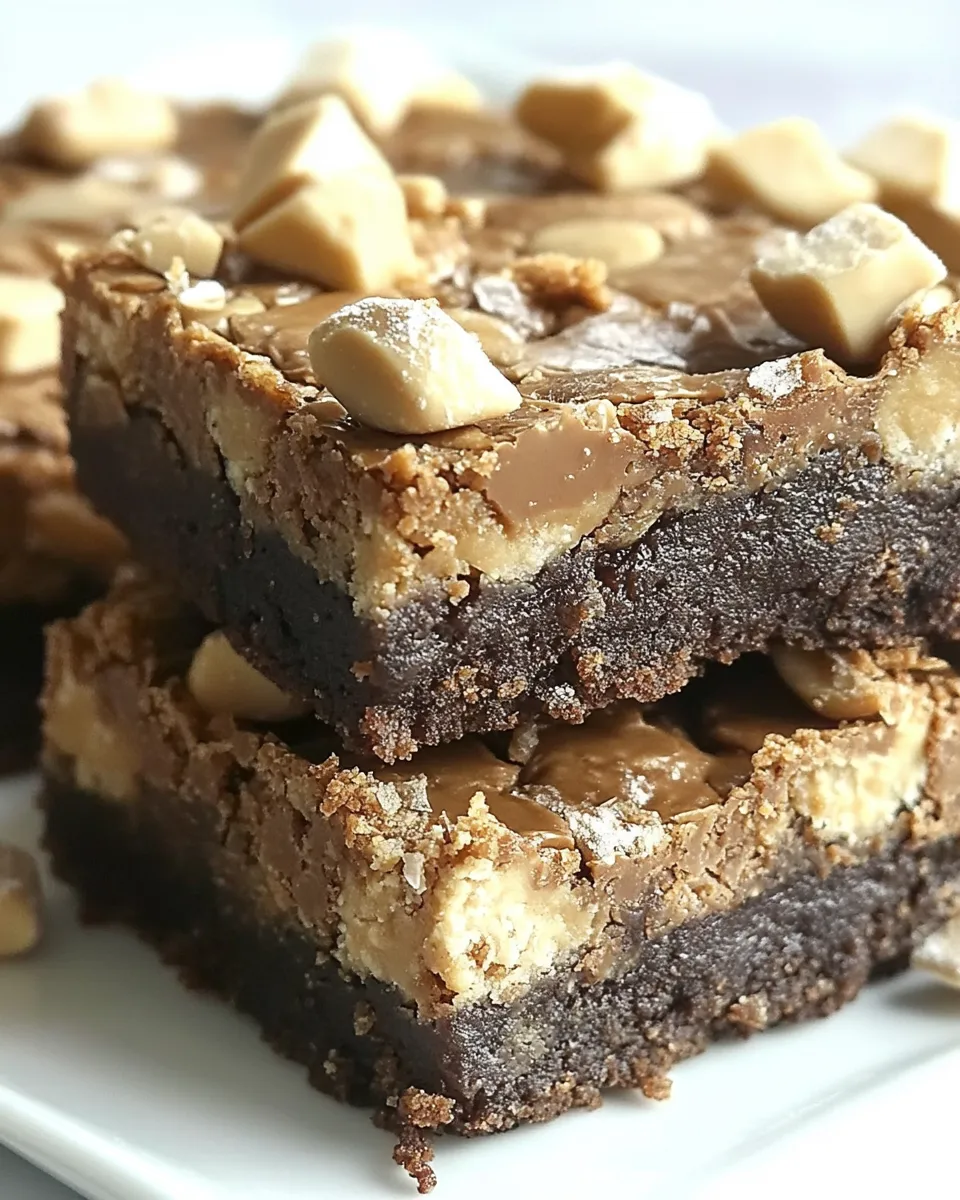
Brownie Peanut Butter Magic Bars
I make these Brownie Peanut Butter Magic Bars whenever I need something that feels indulgent but comes together without a lot of drama. They hit that sweet spot between fudgy brownie, melty chocolate, and salty-sweet peanut butter candy. Guests always ask for the recipe, and it’s one of those treats that travels well to potlucks and school events.
The best part: you don’t need to temper chocolate, micromanage temperatures, or stir a dozen components. With a boxed brownie mix as the base and a few pantry staples, you press, sprinkle, pour, bake, and slice. The steps are straightforward, and the payoff is always worth the little effort.
Below I give clear, practical steps and sensible tips so your bars come out reliably—fudgy edges, a slightly golden top, and clean slices. Read through once before starting, and you’ll be set for dependable, delicious results.
Gather These Ingredients

- 1 box Brownie Mix 19.5 ounces — forms the brownie crust; any standard 19.5-ounce boxed mix will work as written.
- 1 stick butter softened — helps bind the boxed mix into a pressable dough and adds richness.
- 1 egg — provides structure so the brownie layer holds together once baked.
- 8 Reese’s Peanut Butter Cups chopped — chunks of candy that add peanut-buttery pockets and texture.
- 1/2 cup peanut butter chips — melts into sweet peanut highlights throughout the bars.
- 1 cup milk chocolate chips — adds melty, familiar chocolate flavor across the top.
- 1 can 14 oz sweetened condensed milk — a thick, sweet binder that creates the gooey layer and helps glue the candy and chips to the brownie base.
Brownie Peanut Butter Magic Bars Made Stepwise
- Preheat oven to 350°F. Line a 9×13-inch pan with foil and spray the foil with cooking spray.
- In the bowl of a stand mixer fitted with the paddle attachment (or using a handheld mixer), combine the 1 box brownie mix (19.5 oz), 1 stick softened butter, and 1 egg. Beat until all dry mix is incorporated and the batter is thick.
- Press the brownie batter evenly into the bottom of the prepared pan to form a uniform crust.
- Evenly sprinkle the chopped 8 Reese’s Peanut Butter Cups, the 1/2 cup peanut butter chips, and the 1 cup milk chocolate chips over the brownie crust.
- Pour the entire 14-oz can of sweetened condensed milk evenly over the candy pieces, covering as much surface as possible.
- Bake in the preheated oven for 28–30 minutes, until the edges are set and begin to brown and the center is no longer jiggly.
- Remove from the oven and let cool completely in the pan on a rack. Once fully cooled, lift the bars from the pan using the foil and slice into desired-sized bars.
Why Brownie Peanut Butter Magic Bars is Worth Your Time
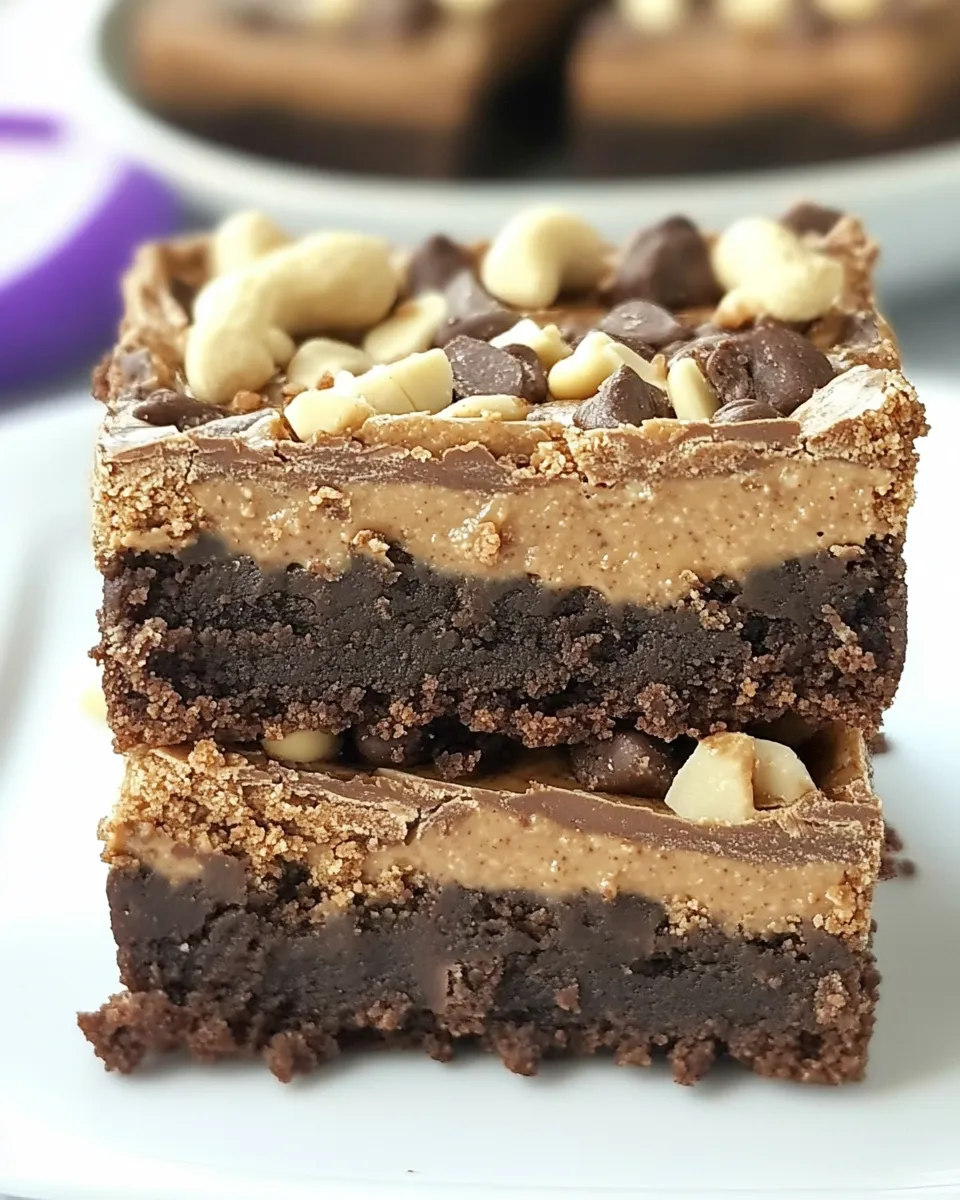
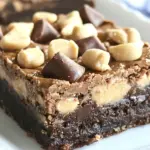
These bars deliver maximum flavor with minimal fuss. The brownie base gives a familiar, fudgy foundation; the candy pieces and chips create pockets of texture and concentrated peanut-chocolate hits; and the condensed milk pulls everything together into a glossy, slightly chewy top layer.
They’re reliably crowd-pleasing. People respond to the contrast of rich chocolate, creamy peanut butter, and the chew of condensed milk. You don’t need a lot of baking skill to get professional results—just follow the steps and you’ll have a dessert that looks and tastes like you spent more time on it than you did.
They’re also forgiving. The recipe uses a boxed mix to keep things simple and consistent, and the assembly is quick. If you need a dessert for an event, these can be made ahead and transported without drama.
Dairy-Free/Gluten-Free Swaps
If you need to adapt these bars, there are straightforward swaps that keep the overall method intact:
- Gluten-free option: Use a certified gluten-free brownie mix of the same weight/volume (19.5 oz or equivalent) so the texture remains consistent.
- Dairy-free option: Use a dairy-free stick spread or margarine in place of the butter and choose dairy-free chocolate and peanut-butter-style chips labeled vegan. Note that some sweetened condensed alternatives exist (coconut condensed milk), and they behave similarly when poured over the mix.
- Nut-free alternative: Replace the Reese’s Peanut Butter Cups with a nut-free candy that has a similar size and doughy center, and use sunflower seed butter chips if available.
Cook’s Kit
- 9×13-inch baking pan — the recipe is written for this pan size to get the right thickness and bake time.
- Aluminum foil — for lining the pan so you can lift the bars out cleanly.
- Nonstick cooking spray — to ensure the foil doesn’t stick to the bars.
- Stand mixer with paddle attachment or a handheld mixer — makes quick work of combining the boxed mix, butter, and egg into a pressable batter.
- Mixing bowl — if using a handheld mixer, use a roomy bowl.
- Spatula or bench scraper — handy for pressing the brownie batter evenly into the pan.
- Cooling rack — cool the pan fully on a rack before slicing for clean pieces.
- Sharp knife — warm a knife briefly in hot water and dry between cuts for neater bars.
Troubles You Can Avoid
Center still jiggly after baking: The recipe calls for 28–30 minutes. Oven temperatures vary, so test toward the end of that window. The edges should look set and start to brown. If the center is very jiggly, give it 3–5 more minutes, checking often.
Uneven press or thin crust: Press the brownie batter evenly into the pan so the crust bakes uniformly. Use the bottom of a measuring cup or your fingers wrapped in parchment to level and compact the layer.
Candy sinking into the batter: The method intentionally places the candy on top of a pressable, not fully baked crust and then pours condensed milk over it. If pieces sink excessively, make sure the brownie batter is thick and well-pressed so it forms a sturdy base.
Messy slices: Cool completely before lifting and slicing. If you want cleaner edges, chill the pan for 30–60 minutes in the fridge before cutting. Run a sharp knife under hot water, dry it, and wipe between cuts for tidy squares.
Variations for Dietary Needs
- Lower sugar: These bars are inherently sweet due to condensed milk and chips. For a modest reduction, use dark chocolate chips instead of milk chocolate chips to balance sweetness, but note the overall character will change.
- Extra peanut butter flavor: Toss a few extra peanut butter chips across the top before baking, or press miniature peanut butter cups instead of chopped full-size cups for a different distribution.
- Nut-free crowd: Skip the peanut butter cups and substitute equal volume of chocolate chips and a chewy nut-free candy piece to keep the texture exciting while removing peanuts.
- Smaller portions: Use a smaller pan and shorten bake time to create thicker bars you can cut into smaller bites—watch the center closely to prevent overbaking.
Pro Perspective
If you want the most consistent results, use a boxed mix that lists weight near 19.5 ounces so the ratios in the directions stay accurate. The recipe’s success depends on that baseline because the batter consistency determines how well the crust presses and how it holds the candy layer.
Press the crust with intention. An evenly compacted crust creates a neat foundation and limits candy from sinking. When you pour the sweetened condensed milk, do it in a slow, steady stream and aim to blanket the candies rather than dump it in one spot. That helps achieve an even, glossy top.
Finally, let it cool. Patience here pays off. The texture firms up and slices cleanly when cooled. If you must serve warm, treat them like squares of gooey candy—use smaller napkins and serve on a platter for easier handling.
Keep-It-Fresh Plan
Room temperature: Store the bars in an airtight container at room temperature for up to 3 days. Keep them away from direct heat or sunlight.
Refrigeration: For longer keeping, refrigerate up to 7 days in an airtight container. Chilled bars slice very cleanly; bring to room temperature for a few minutes before serving if you prefer a softer bite.
Freezing: Freeze individual bars wrapped tightly in plastic wrap and placed in a freezer-safe bag or container. Freeze up to 3 months. Thaw overnight in the refrigerator and bring to room temperature before serving for best texture.
Frequently Asked Questions
- Can I use a homemade brownie batter instead of a boxed mix? Yes. If you use a homemade batter, aim for a thick, pressable consistency similar to the boxed batter described here so the crust supports the layers above. Bake time may vary.
- Why sweetened condensed milk? It provides both sweetness and a cohesive, gooey texture that sets during baking. It’s key to the “magic” of these bars.
- Can I halve the recipe? You can, but adjust pan size (try an 8×8-inch) and watch bake time carefully; a smaller pan will likely need less time.
- How do I get clean slices every time? Cool completely, then reheat a knife under hot water, dry it, and slice in a single clean motion. Wipe between cuts.
Serve & Enjoy
Slice these into squares and serve on a simple platter. They pair nicely with coffee, milk, or a scoop of vanilla ice cream for an extra-special dessert. If you’re taking them to a gathering, line a tin with parchment and stack in a single layer to keep the tops intact.
These bars are satisfying and shareable. Make them the day before an event for easier transport and cleaner slicing. Then sit back and watch people dig in—the combination of brownie, peanut butter, and sweetened condensed milk is always a welcome treat at the table.
Brownie Peanut Butter Magic Bars
Ingredients
Ingredients
- 1 box Brownie Mix19.5 ounces
- 1 stick buttersoftened
- 1 egg
- 8 Reese’s Peanut Butter Cupschopped
- 1/2 cuppeanut butter chips
- 1 cupmilk chocolate chips
- 1 can14 oz sweetened condensed milk
Instructions
Instructions
- Preheat oven to 350°F. Line a 9x13-inch pan with foil and spray the foil with cooking spray.
- In the bowl of a stand mixer fitted with the paddle attachment (or using a handheld mixer), combine the 1 box brownie mix (19.5 oz), 1 stick softened butter, and 1 egg. Beat until all dry mix is incorporated and the batter is thick.
- Press the brownie batter evenly into the bottom of the prepared pan to form a uniform crust.
- Evenly sprinkle the chopped 8 Reese’s Peanut Butter Cups, the 1/2 cup peanut butter chips, and the 1 cup milk chocolate chips over the brownie crust.
- Pour the entire 14-oz can of sweetened condensed milk evenly over the candy pieces, covering as much surface as possible.
- Bake in the preheated oven for 28–30 minutes, until the edges are set and begin to brown and the center is no longer jiggly.
- Remove from the oven and let cool completely in the pan on a rack. Once fully cooled, lift the bars from the pan using the foil and slice into desired-sized bars.
Equipment
- 9x13-inch pan
- Foil
- Cooking Spray
- stand mixer or handheld mixer
- Paddle Attachment