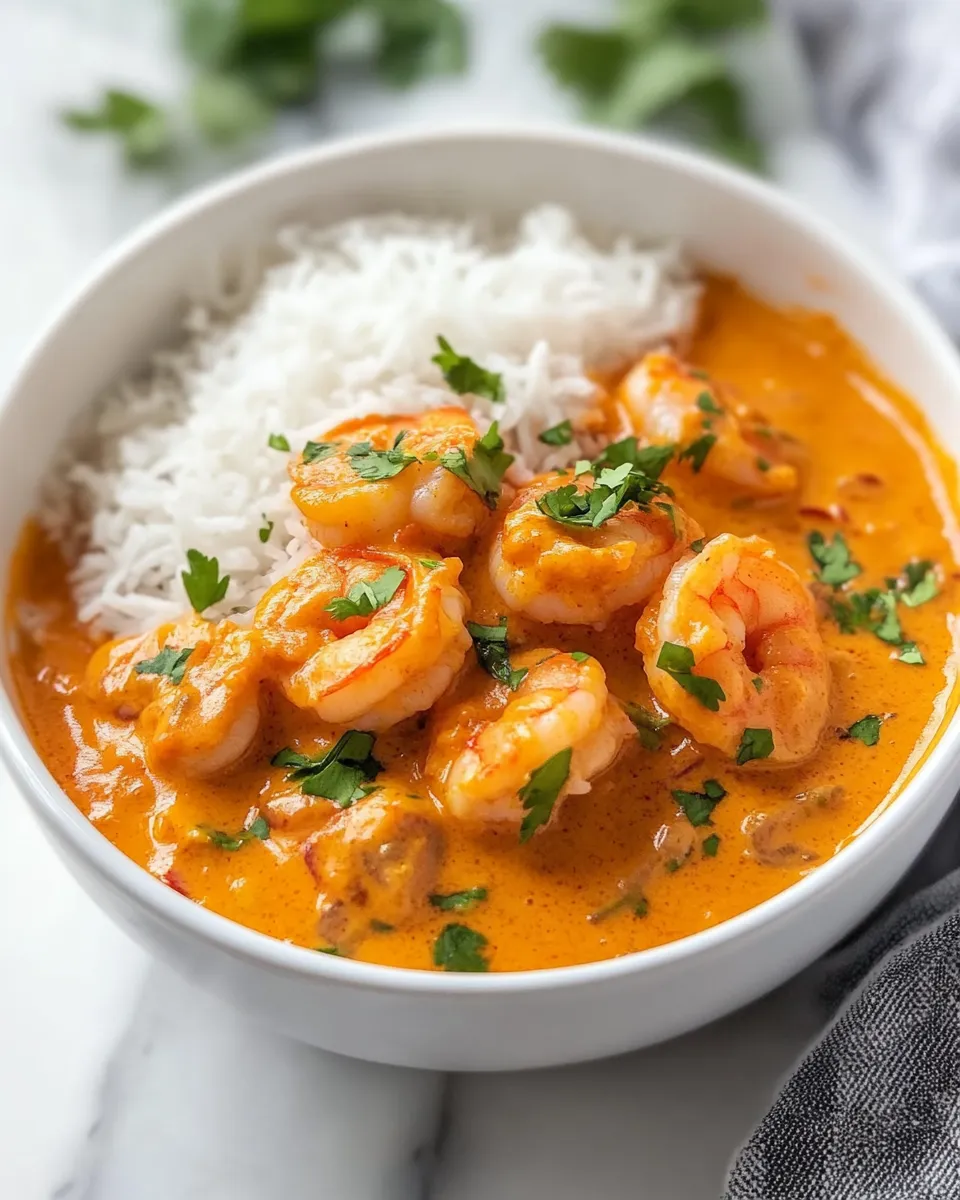
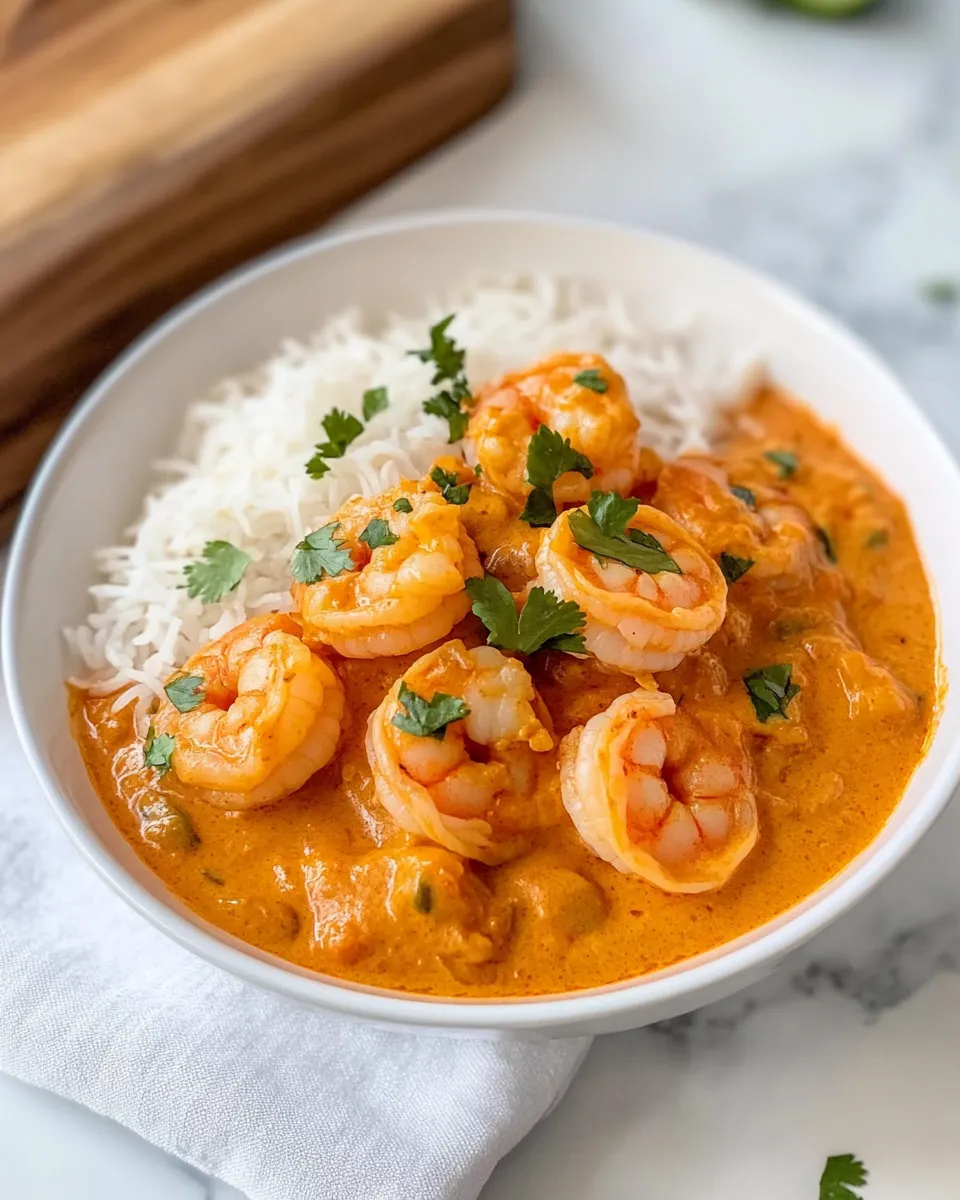
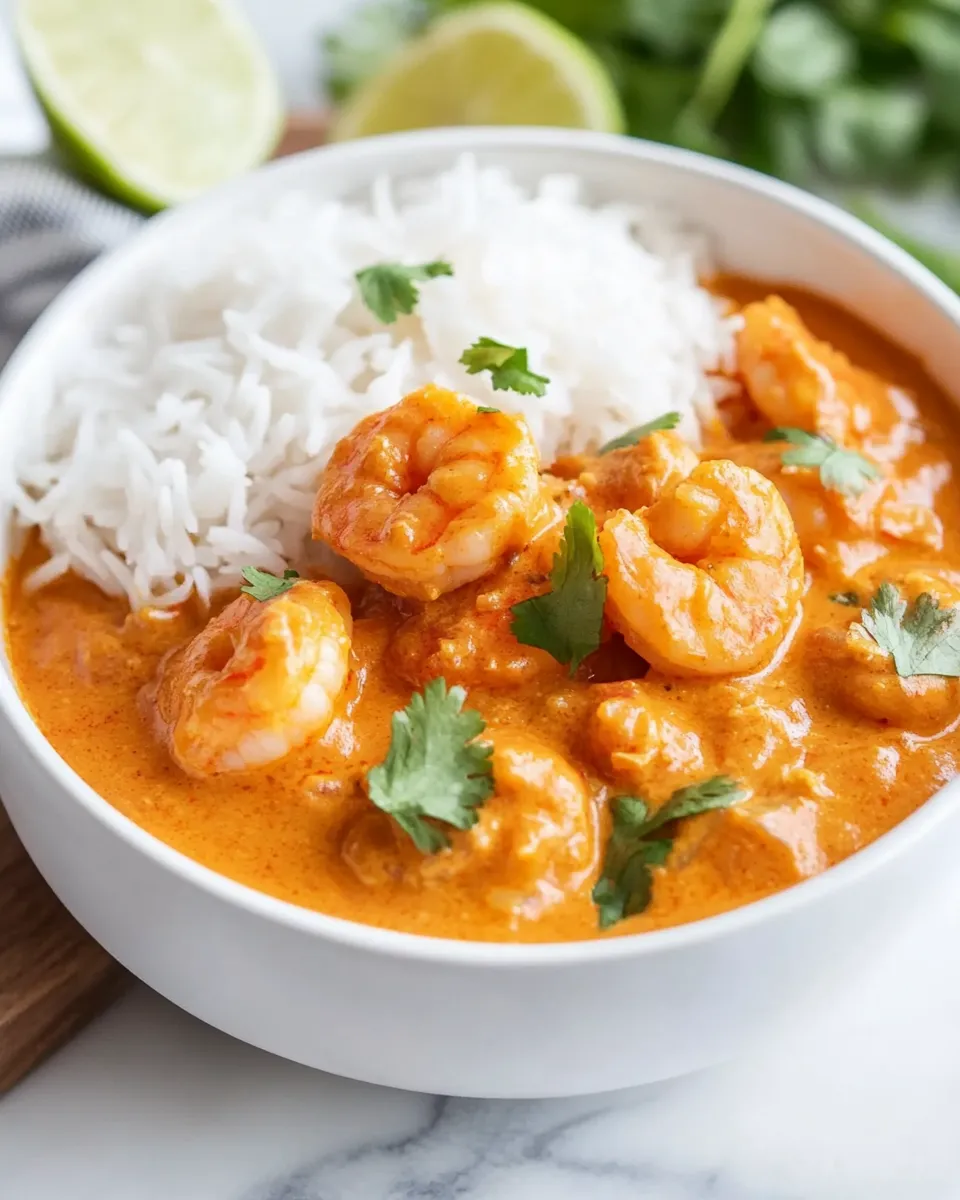
Coconut Shrimp Curry
This coconut shrimp curry is one of those weeknight meals I turn to when I want something comforting but not fussy. It hits bright, creamy, and lightly spiced notes without a long ingredient list — coconut milk, tomato, warming spices, and tender shrimp. It comes together quickly, so it’s great for busy evenings or a casual dinner with friends.
I like that the sauce is forgiving: a short sauté to bloom the spices, a splash of tomato for body, coconut milk for silk, and shrimp added at the end so they stay plump and tender. The recipe is straightforward, practical, and rooted in technique more than secrecy — set up your ingredients and follow the steps, and you’ll have a fragrant dinner in under 30 minutes.
Below you’ll find a clear ingredients list with tips, a direct step-by-step guide you can follow at the stove, and practical notes on equipment, storage, and simple swaps. If you want to adapt it, I include diet-friendly ideas and common pitfalls so you skip the mistakes I learned the hard way.
What You’ll Need

Set aside about 10 minutes for prep: dice the onion, grate the ginger and garlic, measure spices, and have shrimp thawed, peeled, and deveined. A little mise en place keeps the cooking stage fast and relaxed.
Ingredients
- 2 tablespoons coconut oil — for sautéing and adding a light coconut flavor; melt until shimmering.
- ½ yellow onion, finely diced — provides sweetness and body to the sauce.
- 1 teaspoon ginger, grated — bright, warm aromatics; fresh is best.
- 1 teaspoon garlic, grated — quick-cooking aromatics; stir in late so it doesn’t burn.
- ½ teaspoon ground cumin — earthy base spice, helps round the curry.
- ½ teaspoon ground coriander — floral-citrus note that lightens the mix.
- ½ teaspoon garam masala (optional) — adds warm, complex top notes; optional per recipe source.
- ½ teaspoon chili powder — for gentle heat; adjust or omit to taste.
- 1 teaspoon ground turmeric — color and a mild peppery bitterness.
- 1 cup tomato sauce (or plain passata) — gives body and subtle acidity to balance the coconut.
- 1 cup coconut milk, fresh or canned — the creamy base; full-fat yields the richest sauce.
- 1 teaspoon brown sugar — balances acidity and rounds the flavors.
- Salt and pepper — to season to taste; add gradually and taste.
- 1 pound (450 g) shrimp, peeled and deveined — I used 31–35 count; cook until just opaque.
- 1 teaspoon lime juice — brightens the finished sauce.
- A few mint leaves and cilantro leaves — for garnish and fresh aroma.
- Lime wedges — to serve and squeeze over at the table.
- Cooked rice — classic accompaniment to soak up the sauce.
- Naan bread — optional for mopping up the curry; serve warm.
Coconut Shrimp Curry: Step-by-Step Guide
- Heat a stainless steel skillet (recommended) over medium heat and add 2 tablespoons coconut oil until melted and shimmering.
- Add ½ yellow onion, finely diced, and 1 teaspoon ginger, grated. Sauté until the onion is soft and translucent, about 2 minutes.
- Add 1 teaspoon garlic, grated, and cook for 30 seconds.
- Add the spices: ½ teaspoon ground cumin, ½ teaspoon ground coriander, ½ teaspoon garam masala (optional), ½ teaspoon chili powder, and 1 teaspoon ground turmeric. Cook and stir for 30 seconds to bloom the spices.
- Pour in 1 cup tomato sauce (or plain passata), then add 1 cup coconut milk. Stir to combine, bring to a gentle simmer, and cook for about 2 minutes until the sauce is smooth and homogeneous.
- Stir in 1 teaspoon brown sugar and season the sauce with salt and pepper to taste.
- Add 1 pound (450 g) shrimp, peeled and deveined, to the sauce. Gently nestle the shrimp into the sauce and cook 2–3 minutes, or until the shrimp are just opaque and no longer translucent. Remove from heat immediately to avoid overcooking.
- Stir in 1 teaspoon lime juice.
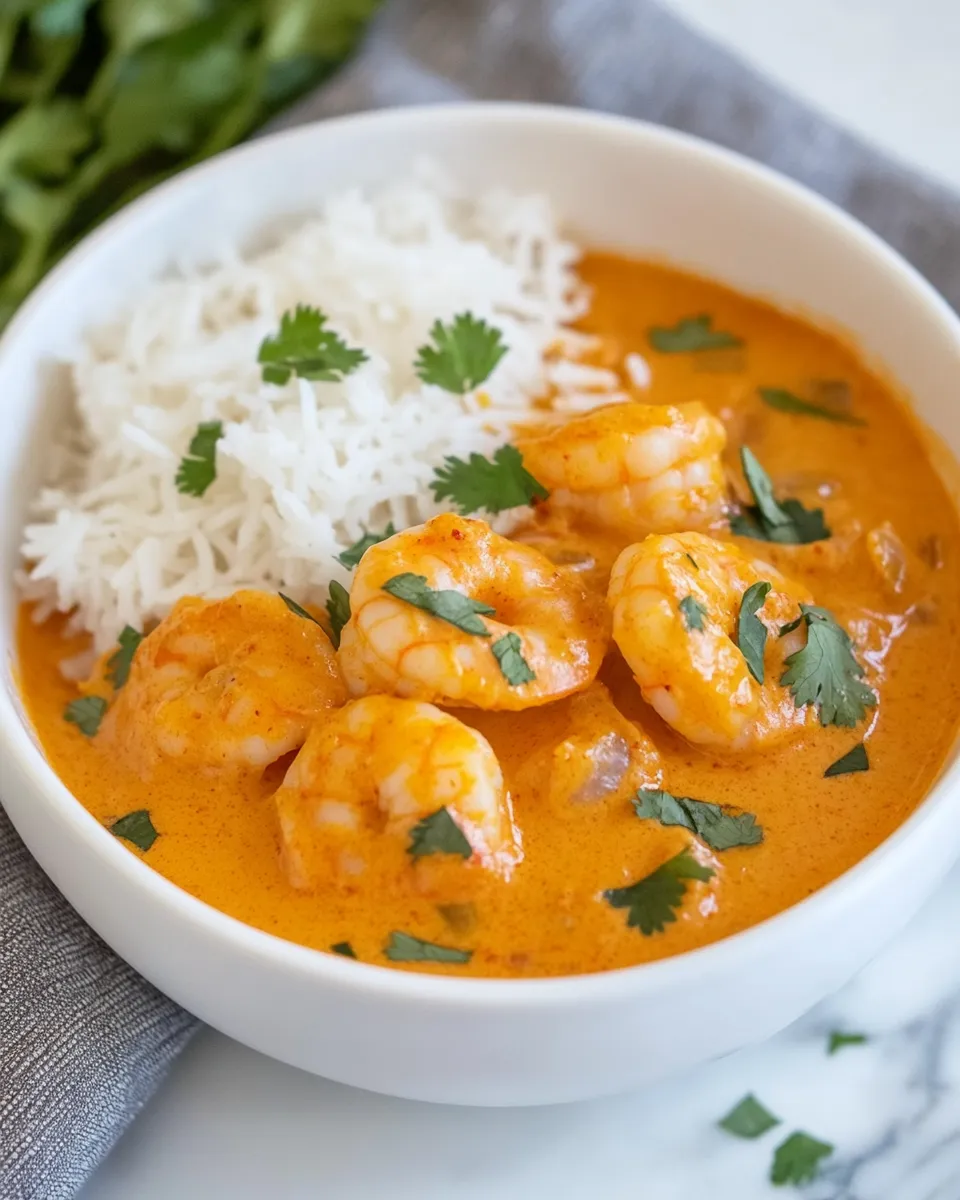
- Garnish with a few mint leaves and cilantro leaves and serve with lime wedges, cooked rice, and naan bread.
Why This Recipe is a Keeper
This recipe balances speed and depth. Blooming the spices in hot oil for just 30 seconds releases essential oils and layers flavor without needing hours on the stove. The tomato sauce gives the curry structure while the coconut milk smooths and enriches it. Shrimp cooks very quickly, so the technique of adding them at the end preserves texture and prevents rubberiness.
It’s also endlessly approachable: the ingredient list is short but flexible, and the flavors are familiar enough to be crowd-pleasing while still having a touch of exotic warmth. For weeknights, it’s a one-pan solution that pairs effortlessly with rice or flatbread.
International Equivalents
- Thai-style coconut curries: Typically use Thai red or yellow curry paste and fish sauce; expect lemongrass and kaffir lime in the fragrance.
- Malaysian/Singaporean prawn curries: Often feature turmeric and tamarind or belacan for different savory edges.
- Indian prawn curry (prawn masala): Uses a tomato-onion base and garam masala and sometimes yogurt; thicker and more spice-forward.
- Goan prawn curry: Coconut-forward with tamarind or kokum for tang and sometimes dried red chilies; bold and slightly sour.
Gear Checklist
- Stainless steel skillet (recommended) — for even heating and good fond development.
- Microplane or fine grater — for ginger and garlic; grating speeds things up and disperses flavor evenly.
- Measuring spoons and cups — simple accuracy keeps the spice balance steady.
- Wooden spoon or heatproof spatula — gentle stirring without damaging the pan.
- Sharp knife and cutting board — for cleanly dicing the onion and prepping garnish.
Steer Clear of These
- Overcooking the shrimp — shrimp go from perfect to rubbery fast. Remove the pan from heat as soon as they turn opaque.
- Burning the garlic — add garlic after the onion and ginger have softened to avoid bitterness.
- Skipping the spice bloom — stirring spices briefly in hot oil lifts their aroma; if you skip this, the curry tastes flatter.
- Rushing seasoning — salt is the last step that pulls flavors together; taste and adjust after the brown sugar is added.
Make It Diet-Friendly
Small swaps make this curry fit different eating goals without losing its character.
Lower-calorie / lower-fat
- Use light coconut milk or dilute full-fat coconut milk with water (omit inventing amounts; taste as you go).
- Serve over cauliflower rice instead of regular rice to reduce calories and carbs.
Gluten-free
- The curry itself is naturally gluten-free. Skip naan or pick a gluten-free flatbread to keep the meal GF-friendly.
Higher-protein / low-carb
- Keep the shrimp portion and serve with steamed greens or a mixed vegetable stir to maintain volume without extra carbs.
Behind the Recipe
I developed this version by paring back toward method. The tomato plus coconut milk base is a reliable way to build both body and creaminess without long reductions. Blooming toasted spices in oil unlocks depth quickly. Shrimp are the star — they need just a brief cook, so the recipe prioritizes timing over long simmering.
Mint and cilantro as garnish add a bright finish that contrasts the richness. A squeeze of lime at the end lifts the entire dish and balances the coconut and tomato notes. I often make a double batch of sauce (hold off the shrimp) and freeze portions; it reheats beautifully with fresh shrimp added at serving.
Refrigerate, Freeze, Reheat
Refrigerate: Cool the curry to room temperature within two hours, then transfer to an airtight container. It will keep 2–3 days in the fridge.
Freeze: The sauce freezes well, but shrimp texture degrades if frozen after cooking. If you plan to freeze, cool the sauce (without shrimp) and freeze in portions. Thaw overnight in the fridge before reheating and add fresh or thawed shrimp at the end to finish cooking for best texture.
Reheat: Gently reheat the sauce over low heat until warm and smooth; if too thick, add a splash of water or coconut milk. Add shrimp and cook just until opaque. Avoid high heat or extended simmering — shrimp finish quickly and will toughen if overcooked.
Ask the Chef
- Can I use frozen shrimp? — Yes. Thaw completely, pat dry, then follow the recipe. Patting them dry helps them sear slightly and integrate into the sauce instead of watering it down.
- Can I make this spicier? — Increase the chili powder slightly or add a pinch of red pepper flakes or a chopped fresh chili. Add small increments and taste.
- What if I don’t have tomato sauce? — Plain passata is listed as an alternative in the ingredients; blending canned tomatoes into a smooth purée is a practical stand-in.
- Can I swap proteins? — Firm white fish or cubed chicken can work, but adjust cook times; chicken needs longer to reach safe doneness, while fish can be delicate.
The Last Word
Coconut Shrimp Curry is reliable comfort food that doesn’t require a cookbook full of steps. It’s designed to be dependable: a short, fragrant cook, quick shrimp finish, bright finish with lime and herbs. Keep your mise en place, bloom the spices, watch the shrimp, and the dish rewards you with a weeknight dinner that feels special.
Serve with steamed rice and warm naan or a crisp salad on the side, and don’t skip the lime wedge — that little squeeze at the table wakes everything up. If you make it, I’d love to hear what you paired it with and any tweaks you discovered along the way.

Coconut Shrimp Curry
Ingredients
Ingredients
- ?2 tablespoonscoconut oil
- ?1/2 yellow onionfinely diced
- ?1 teaspoongingergrated
- ?1 teaspoongarlicgrated
- ?1/2 teaspoonground cumin
- ?1/2 teaspoonground coriander
- ?1/2 teaspoongaram masalaoptional Note 2
- ?1/2 teaspoonchili powder
- ?1 teaspoonground turmeric
- ?1 cuptomato sauceor plain passata
- ?1 cupcoconut milkfresh or canned
- ?1 teaspoonbrown sugar
- ?Salt and pepper
- ?1 pound 450 gshrimppeeled and deveined, I used 31-35 count
- ?1 teaspoonlime juice
- ?A few mint leaves and cilantro leavesfor garnish
- ?Lime wedgesfor garnish
- ?Cooked rice
- ?Naan bread
Instructions
Instructions
- Heat a stainless steel skillet (recommended) over medium heat and add 2 tablespoons coconut oil until melted and shimmering.
- Add ½ yellow onion, finely diced, and 1 teaspoon ginger, grated. Sauté until the onion is soft and translucent, about 2 minutes.
- Add 1 teaspoon garlic, grated, and cook for 30 seconds.
- Add the spices: ½ teaspoon ground cumin, ½ teaspoon ground coriander, ½ teaspoon garam masala (optional), ½ teaspoon chili powder, and 1 teaspoon ground turmeric. Cook and stir for 30 seconds to bloom the spices.
- Pour in 1 cup tomato sauce (or plain passata), then add 1 cup coconut milk. Stir to combine, bring to a gentle simmer, and cook for about 2 minutes until the sauce is smooth and homogeneous.
- Stir in 1 teaspoon brown sugar and season the sauce with salt and pepper to taste.
- Add 1 pound (450 g) shrimp, peeled and deveined, to the sauce. Gently nestle the shrimp into the sauce and cook 2–3 minutes, or until the shrimp are just opaque and no longer translucent. Remove from heat immediately to avoid overcooking.
- Stir in 1 teaspoon lime juice.
- Garnish with a few mint leaves and cilantro leaves and serve with lime wedges, cooked rice, and naan bread.
Equipment
- stainless steel skillet
Notes
For more Indian flavor, add half a teaspoon of garam masala.
Feel free to add some vegetables such as peas, sliced bell peppers, cauliflower florets, chickpeas, zucchini, or potato. You can also change it up and swap the shrimp for chicken or fish.
Storethe leftovers in an airtight container in the fridge for up to 3 days, or freeze for up to 3 months. Reheat in the microwave until just warmed through, stir well before serving.
Nutrition: a rough estimate per serving without rice.