Zucchini Chicken Enchiladas
These Zucchini Chicken Enchiladas are a fresh, lighter take on a classic comfort dish—rolling shredded chicken and a medley of beans, corn, and spices inside thinly sliced zucchini in place of tortillas. The result is bright, veggie-forward, and perfect for weeknight dinners or when you want something cozy without feeling heavy. The recipe yields a family-friendly casserole that bakes up bubbly and saucy, and it’s easily customized with favorites like extra cheese, avocado, or cilantro for brightness.
Why you’ll love this recipe

Replacing traditional tortillas with zucchini creates a dish that’s lower in carbs and higher in vegetables while still delivering on familiar Mexican-inspired flavors: cumin, chili powder, tender shredded chicken, corn, and black beans. The assembly is straightforward, and the casserole bakes quickly because the zucchini slices are very thin. You get gooey melted cheese, tangy enchilada sauce, and satisfying texture from the black beans and corn—everything you want from enchiladas, but lighter.
Ingredients
Use the following ingredients exactly as listed for the best results.
- 1 to 2 tablespoons olive oil
- ½ cup white or yellow onion, finely diced
- 3 cloves garlic, finely minced
- 1 cup black beans, drained and rinsed
- 1 cup corn, I use frozen that’s been thawed and drained; use canned that’s been drained, or use freshly shaved from the cob
- 2 teaspoons chili powder
- 2 teaspoons ground cumin
- 1 teaspoon salt
- 1 teaspoon black pepper
- 2 cups shredded chicken* See Notes for options
- 10-ounce can red enchilada sauce, divided (green enchilada sauce may be substituted)
- 1 cup shredded Mexican blend cheese, divided
- 2 pounds zucchini, very thinly sliced (approximately 4 large)
- Finely minced cilantro, optional for garnishing
- Sliced avocados, optional for garnishing
- Mexican crema, optional for garnishing
Equipment
- Large skillet
- Cutting board and knife
- Vegetable peeler or mandoline for thinly slicing zucchini
- Mixing bowl
- 9×13-inch baking dish (or equivalent)
- Spatula or wooden spoon
Prep at a glance
Preheat your oven to 375°F (190°C). Thinly slice the zucchini lengthwise so you have long strips to roll. Shred cooked chicken and measure out the beans, corn, spices, and cheese. Mince the garlic and dice the onion.
Step-by-step instructions
- Sauté the aromatics. Heat 1 to 2 tablespoons olive oil in a large skillet over medium heat. Add ½ cup finely diced white or yellow onion and sauté until softened and translucent, about 4 to 6 minutes. Add 3 cloves finely minced garlic and cook for 30 to 60 seconds more until fragrant. Stir constantly to prevent burning.
- Add beans, corn, and seasonings. To the skillet, add 1 cup black beans (drained and rinsed) and 1 cup corn (thawed and drained if frozen, or drained if using canned, or freshly shaved from the cob). Stir to combine. Sprinkle in 2 teaspoons chili powder, 2 teaspoons ground cumin, 1 teaspoon salt, and 1 teaspoon black pepper. Cook, stirring occasionally, for 2 to 3 minutes so the spices bloom and the mixture is warmed through.
- Incorporate the chicken and sauce. Add 2 cups shredded chicken and ¼ of the 10-ounce can red enchilada sauce to the skillet. Stir until the chicken is evenly coated and the filling is heated through, about 2 to 3 minutes. Remove from heat and set aside.
- Prepare the zucchini “wraps.” Very thinly slice 2 pounds zucchini lengthwise—about 4 large zucchini will yield enough long thin strips. A mandoline works well; a sharp knife or vegetable peeler also works. Pat the zucchini slices dry with paper towels to remove excess moisture. This helps prevent a watery casserole.
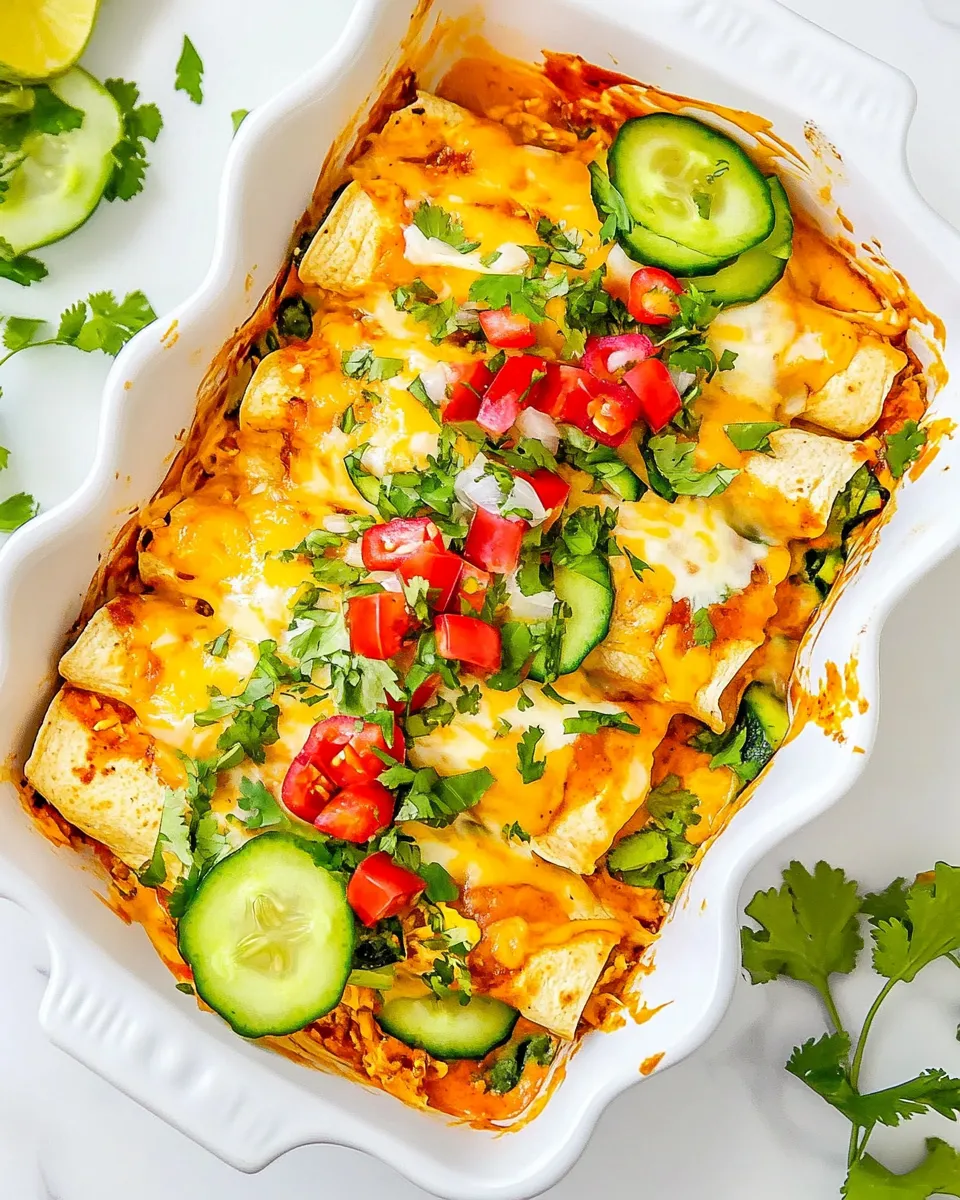
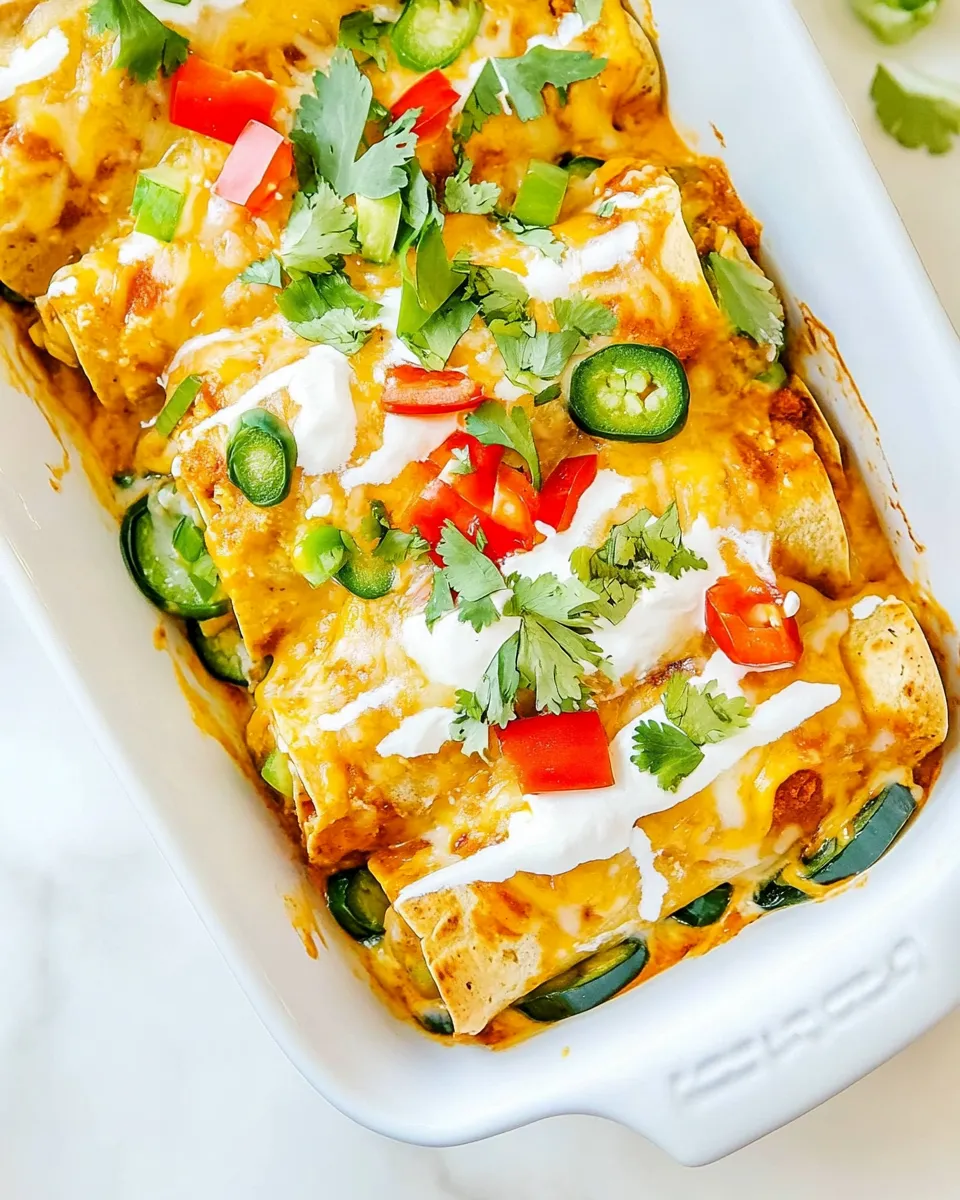
- Assemble the enchiladas. Spoon about 2 to 3 tablespoons of the chicken-and-bean mixture onto the wide end of a zucchini slice. Sprinkle a little of the shredded Mexican blend cheese over the filling. Roll the zucchini slice around the filling and place seam-side down in a 9×13-inch baking dish. Repeat with remaining zucchini slices and filling, arranging the enchilada rolls snugly in the dish.
- Top with sauce and cheese. Pour the remaining enchilada sauce evenly over the assembled zucchini rolls. Sprinkle the remaining shredded Mexican blend cheese evenly over the top so the casserole melts and browns attractively in the oven.
- Bake until bubbly. Place the baking dish on the middle rack of your preheated oven and bake at 375°F (190°C) for 18 to 22 minutes, or until the sauce is bubbling and the cheese is melted and lightly golden in spots.
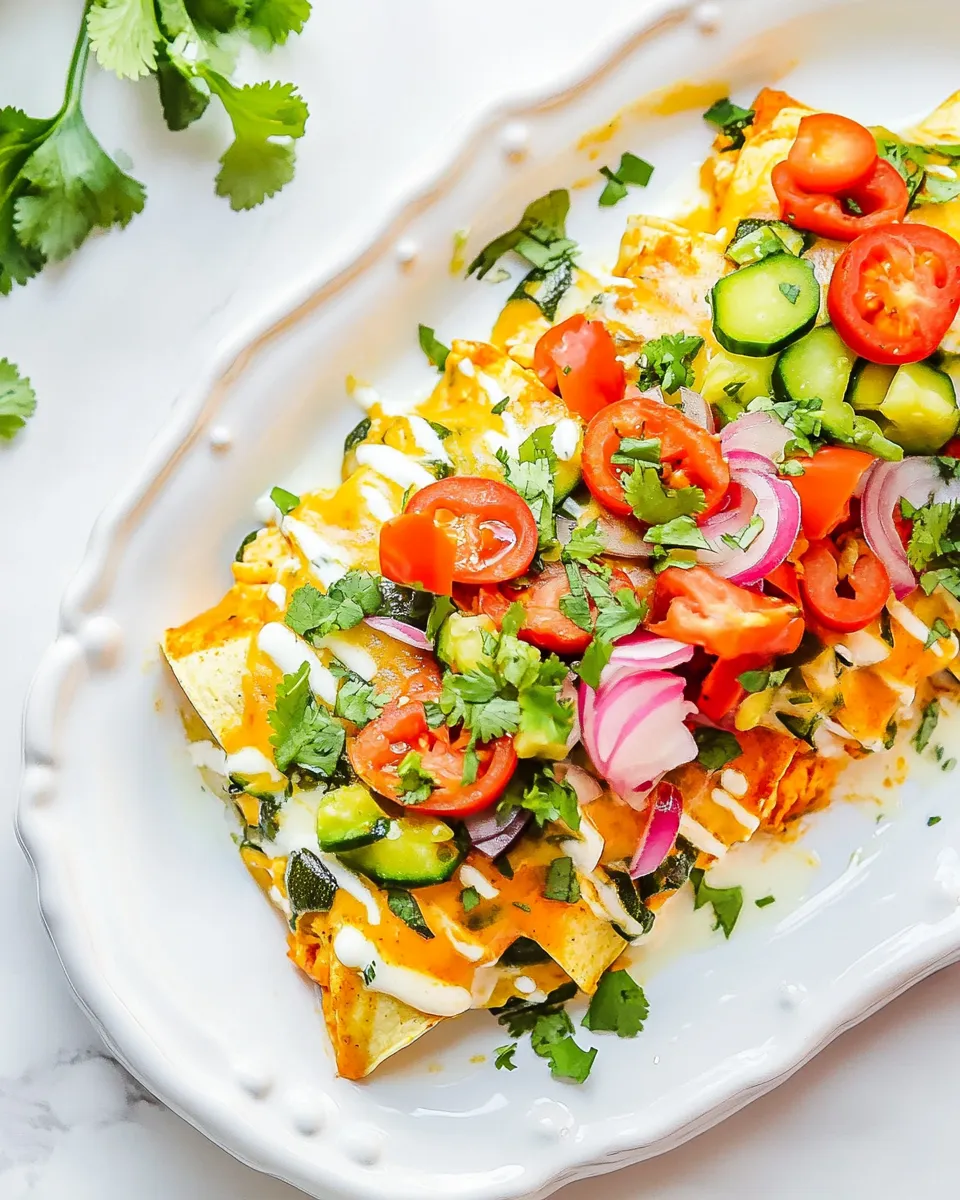
- Rest and garnish. Remove the baking dish from the oven and allow the enchiladas to rest for 5 minutes. This helps the filling set slightly and makes serving cleaner. If desired, garnish with finely minced cilantro, sliced avocados, and a drizzle of Mexican crema.
- Serve. Use a spatula to transfer portions to plates. These enchiladas pair nicely with a simple green salad, extra avocado slices, or warm rice on the side.
Troubleshooting & tips
- Very thin zucchini slices are key. If slices are too thick they won’t roll nicely and the texture will be more vegetable than soft wrap.
- Patting the zucchini dry removes excess water and prevents a soggy casserole. If you notice a lot of liquid, blot again with paper towels before assembling.
- Use cooked shredded chicken from a roasted or poached bird. If you prefer, rotisserie-style cooked and shredded meat works well. See Notes for more options.
- If you prefer green enchilada sauce, you can substitute the red sauce called for in the ingredients. The flavor will shift to a brighter, tangier profile.
- To add more heat, stir a pinch of cayenne or a few dashes of hot sauce into the filling or on top before baking.
Notes
- Shredded chicken options: Use leftover cooked chicken breast or thighs shredded by hand or with forks. For quick prep, gently simmer boneless skinless chicken pieces in broth until cooked through, then shred. Rotisserie-style cooked poultry also works well—just shred and measure 2 cups.
- Make-ahead: Assemble the enchiladas in the baking dish up to the point of adding the final sauce and cheese. Cover and refrigerate for up to 24 hours. When ready, add the remaining sauce and cheese, then bake until hot and bubbly; you may need to add a few extra minutes to the bake time.
- Storage: Leftovers keep in an airtight container in the refrigerator for 3 to 4 days. Reheat in a 350°F (175°C) oven until warmed through or microwave individual portions.
- Freezing: You can freeze the assembled, unbaked casserole (with sauce and cheese) in a freezer-safe dish for up to 2 months. Thaw overnight in the refrigerator before baking as directed.
Flavor variations
- Add diced roasted poblanos or bell peppers to the filling when sautéing the onions for a sweeter, smokier profile.
- Stir chopped fresh spinach into the warm filling just before assembly for extra greens.
- Top the finished casserole with pickled red onions or a squeeze of fresh lime to brighten the dish.
Frequently asked questions
Can I use a different vegetable instead of zucchini? Yes—thinly sliced eggplant or long, thin strips of roasted sweet potato could work, but cooking times and texture will vary. Zucchini gives the lightest, freshest result.
What if my zucchini strips are fragile and tear? Use wider strips and avoid rolling too tightly. Overlap a second strip if needed to create a sturdier wrap.
Can I make this spicier? Absolutely. Increase the chili powder slightly, add cayenne, or fold in some chopped jalapeño to the filling.
Serving suggestions
These zucchini chicken enchiladas are delightful with dollops of Mexican crema or plain yogurt, sliced avocado, and a scattering of minced cilantro. A side of lime-cilantro rice, roasted sweet potatoes, or a crisp green salad rounds out the meal nicely.
Nutritional notes
The substitution of zucchini for tortillas reduces carbohydrates and increases vegetable content in each serving, while the combination of chicken, black beans, and cheese provides a balanced mix of protein and satisfying flavor. Because zucchini releases water during cooking, take care to pat slices dry to maintain ideal texture.
Final thoughts
These Zucchini Chicken Enchiladas deliver cozy, familiar flavors in a lighter, vegetable-forward package. The simple skillet filling comes together quickly, and the zucchini strips bake into a satisfying, saucy casserole that’s great for weeknights or for feeding a crowd. Garnish with avocado and cilantro for freshness, and enjoy the balance of comfort and brightness in every bite.
Happy cooking—and remember, a few small tweaks to the filling or toppings can make this recipe your own. Enjoy your Zucchini Chicken Enchiladas!

Zucchini Chicken Enchiladas
Ingredients
- 1 to 2 tablespoons olive oil
- 1/2 cup white or yellow onion finely diced
- 3 cloves garlic finely minced
- 1 cup black beans drained and rinsed
- 1 cup corn thawed if frozen, or drained if canned
- 2 teaspoons chili powder
- 2 teaspoons ground cumin
- 1 teaspoon salt
- 1 teaspoon black pepper
- 2 cups shredded chicken see notes for options
- 10 ounce can red enchilada sauce divided (green may be substituted)
- 1 cup shredded Mexican blend cheese divided
- 2 pounds zucchini very thinly sliced (about 4 large; ~36 strips total)
- cilantro finely minced, optional for garnishing
- avocado sliced, optional for garnishing
- Mexican crema optional for garnishing
Instructions
- Preheat the oven to 350°F (175°C) and spray a 9x13-inch baking dish with cooking spray; set aside.
- Heat 1 to 2 tablespoons olive oil in a large skillet over medium heat. Add the finely diced onion and sauté for 3–4 minutes until softened and translucent, stirring frequently.
- While the onion cooks, use a Y-peeler to slice each zucchini lengthwise into very thin strips. Aim for about 36 strips total. Lay the slices on paper towels to absorb excess moisture and set aside.
- Add the minced garlic to the skillet and cook for 1 minute until fragrant, stirring constantly.
- Stir in the drained black beans and corn, then add the chili powder, ground cumin, salt, and black pepper. Cook for about 1 minute to warm and combine flavors.
- Add the shredded chicken, 1/3 of the enchilada sauce (about 3.3 oz), and 1/2 cup of the cheese to the skillet. Stir to combine and heat for about 1 minute. Taste and adjust seasoning if desired.
- Spread the remaining 1/3 of the enchilada sauce evenly over the bottom of the prepared baking dish.
- Assemble the roll-ups: lay three zucchini strips parallel and slightly overlapping. Spoon about 3 tablespoons of the filling on one end of the strips and carefully roll them up. Repeat until all filling is used (you should have approximately 12 roll-ups).
- Place each roll-up seam-side down in the prepared pan. Drizzle the remaining 1/3 cup enchilada sauce over the top and sprinkle with the remaining 1/2 cup cheese.
- Bake in the preheated oven for about 25 minutes, beginning to check at 20 minutes. The dish is done when the cheese is lightly golden and the zucchini is tender.
- Optionally garnish with finely minced cilantro, sliced avocado, and a drizzle of Mexican crema before serving.
Equipment
- 9x13 inch Baking Dish
- Large Skillet
- Y-peeler
- Cutting Board
- Knife
- Paper Towels
- Measuring Cups and Spoons
Notes
- Use any cooked shredded or diced chicken you have on hand.
- Frozen corn should be thawed and drained before using.
- Paper towels help absorb excess zucchini moisture before assembling.
- Adjust salt and spices to taste, and add cayenne for heat.
- If using canned enchilada sauce, drain any excess liquid if very watery.