Stuffed Chicken Parmesan Recipe (with GF Option)
This Stuffed Chicken Parmesan Recipe (with GF Option) is a cozy, dinner-party-worthy dish that feels fancy but comes together faster than you might expect. The exterior is golden and crisp, the filling is gooey and cheesy, and a bright hit of basil on top ties everything together. I love this recipe because it uses simple pantry ingredients and easily converts to a gluten-free version without sacrificing texture or flavor.
Why you’ll love this Stuffed Chicken Parmesan Recipe (with GF Option)

There are a few reasons this recipe has become a staple in my weeknight rotation. First, the stuffing—molten mozzarella tucked inside a thick chicken breast—makes every bite an indulgence. Second, the crisp coating contrasts beautifully with the tender meat. Third, it’s flexible: swap in a gluten-free all-purpose flour and gluten-free plain breadcrumbs and you’re set. Finally, the method is straightforward and dependable, which means reliable dinner vibes every time.
Ingredients
- 1 1/2 lbs chicken breasts, (4 medium)
- 1/2 cup all-purpose flour, *or gluten free flour
- 3/4 tsp salt
- 1/2 tsp black pepper
- 2 large eggs, well beaten with a fork
- 1/2 cup plain bread crumbs such as panko, **see notes for GF option
- 1/3 cup parmesan cheese, finely grated
- 3 Tbsps extra light olive oil, plus more as needed
- 2 cups marinara sauce
- 6 oz mozzarella cheese, divided, (1 1/2 cups shredded)
- 6 fresh basil leaves, finely chopped, to garnish
Equipment
- Baking sheet or ovenproof skillet
- Sharp knife and cutting board
- Shallow bowls for dredging stations
- Meat mallet or rolling pin (optional)
- Tongs and a spatula
- Instant-read thermometer (optional but helpful)
Prep and timing
Hands-on time is about 25–35 minutes and total time is roughly 45–55 minutes depending on oven and thickness of the chicken. This recipe serves 4. If you want a crispier crust, let the coated chicken rest in the refrigerator for 15–20 minutes before cooking.
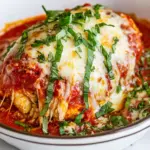
Taste and texture notes
The outer layer should be a warm golden brown with a crisp bite. Inside, the chicken remains juicy and the mozzarella becomes lusciously melty. The parmesan mixed into the breadcrumbs adds savory, slightly nutty notes that complement the bright marinara. Fresh basil sprinkled on top provides a fragrant, herbaceous finish.
Step-by-step instructions
- Preheat and prepare: Preheat your oven to 400°F (200°C). Lightly oil an ovenproof skillet or line a baking sheet with foil. Have your marinara warmed slightly so it’s ready once the chicken finishes cooking.
- Pound and butterfly the chicken: Pat each chicken breast dry with paper towels. To make a pocket, place a chicken breast on a cutting board and slice horizontally almost all the way through, stopping about 1/2 inch from the opposite edge. Open the breast like a book. If your breasts are uneven in thickness, cover with plastic wrap and gently pound with a meat mallet or rolling pin to an even thickness, about 1/2 inch thick. Repeat with all 4 breasts.
- Season flour: In a shallow dish, whisk together the 1/2 cup all-purpose flour (or gluten free flour), 3/4 tsp salt, and 1/2 tsp black pepper. This seasoned flour will be the first dredge to help the egg adhere.
- Prep egg wash: In a second shallow bowl, beat the 2 large eggs thoroughly with a fork until smooth.
- Make breadcrumb mixture: In a third shallow bowl, combine the 1/2 cup plain bread crumbs such as panko (use gluten-free breadcrumbs for the GF option) and the 1/3 cup finely grated parmesan cheese. Mix until evenly combined.
- Stuff the chicken: Divide the 6 oz of mozzarella cheese into four equal portions. Place one portion of shredded mozzarella inside the pocket of each butterflied chicken breast, spreading it so the cheese sits evenly. Close the breast around the cheese and tuck edges to keep the filling secure. If needed, use a few toothpicks to close the opening; remove them before serving.
- Dredge the stuffed breasts: One at a time, dredge each stuffed chicken breast in the seasoned flour, shaking off any excess. Dip it into the beaten eggs, ensuring full coverage, then press it into the breadcrumb-parmesan mixture, coating all sides. Press firmly so the crumbs adhere well to the chicken. Set each coated breast aside on a plate.
- Brown the chicken: Heat 3 Tbsps extra light olive oil in a large ovenproof skillet over medium-high heat. When the oil shimmers, add 2 stuffed chicken breasts without crowding the pan. Cook 3–4 minutes until the bottom is golden brown and releases easily from the pan, then carefully flip and brown the other side for another 3–4 minutes. Transfer browned breasts to a clean plate and repeat with remaining oil and chicken breasts. Add more oil as needed to maintain a shallow layer in the pan.
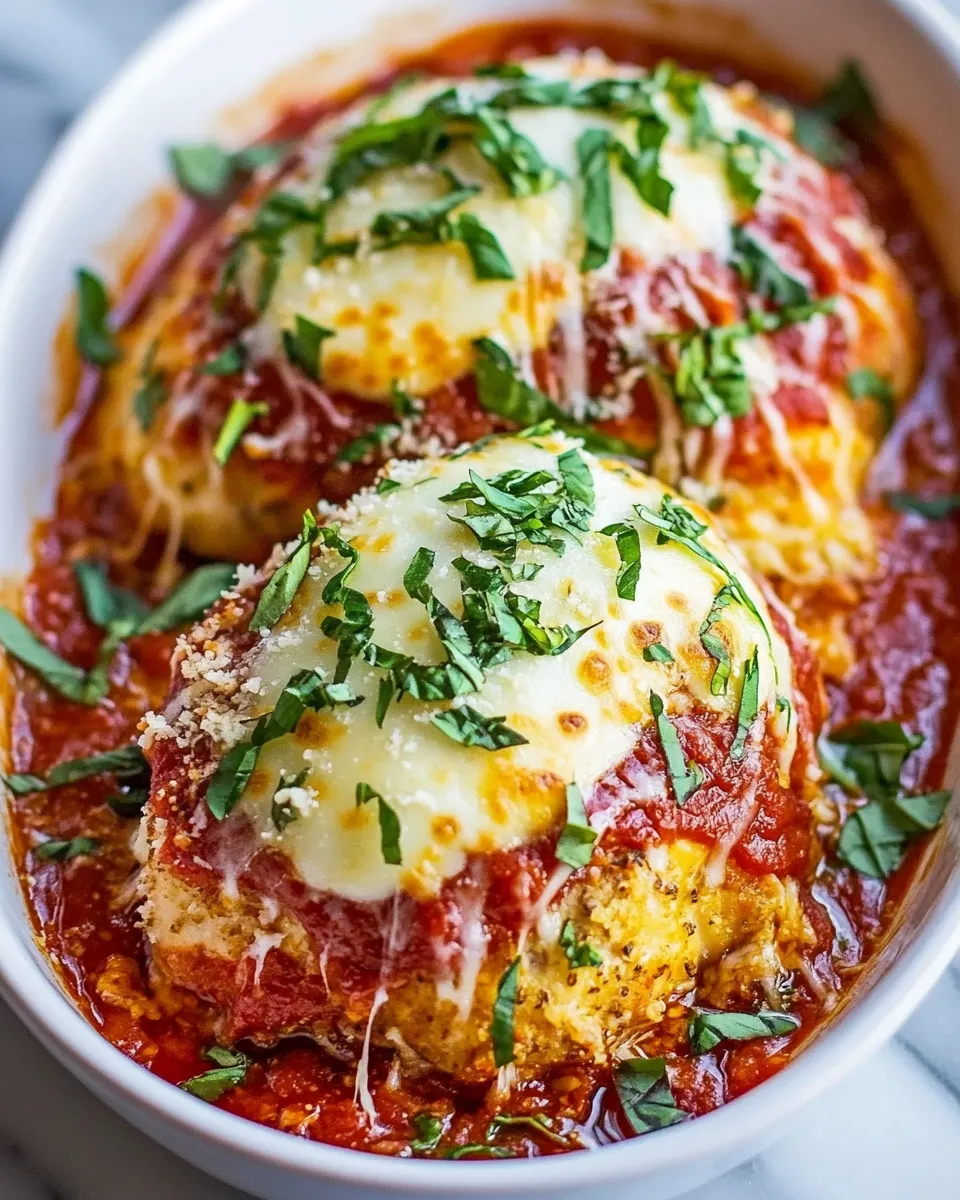
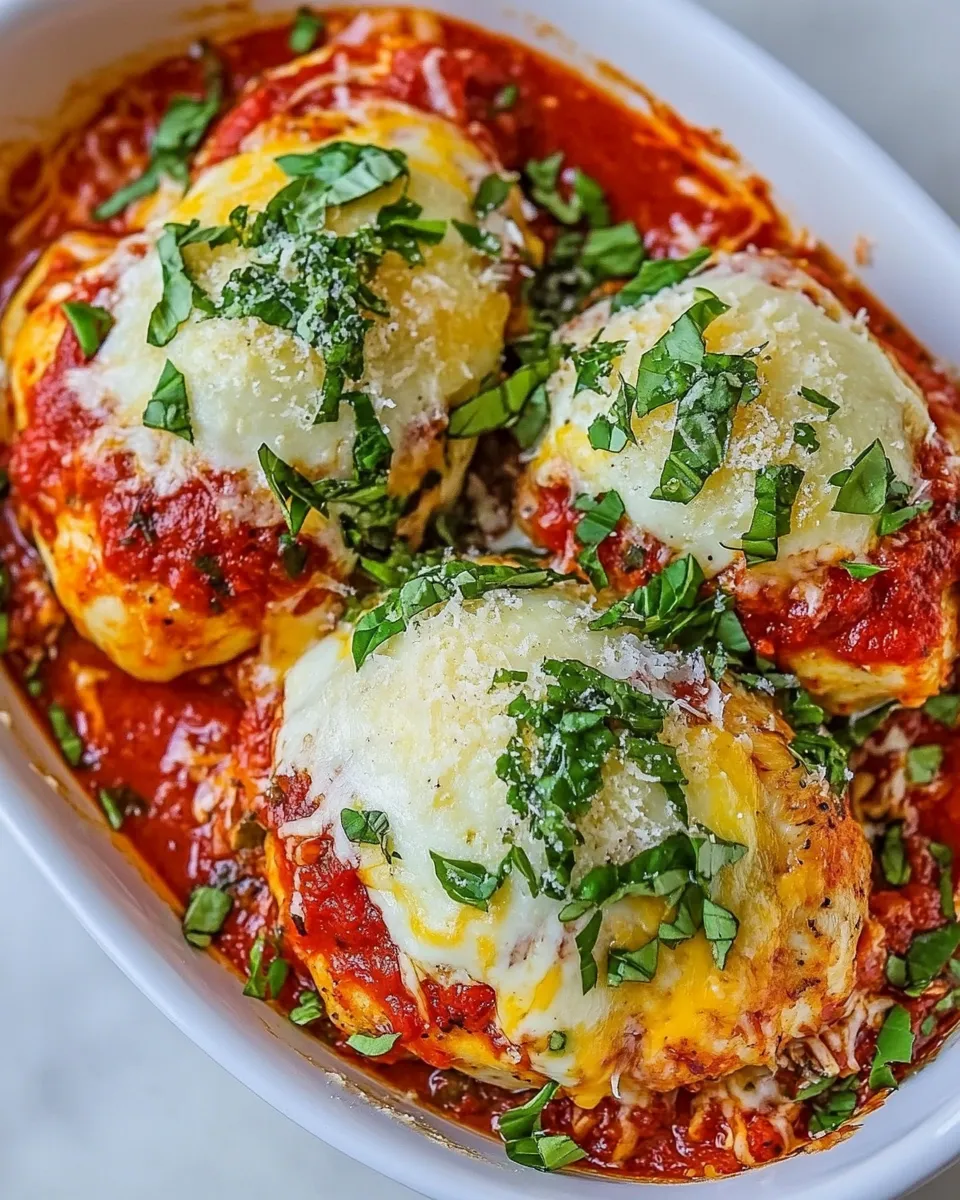
- Assemble for baking: Reduce the oven temperature if your skillet has heated very hot; the oven should remain 400°F (200°C). Pour about half of the 2 cups marinara sauce into the bottom of the skillet or onto the prepared baking sheet in a thin layer. Nestle the browned stuffed chicken breasts into the sauce, spacing them evenly. Spoon the remaining marinara sauce over the tops of each breast—use just enough to coat but not drown the crust. Sprinkle the remaining mozzarella (if any is withheld for topping, use as specified) evenly over the chicken so each piece has a bit of cheese to melt on top.
- Bake until cooked through: Transfer the skillet or baking sheet to the preheated oven. Bake for 15–20 minutes, or until the internal temperature of the chicken reaches 165°F (74°C) and the cheese inside is fully melted. Times will vary based on breast thickness; start checking at 12–15 minutes. The breadcrumb coating should be set and slightly crisp.
- Broil for a golden top (optional): If you want a more golden, bubbly cheese top, switch the oven to broil for 1–2 minutes at the end of baking. Watch closely to prevent burning.
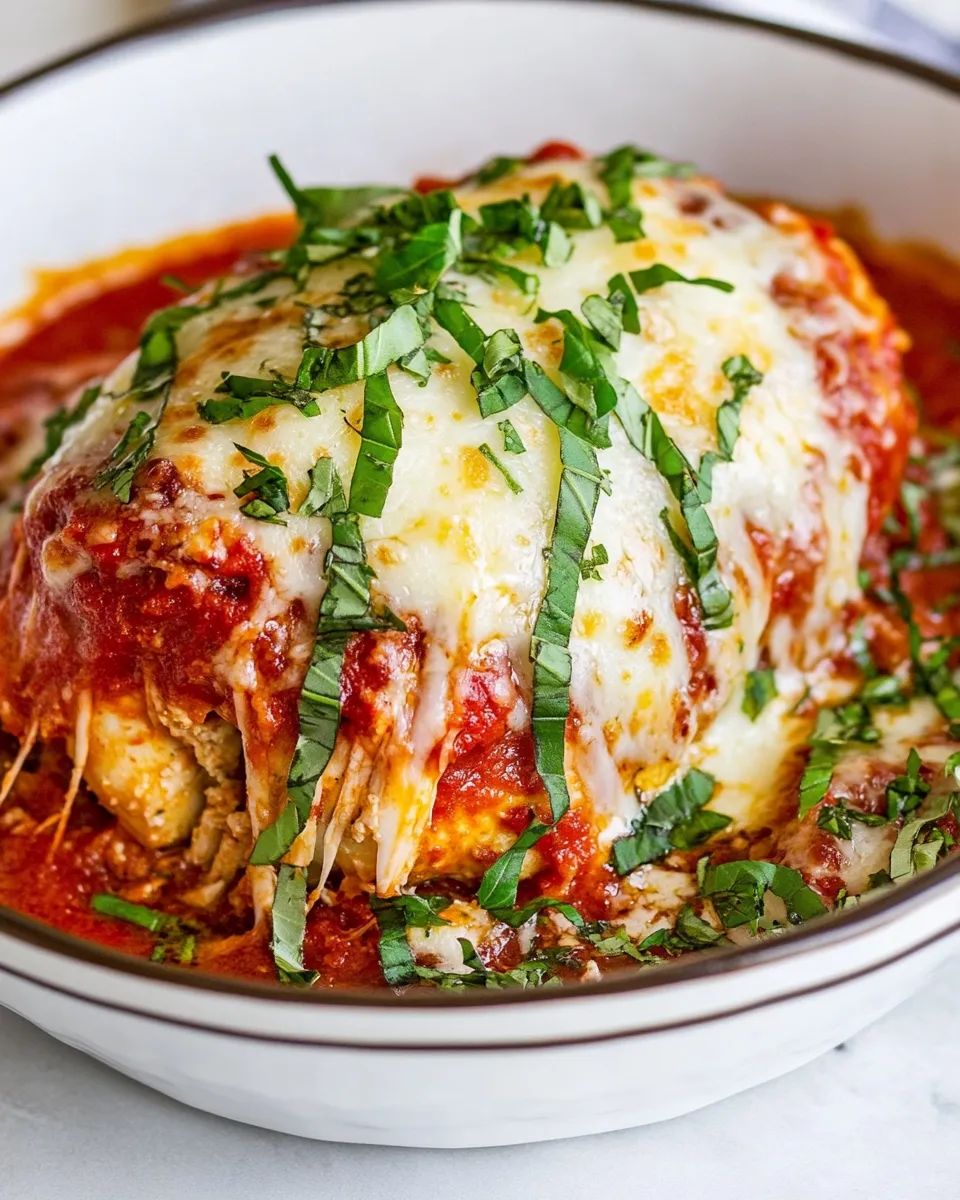
- Rest and garnish: Remove the chicken from the oven and let it rest 3–5 minutes to allow juices to redistribute and the cheese to settle. Sprinkle the finely chopped 6 fresh basil leaves over the top of the chicken just before serving for a fresh, aromatic finish.
- Serve: Serve each stuffed chicken breast with extra warmed marinara on the side and a simple salad or steamed vegetables. Leftovers keep well in the refrigerator for 2–3 days; reheat gently in a 350°F oven until warmed through.
Notes, swaps, and troubleshooting
- Gluten-free option: Swap the 1/2 cup all-purpose flour for a 1:1 gluten-free all-purpose flour blend and use gluten-free plain breadcrumbs or crushed gluten-free crackers in place of panko. Ensure all packaged ingredients are labeled gluten-free if cross-contact is a concern.
- Cheese choices: Use low-moisture shredded mozzarella for the best melty texture. If you prefer, substitute provolone for part of the mozzarella for extra flavor.
- Marinara: A simple, slightly chunky marinara works best. Use a high-quality jarred sauce or homemade if you have it—both deliver great results.
- Even cooking: If your chicken breasts are much larger, consider slicing them into cutlets and stuffing those to keep cooking time consistent. Alternatively, pound to an even thickness before stuffing.
- Sealing the pocket: If the pocket opens during dredging, use toothpicks to close it and remove them after baking. Another trick is to press a small amount of breadcrumb mixture into the seam to help seal it during frying.
- Crispier crust: Rest the dredged breasts in the refrigerator for 15–20 minutes before frying. This firms the coating and helps it adhere, producing a crispier crust.
- Oil choice: Extra light olive oil is used here for a neutral flavor and a higher smoke point, but you can substitute vegetable oil or avocado oil if preferred.
Make-ahead tips
- Assemble the stuffed breasts, dredge them, and place them on a tray covered with plastic wrap in the refrigerator up to 24 hours before cooking. Allow them to come closer to room temperature for 15–20 minutes before frying to avoid a sudden temperature drop in the pan.
- Fully cooked leftovers reheat well in an oven set to 350°F for about 10–15 minutes, covered with foil to prevent drying out.
Serving suggestions
This Stuffed Chicken Parmesan Recipe (with GF Option) pairs beautifully with a simple pasta tossed in olive oil and garlic, roasted vegetables, or a crisp green salad. For a lighter plate, serve over a bed of sautéed spinach or spiralized zucchini.
Nutrition snapshot (per serving, approximate)
Calories vary based on exact brands and whether you choose the gluten-free swaps. Expect a protein-rich, moderate-carb meal with approachable calories suitable for a filling dinner.
Final thoughts
This Stuffed Chicken Parmesan Recipe (with GF Option) is one of those recipes that looks impressive but is totally approachable. It’s perfect for weeknight dinners when you want something special without a lot of fuss, and it’s also elegant enough to serve guests. The combination of crispy coating, gooey mozzarella, savory parmesan, and bright basil is classic and comforting. Try it once, and it’ll likely earn a spot in your regular rotation.
Stuffed Chicken Parmesan Recipe (with GF Option)
Ingredients
- 1 1/2 lb chicken breasts (about 4 medium), butterflied and slit to create a pocket
- 1/2 cup all-purpose flour *or gluten free flour
- 3/4 tsp salt
- 1/2 tsp black pepper
- 2 large eggs well beaten
- 1/2 cup plain bread crumbs such as panko; see notes for GF option
- 1/3 cup Parmesan cheese finely grated
- 3 Tbsp extra light olive oil plus more as needed for frying
- 2 cups marinara sauce
- 6 oz mozzarella cheese divided (about 1 1/2 cups shredded), reserve ~2-3 Tbsp per breast for stuffing
- 6 leaves fresh basil finely chopped, for garnish
Instructions
- Preheat the oven to 400°F (205°C). Pat the chicken dry and season both sides and the inside of each breast pocket with 3/4 teaspoon salt and 1/2 teaspoon black pepper total, or to taste.
- Cut a deep slit into each chicken breast to form a pocket, being careful not to cut through. Stuff each pocket with about 2–3 tablespoons of shredded mozzarella and press the edges closed to seal.
- Set up a dredging station with three shallow bowls: flour in the first, beaten eggs in the second, and a mixture of bread crumbs and grated Parmesan (1/2 cup crumbs + 1/3 cup Parmesan) in the third.
- Working with one stuffed breast at a time, dredge in flour and tap off excess, dip into the beaten eggs, then coat thoroughly with the breadcrumb-Parmesan mixture. Repeat for all breasts.
- Heat 3 tablespoons olive oil in a large deep skillet or Dutch oven over medium heat. When hot, add the breaded chicken in a single layer and sauté until golden brown, about 4 minutes per side.
- Pour 2 cups marinara sauce into the pan around and partly over the chicken; spoon some sauce onto each breast. Sprinkle the remaining mozzarella over the chicken.
- Transfer the skillet to the preheated oven (or move chicken to an oven-safe baking dish) and bake uncovered 15–20 minutes, until an instant-read thermometer inserted into the thickest part of the chicken (avoiding the cheese pocket) reads 165°F (74°C).
- Remove from oven, garnish with chopped fresh basil, and serve.
Equipment
- Mixing Bowls
- Fork
- Large deep skillet or Dutch oven
- oven-safe baking dish or same skillet for oven
- Measuring Cups and Spoons
- Instant-read thermometer
Notes
- For a gluten-free version use a GF all-purpose flour and finely crushed GF cracker crumbs.
- Adjust salt and pepper to taste before stuffing.
- Ensure pockets are sealed well to prevent cheese leaking while cooking.
- Use an instant-read thermometer to confirm doneness.