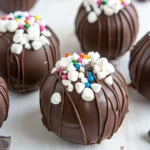
Hot Chocolate Bombs
I make these hot chocolate bombs every winter when friends drop by, when the kids want a cozy afternoon treat, or when I need a quick, comforting gift. They’re surprisingly simple to assemble and feel special without being fussy. You get a crisp chocolate shell that melts into a rich cup of hot cocoa, releasing the cocoa mix and marshmallows tucked inside.
This recipe focuses on technique and timing so your shells are sturdy and your bombs open reliably in a warm mug. I’ll walk you through what you need, the exact steps to follow, common mistakes to avoid, and sensible swaps if you need dairy-free or nut-free options.
Keep a bowl of warm water and a clean towel nearby—this recipe moves quickly once the chocolate is melted. Read the instructions through once before starting and set up your workspace so everything flows. Let’s get practical: no fluff, just helpful tips and the full recipe so your bombs come out consistently great.
What Goes In

Ingredients
- 6 oz (175 g) quality chocolate — the shell and glue; pick a chocolate you enjoy eating because it’s the main flavor. Chop into even pieces so it melts uniformly.
- 6 tablespoons hot cocoa mix — the filling flavor; divide evenly for consistent servings and avoid clumping by sifting if your mix is lumpy.
- 1 cup mini marshmallows — texture and charm; use mini or finely chopped regular marshmallows so they fit neatly inside the shell.
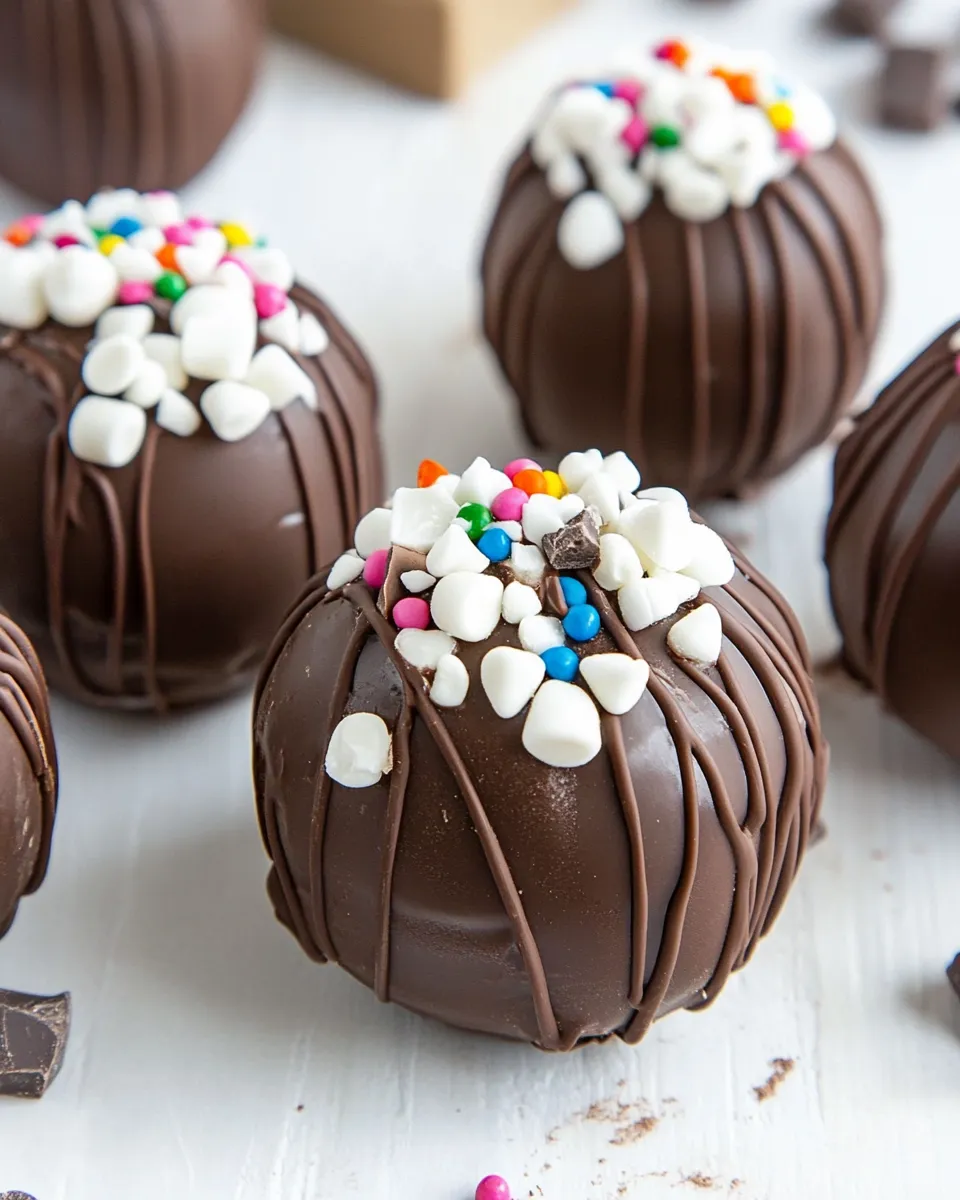
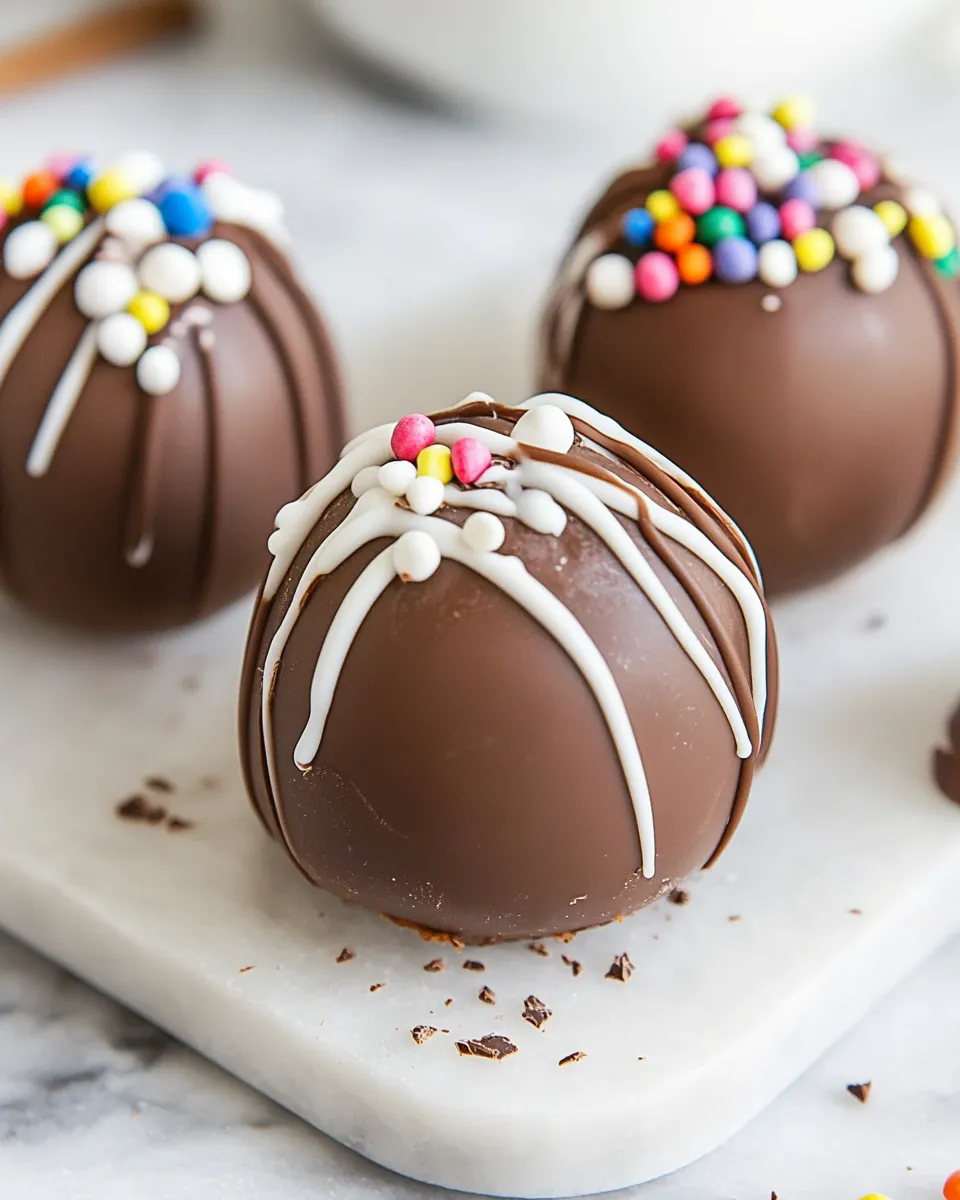
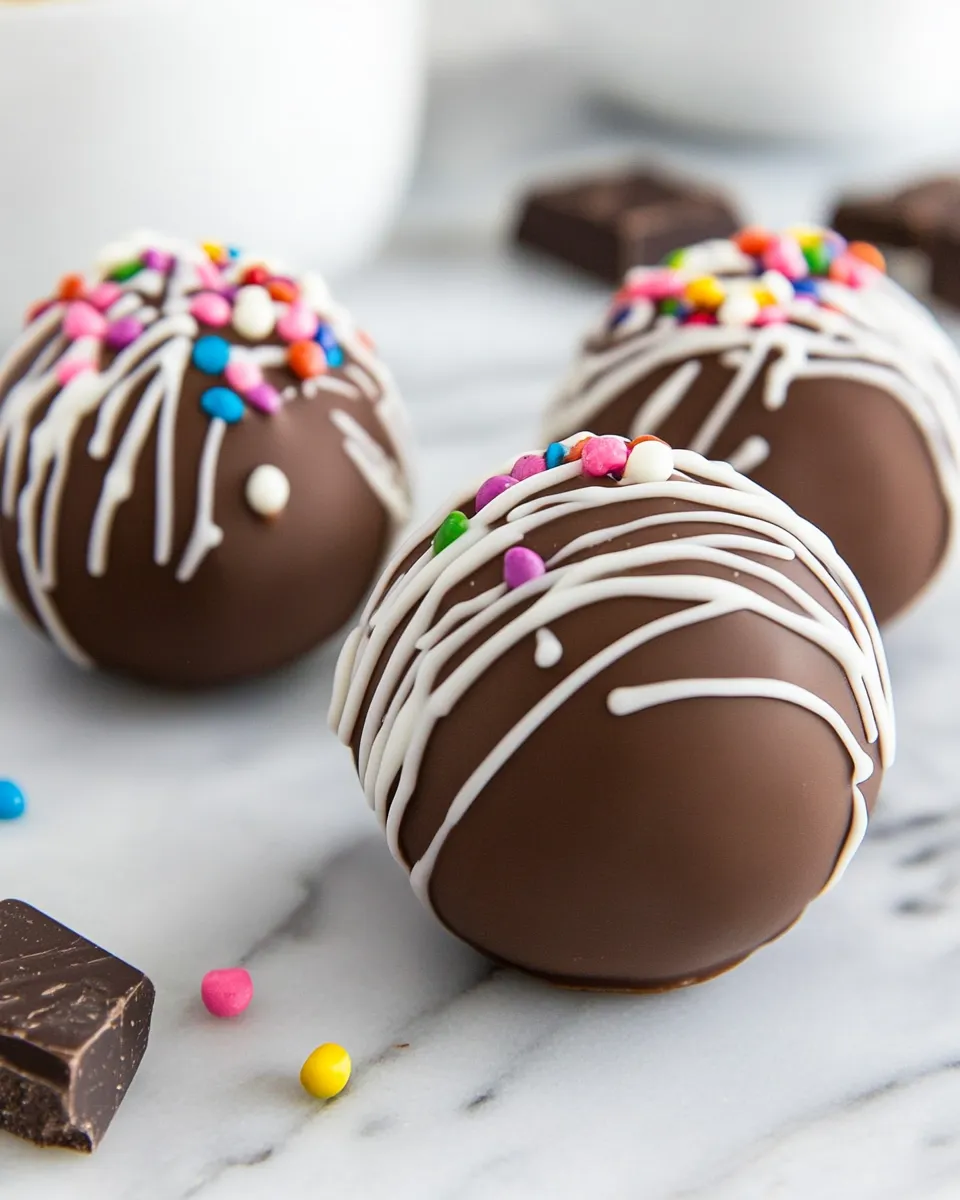
Hot Chocolate Bombs, Made Easy
- Break or chop the 6 oz (175 g) chocolate into small, even pieces and place them in a microwave-safe bowl. Melt in 15-second intervals, stirring between each interval, until smooth. (Alternatively, melt in a double boiler until smooth.)
- If using a sphere mold, work quickly: spoon melted chocolate into each half-sphere and spread it evenly with the back of the spoon or a pastry brush so the shell is well coated. Aim for an even, reasonably thick layer so the shells are sturdy. Try to leave some melted chocolate in the bowl to use for sealing and decorating later.
- Place the filled molds on a tray and chill in the freezer for 10–15 minutes, or until the chocolate is fully set.
- Remove the set chocolate halves from the molds carefully and place them on a clean tray. If any halves are thin or fragile, you can recoat those areas with a little of the remaining melted chocolate and chill again until set.
- (Optional decoration) If you want a simple drizzle, rewarm any reserved melted chocolate just until pourable, then drizzle over half of the chocolate halves. Return those halves to the freezer for 5–10 minutes to harden the drizzle.
- Plan to make 6 hot chocolate bombs: divide the 6 tablespoons of hot cocoa mix into six equal portions (1 tablespoon each). Divide the 1 cup of mini marshmallows evenly among the six bombs.
- Take the plain (undecorated) half-spheres and place 1 tablespoon of the hot cocoa mix into each one. Top each with the evenly divided portion of mini marshmallows.
- To seal each bomb, warm a small microwave-safe plate for 20–40 seconds (or warm a metal spoon over a stove). Briefly press the rim of an empty (decorated) half-sphere against the warm plate or spoon for 1–2 seconds so the edge softens, then immediately press it onto the filled half to join. Hold gently until sealed. If needed, use a little of the reserved melted chocolate as “glue” along the seam and chill briefly to set.
- Once sealed, chill the finished bombs for a few minutes so seams fully set and shells are firm.
- To serve, place one hot chocolate bomb in a mug. Pour about 6 oz (175 ml) of warm liquid over the bomb and stir as the shell melts and releases the cocoa and marshmallows, until the drink is smooth and combined.
- Store any unused bombs in an airtight container in a cool, dry place or in the refrigerator if your kitchen is warm. Consume within a week for best texture.
Why It Works Every Time

There are two simple physics-and-chemistry reasons these bombs succeed: the shell thickness and temperature contrast. A reasonably thick, even chocolate shell gives structure so the halves hold their shape and don’t collapse under their own weight. Chilling between steps firms the chocolate quickly so you can handle the pieces without fingerprints or cracks.
Pouring warm liquid over the bomb takes advantage of heat transfer: a warm mug (and warm water or milk) softens the chocolate fast, letting it melt evenly and release the dry cocoa and marshmallows. If the liquid is too hot or too cold you’ll either scald the shell or leave it unmelted; aim for that comfortable warmth where steam rises but you can still hold the mug briefly.
Allergy-Friendly Substitutes
- Use dairy-free or vegan chocolate as a direct swap for the quality chocolate if you need a lactose-free or plant-based option.
- Choose a naturally dairy-free hot cocoa mix or one labeled vegan to replace the hot cocoa mix when avoiding dairy.
- Replace standard mini marshmallows with vegan marshmallows for a fully vegan bomb; read labels to ensure they’re gelatin-free.
Equipment Breakdown
Minimal gear is required, but a few items make the job orderly and fast:
- Sphere mold — the right size makes consistent bombs and speeds assembly.
- Microwave-safe bowl or double boiler — for melting chocolate gently.
- Pastry brush or back of a spoon — for pooling and smoothing chocolate inside the molds.
- Tray and parchment or silicone mat — for chilling and moving the halves.
- Small microwave-safe plate or metal spoon — to warm and soften edges for sealing.
Learn from These Mistakes
- Thin shells: if you skimp on chocolate when coating the mold, the halves will crack or flex. Coat fairly thick for sturdiness and recoat fragile spots.
- Skipping chill time: not chilling long enough makes removing halves messy and causes seams to fail when sealing.
- Overheating chocolate: microwave in short bursts and stir. Chocolate that’s too hot can seize or lose sheen and texture.
- Rushing the seal: pressing warm rims together before the edge is softened leads to uneven joins. Quick, confident presses after briefly warming give the cleanest seam.
Dietary Swaps & Alternatives
If you’re adjusting for diet preferences, the core swaps are straightforward: swap the chocolate for a suitable alternative, use a compatible hot cocoa mix, and pick marshmallows that meet your needs. You can also:
- Use almond, oat, or soy milk as your warm liquid when serving for lactose-free options.
- For a lower-sugar treat, look for low-sugar cocoa mixes and dark chocolate with a higher cocoa percentage—be mindful the flavor will be more intense.
- Add spices like cinnamon or chili directly into the hot liquid when serving rather than into the bombs if you want optional flavor variations without changing the bomb contents.
Author’s Commentary
I started making hot chocolate bombs to turn a simple cup of cocoa into a moment. They’re surprisingly forgiving if you follow the temperature and chill steps. My go-to is good-quality chocolate—if the chocolate tastes flat on its own, it won’t sing in the final drink. Reserve a little melted chocolate for sealing and decorating; it saves the stress of trying to remelt a large batch mid-assembly.
One practical habit: assemble on a single tray in the order you’ll chill and finish. That keeps the workflow moving and prevents chocolate from setting at inconvenient times. If you’re gifting these, pack them on a layer of tissue in a sturdy box and include instructions for serving so the recipient gets the right experience.
How to Store & Reheat
Store finished bombs in an airtight container in a cool, dry place; refrigeration is fine if your kitchen runs warm. Consume within a week for the best marshmallow texture and shell snap. If refrigerated, let the bombs sit at room temperature briefly before serving so condensation doesn’t form when you pour warm liquid over them.
To ‘reheat’ or serve: place one hot chocolate bomb in a mug and pour about 6 oz (175 ml) of warm liquid over it. Stir as the shell melts and incorporate the cocoa and marshmallows. If the chocolate seems too firm, warm the liquid slightly more; if it’s too thin, use milk or a creamier alternative for richer texture.
Questions People Ask
- Can I make these ahead? Yes—store them airtight and cool; they’ll keep well for up to a week. For longer storage, freeze individually wrapped bombs and thaw gently before serving.
- How do I avoid melting at room temperature? Keep them in a cool, dry spot away from direct sunlight. If your kitchen is warm, refrigeration is the safer option.
- What liquid works best? Whole milk makes a rich drink; non-dairy milks like oat or almond are great for lactose-free versions. Heat the liquid until it’s warm but not boiling for best melt and mouthfeel.
- Can I add mix-ins? Yes, but keep them small—tiny sprinkles, small toffee bits, or a pinch of instant espresso work. Don’t overload the shell or you’ll have trouble sealing.
Save & Share
If this recipe helped you make reliable, beautiful hot chocolate bombs, save the page to return to the tips on shell thickness and sealing—and share a photo with friends who love simple, impressive treats. Pair them with a note about how to serve (one bomb per 6 oz/175 ml warm milk) so everyone enjoys the same cozy result.
Want a shortcut? Make the shells and keep fillings separate in small bags, then assemble just before gifting. That gives the same delight but avoids fragile handling during transport. Happy melting—and enjoy the little theatrical moment when that bomb opens with a warm pour.
Hot Chocolate Bombs
Ingredients
Ingredients
- ?6 oz 175 gquality chocolate
- ?6 tablespoonshot cocoa mix
- ?1 cupmini marshmallows
Instructions
Instructions
- Break or chop the 6 oz (175 g) chocolate into small, even pieces and place them in a microwave-safe bowl. Melt in 15-second intervals, stirring between each interval, until smooth. (Alternatively, melt in a double boiler until smooth.)
- If using a sphere mold, work quickly: spoon melted chocolate into each half-sphere and spread it evenly with the back of the spoon or a pastry brush so the shell is well coated. Aim for an even, reasonably thick layer so the shells are sturdy. Try to leave some melted chocolate in the bowl to use for sealing and decorating later.
- Place the filled molds on a tray and chill in the freezer for 10–15 minutes, or until the chocolate is fully set.
- Remove the set chocolate halves from the molds carefully and place them on a clean tray. If any halves are thin or fragile, you can recoat those areas with a little of the remaining melted chocolate and chill again until set.
- (Optional decoration) If you want a simple drizzle, rewarm any reserved melted chocolate just until pourable, then drizzle over half of the chocolate halves. Return those halves to the freezer for 5–10 minutes to harden the drizzle.
- Plan to make 6 hot chocolate bombs: divide the 6 tablespoons of hot cocoa mix into six equal portions (1 tablespoon each). Divide the 1 cup of mini marshmallows evenly among the six bombs.
- Take the plain (undecorated) half-spheres and place 1 tablespoon of the hot cocoa mix into each one. Top each with the evenly divided portion of mini marshmallows.
- To seal each bomb, warm a small microwave-safe plate for 20–40 seconds (or warm a metal spoon over a stove). Briefly press the rim of an empty (decorated) half-sphere against the warm plate or spoon for 1–2 seconds so the edge softens, then immediately press it onto the filled half to join. Hold gently until sealed. If needed, use a little of the reserved melted chocolate as “glue” along the seam and chill briefly to set.
- Once sealed, chill the finished bombs for a few minutes so seams fully set and shells are firm.
- To serve, place one hot chocolate bomb in a mug. Pour about 6 oz (175 ml) of warm liquid over the bomb and stir as the shell melts and releases the cocoa and marshmallows, until the drink is smooth and combined.
- Store any unused bombs in an airtight container in a cool, dry place or in the refrigerator if your kitchen is warm. Consume within a week for best texture.
Equipment
- Half sphere silicone mold
Notes
If you substitute the chocolate with chocolate melts, they will melt smoothly and look better but won’t taste as good.
To avoid getting fingerprints on the cocoa bombs, wear food-safe gloves when working with the chocolate.
Store in a plastic bag or airtight container for up to 2 weeks at room temperature or in the fridge.
Salted caramel: Add a little bit of salted caramel in the cocoa bomb or use caramel chips, then sprinkle the cocoa bomb with flaky sea salt.
Gingerbread: Use white chocolate for the cocoa bomb, add gingerbread spice or syrup inside the cocoa bomb. Sprinkle with crumbled gingerbread.
Birthday cake:Use white chocolate, add a drop of vanilla extract and mix in colorful sprinkles. Decorate with a drizzle of white chocolate and extra colorful sprinkles.
Peppermint: Add crushed peppermint candy inside the cocoa bombs, and sprinkle with more on the outside after the chocolate drizzle.
Mocha: Add a teaspoon of Instant coffee inside the cocoa bomb.
S’mores: You can lightly toast the mini marshmallows before placing them in the cocoa bombs, and add some crushed graham crackers inside the cocoa bomb, and to sprinkle the outside.
Oreo: Crushed some Oreos and place inside the cocoa bomb, and sprinkle the outside.