Vintage Brownie Surprise Cake
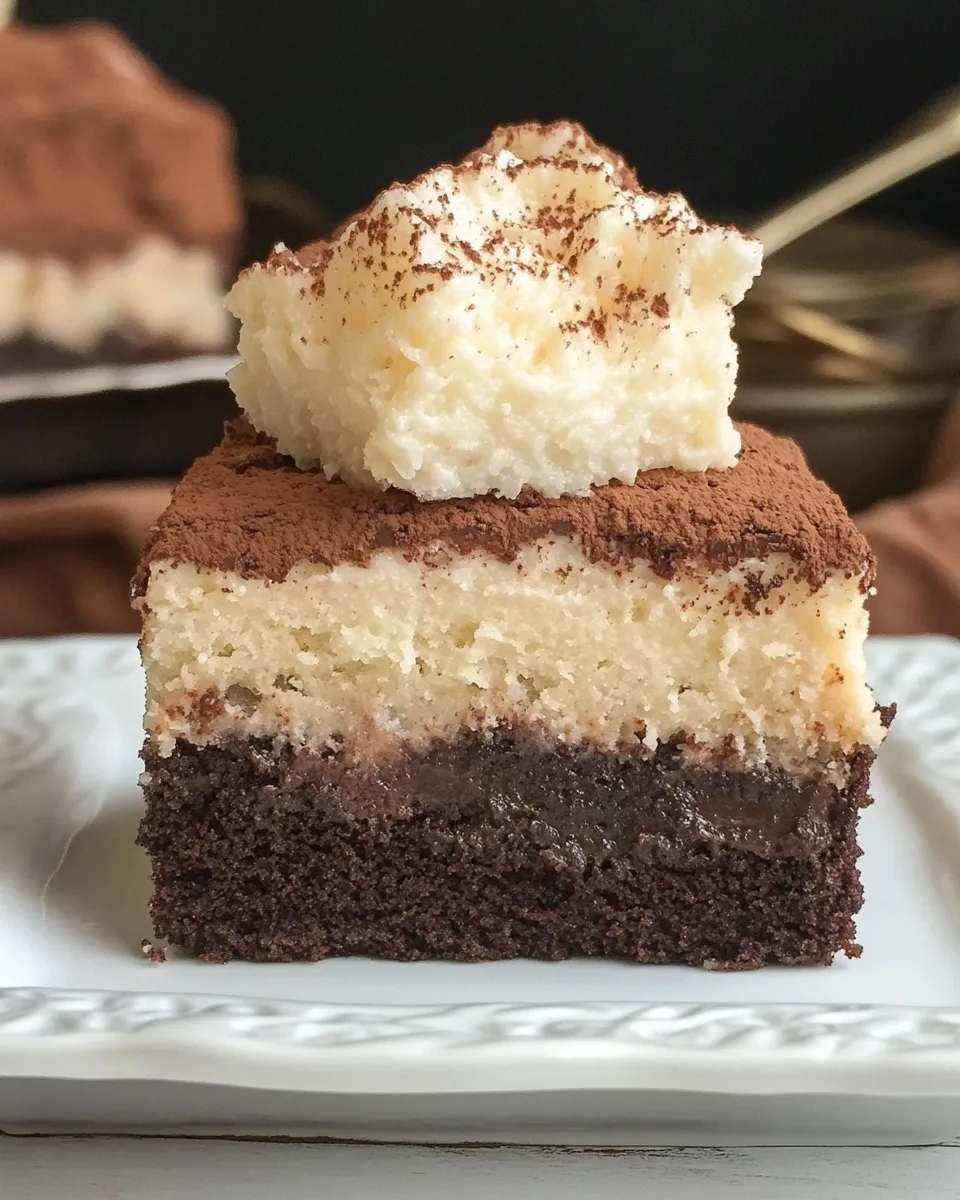
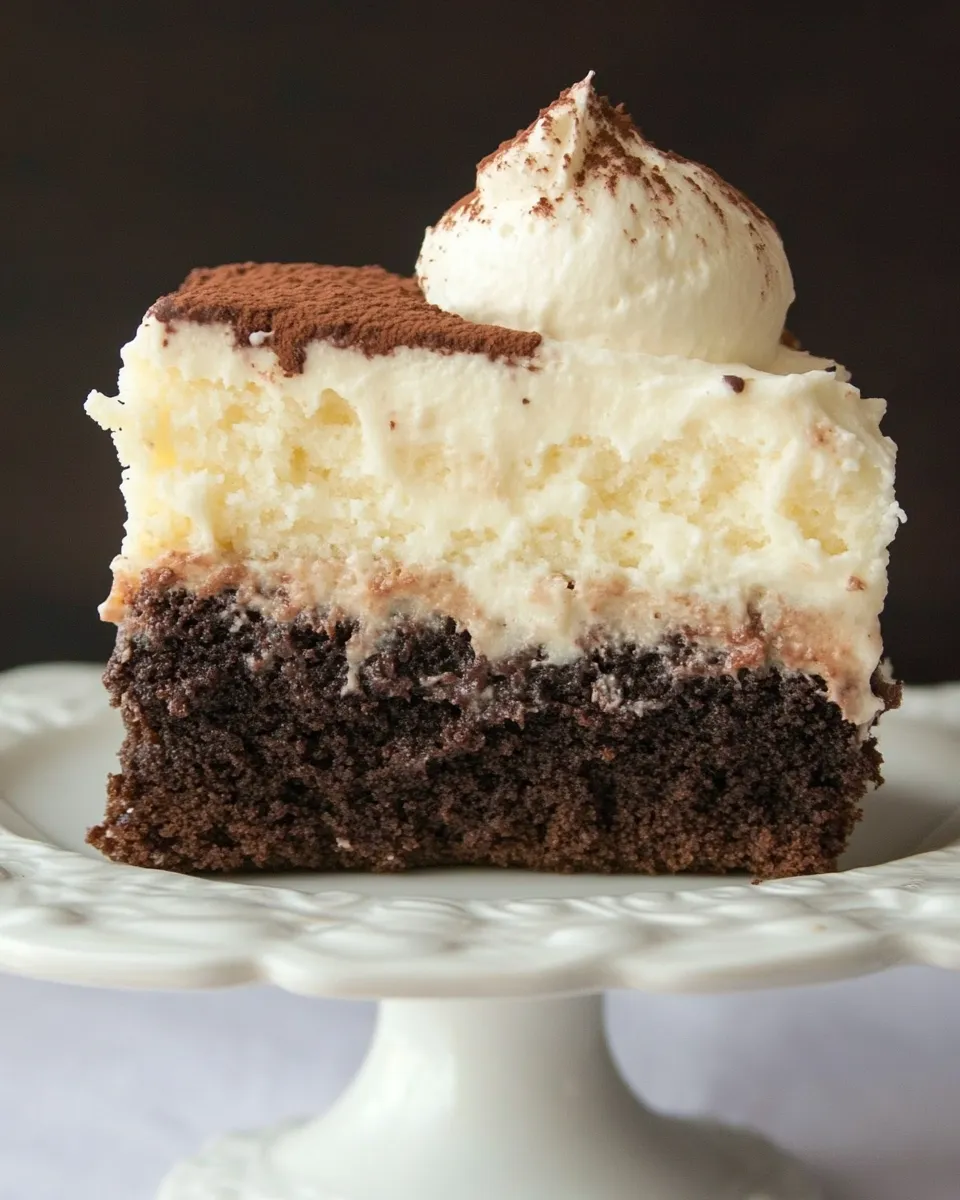
This cake is the sort of thing my grandmother might have brought to a potluck: straightforward, comforting, and a little bit showy. It layers a fudgy brownie under two simple white cake layers, then dresses the whole thing in a cream cheese frosting and a glossy chocolate topping. The contrast of textures—dense brownie, tender cake, silky frosting—gives you that “surprise” when you slice into it.
I’ll keep this practical and to the point. You’ll find a clear shopping list, exact ingredients (as the recipe requires), step‑by‑step assembly from the original directions, and sensible tips for success. If you follow the package directions for the mixes and the step order, the results are reliably delicious.
Your Shopping Guide

Before you start, gather everything so the assembly day is smooth. This recipe relies on two boxed mixes and a handful of staple dairy and baking items—easy to find at any grocery store. Buy a reliable brand for the brownie and white cake mixes; some brownie mixes yield cakier results while others stay fudgy. Choose the fudgier variety if you want a denser surprise layer.
For the topping, pick a semi‑sweet chocolate you like to eat by itself. The sweetened condensed milk comes in 14‑ounce cans—you’ll use about half, so if you’re planning, keep that in mind. For the frosting, full‑fat cream cheese and real unsalted butter at room temperature create the smoothest texture. Powdered sugar quality varies by brand, but any standard confectioners’ sugar will do.
How to Prepare Vintage Brownie Surprise Cake
Ingredients
- 1 box white cake mix — plus ingredients to prepare cake; follow package directions for batter and baking.
- 1 box brownie mix (9×13″ pan size) — plus ingredients to prepare brownies per package; you’ll bake the batter in a 9″ round for the surprise layer.
- 2 ounces semi-sweet chocolate — broken into pieces to melt into the chocolate sauce.
- 7 ounces sweetened condensed milk — half of a 14-ounce can; used with the chocolate for a glossy topping.
- 1 (8-ounce) package cream cheese — at room temperature to ensure a lump-free frosting.
- 1/2 cup (1 stick) unsalted butter — at room temperature; makes the frosting stable and creamy.
- 1 teaspoon vanilla extract — adds depth to the frosting flavor.
- 4 cups powdered sugar — added gradually to the cream cheese mixture for the right texture.
- 1/4 cup milk — use as needed, 1 tablespoon at a time, up to the full amount to reach spreadable consistency.
- Prepare the white cake mix according to package directions and divide the batter between two greased 9-inch round cake pans. Bake as directed on the package and cool the cake layers completely on a wire rack. (You may bake these the night before and wrap them once cool.)
- On assembly day, prepare the brownie mix according to package directions for a 9×13″ pan. Line a 9-inch round cake pan with foil and spray the foil with cooking spray.
- Pour brownie batter into the prepared 9-inch round pan, filling no more than 3/4 full. If there is excess batter that will not fit, bake the extra in cupcake liners or a small additional pan (or discard any extra).
- Bake the brownie layer(s) until a toothpick inserted about 1 inch from the side comes out with just a few moist crumbs. For a 9-inch round pan the time may be shorter than a 9×13″ pan; check at the lower end of the package time range. Let the brownie layer cool in the pan for 30–45 minutes.
- When the brownie has cooled 30–45 minutes, lift it from the pan using the foil and remove the foil. Place the brownie layer on your cake stand or serving plate and allow it to finish cooling to room temperature.
- While the brownie cools to room temperature, make the chocolate sauce: place 2 ounces chopped semi‑sweet chocolate and 7 ounces sweetened condensed milk in a small heatproof bowl. Microwave in 30‑second increments, stirring between each, until the mixture is smooth. Let the sauce sit 5 minutes to cool slightly.
- Pour the chocolate sauce over the top of the room‑temperature brownie layer on the cake stand. It may spill slightly over the sides. Allow the chocolate to set while you make the frosting.
- Make the frosting: in a stand mixer fitted with the paddle (or using a hand mixer), beat 1/2 cup (1 stick) unsalted butter, 1 (8-ounce) package cream cheese (room temperature), and 1 teaspoon vanilla extract for 1–2 minutes until smooth.
- Add 4 cups powdered sugar to the butter‑cream cheese mixture, 1 cup at a time, beating until the frosting is light and creamy after each addition.
- Add up to 1/4 cup milk, 1 tablespoon at a time, until the frosting reaches a spreadable consistency (use as much milk as needed, up to the full 1/4 cup).
- Once the brownie layer and chocolate topping are at room temperature, place one cooled white cake layer on top of the brownie layer. Spread a thin layer of frosting over that cake layer, then place the second white cake layer on top.
- Apply a thin layer of frosting around the entire cake to create a crumb coat. Chill the cake in the refrigerator until the crumb coat is set, about 15–30 minutes.
- Remove the cake from the refrigerator and use the remaining frosting to finish coating the cake. Use a spatula to create a “c” pattern over the frosted cake for the vintage look.
- Store the finished cake loosely covered in the refrigerator.
Why This Recipe Works
The structure is simple and reliable: boxed mixes give consistent crumb and rise, while the homemade chocolate topping and cream cheese frosting add freshness and control of sweetness. Using a round brownie baked separately ensures the fudgy layer stays dense rather than seeping into the cake layers.
The timing matters. Cooling the brownie to room temperature before topping and stacking prevents melting or sliding. The cream cheese plus butter frosting hits a good balance—cream cheese gives tang and body, butter stabilizes the texture so it spreads and holds the vintage “c” pattern.
Ingredient Swaps & Substitutions
When you need a swap, keep proportions similar and expect minor texture changes.
- White cake mix — you can use a yellow cake mix if you prefer a slightly richer cake color and flavor.
- Brownie mix — choose a fudgy mix for the best dense layer; cakier mixes will result in a lighter middle.
- Semi‑sweet chocolate — bittersweet will deepen the sauce flavor, while milk chocolate will make it sweeter and softer.
- Sweetened condensed milk — do not replace with evaporated milk; the sugar and thickness are essential for the glossy sauce.
- Cream cheese — full‑fat yields the best texture; reduced‑fat versions will be looser and may need less milk.
Toolbox for This Recipe
Tools make this cake easier and more consistent. Here’s what I use and recommend:
- Two 9-inch round cake pans — for the white cake layers.
- One 9-inch round pan lined with foil — for baking the brownie layer and lifting it out cleanly.
- Stand mixer or hand mixer — to whip a smooth frosting without overworking it.
- Offset spatula and bench scraper — for the crumb coat and final smoothing; a small offset is great for the “c” pattern.
- Microwave-safe bowl — for the chocolate sauce; alternatively, use a double boiler.
- Toothpicks — for checking brownie doneness near the edges as instructed.
Frequent Missteps to Avoid
Follow these notes to prevent common issues.
- Assembling while warm: Don’t assemble the cake while the brownie or chocolate topping is still warm. Warm layers shift and the frosting will slip.
- Overfilling the brownie pan: The directions say fill no more than 3/4 full. Extra batter can bubble over and ruin the pan lining.
- Not chilling the crumb coat: Skip the chill and crumbs will work into the final frosting, brown flecks showing through.
- Rushing the frosting: If the cream cheese or butter is too cold, the frosting lumps; too warm and it will be loose. Aim for room temperature.
Make It Your Way
Want to personalize? Small changes keep the core structure intact.
- Decorative edge: After the final coat, pipe a simple border with any leftover frosting.
- Flavor boost: Stir a teaspoon of instant espresso into the chocolate sauce for depth.
- Textural contrast: Sprinkle chopped toasted nuts or crisped rice around the base—do this sparingly so the cut reveals the surprise brownie.
If You’re Curious

Why a white cake and a brownie together? The point is contrast. The white cake keeps the slice light and airy visually, so the dense, rich brownie becomes the unexpected center note. The cream cheese frosting complements both textures without overpowering the brownie.
Yes, boxed mixes are used. They save time and produce a consistent crumb—this recipe leans on that reliability so you can focus on assembly and presentation.
Storage & Reheat Guide
Store the finished cake loosely covered in the refrigerator, as the recipe instructs. The cream cheese frosting and the condensed-milk chocolate topping mean refrigeration keeps the textures stable and food-safe. The cake will hold up for 3–4 days refrigerated.
To serve, remove the cake from the fridge about 30–60 minutes before slicing to let the frosting soften slightly—this makes cleaner slices. Avoid microwaving slices; the contrast between warmed brownie and cold frosting is not ideal. If you prefer a slightly softer brownie center, allow individual slices to sit at room temperature for 15–20 minutes before serving.
Vintage Brownie Surprise Cake Q&A
Q: Can I make the cake entirely a day ahead?
A: Yes. Bake the white cake layers the day before and wrap them well once cool. Bake the brownie the night before or the morning of assembly; keep it covered until you’re ready to add the chocolate topping so it doesn’t dry out.
Q: My brownie sank in the middle—still usable?
A: Likely yes. If it’s slightly sunken but baked through, you can level it and continue. If it’s underbaked, you’ll need to bake the extra batter or make cupcakes as the directions suggest for excess batter.
Q: Can I freeze this cake?
A: Freezing is possible but changes the texture. If you must freeze, freeze individual slices wrapped tightly, and thaw in the refrigerator overnight. The cream cheese frosting may weep slightly on thawing, so serve soon after warming to room temperature.
Final Thoughts
This Vintage Brownie Surprise Cake is a reliable crowd-pleaser because it pairs familiar flavors in a simple, effective structure. Follow the package directions for the mixes, respect the cooling and chilling steps, and work with room‑temperature dairy for the smoothest frosting. The “surprise” moment—cutting into a cake to find a fudgy brownie center—never gets old.
Make it for a casual family dinner, a potluck, or any time you want a dessert that looks classic but doesn’t require hours in the kitchen. It’s straightforward, forgiving, and exactly the kind of recipe you come back to again and again.

Vintage Brownie Surprise Cake
Ingredients
Ingredients
- 1 box white cake mixplus ingredients to prepare cake
- 1 box brownie mix9 x13" pan size plus ingredients to prepare brownies
- 2 ouncessemi-sweet chocolatebroken into pieces
- 7 ouncessweetened condensed milkhalf of a 14-ounce can
- 1 8- ouncepackage cream cheeseat room temperature
- 1/2 cup1 stick unsalted butter at room temperature
- 1 teaspoonvanilla extract
- 4 cupspowdered sugar
- 1/4 cupmilk
Instructions
Instructions
- Prepare the white cake mix according to package directions and divide the batter between two greased 9-inch round cake pans. Bake as directed on the package and cool the cake layers completely on a wire rack. (You may bake these the night before and wrap them once cool.)
- On assembly day, prepare the brownie mix according to package directions for a 9x13" pan. Line a 9-inch round cake pan with foil and spray the foil with cooking spray.
- Pour brownie batter into the prepared 9-inch round pan, filling no more than 3/4 full. If there is excess batter that will not fit, bake the extra in cupcake liners or a small additional pan (or discard any extra).
- Bake the brownie layer(s) until a toothpick inserted about 1 inch from the side comes out with just a few moist crumbs. For a 9-inch round pan the time may be shorter than a 9x13" pan; check at the lower end of the package time range. Let the brownie layer cool in the pan for 30–45 minutes.
- When the brownie has cooled 30–45 minutes, lift it from the pan using the foil and remove the foil. Place the brownie layer on your cake stand or serving plate and allow it to finish cooling to room temperature.
- While the brownie cools to room temperature, make the chocolate sauce: place 2 ounces chopped semi‑sweet chocolate and 7 ounces sweetened condensed milk in a small heatproof bowl. Microwave in 30‑second increments, stirring between each, until the mixture is smooth. Let the sauce sit 5 minutes to cool slightly.
- Pour the chocolate sauce over the top of the room‑temperature brownie layer on the cake stand. It may spill slightly over the sides. Allow the chocolate to set while you make the frosting.
- Make the frosting: in a stand mixer fitted with the paddle (or using a hand mixer), beat 1/2 cup (1 stick) unsalted butter, 1 (8-ounce) package cream cheese (room temperature), and 1 teaspoon vanilla extract for 1–2 minutes until smooth.
- Add 4 cups powdered sugar to the butter‑cream cheese mixture, 1 cup at a time, beating until the frosting is light and creamy after each addition.
- Add up to 1/4 cup milk, 1 tablespoon at a time, until the frosting reaches a spreadable consistency (use as much milk as needed, up to the full 1/4 cup).
- Once the brownie layer and chocolate topping are at room temperature, place one cooled white cake layer on top of the brownie layer. Spread a thin layer of frosting over that cake layer, then place the second white cake layer on top.
- Apply a thin layer of frosting around the entire cake to create a crumb coat. Chill the cake in the refrigerator until the crumb coat is set, about 15–30 minutes.
- Remove the cake from the refrigerator and use the remaining frosting to finish coating the cake. Use a spatula to create a "c" pattern over the frosted cake for the vintage look.
- Store the finished cake loosely covered in the refrigerator.
Equipment
- 9-inch round cake pans
- 9x13-inch pan
- Stand mixer or hand mixer
- small heatproof bowl
- Microwave
- Wire Rack
- Foil
- cake stand or serving plate
- Spatula
Notes
Follow package directions for the boxed cake and brownie mixes; additional ingredients called for on the packages are not listed here.