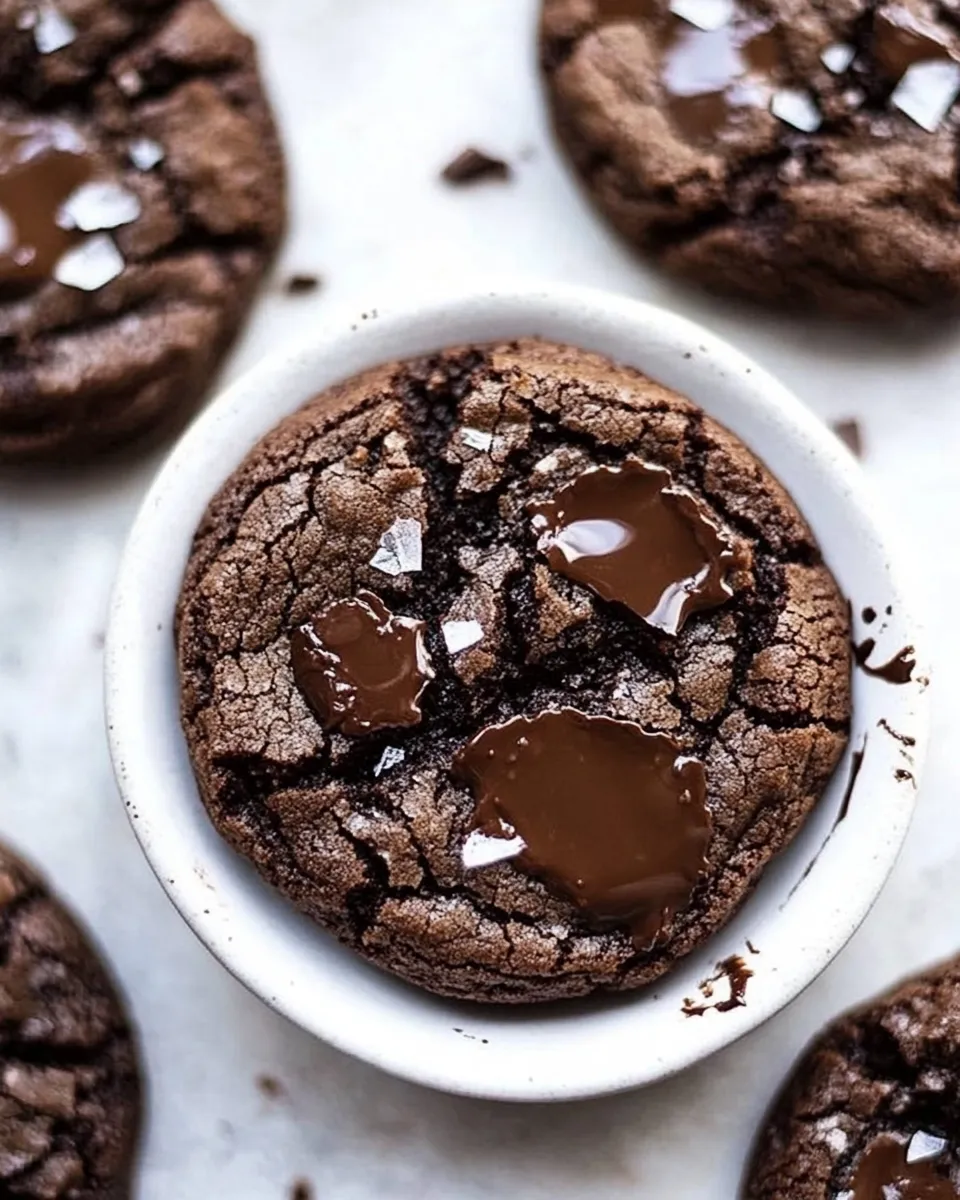
Ultimate Chocolate Cookies
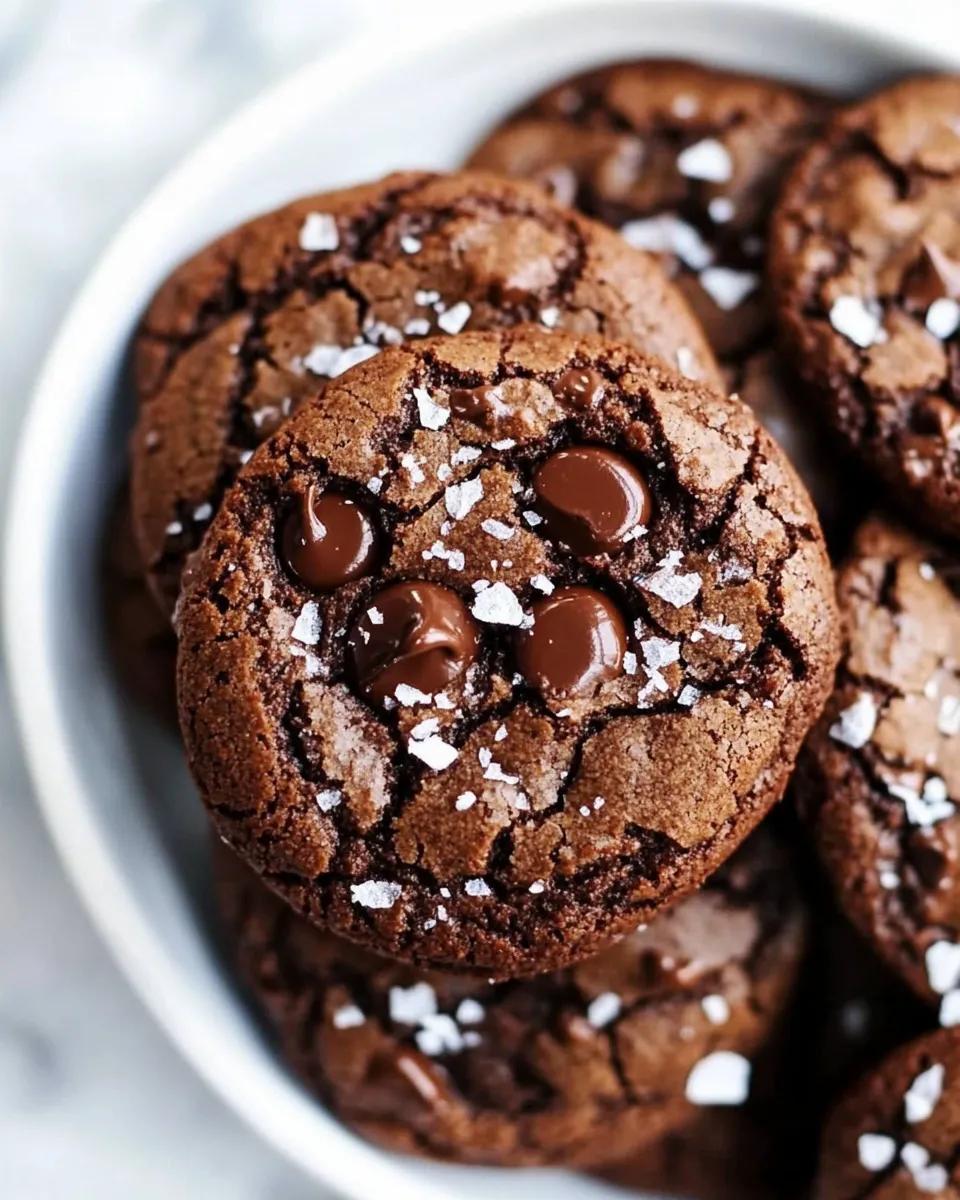
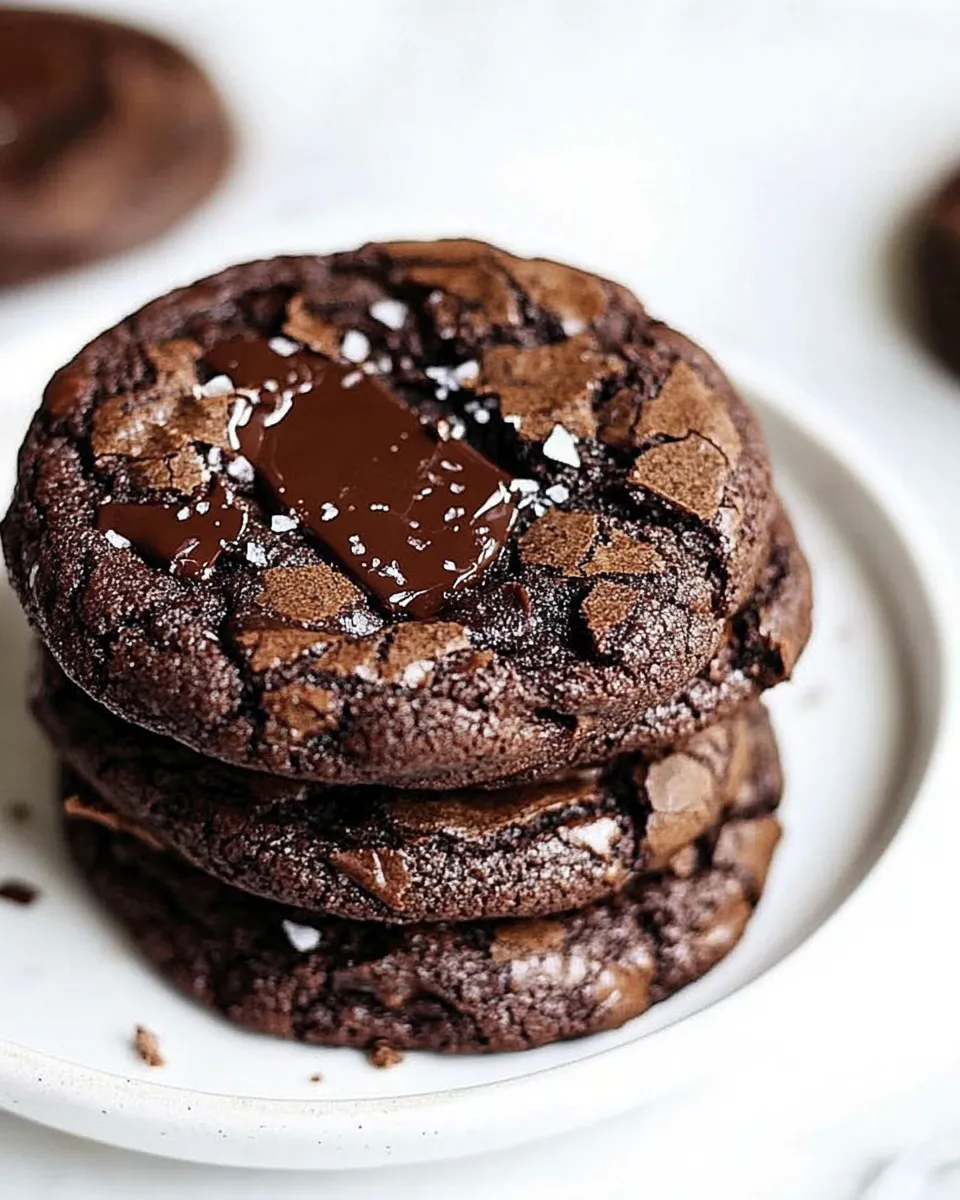
These are the cookies I keep coming back to when I need something reliably rich, chocolatey, and just a little bit dramatic. They take chocolate to the next level by combining cocoa in the dough with both chips and chunks, then topping warm cookies with extra wafers or chunks so every bite has molten pockets of chocolate.
They’re approachable: no tempering, no weird equipment, and the technique focuses on simple, repeatable steps that cut down on guesswork. If you can measure, cream butter and sugar, and watch the oven for a couple minutes, you’ll get bakery-style results at home.
I like to make these for friends because they look impressive but come together quickly. The sea salt finish is small but purposeful — it sharpens the chocolate and balances the sweetness. Follow the method below exactly the first time; once you’ve seen how they behave you can tweak texture and add-ins to your taste.
What Goes In

- 2 1/4 cups all-purpose flour — structure for the cookies; measure by spooning into the cup and leveling.
- 1 teaspoon baking soda — leavening that gives a slight lift and helps spread.
- 1/2 teaspoon sea salt — balances sweetness; use fine sea salt in the dough so it distributes evenly.
- 3/4 cup cocoa powder, Dutch processed or unsweetened — primary chocolate flavor; Dutch-processed yields a darker, smoother taste.
- 1 cup unsalted butter, at room temperature — fat for tenderness and flavor; room temperature ensures even creaming with sugars.
- 1 cup granulated sugar — adds sweetness and a bit of crispness to the exterior.
- 1 cup light brown sugar — adds moistness and a deeper, caramel-like note to the cookie.
- 2 large eggs — binders that add structure and a touch of richness.
- 1 teaspoon vanilla extract — rounds and enhances chocolate flavor; don’t skip it.
- 1 cup chocolate chips — pockets of melted chocolate throughout the dough.
- 1 cup chocolate chunks — larger chocolate bits for texture contrast and irregular melt pockets.
- 3/4 cup chocolate baking wafers or big chocolate chunks, for pressing on top of cookies — pressed into warm cookies to create glossy, melty tops and an attractive presentation.
- Sea salt flakes, for sprinkling on cookies — finishing salt to brighten flavors; sprinkle to taste right after baking.
Make Ultimate Chocolate Cookies: A Simple Method
- Preheat oven to 350°F (175°C). Line a baking sheet with parchment paper or a Silpat and set aside.
- In a medium bowl, whisk together 2 1/4 cups all-purpose flour, 1 teaspoon baking soda, 1/2 teaspoon sea salt, and 3/4 cup cocoa powder until evenly combined. Set aside.
- In a large bowl (or the bowl of a stand mixer), cream 1 cup unsalted butter (room temperature) with 1 cup granulated sugar and 1 cup light brown sugar until smooth and slightly fluffy, about 2–3 minutes.
- Add 2 large eggs one at a time, beating well after each addition. Add 1 teaspoon vanilla extract and mix until combined.
- With the mixer on low speed, gradually add the dry flour–cocoa mixture and beat just until combined and no dry streaks remain; avoid overmixing.
- Stir in 1 cup chocolate chips and 1 cup chocolate chunks until evenly distributed.
- Scoop the dough into rounded tablespoons (or use a small cookie scoop) and place on the prepared baking sheet about 2 inches apart.
- Bake the cookies in the preheated oven for 8 minutes. Remove the baking sheet from the oven.
- Quickly press the 3/4 cup chocolate baking wafers or big chocolate chunks gently into the tops of the warm cookies. Return the baking sheet to the oven and bake an additional 2 minutes, or until cookies are set around the edges but still soft in the center.
- Remove from oven and immediately sprinkle cookies with sea salt flakes to taste. Let the cookies sit on the baking sheet for 3 minutes, then transfer to a cooling rack to cool completely.
What Sets This Recipe Apart
There are three small choices here that make a big difference. First, the dough includes cocoa powder and both chips and chunks, so chocolate flavor exists in every texture: powdery, silky, and molten. Second, pressing extra wafers or chunks into the top while the cookies are still hot creates glossy patches of melted chocolate that look and taste indulgent. Third, the final sprinkle of sea salt flakes shifts the flavor profile from merely sweet to layered and satisfying.
Unlike thin, crispy chocolate cookies, this recipe targets a cookie that’s set at the edges and soft in the center. The 8+2 minute bake time is calibrated to give you that contrast. If you prefer chewier or drier cookies, small timing changes will alter the crumb quickly—this method gives a reliable, crowd-pleasing baseline.
Swap Guide
Need to swap something? Here are practical, commonly used options that won’t break the method:
- If you want dairy-free, use a firm plant-based butter that behaves like butter in creaming (see Variations for Dietary Needs for notes).
- Swap chocolate chips for all chunks or vice versa depending on the texture you prefer. The recipe relies on a mix to create varied melt pockets.
- If you don’t have wafers for the tops, use oversized chocolate chunks; press them flat into the warm cookies the same way.
- For a slightly different chocolate profile, use all Dutch-processed cocoa or a combination of Dutch-processed and natural — just be aware the flavor and color will shift.
Before You Start: Equipment
Use a stand mixer or a sturdy hand mixer for consistent creaming; you can cream by hand with a wooden spoon but it requires more elbow grease. Have a medium bowl for dry ingredients and a large bowl for creaming and combining.
- Measuring cups and spoons — accurate dry and liquid measurements are important.
- Baking sheet(s) lined with parchment paper or a Silpat — prevents sticking and helps even browning.
- Cookie scoop or tablespoon — yields uniform cookies that bake evenly.
- Cooling rack — lets cookies cool without becoming soggy on the bottom.
Avoid These Mistakes
Here are the common pitfalls and how to avoid them.
- Overmixing after adding the dry ingredients — this develops gluten and makes cookies tough. Mix just until no dry streaks remain.
- Skipping the top chocolate press step — the extra wafers or chunks create the signature glossy pockets. If you forget, the cookies still taste good, but they won’t have the same presentation or texture contrast.
- Placing the cookies too close together — give them about 2 inches; overcrowding causes them to merge into one large baked mass.
- Not using room temperature butter — cold butter won’t cream smoothly with the sugars and the texture will be off.
- Overbaking by a minute or two — the recipe is tuned to 8 minutes then 2 minutes after pressing toppings. Remove when edges are set but centers are still soft.
Variations for Dietary Needs
If you have dietary restrictions, you can adapt the recipe while keeping the method intact. Keep in mind swaps will affect texture and flavor, so proceed with small, tested changes.
- Vegan/dairy-free: Replace unsalted butter with a firm, stick-style plant-based butter for a closer texture in creaming. Use flax or chia “eggs” cautiously—this will change structure; a commercial egg replacer made for baking tends to give more reliable results. Choose dairy-free chocolate chips and wafers labeled vegan.
- Lower-sugar options: You can experiment with reduced brown sugar or a partial substitute like a sugar replacement designed for baking, but texture will change. Because sugars contribute to spread and chew, reduce only in small increments and test a batch first.
- Gluten-free: Use a 1-to-1 gluten-free all-purpose flour blend that contains binding agents (xanthan gum or similar) for best results. Measure by weight if possible, as gluten-free blends can vary in density.
Notes on Ingredients
Small choices in ingredient types change the final cookie more than you might expect. Read these notes before you bake.
- Flour: Standard all-purpose flour is used. Spoon and level for accuracy or weigh for best consistency.
- Baking soda: Works with the sugars and baking time to create the desired spread. Don’t substitute baking powder directly.
- Cocoa powder: Dutch-processed vs. natural changes acidity and flavor. Dutch yields darker, smoother chocolate notes; natural will be brighter and slightly more acidic.
- Butter: Room-temperature butter gives better emulsion with sugars. If it’s too soft, chill for a short time; if it’s cold, beat longer but you risk uneven creaming.
- Eggs: Large eggs are standard; they add moisture and structure. Using eggs straight from the fridge is fine; they’ll mix in during creaming without issues.
- Chocolate: Mixing chips and chunks creates texture contrast; using only chips gives a more uniform melt, while only chunks yields big, irregular molten pockets.
- Sea salt flakes: Finish with flakes for texture and bright flavor. Regular table salt in the dough is already included, so take care with the finishing salt.
Leftovers & Meal Prep
These cookies store and reheat well. For best texture, follow these guidelines:
- Room temperature storage: Keep in an airtight container for up to 3 days. Place a piece of bread in the container to maintain chewiness if desired.
- Refrigeration: You can refrigerate for up to a week, wrapped airtight. Cold cookies will firm up; warm briefly in a 300°F (150°C) oven for a few minutes to revive softness.
- Freezing: Freeze baked cookies in a single layer on a sheet pan, then transfer to a freezer bag for up to 3 months. Thaw at room temperature and reheat briefly if you want the chocolate melty.
- Cookie dough: You can portion the dough and freeze raw scoops on a sheet pan until solid, then store in a bag for up to 3 months. Bake from frozen—add 1–2 minutes to the bake time.
Troubleshooting Q&A
Quick answers to the problems readers commonly ask about.
- Q: My cookies spread too thin. A: Check that your butter wasn’t too warm or melted. Chill the dough for 20–30 minutes before scooping if this happens; also ensure your baking soda measurement is correct.
- Q: They came out dry and crumbly. A: You may have overbaked or used too much flour. Measure flour properly and remove cookies when edges are set but centers are still soft.
- Q: The chocolate didn’t melt on top. A: Pressing the wafers or chunks must be done immediately after the first bake while cookies are still very warm. If the oven runs cool, increase oven temperature accuracy or press and then return to the oven for the extra 2 minutes.
- Q: Cookies are too cakey. A: Overmixing after adding dry ingredients can cause this. Mix until just combined; avoid extended beating.
- Q: Salt tastes too strong. A: The sea salt flakes are a finishing touch; sprinkle lightly. If you used coarse salt in the dough by accident, reduce or omit finishing flakes next time.
Before You Go
These cookies reward attention to small details: accurate measuring, gentle mixing, and the quick top-press step. Bake one tray exactly as written, taste, and take notes—then make the adjustments you want. A slightly different cocoa, a different balance of chips to chunks, or a quick chill of the dough will give you your ideal Ultimate Chocolate Cookies.
If you bake a batch, I’d love to hear how you tweaked them and whether you kept the wafers or used large chunks. Small changes make big differences; once you find your version, these will be the cookies you reach for on demand.

Ultimate Chocolate Cookies
Ingredients
Ingredients
- 2 1/4 cupsall-purpose flour
- 1 teaspoonbaking soda
- 1/2 teaspoonsea salt
- 3/4 cupcocoa powder Dutch processed or unsweetened
- 1 cupunsalted butter at room temperature
- 1 cupgranulated sugar
- 1 cuplight brown sugar
- 2 large eggs
- 1 teaspoonvanilla extract
- 1 cupchocolate chips
- 1 cupchocolate chunks
- 3/4 cupchocolate baking wafers or big chocolate chunks for pressing on top of cookies
- Sea salt flakes for sprinkling on cookies
Instructions
Instructions
- Preheat oven to 350°F (175°C). Line a baking sheet with parchment paper or a Silpat and set aside.
- In a medium bowl, whisk together 2 1/4 cups all-purpose flour, 1 teaspoon baking soda, 1/2 teaspoon sea salt, and 3/4 cup cocoa powder until evenly combined. Set aside.
- In a large bowl (or the bowl of a stand mixer), cream 1 cup unsalted butter (room temperature) with 1 cup granulated sugar and 1 cup light brown sugar until smooth and slightly fluffy, about 2–3 minutes.
- Add 2 large eggs one at a time, beating well after each addition. Add 1 teaspoon vanilla extract and mix until combined.
- With the mixer on low speed, gradually add the dry flour–cocoa mixture and beat just until combined and no dry streaks remain; avoid overmixing.
- Stir in 1 cup chocolate chips and 1 cup chocolate chunks until evenly distributed.
- Scoop the dough into rounded tablespoons (or use a small cookie scoop) and place on the prepared baking sheet about 2 inches apart.
- Bake the cookies in the preheated oven for 8 minutes. Remove the baking sheet from the oven.
- Quickly press the 3/4 cup chocolate baking wafers or big chocolate chunks gently into the tops of the warm cookies. Return the baking sheet to the oven and bake an additional 2 minutes, or until cookies are set around the edges but still soft in the center.
- Remove from oven and immediately sprinkle cookies with sea salt flakes to taste. Let the cookies sit on the baking sheet for 3 minutes, then transfer to a cooling rack to cool completely.
Equipment
- Mixing Bowls
- Stand mixer or hand mixer
- Baking Sheet
- parchment paper or Silpat
- Cookie Scoop
- Cooling Rack
Notes
Store the cookies in an airtight container on the counter for up to 4 days.
You can also freeze the baked cookies or the cookie dough. See post for tips!