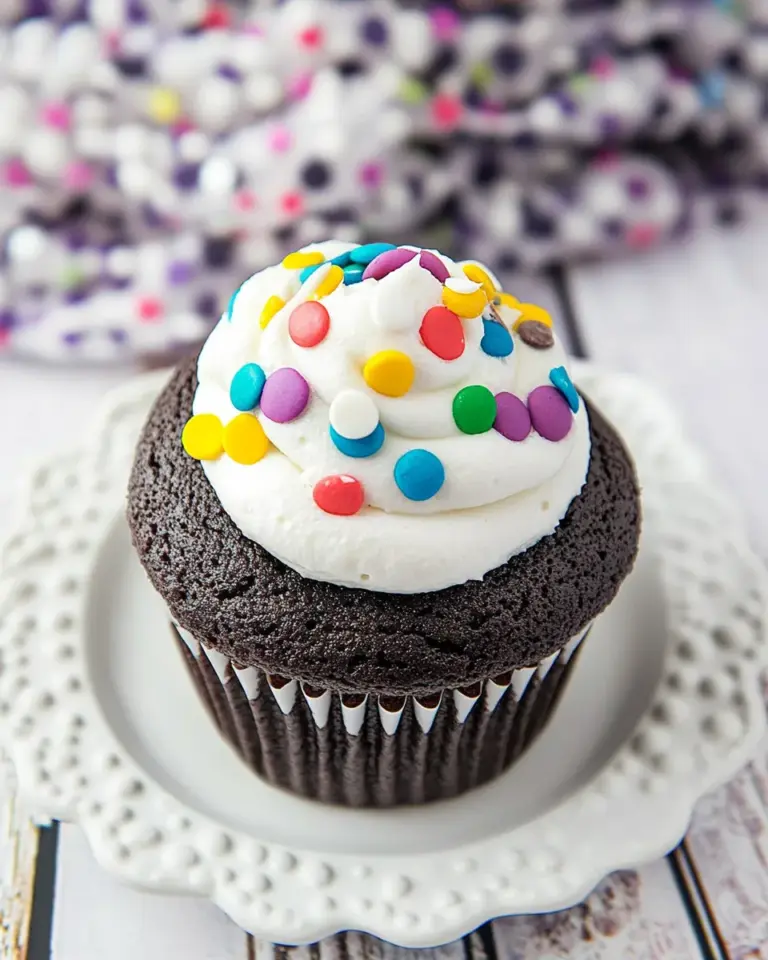
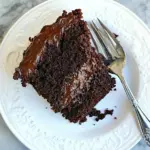
THE Chocolate Cake
If you want one reliable, deeply chocolatey cake that hits every occasion — birthdays, weeknight dessert emergencies, or when you simply need chocolate — this is it. I’ve baked and tuned this recipe enough times that the rhythm of it feels comforting: room-temperature butter, boiling water, and a frosting that tastes like a chocolate cloud. No tricks, just straightforward technique and ingredients that do the heavy lifting.
I call it THE Chocolate Cake because it’s unapologetically chocolate-forward and built to be the cake people remember. It slices clean, it travels well, and the frosting sets up so you can decorate or slice without it collapsing into a gooey mess. The method is practical; the result is indulgent.
Below you’ll find the ingredient breakdown, the exact step-by-step instructions, troubleshooting, storage tips, and a few sensible variations. I keep the tone warm and useful — nothing fussy, just what you need to get a bakery-style cake out of your own oven.
The Ingredient Lineup

- 2 cups all-purpose flour — the cake’s structure; measure by spooning into the cup and leveling for accuracy.
- 2 cups sugar — sweetness and tenderness; granulated sugar is standard here.
- ¾ cup unsweetened cocoa powder — the primary chocolate flavor; sift if it looks clumpy.
- 2 teaspoons baking powder — helps the cake rise; ensure it’s fresh for best lift.
- 1½ teaspoons baking soda — works with the acidic components to lighten crumb.
- 1 teaspoon salt — balances sweetness; this is for the batter.
- 1 teaspoon instant espresso — intensifies chocolate without adding coffee flavor; dissolve with the dry mix.
- 1 cup heavy cream — adds richness and moisture to the batter.
- ½ cup vegetable oil — keeps the crumb tender and moist, even a day later.
- 2 eggs – room temp — room temperature eggs emulsify better for an even batter.
- 2 teaspoons vanilla extract — for the batter; enhances overall flavor depth.
- ½ teaspoon almond extract — a small lift of nutty aroma; don’t overdo it.
- pinch of salt — another small seasoning note in the batter for balance.
- 1 cup boiling water — blooms the cocoa and makes the batter silky; add carefully.
- 1½ cups butter 3 sticks – allow to come completely to room temperature — for the frosting; must be soft enough to beat smooth but not melted.
- 1 cup unsweetened cocoa — for the frosting; sift to avoid lumps.
- 5 cups confectioner’s sugar — the bulk of the frosting; add gradually for the right texture.
- ½ cup milk — used to adjust frosting consistency; keep extra on hand but use sparingly.
- 2 teaspoons vanilla extract — for the frosting; adds warmth and rounds out chocolate.
- ½ teaspoon instant espresso — in the frosting; boosts chocolate intensity.
- pinch of salt — a tiny amount in the frosting brightens flavor.
Chocolate Cake — Do This Next
- Several hours before baking, remove the eggs and the 1½ cups (3 sticks) butter from the refrigerator so they come to room temperature.
- When you begin, bring 1 cup water to a boil and preheat the oven to 350°F (175°C).
- Prepare two 9-inch round cake pans: spray with baking spray (for baking) or butter and lightly flour them.
- In a large bowl or the bowl of a stand mixer, combine and whisk together: 2 cups all-purpose flour, 2 cups sugar, ¾ cup unsweetened cocoa powder, 2 teaspoons baking powder, 1½ teaspoons baking soda, 1 teaspoon salt, and 1 teaspoon instant espresso powder. Make sure the dry ingredients are evenly mixed and any lumps are broken up.
- Add the wet ingredients to the dry mix: 1 cup heavy cream, ½ cup vegetable oil, 2 room-temperature eggs, 2 teaspoons vanilla extract, ½ teaspoon almond extract, and a pinch of salt. Mix on medium speed (or with a hand mixer on medium) until everything is well combined and there are no streaks of flour.
- With the mixer running on low, carefully pour in the boiling water in a slow, steady stream until incorporated. Once all the water is added, increase the mixer speed to high and beat the batter for about 1 minute to aerate it.
- Divide the batter evenly between the two prepared 9-inch pans and smooth the tops.
- Bake on the center rack for 25–35 minutes, or until a toothpick or cake tester inserted in the center comes out clean or with a few moist crumbs (not wet batter).
- Remove the pans from the oven and let the cakes cool in the pans for about 10 minutes. Then run a knife around the edges, invert the cakes onto wire racks, and cool completely before frosting.
- For the frosting, sift or whisk 1 cup unsweetened cocoa powder in a large bowl to remove lumps.
- In the bowl of a stand mixer or with a hand mixer, beat 1½ cups (3 sticks) room-temperature butter together with the sifted cocoa until smooth and well combined. Do not use cold butter.
- Add the 5 cups confectioner’s sugar and the ½ cup milk gradually: add about 1 cup confectioner’s sugar, then about 1 tablespoon milk, beat on high for about 1 minute; repeat this sequence (1 cup sugar + ~1 tablespoon milk; beat) until all 5 cups of sugar and the bulk of the ½ cup milk have been incorporated. Adjust the amount of milk as you go—use the ½ cup total as your limit.
- Add 2 teaspoons vanilla extract, ½ teaspoon instant espresso, and a pinch of salt to the frosting and beat until fully combined. Taste and adjust texture: if the frosting is too thick, add up to the remaining milk 1 tablespoon at a time; if it is too thin, add small additional amounts of confectioner’s sugar until you reach the desired spreading consistency.
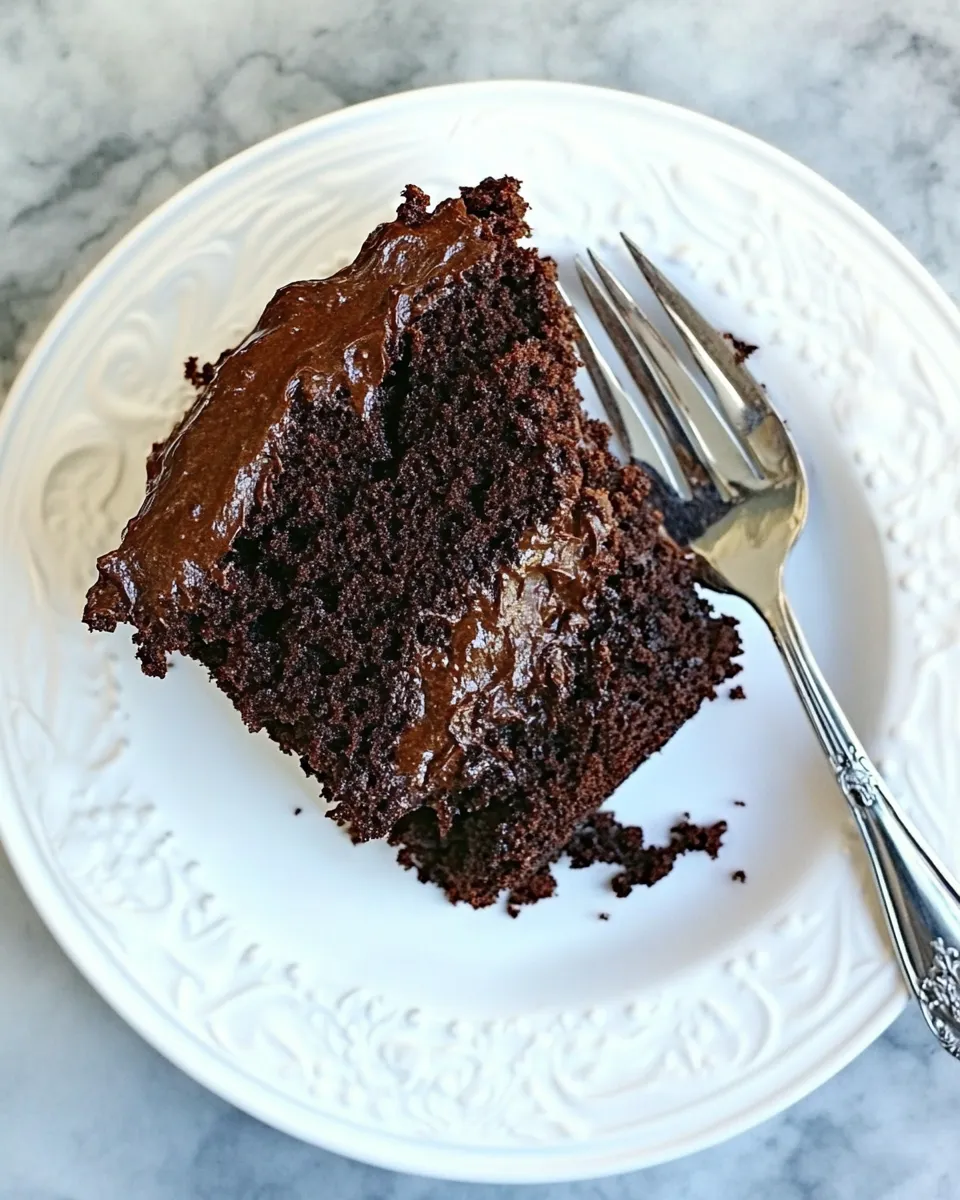
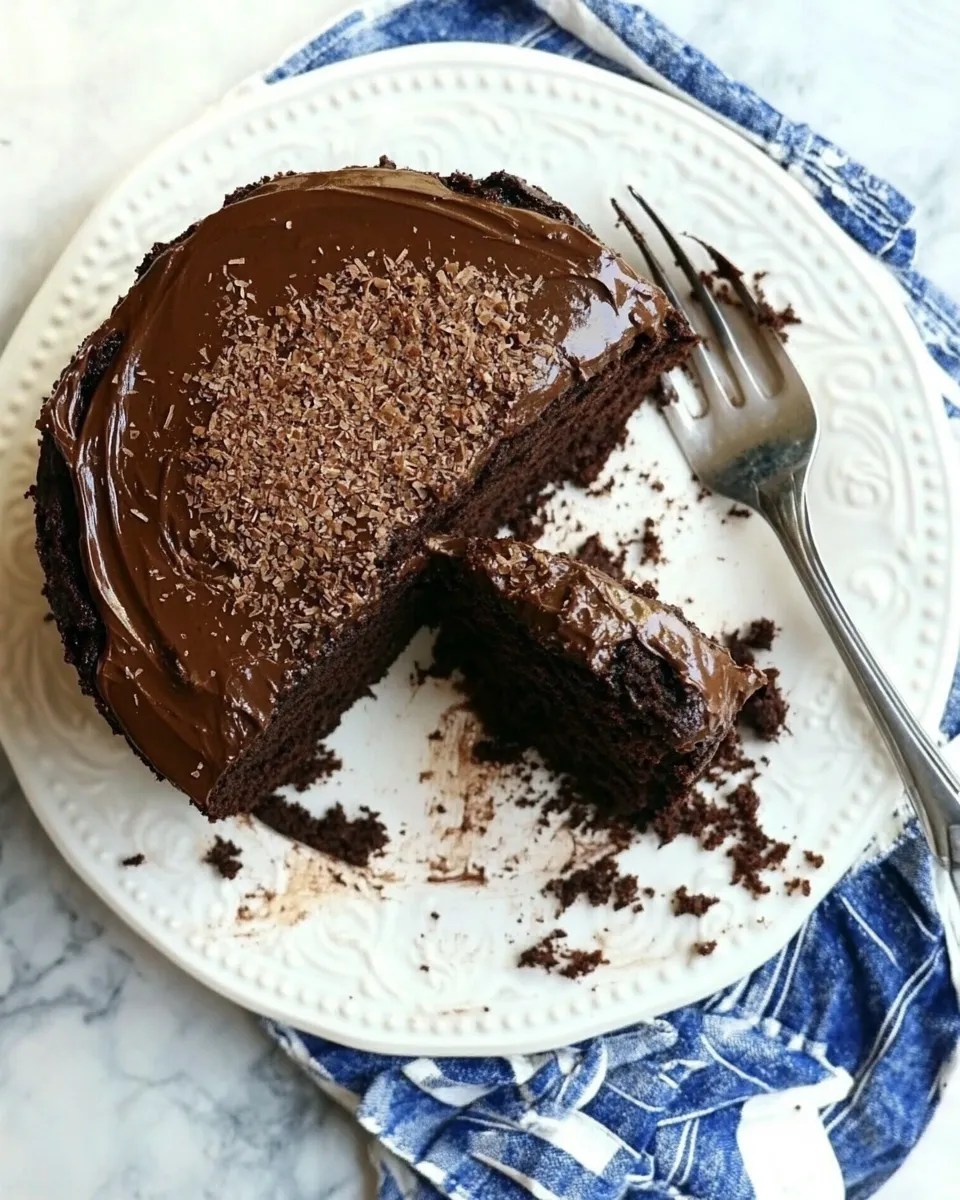
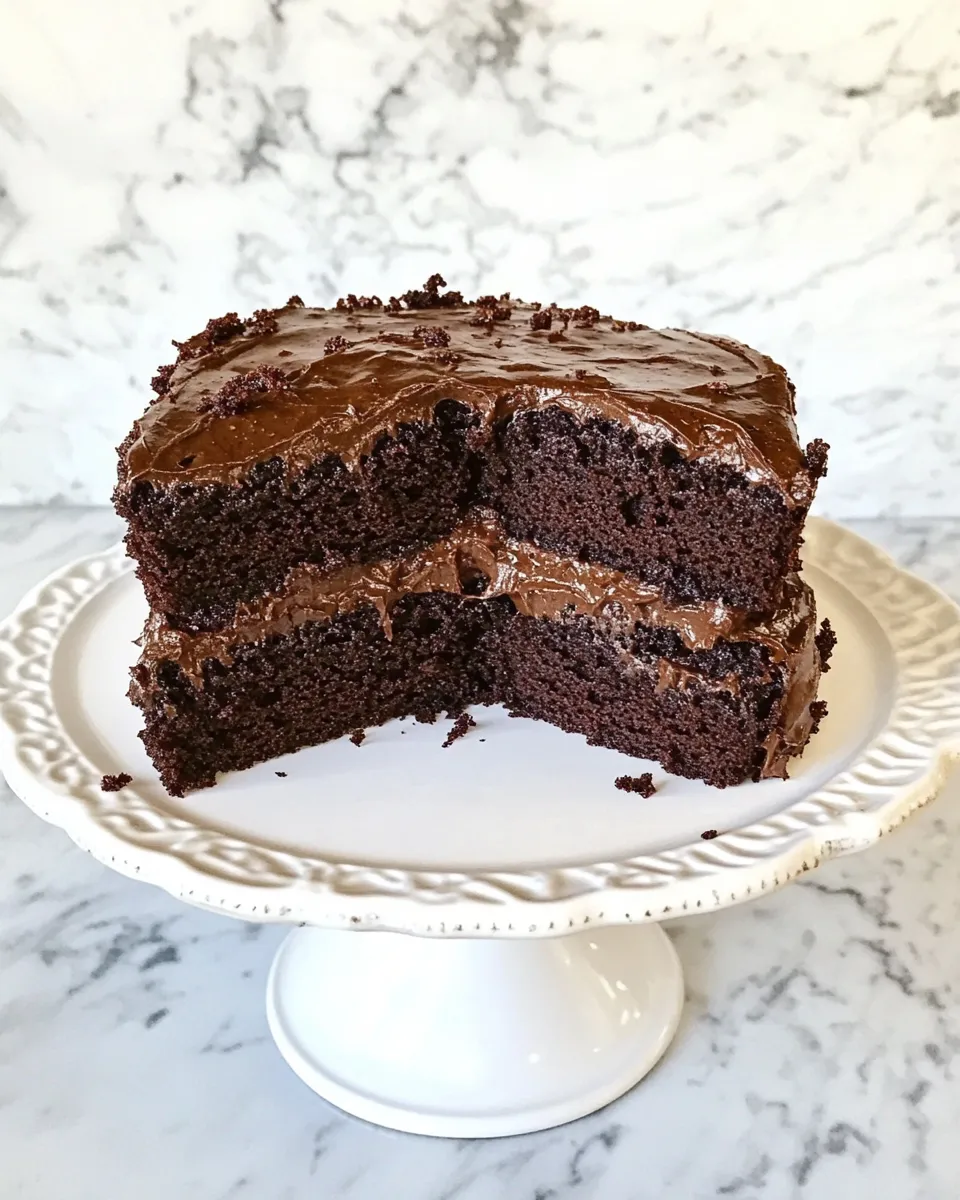
- To assemble: place one cooled cake layer on your serving plate, spread a layer of frosting over the top, set the second layer on top, and use the remaining frosting to cover the top and sides of the cake.
- If needed, chill the cake briefly (15–30 minutes) to set the frosting before slicing. Store leftovers covered at room temperature for a day or refrigerated for longer storage.
Top Reasons to Make Chocolate Cake
- Deep chocolate flavor that comes from both cocoa in the batter and cocoa in the frosting.
- Simple techniques — no tempering, no jelly-roll gymnastics — yet it looks and tastes special.
- Reliable texture: the oil and heavy cream keep the crumb moist even after a day.
- Frosting that spreads smoothly and sets well, so it’s easy to finish without a crumb coat struggle.
- Scales to two 9-inch pans, making it perfect for gatherings and straightforward to slice.
No-Store Runs Needed
This recipe leans on pantry staples: flour, sugar, cocoa, baking powder, baking soda, oil, eggs, butter, powdered sugar, and a touch of extract. If you bake semi-regularly you likely have most of this on hand. The single fresh item that matters for success is room-temperature butter and eggs — that just means planning ahead, not an emergency store run.
If you’re missing instant espresso powder, you can still proceed — the cake will be chocolatey. The espresso just deepens the chocolate note. But do check you have confectioner’s sugar for the frosting; it’s not a good swap for granulated sugar in buttercream.
Setup & Equipment
- Two 9-inch round cake pans — for even baking and the classic layer look.
- Baking spray or butter and flour — for greasing the pans cleanly.
- Stand mixer or hand mixer — for beating the batter and frosting smoothly.
- Mixing bowls (one large) and a whisk — you need a dry-ingredient bowl and a wet-ingredient bowl or mixer bowl.
- Measuring cups and spoons — accurate measuring matters for baking.
- Rubber spatula — for scraping bowls and smoothing batter into pans.
- Wire racks for cooling — cool cakes evenly to prevent soggy bottoms.
- Toothpick or cake tester — to check doneness without overbaking.
Mistakes That Ruin Chocolate Cake
- Using cold butter in the frosting — it won’t whip smooth and will stay lumpy.
- Skipping the boiling water step or adding it too fast — it needs to bloom the cocoa for a silky batter.
- Overbaking the layers — dry cake is hard to fix; remove from oven the moment a few moist crumbs cling to the tester.
- Under-measuring flour — too much flour makes a dense cake; spoon and level when measuring.
- Adding all the milk at once to the frosting — you can end up with runny frosting; add gradually per the instructions.
Year-Round Variations
Keep the base recipe as written and make small, seasonal tweaks without changing technique. In winter, add a pinch more instant espresso to both batter and frosting for a warm, rounded depth. In summer, omit the almond extract if you prefer a cleaner chocolate note and chill the finished cake briefly before slicing to help it hold in warmer kitchens.
If you want a slightly richer frosting, beat in an extra tablespoon of room-temperature butter (note: this adjusts the original balance) or reduce the milk marginally. For a lighter finish, skip chilling and serve at room temperature where the frosting is softer and more spreadable.
What Could Go Wrong
If the crumb is gummy, it’s usually underbaked or the oven temperature was off. A few moist crumbs on the tester are fine, but wet batter means more time. If the frosting separates or looks curdled, it might be from butter that was too warm; pop the bowl in the refrigerator briefly, then rewhip. If the cake layers slide when stacking, chill them for 15–30 minutes — that sets the crumb and makes assembly trouble-free.
Storing Tips & Timelines
Store leftovers covered at room temperature for a day or refrigerated for longer storage. If you plan to keep slices beyond 48 hours, refrigeration is safer. Bring chilled slices back to room temperature for 30–60 minutes before serving for the best texture. If you’ve frosted and wrapped the whole cake tightly, it will keep 3–4 days in the fridge.
Questions People Ask
- Can I make this gluten-free? The recipe is written for all-purpose flour; to go gluten-free, use a reliable 1-to-1 substitute and expect slight differences in texture.
- Can I freeze the cake? Yes. Freeze unfrosted layers wrapped tightly for up to 2 months. Thaw in the fridge overnight before frosting.
- What if my frosting is too sweet? A pinch of salt or a bit more instant espresso can temper sweetness without changing the recipe significantly.
- Can I halve the recipe? Yes, but bake time may change; check earlier for doneness.
Ready, Set, Cook
Plan for a few hours total when you include cooling and any chilling time. The timeline is simple: pull eggs and butter out early, assemble dry and wet ingredients, pour in boiling water, bake, cool, and buttercream. Follow the steps in order and you’ll end up with a dependable, celebratory Chocolate Cake that handles slicing and serving with grace.
Make it once, and you’ll know why I keep this recipe in my regular rotation. It’s straightforward, forgiving where it needs to be, and reliably delicious.
THE Chocolate Cake
Ingredients
Ingredients
- 2 cups all-purpose flour
- 2 cups sugar
- 3/4 cup unsweetened cocoa powder
- 2 teaspoons baking powder
- 1 1/2 teaspoons baking soda
- 1 teaspoon salt
- 1 teaspoon instant espresso
- 1 cup heavy cream
- 1/2 cup vegetable oil
- 2 eggs – room temp
- 2 teaspoons vanilla extract
- 1/2 teaspoon almond extract
- pinch of salt
- 1 cup boiling water
- 1 1/2 cups butter3 sticks – allow to come completely to room temperature
- 1 cup unsweetened cocoa
- 5 cups confectioner’s sugar
- 1/2 cup milk
- 2 teaspoons vanilla extract
- 1/2 teaspoon instant espresso
- pinch of salt
Instructions
Instructions
- Several hours before baking, remove the eggs and the 1½ cups (3 sticks) butter from the refrigerator so they come to room temperature.
- When you begin, bring 1 cup water to a boil and preheat the oven to 350°F (175°C).
- Prepare two 9-inch round cake pans: spray with baking spray (for baking) or butter and lightly flour them.
- In a large bowl or the bowl of a stand mixer, combine and whisk together: 2 cups all-purpose flour, 2 cups sugar, ¾ cup unsweetened cocoa powder, 2 teaspoons baking powder, 1½ teaspoons baking soda, 1 teaspoon salt, and 1 teaspoon instant espresso powder. Make sure the dry ingredients are evenly mixed and any lumps are broken up.
- Add the wet ingredients to the dry mix: 1 cup heavy cream, ½ cup vegetable oil, 2 room-temperature eggs, 2 teaspoons vanilla extract, ½ teaspoon almond extract, and a pinch of salt. Mix on medium speed (or with a hand mixer on medium) until everything is well combined and there are no streaks of flour.
- With the mixer running on low, carefully pour in the boiling water in a slow, steady stream until incorporated. Once all the water is added, increase the mixer speed to high and beat the batter for about 1 minute to aerate it.
- Divide the batter evenly between the two prepared 9-inch pans and smooth the tops.
- Bake on the center rack for 25–35 minutes, or until a toothpick or cake tester inserted in the center comes out clean or with a few moist crumbs (not wet batter).
- Remove the pans from the oven and let the cakes cool in the pans for about 10 minutes. Then run a knife around the edges, invert the cakes onto wire racks, and cool completely before frosting.
- For the frosting, sift or whisk 1 cup unsweetened cocoa powder in a large bowl to remove lumps.
- In the bowl of a stand mixer or with a hand mixer, beat 1½ cups (3 sticks) room-temperature butter together with the sifted cocoa until smooth and well combined. Do not use cold butter.
- Add the 5 cups confectioner’s sugar and the ½ cup milk gradually: add about 1 cup confectioner’s sugar, then about 1 tablespoon milk, beat on high for about 1 minute; repeat this sequence (1 cup sugar + ~1 tablespoon milk; beat) until all 5 cups of sugar and the bulk of the ½ cup milk have been incorporated. Adjust the amount of milk as you go—use the ½ cup total as your limit.
- Add 2 teaspoons vanilla extract, ½ teaspoon instant espresso, and a pinch of salt to the frosting and beat until fully combined. Taste and adjust texture: if the frosting is too thick, add up to the remaining milk 1 tablespoon at a time; if it is too thin, add small additional amounts of confectioner’s sugar until you reach the desired spreading consistency.
- To assemble: place one cooled cake layer on your serving plate, spread a layer of frosting over the top, set the second layer on top, and use the remaining frosting to cover the top and sides of the cake.
- If needed, chill the cake briefly (15–30 minutes) to set the frosting before slicing. Store leftovers covered at room temperature for a day or refrigerated for longer storage.
Equipment
- Mixing Bowl
- Stand mixer or hand mixer
- Whisk
- Measuring Cups and Spoons
- Two 9-inch round cake pans
- baking spray or butter and flour
- Sifter or fine mesh sieve
- Wire Rack
- Knife
Notes
Gather all of your ingredients before you start, that way you won't forget one.
If you don't have any instant espresso, it's fine to use instant coffee OR substitute ½ of the water you will add with liquid coffee.
You can find instant espresso at Williams Sonoma if you can't find it anywhere else.
The final cake batter will be very loose and liquidy. No worries, that is how it is supposed to look.
You'll note that the cake batter, if you have whipped it up right, will have a LOT Of bubbles in it. That's perfect!
Use the best Cocoa that you can find. I usually use Hershey's (it is what is at my local grocery). Don't use the off brand.