The Best Homemade Banana Pudding Recipe
This banana pudding is the one recipe I reach for when I want a dessert that feels like a hug from childhood but with a grown-up finish. It’s creamy, not-too-sweet, and balanced with the snap of vanilla wafers and a golden meringue top. You can make it ahead, which makes it perfect for gatherings—or for deciding to treat yourself on a quiet evening.
There are a few steps that matter: tempering the eggs, cooking the custard slowly until it’s thick, folding in whipped cream for lightness, and sealing the whole thing under a meringue. None of it is hard. A little attention to timing and temperature will reward you with a pudding that holds its layers and tastes bright and fresh.
I’ll walk you through an exact, reliable method that I use in my kitchen. You’ll find notes on tools, common swaps, and what to avoid so your Banana Pudding turns out consistently excellent every time.
Shopping List

Before you start, gather the ingredients and tools so the process is smooth. This pudding moves from stovetop to chilled layers to torched meringue, so having everything at hand saves stress.
Ingredients
- 6 eggs, yolks and whites separated — yolks for the custard, whites reserved for meringue.
- 1 cup sugar — split during the recipe: 3/4 cup for the custard, 1/4 cup reserved for the meringue.
- 1/3 cup all-purpose flour — thickens the custard and stabilizes it without adding grainy texture.
- 4 cups whole milk — the base for the custard; whole milk gives the best richness and mouthfeel.
- pinch of sea salt — brightens the flavors and balances the sweetness.
- 1 teaspoon vanilla extract — flavoring for the custard; add at the end off the heat for best aroma.
- 1 whipped cream recipe — folded into cooled custard to lighten the texture (chill the whipped cream before folding).
- 1 box of vanilla wafers — creates the classic crunchy-soft layers; use whole wafers to layer.
- 4 peeled and thinly sliced large bananas — fresh slices layered between custard and wafers; use firm-ripe bananas to avoid browning and mush.
Build Banana Pudding Step by Step
- Separate the 6 eggs into yolks and whites. Measure out 3/4 cup of the sugar and set aside the remaining 1/4 cup for the meringue. Prepare the whipped cream recipe and set it chilled in the refrigerator until ready to fold in.
- In a medium bowl, whisk the 6 egg yolks with the 3/4 cup sugar and the 1/3 cup all-purpose flour until smooth and no lumps remain.
- Slowly whisk the 4 cups whole milk into the yolk mixture until fully combined. Stir in a pinch of sea salt.
- Pour the mixture into a medium saucepan and cook over low heat, stirring constantly, for about 12–15 minutes, or until the mixture becomes very thick and custard-like.
- Remove the custard from the heat and stir in the 1 teaspoon vanilla extract. Transfer the custard to a heatproof bowl, cover (press plastic wrap directly on the surface to prevent a skin), and chill in the refrigerator until completely cold, about 45 minutes.
- Once the custard is cold, fold the prepared whipped cream into the custard: gently fold one-third at a time (or add all at once and fold) until the mixture is uniform and light. This is your whipped-cream custard mixture.
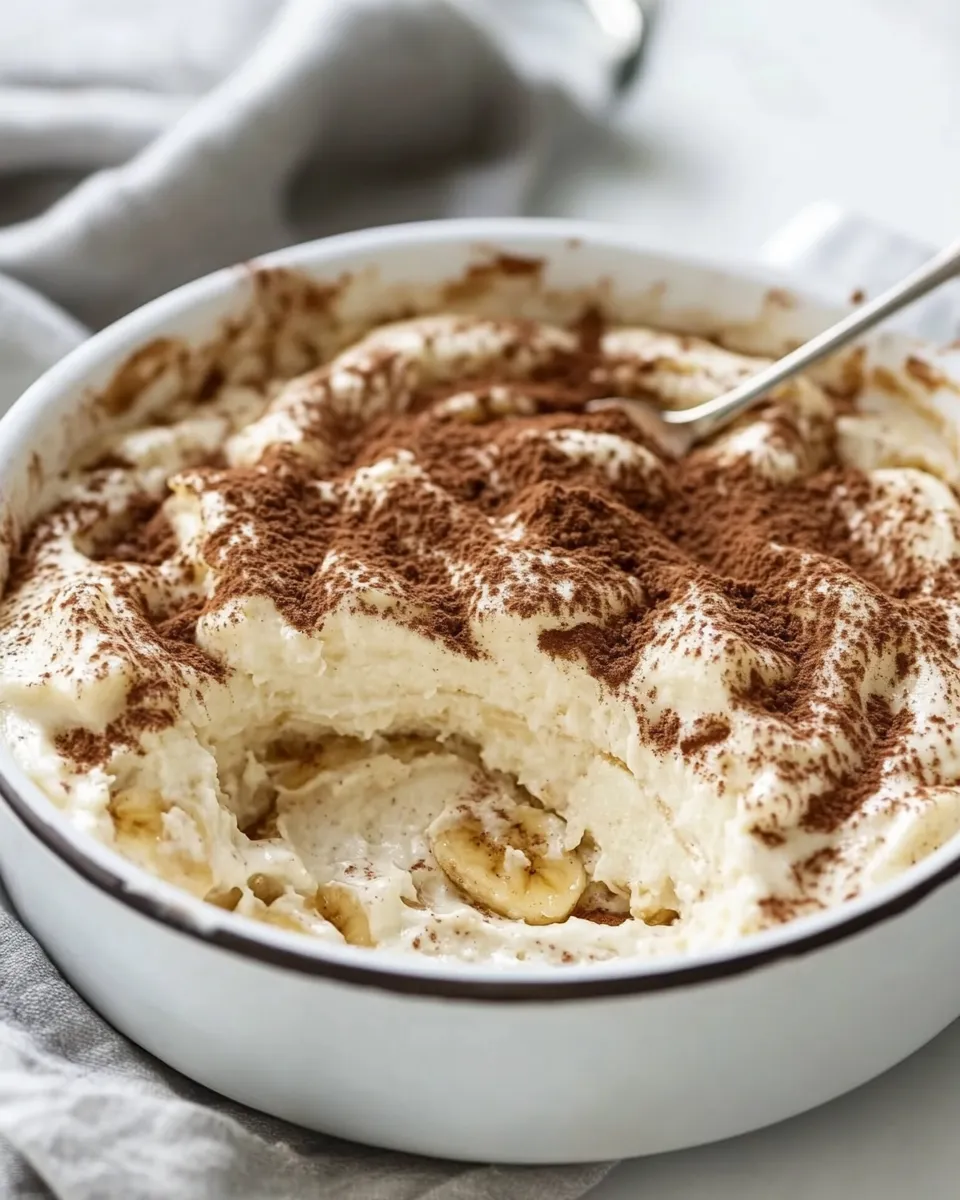
- In a deep 13×9-inch casserole pan, spread one-third of the whipped-cream custard evenly over the bottom.
- Arrange a single layer of vanilla wafers over the custard to cover the surface. Top the wafers with half of the peeled, thinly sliced bananas (use two bananas’ worth of slices, evenly distributed).
- Spread a second one-third of the whipped-cream custard over the banana layer. Repeat the wafer layer and the remaining banana slices.
- Spread the final one-third of the whipped-cream custard to cover the last banana layer. Smooth the top and set the assembled pudding aside while you make the meringue (or refrigerate briefly if you need to).
- In a clean bowl (or stand mixer bowl) with the whisk attachment, whip the 6 reserved egg whites on medium speed until soft peaks form, about 3–4 minutes.
- With the mixer on high, slowly sprinkle in the reserved 1/4 cup sugar and continue whisking until medium-stiff peaks form to make a meringue.
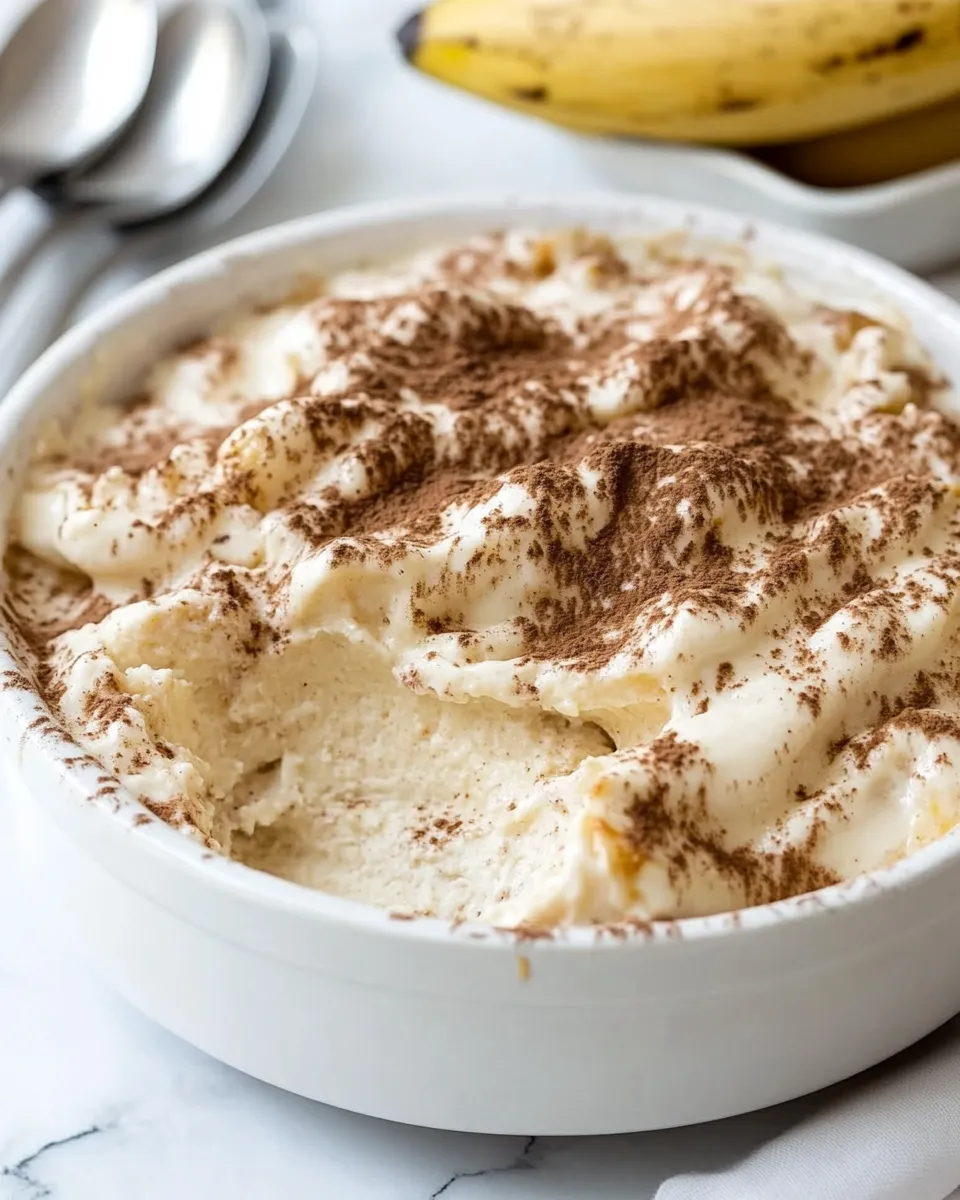
- Spread the meringue evenly over the top of the assembled pudding, making sure it seals to the edges. Using a kitchen torch, brown the meringue evenly until golden. (If you do not have a torch, you may broil briefly—watch carefully to avoid burning.)
- Chill briefly to set the meringue if needed, then serve.
Why Banana Pudding is Worth Your Time
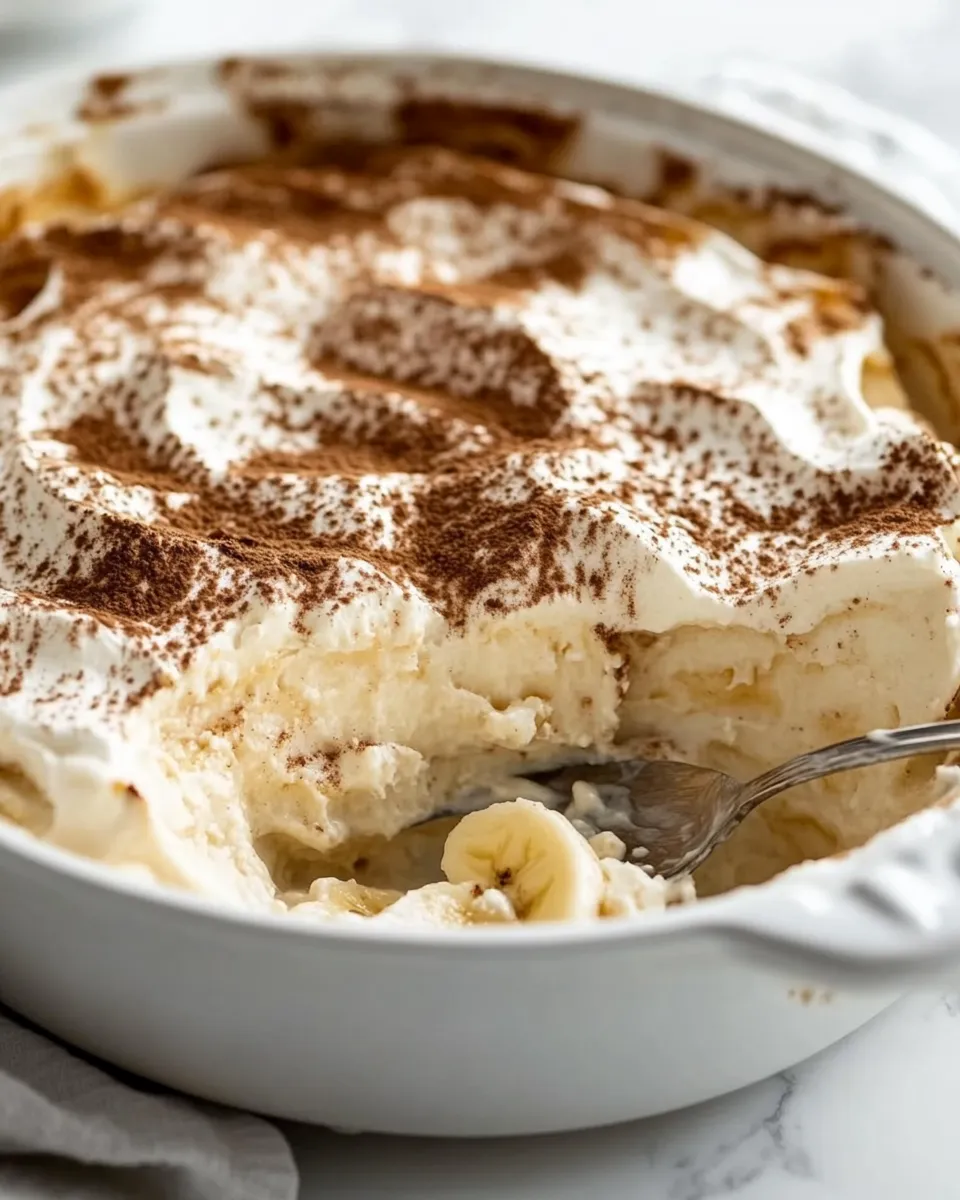
This Banana Pudding balances textures and flavors in a way few desserts do: silky custard, airy whipped cream, tender banana, and crisp-but-soaking wafers. The combination hits creamy, sweet, and a touch of toasted caramel from the meringue.
It’s also a forgiving recipe. The custard is stable thanks to flour in the base, and folding whipped cream keeps it light without losing structure. Once assembled, the pudding holds in the fridge for a couple of days—making it great for entertaining. And the steps train useful skills: tempering, making a stable custard, whipping egg whites—techniques you’ll use again and again.
Quick Replacement Ideas
- Milk: If you must, 2% milk will work but the custard won’t be as rich as with whole milk.
- Vanilla wafers: Any plain, lightly sweet cookie (shortbread or plain tea biscuits) can substitute in a pinch.
- Vanilla extract: Use vanilla bean paste if you have it—more visual flecks and a deeper aroma.
- Whipped cream: Stabilize by folding in a tablespoon of powdered sugar or a small amount of mascarpone if you need stronger hold for longer storage.
Cook’s Kit
- Medium saucepan — for cooking the custard slowly and evenly.
- Heatproof bowl — to cool the custard and press plastic wrap on the surface.
- 13×9-inch casserole pan — the assembly pan specified in the recipe.
- Stand mixer or hand mixer — for whipping egg whites to meringue and whipping cream.
- Whisk and spatula — for smooth mixing and gentle folding.
- Kitchen torch (optional) — for perfectly browned meringue; broiler as backup.
Avoid These Mistakes
- Rushing the custard: Cook it over low heat and stir constantly; high heat causes curdling or grainy texture.
- Adding vanilla too soon: Let the custard come off the heat before stirring in vanilla to preserve its aroma.
- Folding aggressively: Fold whipped cream gently to keep the mixture light; overmixing deflates it.
- Not sealing the meringue: Press the meringue to the edges so it creates a barrier—this helps prevent the top layer from weeping.
- Using overripe bananas: Brown, mushy bananas turn the pudding soggy—choose firm-ripe bananas for texture and sweetness.
Better Choices & Swaps
- For richer custard: Full-fat dairy is preferred—stick with whole milk for the best mouthfeel.
- For a sturdier finished dish: Fold less whipped cream or use a touch of mascarpone to add structure without losing creaminess.
- For lemon brightness: A small amount of lemon zest in the custard (added at the end) pairs beautifully with banana; add conservatively so it doesn’t overpower.
- For crunch contrast: Toast some chopped nuts and sprinkle just before serving—but keep them separate if serving to people with allergies.
Insider Tips
- Temper the yolks carefully: When adding hot milk to yolks, add it slowly while whisking to prevent scrambling.
- Press plastic wrap to the custard surface to stop a skin from forming while it cools.
- Assemble while the custard is fully cold; warm custard will make wafers soggy too quickly and bananas will discolor faster.
- If broiling the meringue, move the pan to the top rack, set the broiler on low, and watch the color change—seconds make the difference.
- Slice bananas uniformly and place them in a single layer to keep even texture across the dish.
Store, Freeze & Reheat
- Refrigerate: Store leftovers covered in the refrigerator for up to 2 days. The layers will soften with time; for best texture eat within the first day.
- Freezing: This assembly is not ideal for freezing—bananas and whipped cream don’t freeze and thaw well. If you freeze, do so before adding fresh bananas and whipped cream, and expect texture changes.
- Reheating: Serve cold or at room temperature. If you want a warm portion, remove the meringue and gently reheat individual servings, but be aware the meringue and wafer textures will change.
Ask & Learn
- Q: Can I make this without eggs? A: Not in this exact format—the eggs are essential for the custard and meringue. If you need an eggless version, consider a different custard base (not covered in this recipe).
- Q: Can I skip the meringue? A: Yes. You can top with extra whipped cream or even leave it plain. Meringue adds texture and a caramelized aroma, but it’s optional.
- Q: How far in advance can I assemble? A: You can make the custard and whipped cream a day ahead. Assemble no more than a day early to maintain good texture of bananas and wafers.
Before You Go
Make this Banana Pudding when you want a classic dessert that’s unmistakable and comforting. Follow the method, pay attention to temperatures, and choose ripe-but-firm bananas. It’s a reliable crowd-pleaser and a dish that rewards careful technique.
If you try it, take a photo of the golden meringue and the clean layers—there’s nothing like that first spoonful. I’d love to hear how it turned out and any little tweaks you made to make it your own.
The Best Homemade Banana Pudding Recipe
Ingredients
Ingredients
- 6 eggs yolks, and whites separated
- 1 cupsugar
- 1/3 cupall-purpose flour
- 4 cupswhole milk
- pinchof sea salt
- 1 teaspoonvanilla extract
- 1 whipped cream recipe
- 1 box of vanilla wafers
- 4 peeled and thinly sliced large bananas
Instructions
Instructions
- Separate the 6 eggs into yolks and whites. Measure out 3/4 cup of the sugar and set aside the remaining 1/4 cup for the meringue. Prepare the whipped cream recipe and set it chilled in the refrigerator until ready to fold in.
- In a medium bowl, whisk the 6 egg yolks with the 3/4 cup sugar and the 1/3 cup all-purpose flour until smooth and no lumps remain.
- Slowly whisk the 4 cups whole milk into the yolk mixture until fully combined. Stir in a pinch of sea salt.
- Pour the mixture into a medium saucepan and cook over low heat, stirring constantly, for about 12–15 minutes, or until the mixture becomes very thick and custard-like.
- Remove the custard from the heat and stir in the 1 teaspoon vanilla extract. Transfer the custard to a heatproof bowl, cover (press plastic wrap directly on the surface to prevent a skin), and chill in the refrigerator until completely cold, about 45 minutes.
- Once the custard is cold, fold the prepared whipped cream into the custard: gently fold one-third at a time (or add all at once and fold) until the mixture is uniform and light. This is your whipped-cream custard mixture.
- In a deep 13×9-inch casserole pan, spread one-third of the whipped-cream custard evenly over the bottom.
- Arrange a single layer of vanilla wafers over the custard to cover the surface. Top the wafers with half of the peeled, thinly sliced bananas (use two bananas’ worth of slices, evenly distributed).
- Spread a second one-third of the whipped-cream custard over the banana layer. Repeat the wafer layer and the remaining banana slices.
- Spread the final one-third of the whipped-cream custard to cover the last banana layer. Smooth the top and set the assembled pudding aside while you make the meringue (or refrigerate briefly if you need to).
- In a clean bowl (or stand mixer bowl) with the whisk attachment, whip the 6 reserved egg whites on medium speed until soft peaks form, about 3–4 minutes.
- With the mixer on high, slowly sprinkle in the reserved 1/4 cup sugar and continue whisking until medium-stiff peaks form to make a meringue.
- Spread the meringue evenly over the top of the assembled pudding, making sure it seals to the edges. Using a kitchen torch, brown the meringue evenly until golden. (If you do not have a torch, you may broil briefly—watch carefully to avoid burning.)
- Chill briefly to set the meringue if needed, then serve.
Equipment
- Medium Bowl
- Medium Saucepan
- Whisk
- stand mixer or electric mixer
- whisk attachment
- Heatproof Bowl
- Plastic Wrap
- 13x9-inch casserole pan
- Kitchen torch
- oven broiler (optional)
- Refrigerator
Notes
How to Store:Cover and keep in the refrigerator for up to 4 days. This will not freeze well as it will cause the custard to break when thawing.
If you don’t havea torch you can bake in the oven at 400° for 7-10 minutes or until the meringue is browned on top.
Just in case youare in a pinch you can substitute the homemade whipped cream with 1 tub of cool whip.
Be sure that thebananas are just ripe when making this recipe.