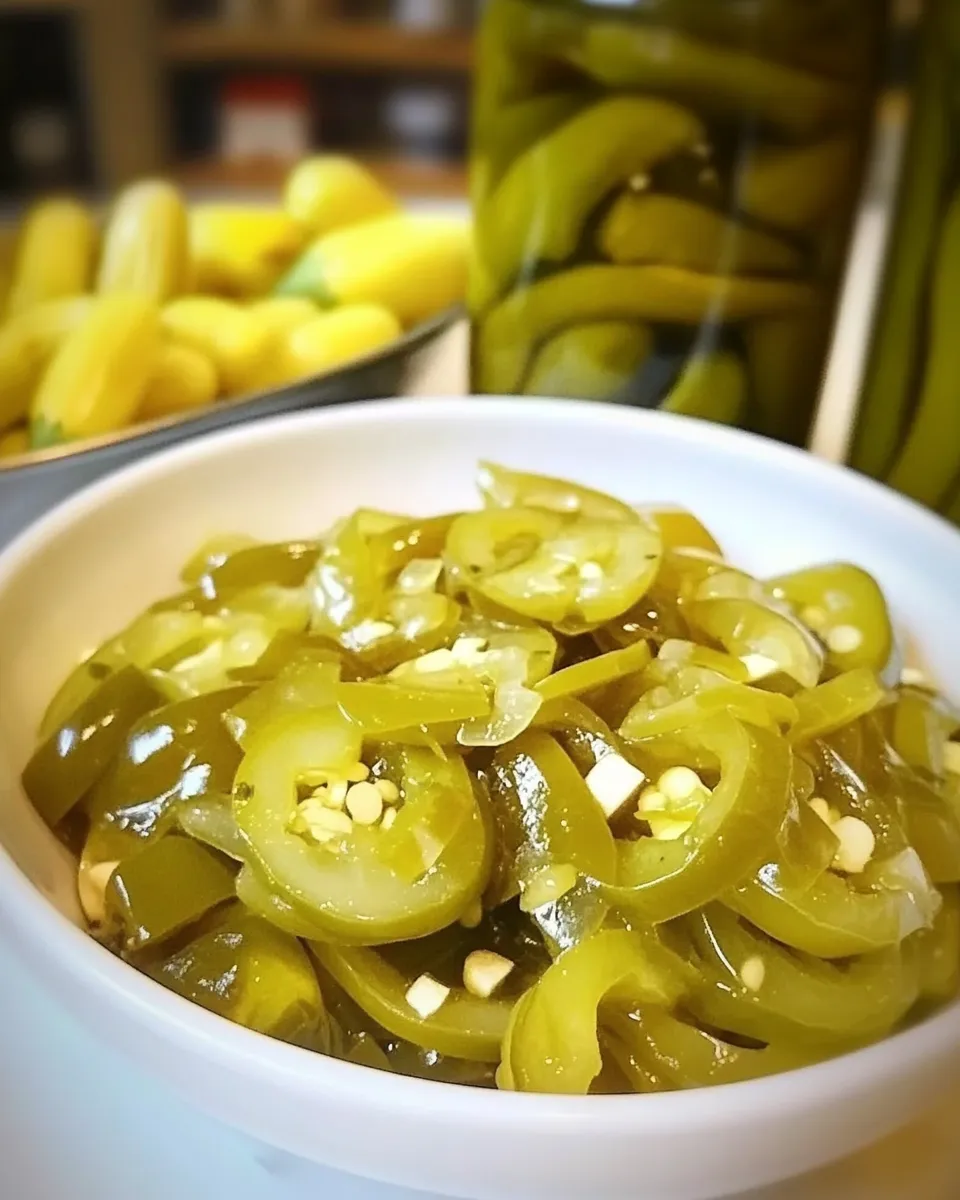
Pickled Chilies
Bright, tangy, and just a touch addictive — pickled chilies are one of those small pantry items that transform a meal. They wake up rice bowls, tacos, sandwiches, and even a simple bowl of noodles. The process is short and hands-off, and the result keeps in the fridge for weeks. If you like a quick condiment that adds flavor more than chaos, this is for you.
There are two things I love about this particular recipe: it’s fast, and it respects the natural heat of the chilies rather than obliterating it. You don’t need a canning setup or hours of prep. A brief blanch in boiling water, a bright brine of Chinese rice vinegar, a pinch of salt and sugar, then a night in the refrigerator — that’s all it takes.
Read through the notes, follow the simple steps, and you’ll have crunchy, sharp chilies ready to lift almost any savory dish. Keep the jar visible in your fridge; you’ll find yourself reaching for it more often than you think.
Ingredient Breakdown

Ingredients
- 4oz (125g) green chilies,discard the seeds and sliced into pieces — the main ingredient; removing seeds tones down the heat and creates even, bite-sized slices.
- 1cupChinese rice vinegar — provides the bright, slightly sweet acid that pickles without overpowering the chilies.
- 1teaspoonsalt — balances the vinegar and helps the chilies stay crisp.
- 1/2teaspoonsugar — rounds the acidity and brings out the chilies’ natural flavor.
- 1cupwater,boiled — used briefly to blanch the chilies and to moderate the vinegar’s bite.
Pickled Chilies Cooking Guide
- Remove the seeds from 4 oz (125 g) green chilies and slice them into pieces; place the sliced chilies in a small heatproof bowl.
- Bring 1 cup water to a boil.
- Pour the boiling 1 cup water over the chilies in the bowl, let them sit for about 10 seconds, then drain and discard the hot water.
- Return the drained chilies to the bowl and add 1 cup Chinese rice vinegar, 1 teaspoon salt, and 1/2 teaspoon sugar. Stir until the salt and sugar are dissolved.
- Transfer the chilies and pickling liquid into a small clean glass jar or container, seal, and refrigerate overnight.
- The pickled chilies will be ready to eat the next day.
Why You’ll Love This Recipe

This pickled chili recipe is efficient and honest. It keeps the chilies’ texture intact and leans on rice vinegar for a milder, sweeter acidity that complements many cuisines. There’s no long simmering or complicated syrup — the brief blanch softens the chilies just enough and the quick brine brightens them.
It’s versatile. Use a spoonful to add zing to fatty outfits like roasted pork or to cut through rich sauces. Add them to sandwiches for contrast, or chop them fine and fold them into a salsa for heat with a pickled note. Because the flavors are straightforward, the chilies pair easily with other pantry staples.
And finally, it’s forgiving. If you prefer a milder bite, remove more membranes and seeds. If you want a livelier crunch, slice slightly thicker. The technique is the key; the result adapts to your kitchen habits.
Easy Ingredient Swaps

Want to tweak the brine or adjust the flavor profile? Here are practical swaps that won’t derail the method.
- Vinegar: If you can’t find Chinese rice vinegar, a mild white vinegar or apple cider vinegar works. Expect a slightly sharper finish with white vinegar and a fruitier note with apple cider vinegar.
- Sweetener: If you prefer less refined sugar, try a touch of honey or maple syrup — use it in the same quantity and stir until dissolved. The texture and preservation won’t change much with a small swap.
- Chilies: Different green chilies (jalapeños, Fresno, or local varieties) change the heat and aroma. Keep the weight the same and seed according to your heat tolerance.
- Water ratio: The recipe uses equal parts water and vinegar. You can reduce water slightly for a brighter, more acidic brine or increase it for a gentler tang.
Equipment & Tools
You don’t need fancy tools. The right basics make this quick and tidy.
- Sharp knife — for clean slices that stay crunchy.
- Small heatproof bowl — to hold chilies during the blanch.
- Small saucepan — to bring the water to a boil.
- Clean glass jar or airtight container — glass helps maintain flavor integrity; use a small jar so the chilies are well covered by liquid.
- Colander or strainer — to drain the chilies after blanching.
Problems & Prevention
Even simple recipes can trip you up. Here are common issues and how to avoid them.
- Too soft chilies: Over-blanching or slicing paper-thin pieces can lead to sogginess. Keep the blanch to about 10 seconds as directed, and slice for a firm bite.
- Too salty or too sour: Measure the salt and vinegar. If the brine tastes off before combining, adjust with small increments of water or vinegar, not large changes.
- Uneven flavor: Make sure the salt and sugar fully dissolve in the vinegar before sealing. Stirring well distributes seasoning so every slice is seasoned.
- Bottle contamination: Use a clean jar and sterile utensils. This is a refrigerator pickle, not a shelf-stable canned preserve — keep it chilled and use clean spoons to remove chilies.
Holiday & Seasonal Touches
Pickled chilies are an excellent, low-effort garnish for holiday spreads and seasonal plates. Their bright acidity lifts heavy holiday flavors and cuts through richer textures like braised meats and creamy sides.
In winter, add them as a counterpoint to roasted root vegetables. In spring and summer, pile them on grilled fish, tacos, or fresh bowls. If you’re preparing a festive board, serve the jar alongside pickles, olives, and relishes — it adds a sharp, colorful note that guests appreciate.
For seasonal presentation, move the jar to a decorative bowl or add a sprig of a fresh, aromatic herb (added at serving, not during pickling) to tie the flavor to the rest of your menu.
Pro Tips & Notes
Timing & texture
Overnight refrigeration gives the chilies a chance to absorb the brine while keeping a snap. They’ll be pleasantly pickled by the next day and continue to develop flavor over several days. If you like a quick bite, try them after 12 hours; for more depth, wait 48 hours.
Serving ideas
Think beyond the jar: chop and mix into mayonnaise for a zesty spread, toss with noodles, or spoon over steamed greens. Keep a jar in your fridge as a quick way to lift weekday meals.
Safety note
This recipe is a refrigerator pickle. It’s intended to be stored chilled and consumed within a reasonable timeframe. Don’t attempt water-bath canning with this exact method unless you adapt the recipe and follow tested canning guidelines.
Store, Freeze & Reheat
Storage is simple: keep the sealed jar in the refrigerator. Use clean utensils each time you remove chilies to avoid introducing bacteria. They’ll stay vibrant and safe to eat for at least 2–3 weeks; flavor may continue to mellow after that.
Freezing is not recommended for texture-sensitive pickles — frozen chilies will lose crunch. Reheating is unnecessary. These are meant to be served cold or at room temperature as a condiment.
Top Questions & Answers
How long do these pickled chilies last?
Stored properly in the refrigerator, expect good flavor and texture for about 2–3 weeks. They’ll be safe beyond that if always kept chilled, but quality declines.
Can I use different chilies?
Yes. The method works with many green chilies. Keep the total weight the same and seed according to your heat preference.
Can I omit the sugar or salt?
You can reduce either, but they affect flavor and preservation. Salt enhances structure and taste; sugar balances acidity. Small adjustments are fine, but omit cautiously.
Do I need to peel the chilies?
No. Peeling is not necessary and would be a lot of extra work. A quick seed removal and slicing are all you need.
Can I make jars ahead for gifts?
This recipe produces refrigerator pickles, not shelf-stable preserves. For gifting, include a label that the jar must be refrigerated and used within a few weeks. If you need shelf-stable jars, follow a tested canning recipe rather than this quick method.
The Last Word
Simple pickles like these are pantry-game changers. Few ingredients. Minimal time. Maximum lift. Whether you use them to brighten a bowl, add crunch to a sandwich, or as a small but potent garnish at a holiday table, these pickled chilies repay the tiny bit of effort many times over.
One final encouragement: make a jar, taste the next day, and then adjust your slicing and seeding next time to suit your palate. Once you find your ideal balance of heat and tang, you’ll have a versatile condiment that brings dishes to life.
Pickled Chilies
Ingredients
Ingredients
- 4 oz 125 ggreen chilies, discard the seeds and sliced into pieces
- 1 cupChinese rice vinegar
- 1 teaspoonsalt
- 1/2 teaspoonsugar
- 1 cupwater boiled
Instructions
Instructions
- Remove the seeds from 4 oz (125 g) green chilies and slice them into pieces; place the sliced chilies in a small heatproof bowl.
- Bring 1 cup water to a boil.
- Pour the boiling 1 cup water over the chilies in the bowl, let them sit for about 10 seconds, then drain and discard the hot water.
- Return the drained chilies to the bowl and add 1 cup Chinese rice vinegar, 1 teaspoon salt, and 1/2 teaspoon sugar. Stir until the salt and sugar are dissolved.
- Transfer the chilies and pickling liquid into a small clean glass jar or container, seal, and refrigerate overnight.
- The pickled chilies will be ready to eat the next day.
Notes
Any green chilies (except bird eye’s chilies) can be used. If you are in the US, you can use green serrano pepper or jalapeno.