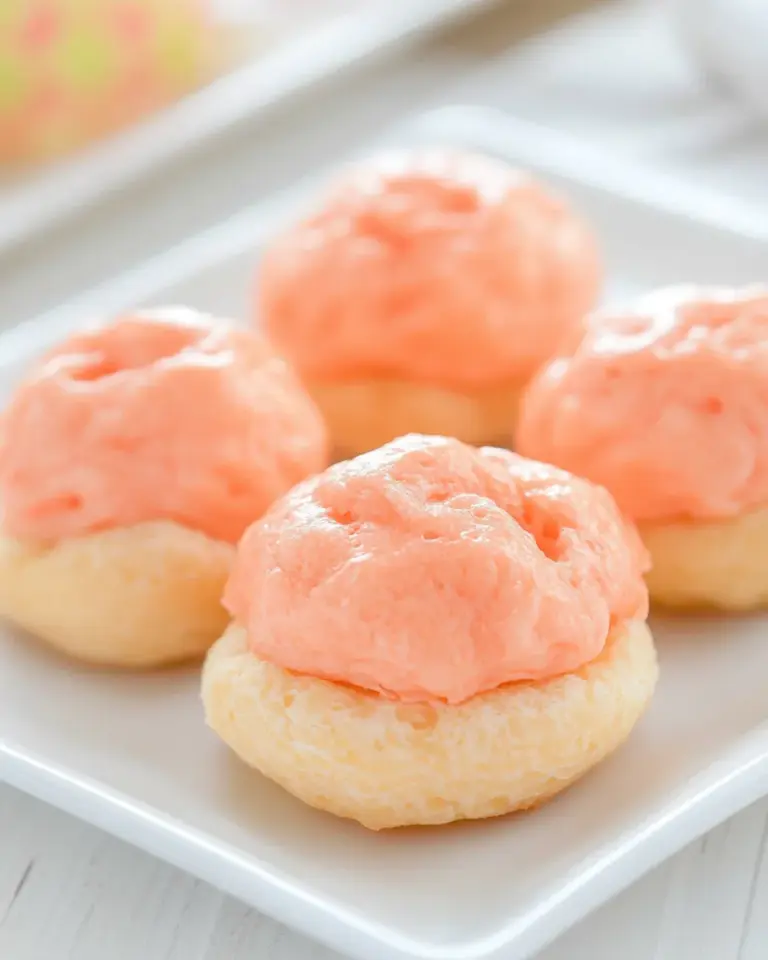
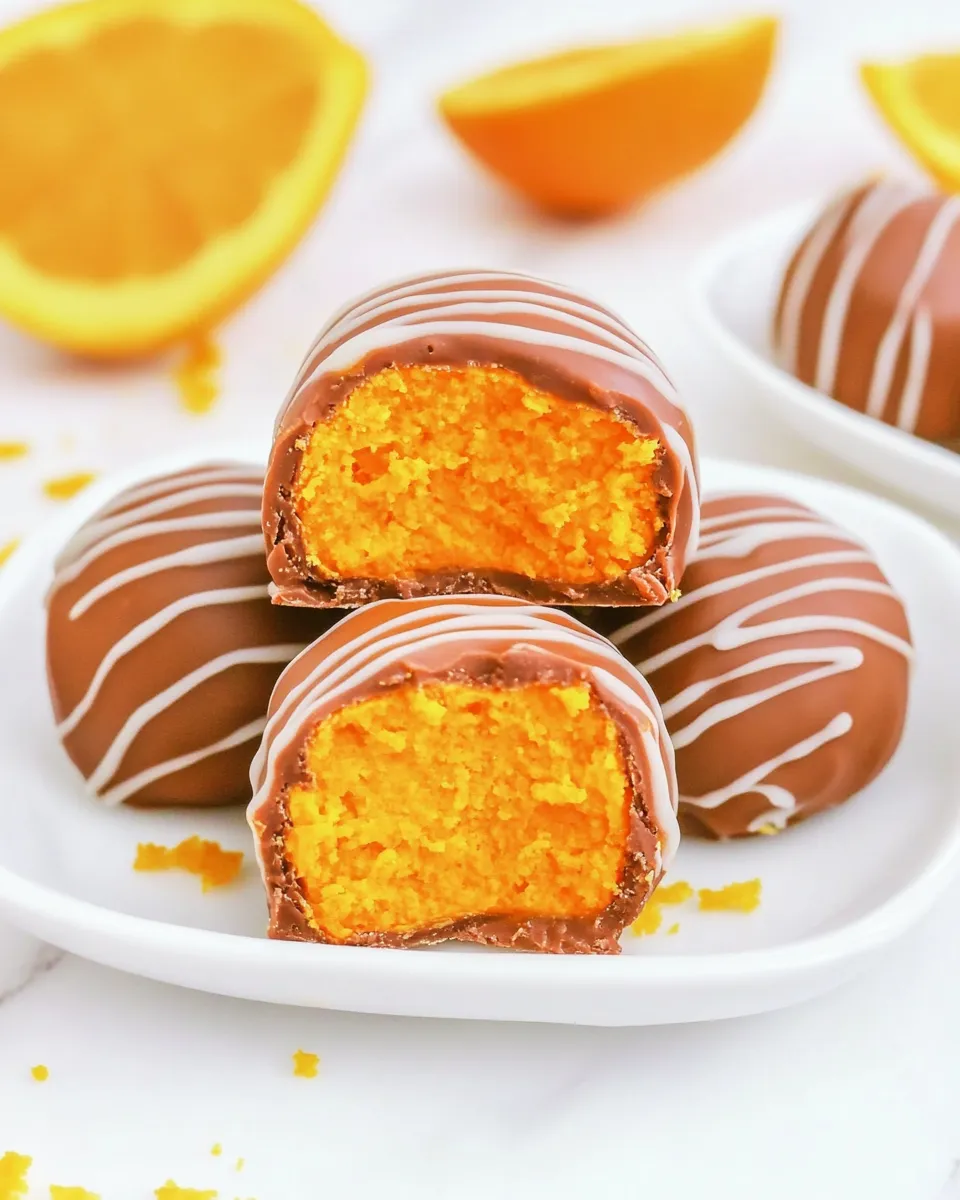
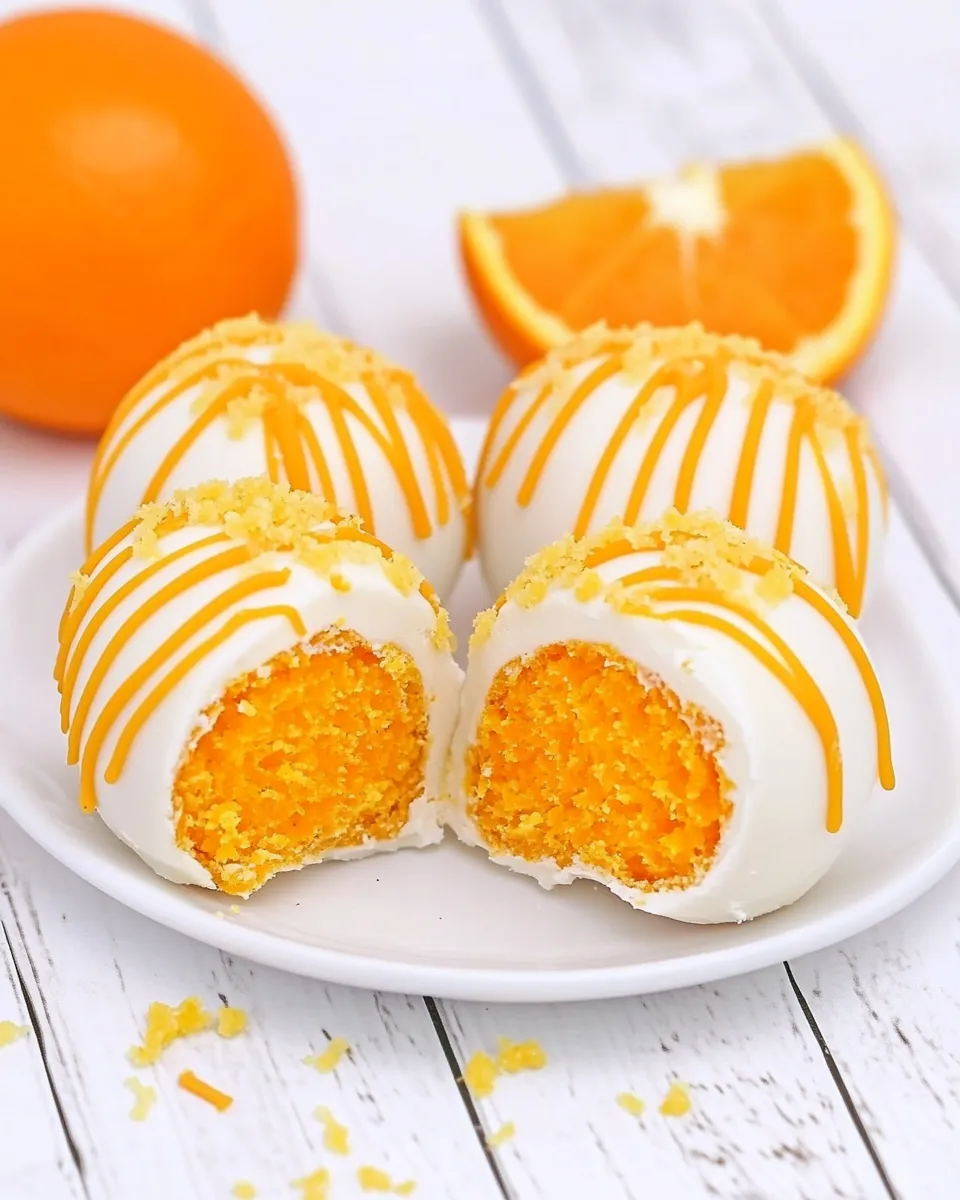
Orange Truffles
These orange truffles are the kind of little treats that disappear fast at a party and get requested again and again. They are simple to make, intensely citrusy, and rely on a few packaged ingredients so you can focus on shaping, dipping, and the finishing drizzle. If you want a quick confection that looks polished but requires minimal technique, this is it.
I tested the process so the timing and temperatures are practical for a home kitchen: microwave-safe bowls, a handheld mixer, and a chilled dough. You’ll end up with smooth, orange-flavored centers coated in a glossy orange shell and finished with white vanilla ribbons. No tempering chocolate, no complicated ganache—just straightforward steps and consistent results.
Below I’ll break down the ingredients and why each one matters, walk through the method step-by-step using the exact instructions, and cover common pitfalls, useful swaps for dietary needs, and storage tips so your truffles stay their best. Ready? Let’s make bright, bite-sized orange truffles that taste like comfort and celebration.
Ingredient Breakdown

- 15.25-ounce orange cake mix — provides the dry base, orange flavor, and structure for the truffle dough; I used Duncan Hines Perfectly Moist brand for consistent texture.
- 8 ounces cream cheese — the binder that adds richness and tenderness; use room-temperature cream cheese for smooth mixing.
- 12 ounces orange candy melts — creates the outer shell with matching orange color and aroma; melts easily in the microwave for dipping.
- 4 ounces white vanilla almond bark — used for the decorative drizzle; melts smoothly and keeps a stable ribbon when drizzled over the coated truffles.
The Method for Orange Truffles
- Pour the 15.25-ounce dry orange cake mix into a medium heat-safe bowl. Microwave the dry cake mix in two 30-second intervals, stirring thoroughly after each interval. Allow the cake mix to cool completely before proceeding.
- In a medium mixing bowl, use a handheld mixer on medium-high speed to beat the 8 ounces room-temperature cream cheese for 2 to 2½ minutes, until completely smooth.
- Sprinkle the cooled dry cake mix evenly over the whipped cream cheese. Mix on low to medium speed just until the cake mix is fully incorporated and a uniform dough forms, scraping the bowl as needed.
- Tightly cover the cream cheese mixture and chill in the refrigerator for 2 hours.
- Line a baking sheet with parchment paper and set it aside.
- Using a 1-tablespoon cookie scoop, portion the chilled mixture. Roll each portion between your palms to form a smooth ball and place the balls on the prepared baking sheet. Repeat until all mixture is portioned. If the balls become too soft, return the tray to the refrigerator briefly before dipping.
- Place 12 ounces orange candy melts in a medium heat-safe bowl. Microwave in 30-second intervals, stirring well after each interval, until the candy melts are completely smooth and fully melted.
- Dip each truffle into the melted orange candy using a fork or dipping tool so it is fully coated. Lift the truffle, gently tap the fork against the bowl to remove excess coating, and position the coated truffle back on the parchment-lined baking sheet. Use a spoon to cover any uncoated spots. Use a toothpick to remove excess coating from the bottom of the fork and to push the truffle off the fork onto the sheet if needed.
- Place 4 ounces white vanilla almond bark in a small heat-safe bowl. Microwave in 30-second intervals, stirring well after each interval, until the almond bark is completely melted and smooth.
- Using a spoon or small dipper, drizzle thin ribbons of the melted white vanilla almond bark over the coated truffles.
- Return the coated and drizzled truffles to the refrigerator until the coatings are firm (about 15–30 minutes) before serving or storing.
Why It Works Every Time
The chemistry behind these truffles is straightforward and forgiving. The dry cake mix supplies both flavor and structure: the flour and starch in the mix absorb moisture from the cream cheese and create a pliable dough that sets up when chilled. Because the cake mix is already flavored and sweetened, you get an immediate burst of orange without needing additional extracts or sugar adjustments.
Beating the cream cheese until very smooth is the foundation of a consistent texture. If the cream cheese has lumps, the dry mix won’t incorporate evenly and you’ll end up with gritty or uneven centers. Chilling the dough firms up the mixture so the balls hold their shape during dipping—this avoids sagging centers and messy shells.
Using candy melts instead of tempered chocolate simplifies coating: candy melts are formulated to melt evenly and set with a glossy finish without the tempering step. The almond bark drizzle provides a stable, contrasting ribbon that adheres well to the set coating and creates a professional look with minimal skill.
Dairy-Free/Gluten-Free Swaps
These truffles use cake mix and cream cheese, so a strict dairy-free or gluten-free version requires careful swaps. For gluten-free, use a certified gluten-free orange cake mix if you can find one; otherwise the structure will change and the texture may be denser. Ensure all candy melts and almond bark you choose are labeled gluten-free.
For dairy-free: replace the cream cheese with a firm, refrigerated dairy-free cream-cheese alternative that whips smooth. Many plant-based cream cheeses (soy or coconut-based) work, but brands vary in moisture and fat content. Start with a brand you know whips to a smooth, creamy state; if it seems too soft, chill it briefly before mixing with the dry cake mix so the dough firms up.
Also pick dairy-free candy melts and almond bark. There are confectionery coatings made from vegetable fats that mimic the behavior of candy melts; they melt and set without dairy. Test a small batch first so you can adjust chilling time and handling to suit the substitutes.
Appliances & Accessories
These are the practical tools that make the process faster and neater:
- Microwave-safe bowls — several sizes so you can melt candy melts and almond bark safely and stir thoroughly.
- Handheld mixer — speeds up smoothing the cream cheese; you can use a stand mixer if preferable.
- 1-tablespoon cookie scoop — ensures uniform truffles and consistent set times.
- Baking sheet and parchment paper — prevents sticking and keeps the workspace tidy.
- Fork or dipping tool — a fork works fine; a dedicated dipping tool saves time when you’re doing many truffles.
- Toothpicks or skewers — helpful for nudging truffles off forks and removing excess coating.
Avoid These Mistakes
Common slip-ups are easy to prevent and make the difference between professional-looking truffles and a messy batch.
Don’t skip cooling the dry cake mix after microwaving. The step switches off any trapped heat and prevents the cream cheese from softening and becoming oily when combined. Warm cake mix plus room-temperature cream cheese can create a runny dough.
Don’t try to dip soft truffles. If the centers are too warm, they’ll slump in the coating and you’ll get thin spots or collapsed shells. If that happens, return the tray to the fridge for 10–20 minutes before continuing.
Avoid overheating candy melts and almond bark. Heat in 30-second intervals and stir between bursts. Overheated melts can seize or become grainy if water gets in. If the coating thickens as it sits, brief low-heat microwaving and stirring will restore a smooth consistency.
Adaptations for Special Diets
Beyond dairy-free and gluten-free swaps, you can adapt the recipe to fit other needs with small adjustments. For lower-sugar options, there aren’t straightforward swaps because the cake mix and candy melts are already sweet and structured. If you need to reduce sugar, consider making a different base (like a cocoa-based truffle using unsweetened chocolate and sugar substitutes) but that departs from this recipe’s simplicity.
For nut allergies: choose candy melts and almond bark labeled nut-free. The name “almond bark” can be misleading; many white almond bark products do not contain almonds, but always read labels carefully. When serving, list ingredients clearly so anyone with allergies can make an informed choice.
Behind-the-Scenes Notes
Why I prefer this exact process: microwaving the dry cake mix is a small trick that warms and slightly loosens the mix so it incorporates more evenly into whipped cream cheese. It’s not about cooking the cake mix; it’s about changing its handling properties. Cooling it fully after warming keeps the fat in the cream cheese stable when they come together.
The 1-tablespoon scoop size is intentional. It yields generous bite-sized truffles that slice neatly in half for photos and plating, but still feel like a single indulgent bite. If you want smaller bonbons, a teaspoon scoop works, but account for a larger batch and shorter set times for each piece.
Prep Ahead & Store
You can make the truffle centers up to 48 hours ahead: keep the rolled, uncoated balls on a parchment-lined tray in an airtight container in the refrigerator. Dip them right before serving if you want the freshest shell, or dip and finish them and then store the coated truffles in a single layer in an airtight container.
Once coated, store the truffles in the refrigerator for up to 7 days. For longer storage, freeze them in a single layer on a tray until firm, then transfer to a freezer-safe container with parchment between layers. Thaw in the refrigerator for a few hours before serving. Because candy coatings can develop a slight bloom when frozen and thawed, refrigerated storage is preferable for keeping the glossy finish.
Common Questions
Q: Can I make these without a microwave? A: Yes. Use a double boiler to warm the cake mix briefly, and use a low heat double boiler for the candy melts and almond bark, stirring constantly until smooth. Keep water away from the coatings to prevent seizing.
Q: My truffles cracked or the coating separated—what went wrong? A: Cracks usually mean the center was too cold when dipped, or the coating set too quickly. Let truffles come to a slightly warmer fridge temperature before dipping if they’re rock-hard. Separation—where the shell lifts away—can happen if the centers are greasy or not chilled evenly. Make sure cream cheese was smooth and fully combined with the dry mix.
Q: Can I flavor the centers more intensely? A: This recipe relies on the cake mix for orange flavor. If you want more punch, you can add a small amount of orange extract to the cream cheese before combining, but do so sparingly (a quarter to half teaspoon) so you don’t upset the dough’s moisture balance.
Next Steps
Make a test batch first: do a half batch of 6–8 truffles to practice scooping, rolling, and dipping. That way you fine-tune chill times and handling for your kitchen temperature. Once you’re comfortable, scale up for parties or gifts.
If you enjoyed these, consider experimenting with different candy-melt colors or flavored almond barks for seasonal finishes. The technique is the same and the results are always impressive: neat, stable truffles that look like they took longer than they did. Happy dipping—and enjoy every zesty bite!

Orange Truffles
Ingredients
Ingredients
- 15.25 ounceorange cake mix I used Duncan Hines Perfectly Moist brand
- 8 ouncescream cheese room temperature
- 12 ouncesorange candy melts
- 4 ounceswhite vanilla almond bark
Instructions
Instructions
- Pour the 15.25-ounce dry orange cake mix into a medium heat-safe bowl. Microwave the dry cake mix in two 30-second intervals, stirring thoroughly after each interval. Allow the cake mix to cool completely before proceeding.
- In a medium mixing bowl, use a handheld mixer on medium-high speed to beat the 8 ounces room-temperature cream cheese for 2 to 2½ minutes, until completely smooth.
- Sprinkle the cooled dry cake mix evenly over the whipped cream cheese. Mix on low to medium speed just until the cake mix is fully incorporated and a uniform dough forms, scraping the bowl as needed.
- Tightly cover the cream cheese mixture and chill in the refrigerator for 2 hours.
- Line a baking sheet with parchment paper and set it aside.
- Using a 1-tablespoon cookie scoop, portion the chilled mixture. Roll each portion between your palms to form a smooth ball and place the balls on the prepared baking sheet. Repeat until all mixture is portioned. If the balls become too soft, return the tray to the refrigerator briefly before dipping.
- Place 12 ounces orange candy melts in a medium heat-safe bowl. Microwave in 30-second intervals, stirring well after each interval, until the candy melts are completely smooth and fully melted.
- Dip each truffle into the melted orange candy using a fork or dipping tool so it is fully coated. Lift the truffle, gently tap the fork against the bowl to remove excess coating, and position the coated truffle back on the parchment-lined baking sheet. Use a spoon to cover any uncoated spots. Use a toothpick to remove excess coating from the bottom of the fork and to push the truffle off the fork onto the sheet if needed.
- Place 4 ounces white vanilla almond bark in a small heat-safe bowl. Microwave in 30-second intervals, stirring well after each interval, until the almond bark is completely melted and smooth.
- Using a spoon or small dipper, drizzle thin ribbons of the melted white vanilla almond bark over the coated truffles.
- Return the coated and drizzled truffles to the refrigerator until the coatings are firm (about 15–30 minutes) before serving or storing.
Equipment
- Microwave-safe bowl
- handheld mixer
- Mixing Bowl
- Baking Sheet
- Parchment Paper
- 1 tablespoon cookie scoop
- Fork or dipping tool
- Spoon
- toothpick
- Refrigerator
Notes
You can allow the uncoated cheesecake bites to sit overnight in the refrigerator before the next step. Be sure to pull them out and let them come to room temperature slightly before coating because the cake mix will expand, and the coating may crack if you coat the bites too soon.
If the coating becomes too thick, you can reheat it in the microwave in 15-second intervals, stirring well after each interval until smooth.
You can place the melted almond bark in a small piping bag or sandwich bag and snip the corner to drizzle the almond bark if you want more control of the drizzle.