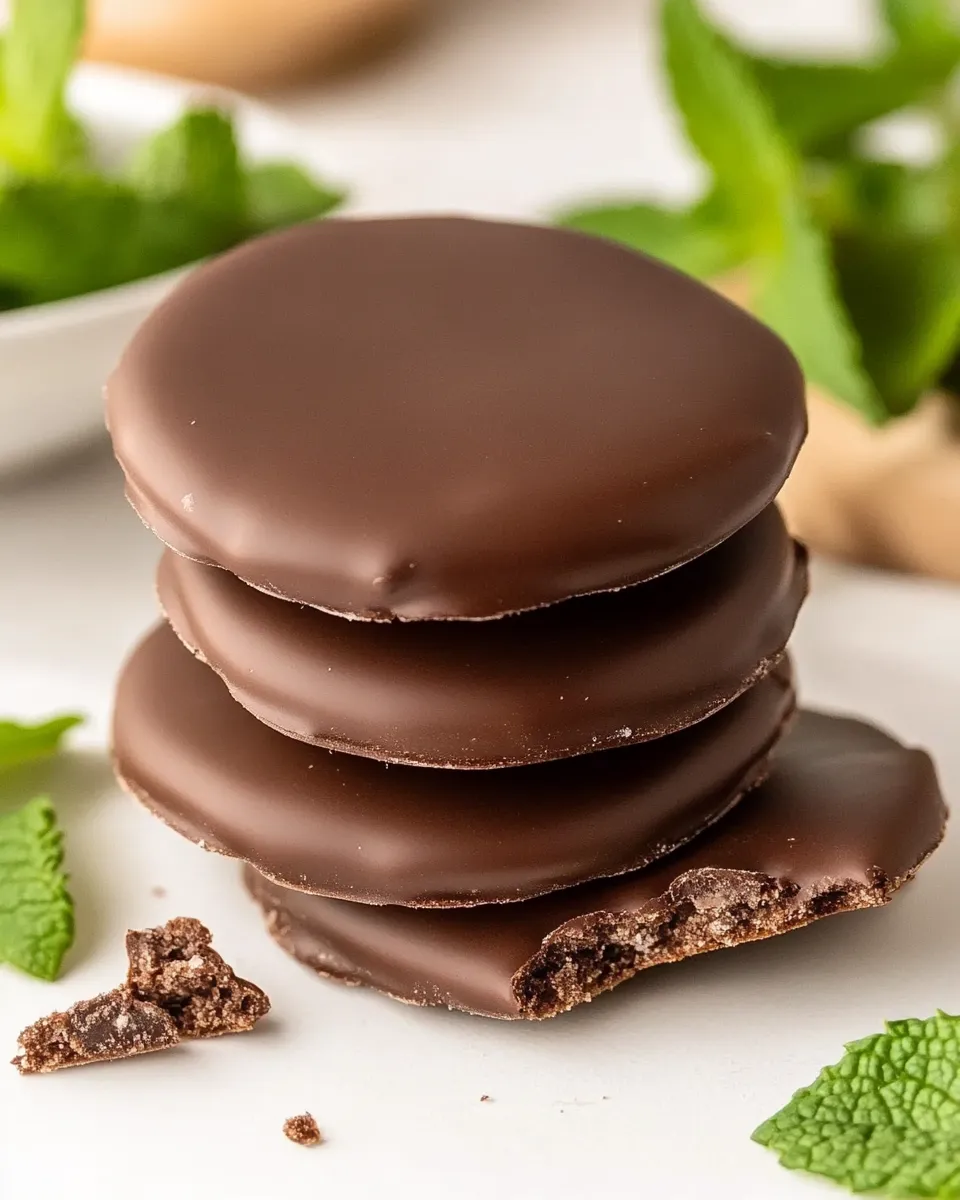
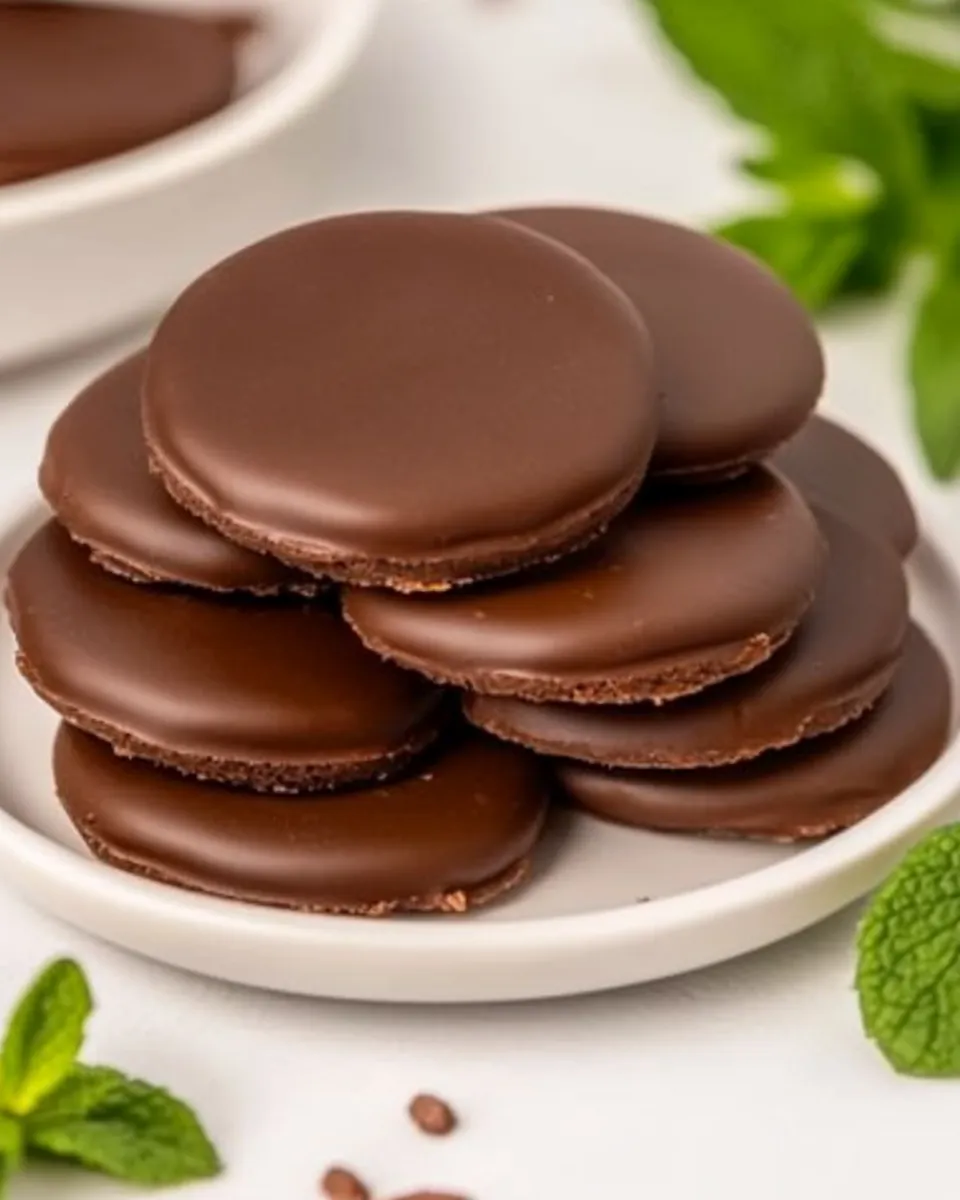
Easy Homemade Thin Mint Cookies
These thin mint-style cookies are a no-fuss treat you can make with three pantry items and minimal equipment. They aren’t trying to be an exact copy of any branded cookie; they’re a crisp, chocolate-coated butter cracker with a cool peppermint note — quick to assemble and easy to scale.
I like making them when I want a crisp, minty bite without rolling dough, chilling, or fiddling with a piping bag. They take a little patience while the chocolate sets, but the hands-on time is short and the payoff is reliable. Kids can help dip the crackers, and they make a lovely plate to bring to gatherings.
Below you’ll find the exact ingredients and a step-by-step method that follows a straightforward melting-and-dipping process. I’ll also walk through why the method works, sensible swaps, the tools that save time, common mistakes to avoid, and how to store the finished cookies so they stay crisp.
The Essentials

What you need to know before you start: work on a clean surface, keep the chocolate dry, and have a plan for where the coated crackers will cool. The full set of ingredients is minimal — crackers, chocolate, and peppermint extract — and the technique is mostly about tempering the chocolate’s texture through gentle heat and patient setting.
Temperature matters. Melt chocolate slowly so it stays glossy and doesn’t seize. If you’re short on time, chilling the trays in the fridge speeds setting but can introduce slight condensation when you remove them; handle that carefully. Otherwise, letting them set at room temperature gives the crispiest finish.
Ingredients
- 60 round butter crackers — the crisp base; choose a simple, lightly salted butter cracker so the chocolate and peppermint shine.
- 1 pound dark or semi-sweet chocolate chips (or chocolate bar cut into bite-size pieces) — the coating and flavor vehicle; chips melt consistently, bars can be higher quality but must be chopped evenly.
- ½ teaspoon peppermint extract — provides the classic mint note; a little goes a long way, so measure carefully.
Build Homemade Thin Mint Cookies Step by Step
- Line two large baking sheets with parchment paper or wax paper and set aside.
- Place 1 pound dark or semi-sweet chocolate chips (or the bite-size pieces of chocolate bar) into a shallow heatproof glass bowl.
- Melt the chocolate either by microwave or double boiler:
- Microwave method: heat in 30-second intervals, stirring between each interval, until the chocolate is creamy and smooth.
- Double-boiler method: set the glass bowl over a pot of simmering water (medium-low heat) and stir frequently until the chocolate is smooth. If any condensation forms on the outside of the bowl, remove the bowl from the pot and dry the outside before continuing.
- Stir ½ teaspoon peppermint extract into the melted chocolate until fully combined and smooth.
- Hold one of the 60 round butter crackers with a fork and dip it into the melted chocolate, turning as needed to coat the cracker.
- Allow excess chocolate to drip back into the bowl through the prongs of the fork so the coating is even.
- Transfer the coated cracker to the prepared parchment-lined baking sheet in a single layer. Repeat steps 5–7 until all 60 crackers are coated. If the chocolate begins to thicken, rewarm gently using the microwave in short intervals or over the double boiler until smooth.
- Let the coated crackers sit at room temperature until the chocolate is fully hardened, about 2 hours.
- If you prefer to speed up setting, place the baking sheets in the refrigerator for 20–30 minutes instead of waiting at room temperature.
Why This Recipe Works

The method relies on three simple principles: maintain smooth melted chocolate, evenly coat the cracker, and allow the chocolate to set without moisture. Melting slowly — whether in short microwave bursts or over a double boiler — preserves the chocolate’s shine and prevents seizing. Adding peppermint extract after the chocolate is melted ensures the volatile oils don’t evaporate and keeps flavor bright.
Using a fork to dip and letting excess chocolate drip creates a thin, even coating that stays crisp. A thick chocolate shell will stay softer longer and may trap moisture against the cracker; thin coatings harden faster and keep the cracker’s snap.
Finally, cooling is just patience and environment. Room temperature setting avoids moisture issues from condensation but takes longer. Chilling is fast and fine for casual settings; if you choose the fridge, let the cookies sit a minute at room temperature before stacking to avoid sweat.
Quick Replacement Ideas
- Chocolate: Swap dark or semi-sweet for milk chocolate if you prefer a sweeter coating, but the higher sugar can soften the finished cookie slightly.
- Peppermint: If you don’t have peppermint extract, a drop or two of peppermint oil will work, but use far less (it’s concentrated). Peppermint schnapps or crème de menthe can add flavor but may affect setting due to their alcohol/water content.
- Crackers: If you can’t find round butter crackers, use any thin, neutral-flavored cracker of similar size. Thicker crackers will be sturdier but change the bite.
Recommended Tools
- Shallow heatproof glass bowl — fits on a pot for a double boiler and allows you to see the chocolate as it melts.
- Small fork for dipping — the prongs let excess chocolate drip away cleanly.
- Parchment or wax paper-lined baking sheets — keeps the coated crackers from sticking and makes cleanup easy.
- Kitchen thermometer (optional) — useful if you want more control over chocolate temperature, though not required for this simple method.
- Small offset spatula or spoon — helpful for nudging drips off the fork or smoothing a stray blob.
Avoid These Traps
Don’t overheat the chocolate
Microwaving too long or boiling the double boiler will cause the chocolate to become grainy or seize. Stop early and stir — residual heat finishes the job.
Keep water away
Even a splash of water can make chocolate seize into a lumpy paste. If condensation forms on the outside of your bowl in a double boiler, dry it immediately before continuing.
Mind the peppermint amount
Peppermint extract is potent. Stick to the ½ teaspoon called for; more can taste medicinal and upset the balance.
Don’t overcrowd cooling sheets
Lay crackers in a single layer with a little space between them. If they touch, the coatings can merge and mar the finish.
Seasonal Spins
These cookies are versatile for holidays and gatherings. For winter or holiday platters, add crushed candy cane sprinkles immediately after dipping while the chocolate is still wet for a festive crunch and extra peppermint punch. For a spring or summer variation, swap the peppermint extract for a light orange or almond extract (start with ¼ teaspoon and taste), keeping in mind it will change the cookie’s character.
For a subtle twist, drizzle a little white chocolate over the dark-coated crackers once the base is set — use a piping bag or fork to create thin lines. If you prefer a more Christmassy look, roll the edges in finely chopped toasted nuts before the chocolate sets, but be aware that adds moisture and texture differences.
Recipe Notes & Chef’s Commentary
On chocolate choice: I usually reach for dark or semi-sweet chips for balanced sweetness and a glossy finish. Chocolate chips contain stabilizers that help them keep shape, but they melt well for dipping if handled gently. If you use a chocolate bar, choose one with a minimum of 55% cacao for a firm snap and less sugar bloom over time.
On pace: This recipe is fast to assemble — the real wait is the setting time. Use that time to tidy up, make a cup of tea, or arrange a simple platter. If you need to speed everything up, the fridge does most of the work in 20–30 minutes.
On presentation: Arrange the cooled cookies on a single platter in concentric circles or wrapped in small cellophane bags tied with ribbon for gifting. They keep their crispness well when properly stored.
Best Ways to Store
- Room temperature: Store in an airtight container layered with parchment paper at room temperature for up to 1 week. Keep in a cool, dry place away from direct sunlight.
- Refrigeration: If your home is warm or the chocolate is soft, refrigerate in an airtight container. Place a sheet of parchment between layers. Bring to room temperature before serving to reduce condensation.
- Freezing: You can freeze in a single layer on a baking sheet until solid, then transfer to a freezer-safe bag or container with parchment between layers. Thaw in the refrigerator for 30–60 minutes, then bring to room temperature before serving to minimize moisture.
Quick Questions
- Can I use milk chocolate? — Yes, but it will be sweeter and slightly softer after setting.
- Can I make these ahead? — Yes. Store them in an airtight container; they hold for up to a week at room temperature or longer in the fridge.
- What if my chocolate thickens while dipping? — Rewarm it gently in short bursts in the microwave or return the bowl to the double boiler and stir until smooth.
- Can I pipe designs on top? — Yes. Once the base coating is set, melt a little contrasting chocolate and drizzle or pipe designs. Allow to set fully before stacking.
Time to Try It
These Homemade Thin Mint Cookies are an efficient way to get a crisp, mint-chocolate bite without baking or complex prep. Follow the simple melting and dipping steps, measure the peppermint, and be patient while the chocolate sets. You’ll end up with a neat stack of crunchy, minty rounds that travel well and please a crowd.
Pull out the crackers, melt the chocolate slowly, add that half teaspoon of peppermint, and start dipping. The process is meditative and the result is reliably good — a small, focused project with a delicious reward. Enjoy.

Easy Homemade Thin Mint Cookies
Ingredients
Ingredients
- 60 round butter crackers
- 1 pounddark or semi-sweet chocolate chips (or chocolate bar cut into bite-size pieces)
- 1/2 teaspoonpeppermint extract
Instructions
Instructions
- Line two large baking sheets with parchment paper or wax paper and set aside.
- Place 1 pound dark or semi-sweet chocolate chips (or the bite-size pieces of chocolate bar) into a shallow heatproof glass bowl.
- Melt the chocolate either by microwave or double boiler: - Microwave method: heat in 30-second intervals, stirring between each interval, until the chocolate is creamy and smooth. - Double-boiler method: set the glass bowl over a pot of simmering water (medium-low heat) and stir frequently until the chocolate is smooth. If any condensation forms on the outside of the bowl, remove the bowl from the pot and dry the outside before continuing.
- Stir ½ teaspoon peppermint extract into the melted chocolate until fully combined and smooth.
- Hold one of the 60 round butter crackers with a fork and dip it into the melted chocolate, turning as needed to coat the cracker.
- Allow excess chocolate to drip back into the bowl through the prongs of the fork so the coating is even.
- Transfer the coated cracker to the prepared parchment-lined baking sheet in a single layer. Repeat steps 5–7 until all 60 crackers are coated. If the chocolate begins to thicken, rewarm gently using the microwave in short intervals or over the double boiler until smooth.
- Let the coated crackers sit at room temperature until the chocolate is fully hardened, about 2 hours.
- If you prefer to speed up setting, place the baking sheets in the refrigerator for 20–30 minutes instead of waiting at room temperature.
Equipment
- Parchment Paper
Notes
Work quickly or in batches.
The chocolate will begin to harden and can become difficult to dip the crackers into. If you work slowly, it may be best to cut the recipe in half and then repeat. Alternatively, you can reheat your chocolate if needed, but I only recommend doing so once.
Storage:
These Homemade "Thin Mints" can be stored in a sealed container in a cool place, for up to 5 days. Alternatively, store them in an airtight container in the refrigerator for up to 10 days. They can also be frozen in a freezer-safe airtight container for up to 1 month.
Chocolate
: Use good-quality dark, semi-sweet, or milk chocolate chips or a chocolate bar cut into bite-sized pieces. If needed use dairy-free chocolate.
Butter Crackers
: Gluten-free butter crackers work in this recipe to make gluten-free thin mints.