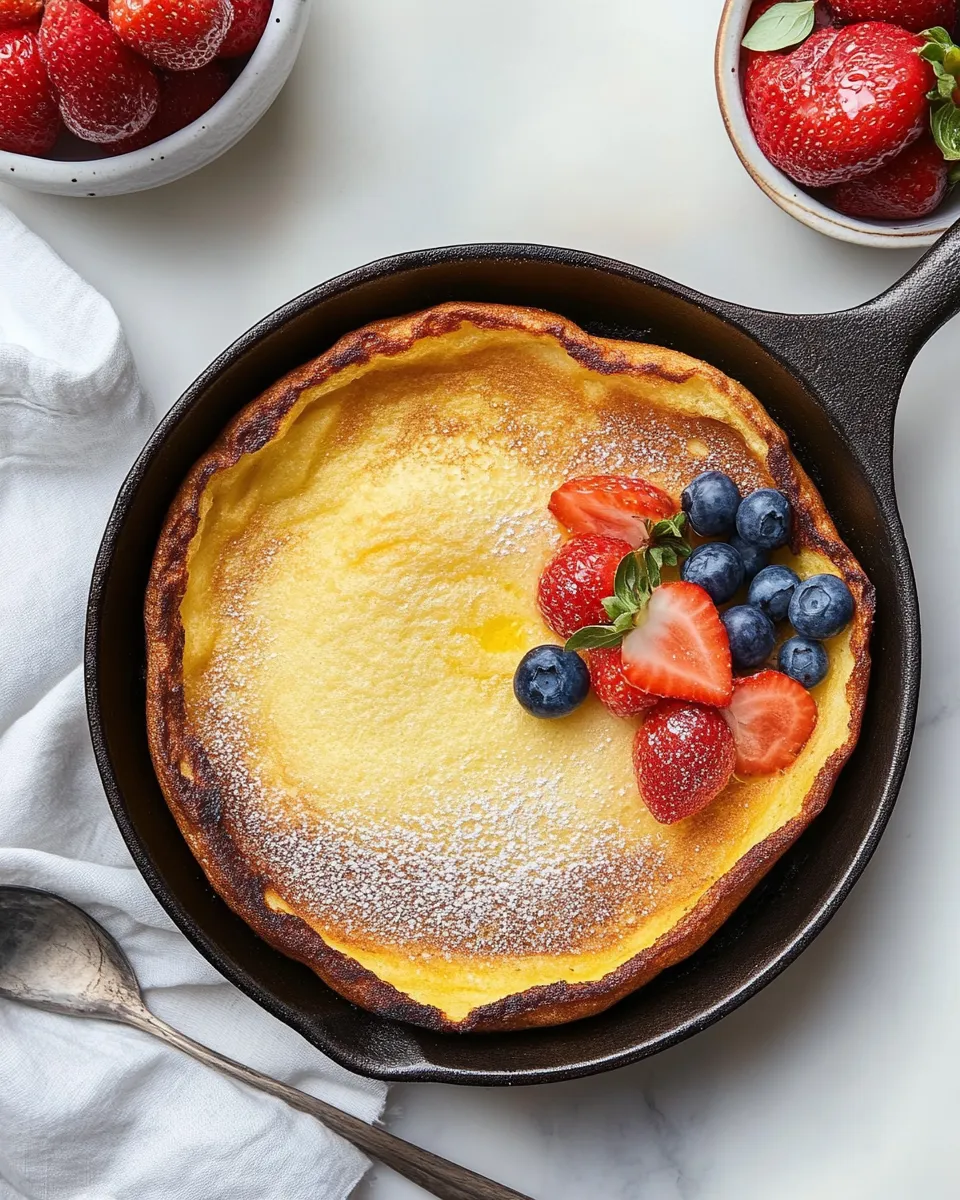
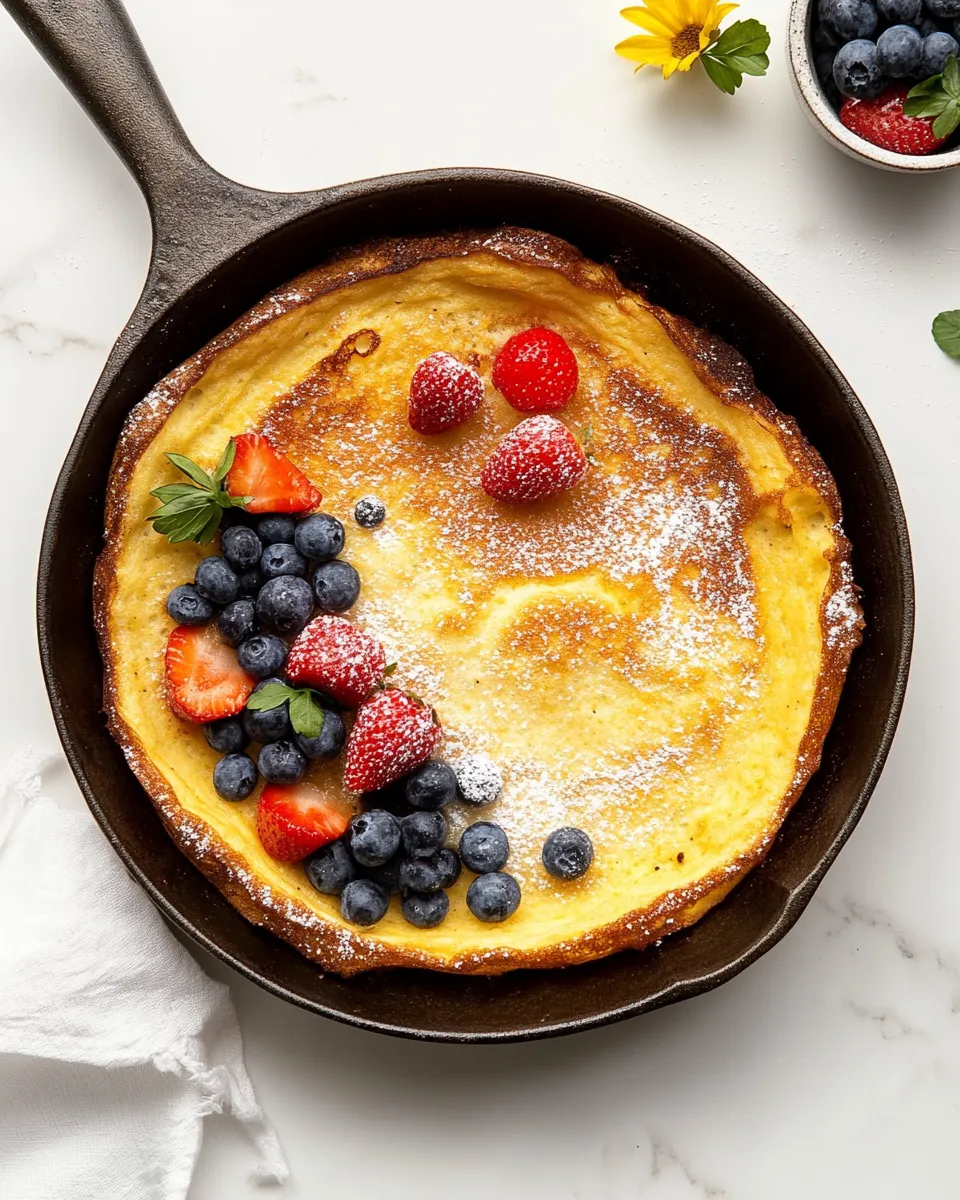
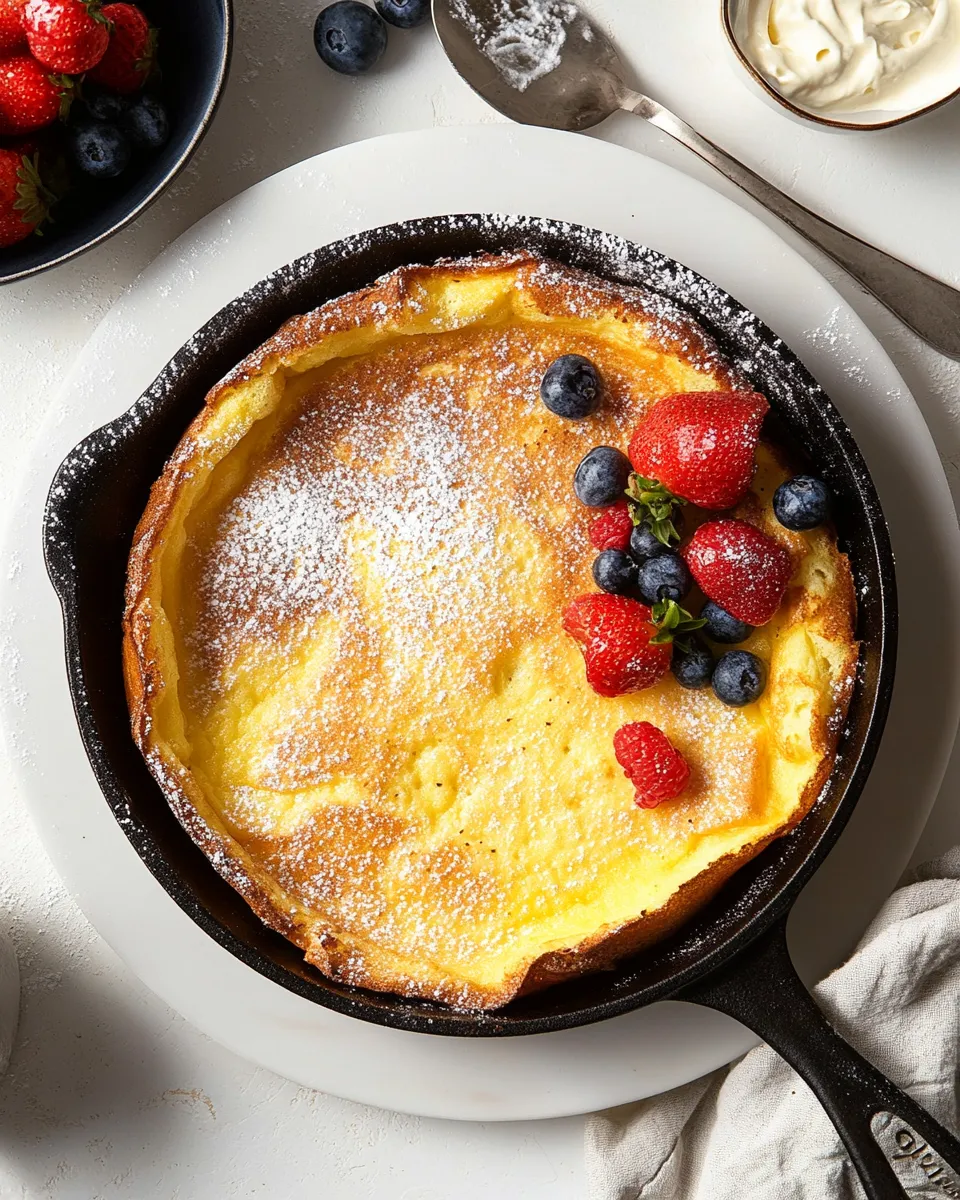
Dutch Baby Recipe
There are few breakfasts that deliver the same “wow” with so little fuss. A Dutch baby puffs like a savory cloud in a hot skillet, then collapses into tender folds you can dress however you like. It reads like a showstopping brunch but comes together fast—perfect for a weekend morning or an elegant weeknight treat.
I keep this version in regular rotation because it balances crisp edges and a custardy center, and the method is forgiving. The technique centers on a hot pan and a thin, well-blended batter. Follow those basics and you’ll get the dramatic rise every time.
This post gives you the ingredients, the exact steps to follow, and practical troubleshooting so you can repeat it confidently. I’ll also share smart serving ideas, storage notes, and answers to the questions readers ask most often.
Ingredients at a Glance

- 1 cup all purpose flour — provides structure; measure by spooning into the cup for accuracy.
- 1/2 cup granulated sugar + extra for top — sweetens the batter and adds a light crust when sprinkled on after baking.
- 1 teaspoon fine sea salt — balances sweetness and enhances flavor.
- 1 tablespoon vanilla extract — adds aromatic depth; good quality vanilla makes a noticeable difference.
- 1 cup whole milk — gives richness and tenderness to the custard-like center.
- 4 large eggs — the lift and structure come from eggs, so use large and room temperature if possible.
- 8 tablespoons unsalted butter divided — half melts into the batter early, half is used to coat hot skillets for that blistered edge and golden color.
Dutch Baby — Do This Next
- Place the 4 large eggs and 1 cup whole milk in a blender. Cover and pulse 2–3 times. Let the mixture sit in the closed blender to warm to room temperature while you preheat the oven (room-temp eggs and milk help the Dutch babies rise).
- Preheat the oven to 425°F (220°C). Remove the upper oven rack if necessary and place two 11–14 inch cast-iron skillets in the oven to preheat while the oven reaches temperature.
- Melt 4 tablespoons of the unsalted butter (microwave briefly or melt in a small saucepan). Set the melted butter aside to cool slightly.
- When the oven and skillets are fully preheated, add 1 cup all-purpose flour, 1/2 cup granulated sugar, and 1 teaspoon fine sea salt, and 1 tablespoon vanilla extract to the blender with the eggs and milk. Blend until the batter is smooth and slightly bubbly.
- With the blender running briefly, pour in the reserved 4 tablespoons melted butter and blend just until incorporated. The batter should be smooth and pourable.
- Using oven mitts, carefully remove one hot skillet at a time from the oven. Add 2 tablespoons of the remaining (unmelted) butter to each skillet (total 4 tablespoons), then quickly return each skillet to the oven for a few seconds to fully melt the butter and heat the pan.
- Remove the skillets from the oven again, swirl each skillet so the melted butter coats the bottom and sides, then pour equal amounts of batter into the two hot skillets. Work quickly and close the oven door immediately.
- Lower the oven temperature to 375°F (190°C) and bake for 25–35 minutes, until the Dutch babies are puffed, set, and golden brown at the edges. Do not open the oven during baking.
- When done, use oven mitts to remove the skillets and transfer the Dutch babies to a cutting board with a spatula (they will deflate quickly). Sprinkle with the extra granulated sugar from the ingredient list, cut into wedges, and serve immediately.
Why This Recipe Belongs in Your Rotation
This Dutch Baby is fast, dramatic, and versatile. The technique is straightforward: a thin batter, very hot pan, and concentrated heat in the oven create the puff. The result is a dish that feels special but requires only pantry staples and a reliable skillet.
It’s a crowd-pleaser for a few reasons. First, it scales well—you’re baking two skillets here, which is great for feeding more than two people without much extra work. Second, it’s forgiving if you follow the timing, and the process is easy to teach to someone else in the kitchen. Lastly, the flavor is clean: butter, vanilla, and a hint of sugar, which pairs well with savory additions or fruit and syrup.
Make it for Sunday breakfast, a casual brunch with friends, or an impressive dessert—it’s equally at home served with lemon and powdered sugar or topped with sautéed apples and a scoop of ice cream.
Low-Carb/Keto Alternatives
If you want to reduce carbs, the two classic levers are swapping the flour and swapping the sugar. Low-carb flours behave differently—density and absorption vary—so texture will change. You can try a fine almond flour blend or a low-carb baking mix, but expect a thinner batter; add one egg white or slightly more binding agent if needed. For sweetness, choose a granulated sugar substitute that measures like sugar (erythritol or allulose blends commonly work).
Be conservative with substitutions: make small test batches to dial in texture and cook time because low-carb ingredients brown and set at different rates. You’ll likely see less dramatic rise but still get a tasty, quick skillet-baked treat.
Cook’s Kit
Essentials
- Two 11–14 inch cast-iron skillets — the recipe depends on the heat retention of cast iron for the puff and crust.
- A reliable oven thermometer — ovens vary; confirmed temperature helps consistent rise.
- Blender — for a perfectly smooth, aerated batter; a whisk works in a pinch but expect more effort.
- Oven mitts and a heatproof spatula — you’ll handle very hot pans quickly.
Nice-to-have
- Sifter or fine-mesh sieve — to aerate flour for an especially light texture.
- Digital kitchen scale — for precise flour measurement if you prefer weight over cups.
Troubles You Can Avoid
Here are the common hiccups and how to prevent them.
- Flat or minimal rise — Make sure eggs and milk are at room temperature and the skillet is properly preheated. Cold dairy or a lukewarm pan reduces steam generation and lift.
- Batter too thick — The batter should be pourable. If it’s thick, blend more briefly with a bit more milk (no more than a tablespoon at a time) until it reaches a thin, crepe-like consistency.
- Uneven browning — Rotate skillets if your oven has hot spots, and ensure butter coats the sides and bottom when you pour the batter.
- Soggy center or undercooked — Resist opening the oven during the first 20–25 minutes. Opening releases heat and kills the rise. If edges are done but center remains wet, bake a few extra minutes at the lowered 375°F (190°C).
- Sticking to the pan — Use the full amount of butter called for and swirl it up the sides while the skillet is hot. Cast iron needs fat to release; nonstick pans won’t give the same rise and texture.
Holiday & Seasonal Touches
Dress the Dutch Baby for the season: fall favorites include thinly sliced pears sautéed with a touch of butter and spice, or caramelized apples and toasted pecans. In winter, top with macerated citrus segments and a drizzle of warm honey. Spring and summer call for fresh berries, a squeeze of lemon, and a dusting of powdered sugar.
For holidays, consider savory variations: fold in grated Gruyère and chopped chives into the batter for a savory bake, then finish with cracked pepper and a dollop of crème fraîche. Or bake smaller single-serving Dutch babies in a muffin tin for easy, elegant plating at a brunch buffet.
If You’re Curious
Origin-wise, the Dutch baby is closely related to German Pfannkuchen and English Yorkshire pudding. It’s not actually Dutch; the name likely evolved in America. The technique—high heat and hot fat—creates steam inside the thin batter, inflating it like a soufflé. The quick bake then sets that structure until it deflates as it cools, which is why you’ll see dramatic oven puffing followed by a tender, collapsed center.
Texture-wise, you’re aiming for crisp, caramelized edges and a silky, custard-like center. That contrast is what makes the dish interesting and versatile. Use whole milk for richness; reduced-fat milk makes the custard firmer and less tender.
Freezer-Friendly Notes
Dutch babies are best eaten fresh—rise and texture are at their peak right out of the oven. If you have leftovers, you can store them in an airtight container in the refrigerator for 2–3 days. Reheat slices in a 350°F (175°C) oven on a baking sheet for 5–8 minutes to restore some crispness; avoid the microwave, which makes the edges soggy.
Freezing isn’t ideal because the structure and texture degrade. If you do freeze, wrap wedges tightly and use within a month. Thaw overnight in the fridge and reheat gently in the oven until warmed through and slightly crisp around the edges.
Your Top Questions
Why does my Dutch baby collapse?
It’s supposed to deflate. The rise is driven by steam and egg structure in the hot oven; once it’s out and cooling, air escapes and it settles into a tender shape. Serve immediately for the best presentation.
Can I make this in one skillet instead of two?
Yes, but adjust bake time. One larger skillet with the full batter will take a bit longer. Keep an eye on the center for doneness and use the same temperature changes: start at 425°F (220°C) and then lower to 375°F (190°C).
What if I don’t have a blender?
Whisk the eggs and milk thoroughly, then gradually whisk in the dry ingredients until smooth. You won’t get the same aeration, but the dish will still be very good. Strain the batter through a sieve to remove lumps.
Can I make this gluten-free?
Yes, with a gluten-free flour blend formulated for baking. Expect a different texture; you may need to experiment with small adjustments. Use blends that contain xanthan gum or another binder for better structure.
Time to Try It
Ready for a confident, delicious bake? Gather the listed ingredients and follow the steps in order—room-temperature dairy and eggs, a screaming-hot skillet, and careful timing are the simple rules. You’ll get a browned, puffed Dutch Baby that’s both showy and approachable.
Make it your own at the table: a dusting of sugar and lemon, fresh fruit and syrup, or savory toppings for a meal that feels special without extra complication. Then come back and tell me how yours turned out—I love hearing which toppings become weekly favorites.

Dutch Baby Recipe
Ingredients
Ingredients
- 1 cupall purpose flour
- 1/2 cupgranulated sugar+ extra for top
- 1 teaspoonfine sea salt
- 1 tablespoonvanilla extract
- 1 cupwhole milk
- 4 largeeggs
- 8 tablespoonsunsalted butter divided
Instructions
Instructions
- Place the 4 large eggs and 1 cup whole milk in a blender. Cover and pulse 2–3 times. Let the mixture sit in the closed blender to warm to room temperature while you preheat the oven (room-temp eggs and milk help the Dutch babies rise).
- Preheat the oven to 425°F (220°C). Remove the upper oven rack if necessary and place two 11–14 inch cast-iron skillets in the oven to preheat while the oven reaches temperature.
- Melt 4 tablespoons of the unsalted butter (microwave briefly or melt in a small saucepan). Set the melted butter aside to cool slightly.
- When the oven and skillets are fully preheated, add 1 cup all-purpose flour, 1/2 cup granulated sugar, and 1 teaspoon fine sea salt, and 1 tablespoon vanilla extract to the blender with the eggs and milk. Blend until the batter is smooth and slightly bubbly.
- With the blender running briefly, pour in the reserved 4 tablespoons melted butter and blend just until incorporated. The batter should be smooth and pourable.
- Using oven mitts, carefully remove one hot skillet at a time from the oven. Add 2 tablespoons of the remaining (unmelted) butter to each skillet (total 4 tablespoons), then quickly return each skillet to the oven for a few seconds to fully melt the butter and heat the pan.
- Remove the skillets from the oven again, swirl each skillet so the melted butter coats the bottom and sides, then pour equal amounts of batter into the two hot skillets. Work quickly and close the oven door immediately.
- Lower the oven temperature to 375°F (190°C) and bake for 25–35 minutes, until the Dutch babies are puffed, set, and golden brown at the edges. Do not open the oven during baking.
- When done, use oven mitts to remove the skillets and transfer the Dutch babies to a cutting board with a spatula (they will deflate quickly). Sprinkle with the extra granulated sugar from the ingredient list, cut into wedges, and serve immediately.
Equipment
- Blender
- Oven
- Cast-Iron Skillet
- Oven mitts
- Spatula
Notes
Storing Leftovers– Dutch babies are best eaten shortly after baking. But if you do have leftovers, they’ll keep well for up to 3 days or so in an airtight container stored in the refrigerator.
Freezing– You can freeze a Dutch baby pancake for up to 2-3 months, wrapped in a layer of plastic wrap and stored in a plastic ziploc bag or a similar freezer-safe, airtight container. However, the texture will be denser and chewier than freshly baked pancakes. Thaw at room temperature for 20-30 minutes before reheating and serving.
Reheating– Reheat a Dutch baby in the microwave in short 10-second bursts at 50% power to make it warm without drying out.