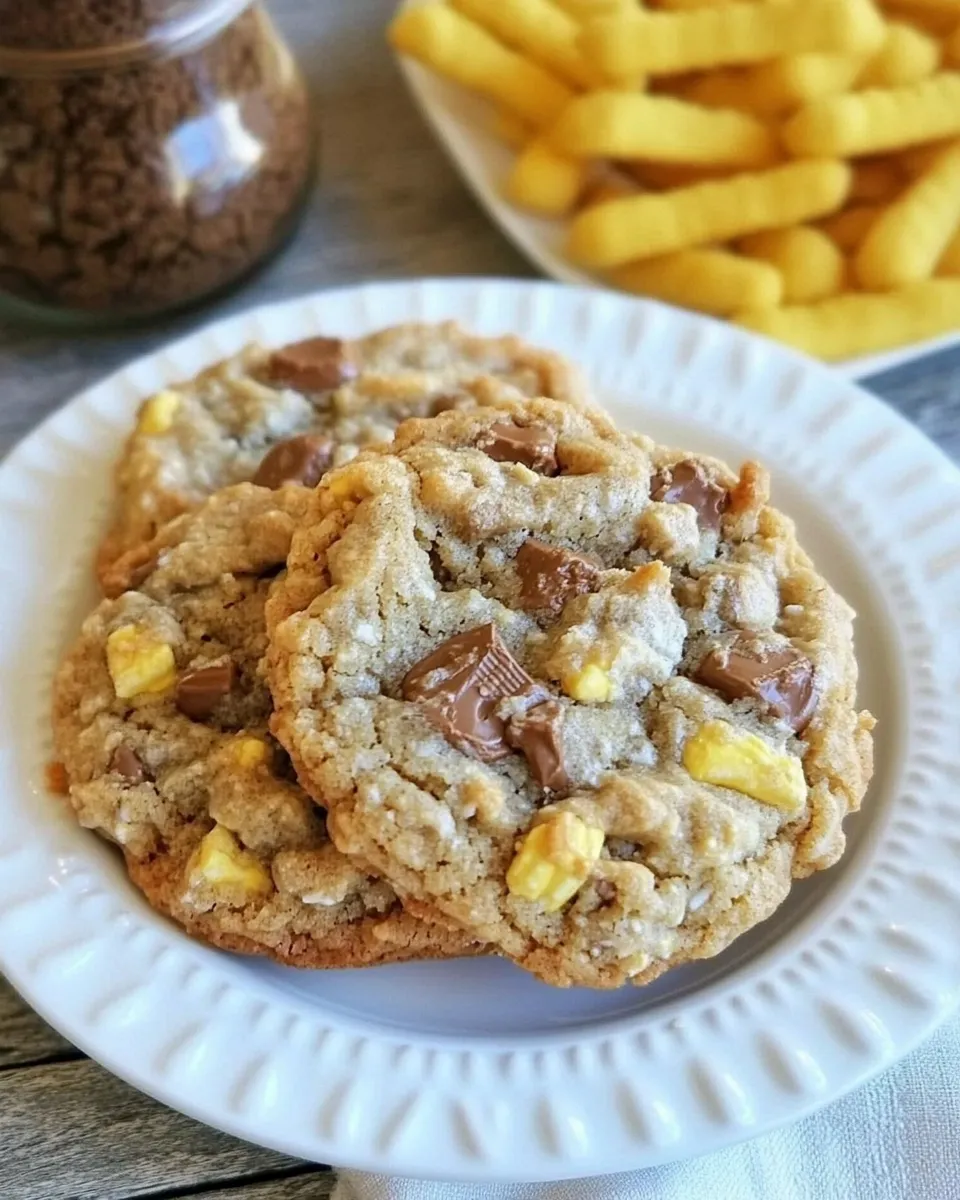
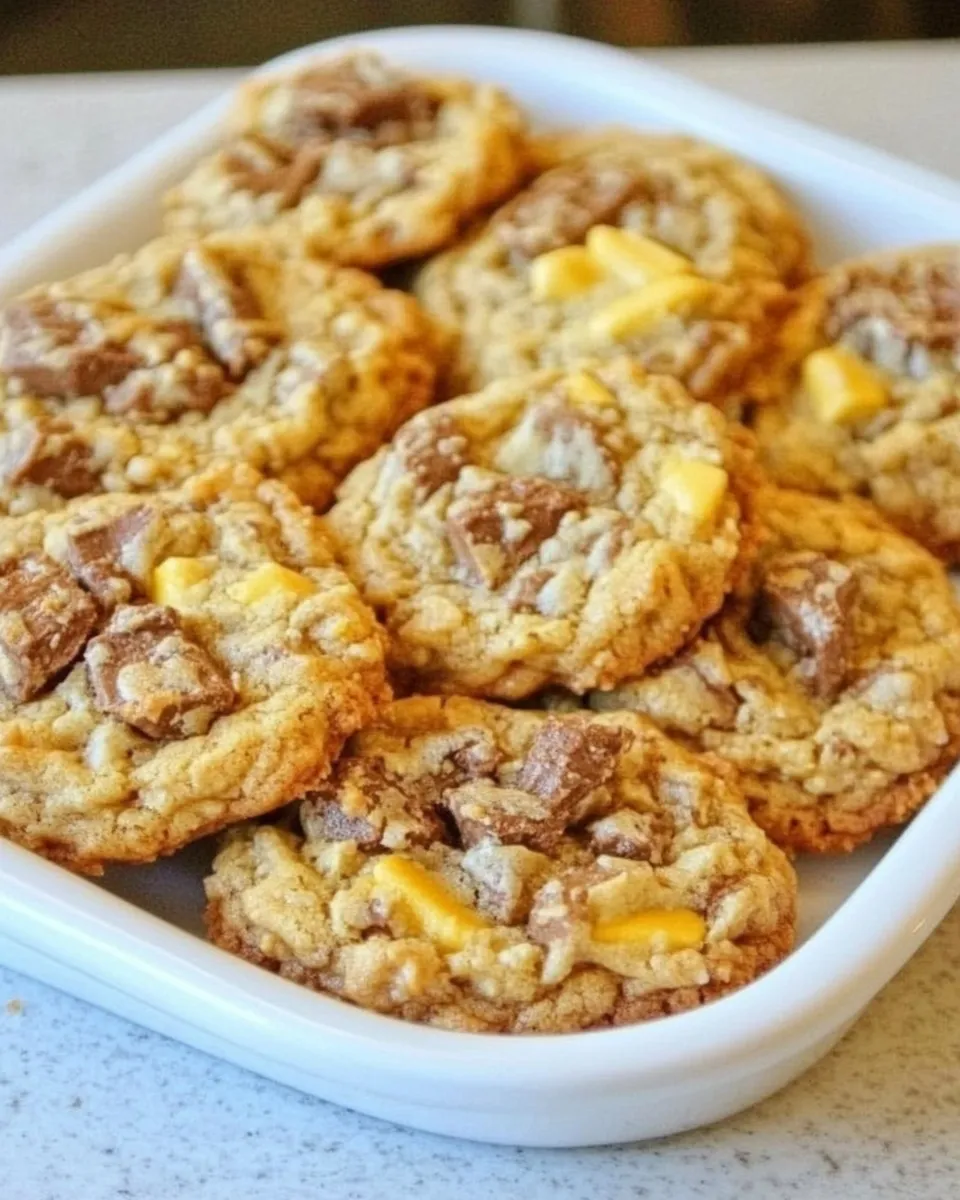
Crispy Butterfinger Cookies
These cookies are exactly what they sound like: crisp edges, a tender center, and a satisfying Butterfinger crunch in every bite. I make them when I want a slightly nostalgic cookie that still feels grown-up — the kind you can hand to friends without apology. They come together quickly and travel well, which is why I reach for this recipe when I need a reliable sweet treat.
The texture comes from a mix of old-fashioned oats for chew and Rice Krispies for snap. Chocolate chips give melty pockets of chocolate while the chopped Butterfinger bars add that peanut-buttery, flaky crunch. The method is straightforward; timing and gentle handling are where the difference shows.
Read through the short ingredient list and the nine simple steps once, then follow the timeline. A little attention — room-temperature butter, gentle folding, and a 2–3 minute rest on the pan — gives you consistent cookies that keep their shape and texture.
What You’ll Need

- 1 cup all-purpose flour — provides structure for the cookie.
- 1/2 teaspoon baking powder — helps a light lift and gentle rise.
- 1/2 teaspoon baking soda — works with the sugar and egg for proper spread.
- 1/4 teaspoon salt — balances sweetness and enhances flavor.
- 1/2 cup unsalted butter (at room temperature) — creamed with sugars for texture and flavor.
- 1/2 cup granulated sugar — adds crispness to the edges.
- 1/2 cup light brown sugar — adds moisture and a toffee-like note.
- 1 large egg — binds the dough and contributes to structure.
- 1 teaspoon vanilla extract — simple flavor lift.
- 1 cup old fashioned oats — chew and body in the cookie.
- 1 1/4 cups Rice Krispies cereal — gives the cookies their signature crisp snap.
- 1 cup chocolate chips — melt into pockets of chocolate throughout.
- 1 cup chopped Butterfinger candy bars — the crunchy, peanut-buttery star of the cookie.
How to Prepare Crispy Butterfinger Cookies
- Preheat the oven to 375°F. Line a baking sheet with parchment paper or a silicone baking mat and set aside.
- In a medium bowl, whisk together 1 cup all-purpose flour, 1/2 teaspoon baking powder, 1/2 teaspoon baking soda, and 1/4 teaspoon salt. Set the dry mixture aside.
- In the bowl of a stand mixer (or a large bowl with a hand mixer), combine 1/2 cup unsalted butter (room temperature), 1/2 cup granulated sugar, and 1/2 cup light brown sugar. Beat on medium speed until smooth and creamy, about 2 minutes.
- Reduce mixer speed to low and add 1 large egg and 1 teaspoon vanilla extract. Beat just until combined, scraping the bowl once if needed.
- With the mixer on low, slowly add the dry flour mixture and mix just until incorporated. Do not overmix.
- Using a spatula, fold in 1 cup old fashioned oats, 1 1/4 cups Rice Krispies cereal, 1 cup chocolate chips, and 1 cup chopped Butterfinger candy bars. Stir gently to combine, taking care not to crush the cereal.
- Scoop the dough into balls about 1 tablespoon each and place them on the prepared baking sheet, leaving about 2 inches between each cookie.
- Bake for 10–12 minutes, or until the cookie edges are slightly brown and the centers are still soft.
- Allow the cookies to cool on the baking sheet for 2–3 minutes, then transfer them to a cooling rack to cool completely.
Why It Works Every Time
The chemistry here is simple and dependable. Creaming the butter with granulated and brown sugar traps air and creates a base that spreads predictably in the oven. The egg and leavening agents (baking powder and soda) balance structure and lift so the cookies have slightly rounded tops but still a thin profile.
Texture comes from combining oats and Rice Krispies. Old fashioned oats hold moisture and give chew, while the Rice Krispies stay fragile and deliver crunch. Folding the cereal in gently keeps those bubbles intact; crush them and you lose the snap.
The 375°F temperature is high enough for quick set and browning at the edges while keeping the centers tender. Watching the cookie edges for slight browning (rather than waiting for the entire cookie to brown) is the easiest way to get the right texture every time.
No-Store Runs Needed
This recipe was designed to be pantry-friendly. Flour, sugar, an egg, butter, vanilla, oats, and cereal are common staples. If you regularly keep basic baking supplies on hand, you already have everything you need to make a batch with no extra stop at the store.
Before you start, check that you have at least 1 cup of Rice Krispies and a cup of chopped Butterfinger bars. If you don’t have Butterfinger bars on hand, consider whether you have another crunchy candy that you enjoy; the recipe will still work, though the final flavor will change. Otherwise, the rest of the pantry items carry you through.
Gear Up: What to Grab
- Stand mixer or a hand mixer — for creaming the butter and sugars.
- Medium mixing bowl — for the dry ingredients.
- Large bowl or mixer bowl — for the wet ingredients and dough.
- Parchment paper or silicone baking mat — for even baking and easy cleanup.
- Baking sheet — choose a rimmed sheet for stability.
- Spatula — for folding in the oats, cereal, chips, and candy.
- Cookie scoop or tablespoon measure — for consistent cookie size.
- Cooling rack — to finish cooling and keep cookies crisp underneath.
What Not to Do
Do not overmix once the flour goes in. Overmixing develops gluten and yields tough cookies. Mix until the dry ingredients are just incorporated.
Do not crush the Rice Krispies when folding them in. The whole point is to preserve their crunch. Use a light hand and a spatula to fold them in alongside the oats and extras.
Do not skip the short cooling time on the baking sheet. The cookies set as they cool; moving them too early can make them fall apart, and moving them too late can over-crisp the bottom.
Spring to Winter: Ideas
Spring: Bake a batch and send a few to friends — these travel well at room temperature and make a cheerful springtime treat. They also pair nicely with a light roast coffee or a cold glass of milk.
Summer: Let the cookies cool completely and sandwich a small scoop of ice cream between two for a nostalgic ice cream cookie. The crunch adds a welcome texture contrast to the creamy filling.
Fall/Winter: Package them in small boxes or jars for gifting. Their crisp edges and Butterfinger crunch feel festive and homemade without a lot of fuss.
Pro Tips & Notes
Measure flour correctly: spoon it into the measuring cup and level it off for the most reliable results. Too much flour makes dry, dense cookies.
Use room-temperature butter for proper creaming. If your butter is cold, cut it into small pieces and let it warm for a bit; if it’s too warm and greasy, it won’t trap air effectively.
When folding in the oats, cereal, chocolate chips, and candy, do it in short, gentle strokes. You want the mix evenly distributed but the Rice Krispies still intact.
Cookie size matters. Use a tablespoon scoop for the texture and bake time given. If you go larger, expect to add a few minutes to the bake and to get a chewier center.
Meal Prep & Storage Notes
Let cookies cool completely before storing. Store them in an airtight container at room temperature for up to 4 days for best texture. To help them stay crisp, place a small piece of parchment between layers.
To freeze: lay the baked cookies in a single layer on a tray, freeze until solid, then transfer to a freezer-safe container or bag. They’ll keep well for up to 2–3 months. Thaw at room temperature for 30–60 minutes when you’re ready to eat.
If you want to freeze dough: scoop dough balls onto a tray, freeze until firm, then store in a sealed bag. Bake from frozen — you may need to add a minute or two to the bake time.
Questions People Ask
Can I use quick oats instead of old fashioned oats? Quick oats work, but they’ll make the texture a bit softer and less chewy. Old fashioned oats hold up better to mixing and baking.
Why are my cookies flat? Check your leavening: baking powder and baking soda both matter here. Also, overly warm butter or overbeating after adding flour can cause excessive spread. Chill the dough briefly if your kitchen is very warm.
Can I make larger cookies? Yes. Increase the scoop size and monitor bake time; larger cookies will need more time and will have chewier centers.
Do I have to chop the Butterfinger bars? Yes — chopping gives you evenly distributed crunchy bits and avoids very large chunks that could make the cookies hard to bite into.
Final Thoughts
Crispy Butterfinger Cookies are an easy way to combine familiar pantry items into something memorable. The technique is forgiving, and the result rewards small attentions: room-temp butter, gentle folding, and the right bake time. Follow the steps as written and you’ll get cookies with crisp edges, tender centers, and that addictive Butterfinger crunch every time.

Crispy Butterfinger Cookies
Ingredients
Ingredients
- 1 cupall-purpose flour
- 1/2 teaspoonbaking powder
- 1/2 teaspoonbaking soda
- 1/4 teaspoonsalt
- 1/2 cupunsalted butterat room temperature
- 1/2 cupgranulated sugar
- 1/2 cuplight brown sugar
- 1 large egg
- 1 teaspoonvanilla extract
- 1 cupold fashioned oats
- 1 1/4 cupsRice Krispies cereal
- 1 cupchocolate chips
- 1 cupchopped Butterfinger candy bars
Instructions
Instructions
- Preheat the oven to 375°F. Line a baking sheet with parchment paper or a silicone baking mat and set aside.
- In a medium bowl, whisk together 1 cup all-purpose flour, 1/2 teaspoon baking powder, 1/2 teaspoon baking soda, and 1/4 teaspoon salt. Set the dry mixture aside.
- In the bowl of a stand mixer (or a large bowl with a hand mixer), combine 1/2 cup unsalted butter (room temperature), 1/2 cup granulated sugar, and 1/2 cup light brown sugar. Beat on medium speed until smooth and creamy, about 2 minutes.
- Reduce mixer speed to low and add 1 large egg and 1 teaspoon vanilla extract. Beat just until combined, scraping the bowl once if needed.
- With the mixer on low, slowly add the dry flour mixture and mix just until incorporated. Do not overmix.
- Using a spatula, fold in 1 cup old fashioned oats, 1 1/4 cups Rice Krispies cereal, 1 cup chocolate chips, and 1 cup chopped Butterfinger candy bars. Stir gently to combine, taking care not to crush the cereal.
- Scoop the dough into balls about 1 tablespoon each and place them on the prepared baking sheet, leaving about 2 inches between each cookie.
- Bake for 10–12 minutes, or until the cookie edges are slightly brown and the centers are still soft.
- Allow the cookies to cool on the baking sheet for 2–3 minutes, then transfer them to a cooling rack to cool completely.
Equipment
- Oven
- Baking Sheet
- Parchment paper or silicone baking mat
- Stand mixer or hand mixer
- Mixing Bowl
- Spatula
- Measuring Cups and Spoons
- Cooling Rack