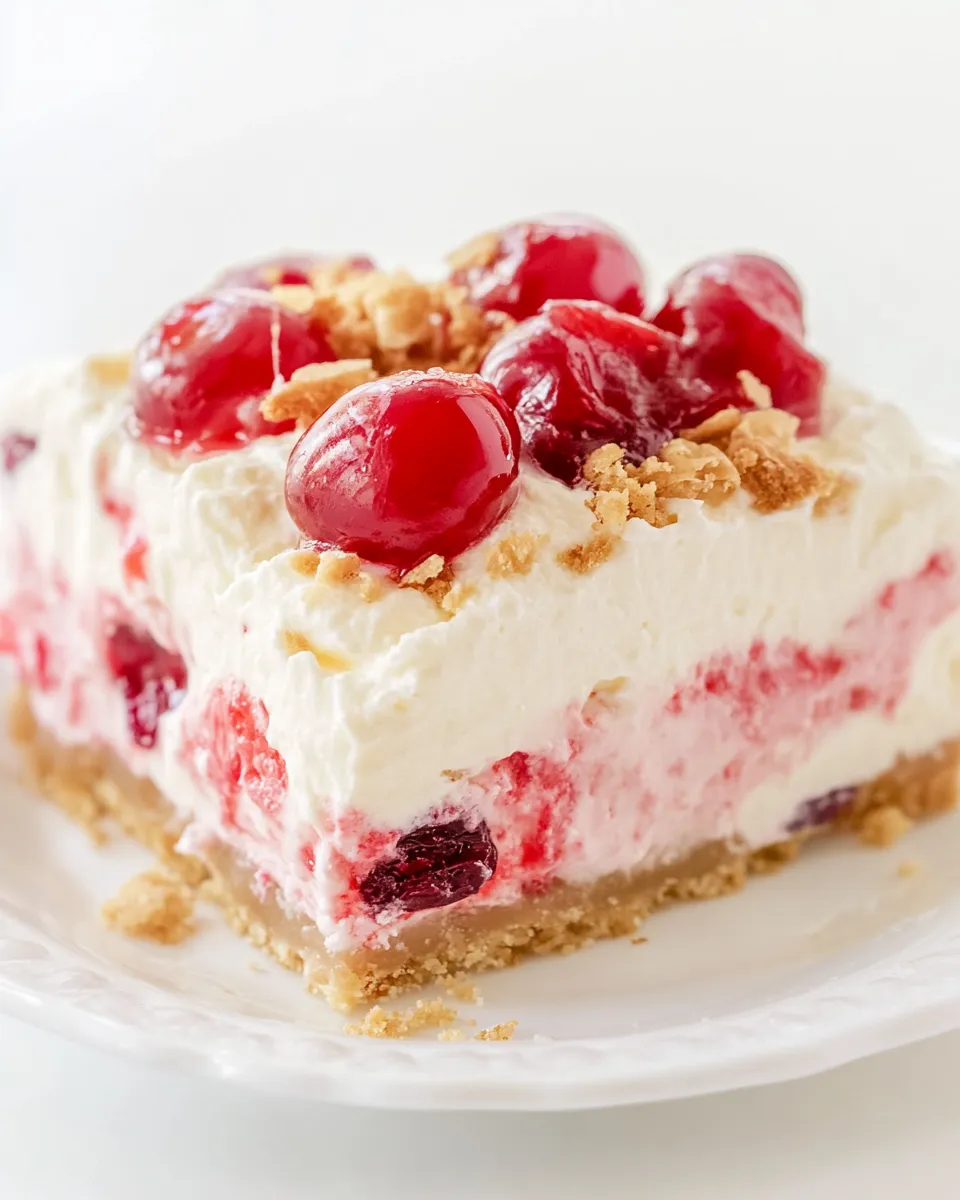
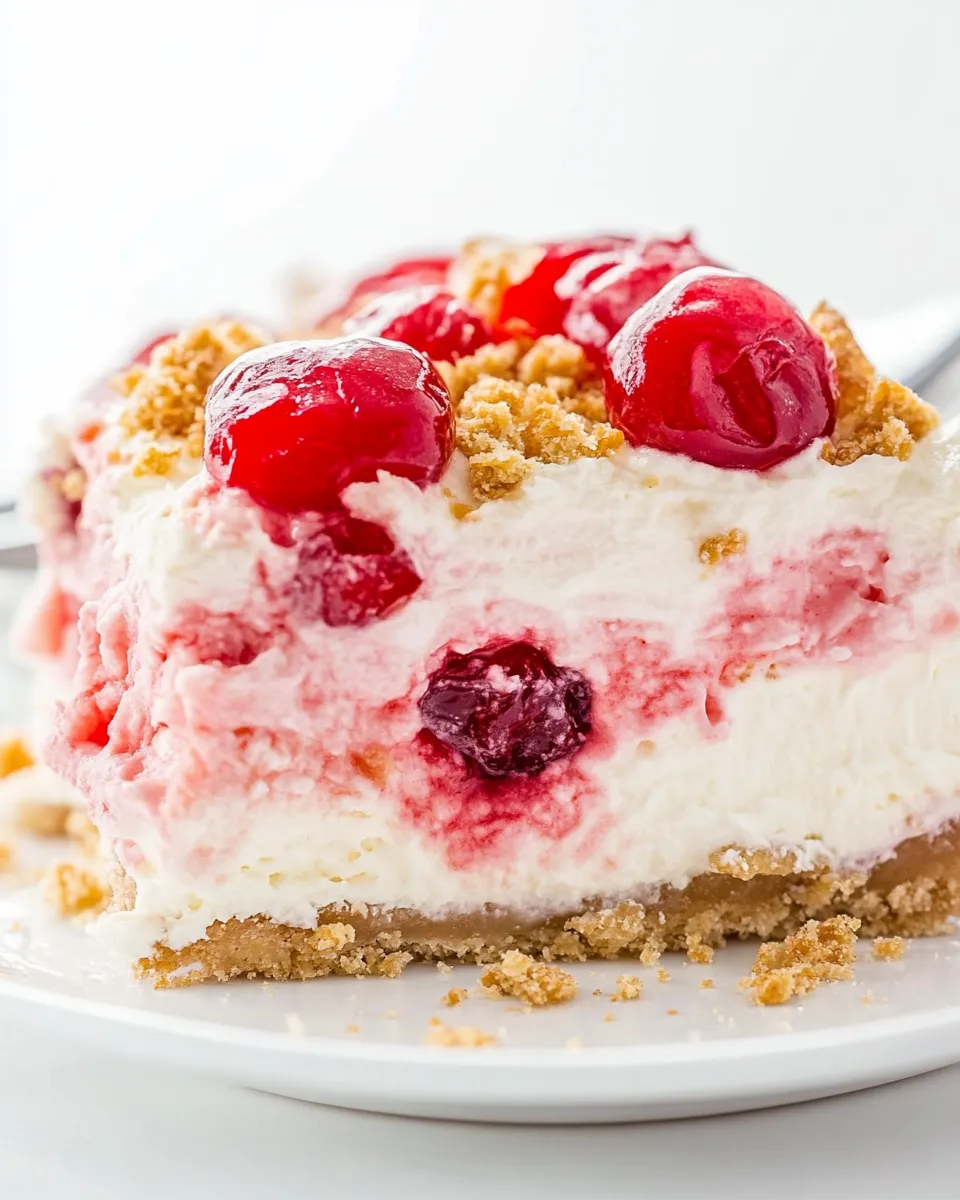
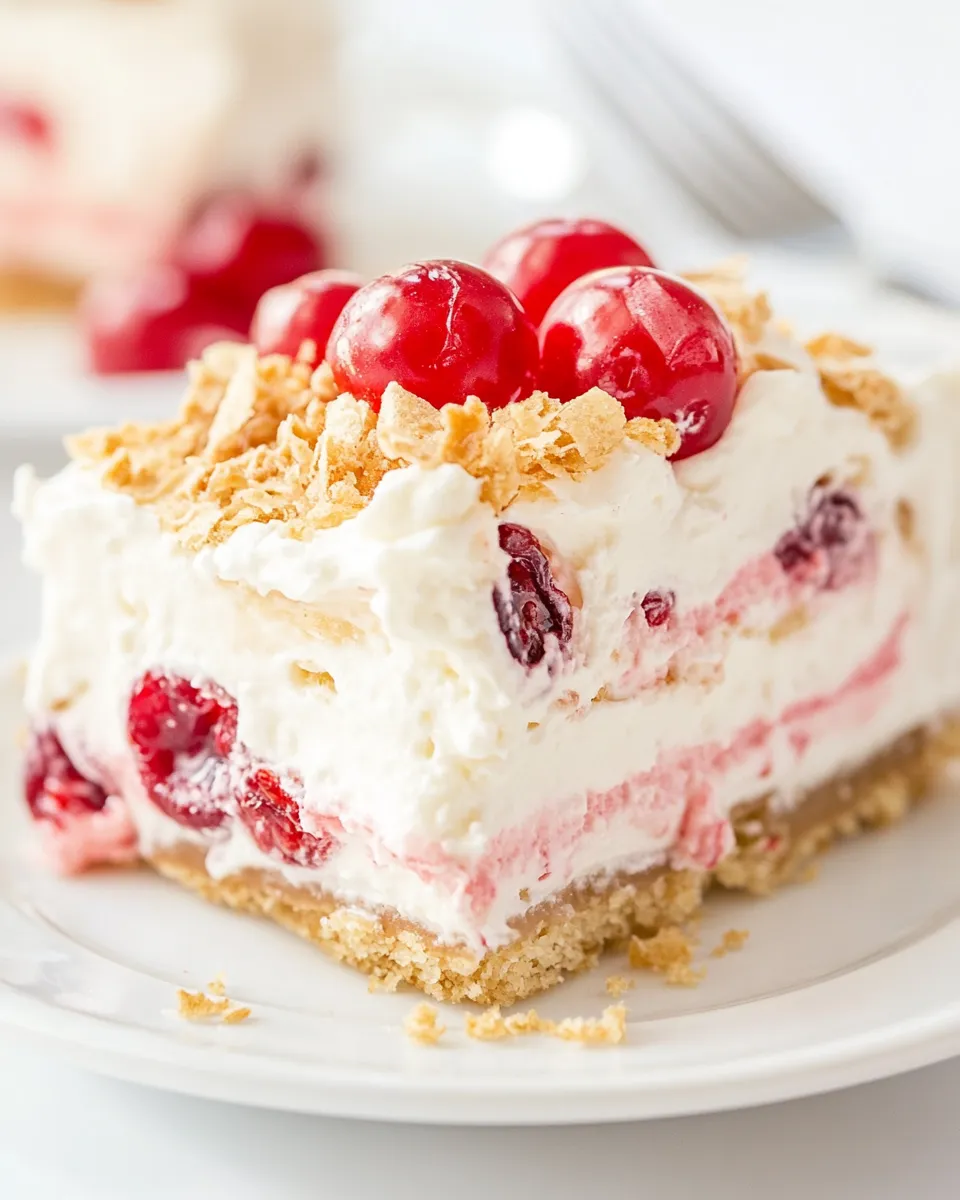
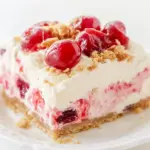
Cherry Cheesecake Lush
This Cherry Cheesecake Lush is one of those reliable desserts that comes together fast and feeds a crowd. It layers a cookie crumb crust, a lightly sweetened cream cheese layer, a cheesecake-flavored pudding middle, bright cherry pie filling, and a cloud of whipped topping finished with pecans. You get texture, creaminess, and a glossy cherry finish — all without baking a cheesecake.
I rely on this recipe when I need a no-fuss dessert for potlucks, weeknight dinner guests, or when I want something I can mostly assemble ahead of time. The steps are straightforward, and the chilling steps are the small bit of patience that pays off in clean slices and distinct layers.
Below you’ll find an ingredient checklist with notes, a strict step-by-step build using the original directions, and practical tips from my own kitchen tests — what to avoid, how to tweak it safely, and the best ways to store leftovers. Read through once, then gather your tools and you’ll be ready to assemble.
Ingredient Checklist

- 14.3 oz package vanilla sandwich cookies (approximately 36 cookies, 2 ½ cups when crushed) — the base of the crust; pulse to fine crumbs for even texture.
- 1/3 cup salted butter (melted and cooled (plus more for greasing dish)) — binds the cookie crumbs and adds flavor; cooled butter prevents sogginess.
- 8 oz cream cheese (softened to room temperature) — gives the creamy, tangy layer; room temperature ensures a lump-free mix.
- 3/4 cup granulated sugar — sweetens the cream cheese layer without overpowering the cheesecake pudding.
- 2 tsp vanilla extract — enhances the cream cheese and cookie flavors.
- 16 oz tub frozen whipped topping (Cool Whip defrosted and divided) — folded into both the cream cheese and pudding layers for lightness; divide as directed.
- 2 3.4 oz packages cheesecake flavored instant pudding mix — creates the quick, no-bake cheesecake-flavored middle layer.
- 3 cup whole milk — hydrates the pudding mixes; whole milk gives the richest texture.
- 2 21 oz can cherry pie filling — the glossy, fruity topping that gives the dessert its name and flavor punch.
- 1 cup pecan (chopped) — adds crunch and contrast; sprinkle on top right before serving.
Build (Cherry Cheesecake Lush) Step by Step
- Lightly butter a 9 x 13-inch glass baking dish; set aside.
- Put the 14.3 oz package vanilla sandwich cookies in a food processor and pulse until they are fine, even crumbs (about 2½ cups). (If you don’t have a food processor, place cookies in a heavy-duty zip-top bag and crush with a rolling pin.)
- Pour the cookie crumbs into a bowl, add the 1/3 cup melted and cooled salted butter, and stir or pulse until the crumbs are evenly moistened.
- Press the cookie-butter mixture firmly and evenly into the bottom of the prepared baking dish. Place the dish in the freezer for 10 minutes.
- In a large bowl, beat the 8 oz softened cream cheese, 3/4 cup granulated sugar, and 2 tsp vanilla extract until smooth and creamy. Add about 1 cup of the defrosted whipped topping and beat until fully combined.
- Spread the cream cheese mixture evenly over the chilled cookie crust. Return the dish to the freezer for 10 minutes.
- In a separate bowl, whisk together both packages of cheesecake instant pudding mix and the 3 cups whole milk until the mixture begins to thicken (about 1–2 minutes). Stir in about 1/2 cup of the defrosted whipped topping until smooth.
- Spread the pudding mixture evenly over the chilled cream cheese layer. Chill in the refrigerator about 30 minutes, or until the pudding layer is set.
- Pour both 21 oz cans of cherry pie filling over the chilled pudding layer and spread gently so the cherries stay on top of the pudding.
- Gently spread the remaining defrosted whipped topping over the cherries. Sprinkle the 1 cup chopped pecans over the top.
- Chill the assembled dessert in the refrigerator 1 to 2 hours before serving (longer chilling will produce firmer slices).
Why This Recipe Works
Everything in this recipe has a clear role. The crushed vanilla sandwich cookies plus butter create a sweet, slightly crunchy crust that mimics a graham-cracker base but with a vanilla lift. Chilling the crust briefly sets the base so the layers above won’t sink in.
The cream cheese layer is lightly sweetened so it complements rather than competes with the cheesecake pudding layer. Folding whipped topping into both the cream cheese and pudding keeps each layer light and creamy — you get a dense, cheesecake-like structure without any baking.
The cheesecake instant pudding provides that unmistakable cheesecake flavor and a stable middle layer that sets up in the fridge. The cherry pie filling on top supplies acidity and shine; it’s the counterpoint that keeps each bite balanced. The chopped pecans finish everything with texture, which matters in a multi-layered dessert.
What to Use Instead
- Omit the pecans — if you need a nut-free dessert, simply leave them off; the dessert will still have plenty of texture from the cookie crust.
- Use all of the whipped topping differently — the recipe calls for dividing the tub; if you prefer a lighter top, use a bit more in the bottom layers and a thinner top layer.
- Adjust the cherry topping amount — if you want fewer cherries on top, use one can of cherry pie filling instead of two; the recipe will still work but with a thinner fruit layer.
- Skip the freezer steps only if necessary — the brief freezes stabilize layers quickly; if you skip them, work carefully and refrigerate longer to set layers.
Before You Start: Equipment
- 9 x 13-inch glass baking dish — recommended for even chilling and clean slicing.
- Food processor or heavy-duty zip-top bag and rolling pin — for crushing the cookies.
- Mixing bowls — at least two: one for the cream cheese layer and one for the pudding.
- Hand mixer or stand mixer — to beat the cream cheese smooth.
- Spatula — for spreading each layer gently and evenly.
- Whisk — for combining the pudding mix and milk quickly.
What Not to Do
- Don’t use cold cream cheese. Cold cream cheese lumps; let it sit to room temperature for a smooth, lump-free layer.
- Don’t skip chilling steps. The short freezes and fridge time help the layers set and keep the cherries on top rather than sinking into the pudding.
- Don’t overwhip the pudding mixture. Whisk until it begins to thicken; overworking can break down the stabilizers and affect texture.
- Don’t press the crust unevenly. An uneven crust will cause uneven slices and instability when serving.
Make It Your Way
If you like more texture, double the pecans or chop them coarsely. If you prefer a lighter dessert, reduce the amount of cookie crust by pressing less thickly into the pan — the dessert will still hold together because of the pudding and whipped topping layers. For a stronger vanilla note, add an extra 1/2 teaspoon of vanilla extract to the cream cheese mixture, keeping in mind that small changes can shift balance quickly.
For cleaner slices, chill the assembled dish on a flat shelf in the refrigerator and use a sharp knife dipped in hot water (wiped dry between cuts) to slice neat squares.
Notes from the Test Kitchen
Tested across several tries, the single most helpful step is the initial 10-minute freezer rest for the crust. It firms up the base so you can spread the cream cheese layer without mixing crumbs into it. The second 10-minute freeze after the cream cheese layer does the same for the next step.
Timing matters less than temperature. If your kitchen is warm, extend the chilling steps slightly. If you find the pudding layer still soft after 30 minutes, give it another 15–30 minutes; the recipe’s structure relies on that pudding set.
When defrosting the whipped topping, place the sealed tub in the refrigerator overnight if possible. If you’re short on time, allow it to sit at room temperature until pliable but not melted; this makes it easier to fold into other layers.
Make-Ahead & Storage
Make-Ahead
This dessert is excellent to assemble a few hours or even a day in advance. After you finish assembling and chill the final 1–2 hours, cover it tightly with plastic wrap. The flavors meld and the layers firm up, making slicing and serving easier the next day.
Storage
Keep leftovers covered in the refrigerator. The texture will soften over time as the cookie crust absorbs moisture, so expect the crust to lose some crunch after a day or two. Use an airtight container or press plastic wrap directly onto the whipped topping to avoid fridge odors transferring.
Reader Questions
- Can I use light milk? Yes, but whole milk gives the creamiest pudding texture. Using lower-fat milk may produce a slightly thinner pudding layer.
- Can I prepare this in a metal pan? A metal pan will work, but I prefer glass for more even chilling and because it’s easier to see layers when serving.
- How long will it hold for a party? Chill until serving time and keep refrigerated between servings. For best texture, serve within a day or two of assembly.
- Can I substitute the cherry pie filling? The recipe uses two 21 oz cans for full coverage. If you want less fruit, use one can and keep the other for another use.
Serve & Enjoy
When it’s time to serve, remove the dish from the fridge and make clean cuts with a warm, dry knife for tidy squares. A small offset spatula helps lift slices onto plates without disturbing the layers. This Cherry Cheesecake Lush is a dependable showstopper — glossy cherries, a stable cheesecake-pudding center, and just enough crunch to keep every bite interesting. Serve chilled, enjoy the contrast of textures, and expect compliments.
Cherry Cheesecake Lush
Ingredients
Ingredients
- 14.3 ozpackage vanilla sandwich cookies approximately 36 cookies, 2 1/2 cups when crushed
- 1/3 cupsalted butter melted and cooled (plus more for greasing dish)
- 8 ozcream cheese softened to room temperature
- 3/4 cupgranulated sugar
- 2 tspvanilla extract
- 16 oztub frozen whipped topping Cool Whip defrosted and divided
- 2 3.4 ozpackages cheesecake flavored instant pudding mix
- 3 cupwhole milk
- 2 21 ozcan cherry pie filling
- 1 cuppecan chopped
Instructions
Instructions
- Lightly butter a 9 x 13-inch glass baking dish; set aside.
- Put the 14.3 oz package vanilla sandwich cookies in a food processor and pulse until they are fine, even crumbs (about 2½ cups). (If you don’t have a food processor, place cookies in a heavy-duty zip-top bag and crush with a rolling pin.)
- Pour the cookie crumbs into a bowl, add the 1/3 cup melted and cooled salted butter, and stir or pulse until the crumbs are evenly moistened.
- Press the cookie-butter mixture firmly and evenly into the bottom of the prepared baking dish. Place the dish in the freezer for 10 minutes.
- In a large bowl, beat the 8 oz softened cream cheese, 3/4 cup granulated sugar, and 2 tsp vanilla extract until smooth and creamy. Add about 1 cup of the defrosted whipped topping and beat until fully combined.
- Spread the cream cheese mixture evenly over the chilled cookie crust. Return the dish to the freezer for 10 minutes.
- In a separate bowl, whisk together both packages of cheesecake instant pudding mix and the 3 cups whole milk until the mixture begins to thicken (about 1–2 minutes). Stir in about 1/2 cup of the defrosted whipped topping until smooth.
- Spread the pudding mixture evenly over the chilled cream cheese layer. Chill in the refrigerator about 30 minutes, or until the pudding layer is set.
- Pour both 21 oz cans of cherry pie filling over the chilled pudding layer and spread gently so the cherries stay on top of the pudding.
- Gently spread the remaining defrosted whipped topping over the cherries. Sprinkle the 1 cup chopped pecans over the top.
- Chill the assembled dessert in the refrigerator 1 to 2 hours before serving (longer chilling will produce firmer slices).
Equipment
- 9 x 13-inch glass baking dish
- food processor (or heavy-duty zip-top bag and rolling pin)
- Mixing Bowls
- Whisk
- Spatula