Black Forest Cheesecake
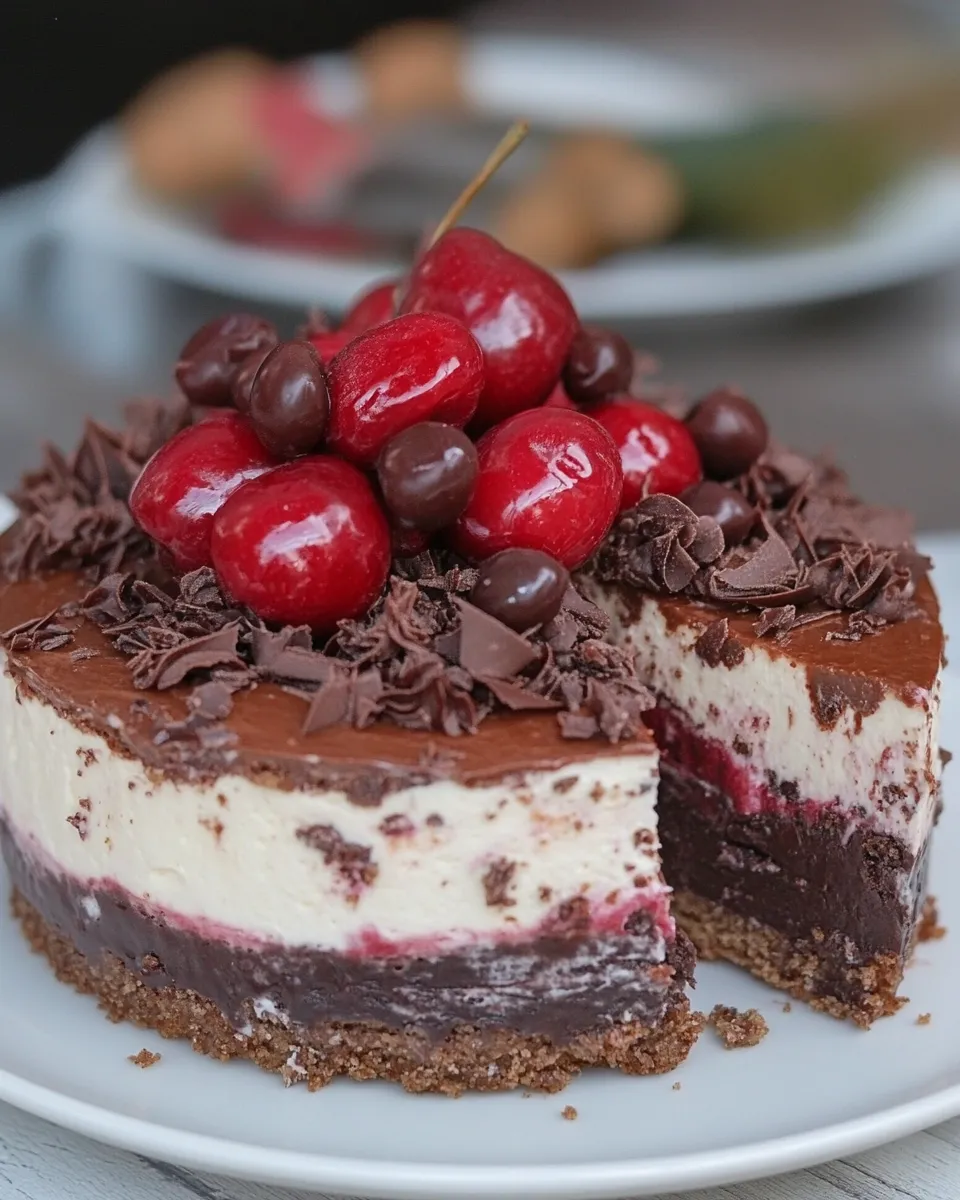
This Black Forest Cheesecake is the kind of dessert I make when I want something impressive but not fiddly. It layers a chocolate biscuit crust, a chocolate-infused cream cheese filling, a bright cherry jelly and a cloud of whipped cream. The assembly looks complicated, but the steps are straightforward and forgiving.
You’ll need a bit of patience for chilling and an eye for timing when making the cherry jelly, but the method follows a clear rhythm: make the crust, blend the filling, bake gently, then top with a glossy cherry layer and whipped cream the next day. The result is a clean, professional-looking cake with a silky interior and a tart-sweet cherry top.
I wrote this recipe to be practical for home bakers: it uses a food processor where helpful, regular baking tools, and ingredients you can find at most supermarkets. I’ll walk you through the ingredients, the exact steps, sensible swaps, and the pitfalls I see beginners make—so your cheesecake comes out smooth, crack-free, and balanced.
Shopping List

- Biscuits or graham crackers — for the crust (look for plain, not spiced).
- Cocoa powder — unsweetened, for depth in the crust.
- Butter — unsalted preferred, for binding and richness.
- Milk — just a small amount used in the crust and to melt chocolate.
- Dark chocolate — choose a good-quality bar for flavor.
- Sour cherries or cherries — you’ll need two measured amounts plus extra for decoration.
- Cream cheese — full-fat gives the best texture.
- Sweet cooking cream and whipping cream — one for the filling, one for topping.
- Eggs — large, for structure.
- Sugar — granulated for the filling and for cooking the cherries.
- Gelatin — powdered, for the cherry jelly.
- Vanilla extract and vanilla sugar — for a subtle aroma in the filling and whipped cream.
- Basic kitchen staples: baking paper, a round 18–20cm pan, and an oven thermometer (optional).
Ingredients
- 250g biscuits (or graham crackers) — forms the chocolatey base; grind finely for an even crust.
- 40g cocoa — adds chocolate flavor and color to the crust.
- 100g butter — melts into the crumbs to bind the crust and add richness.
- 300ml sweet cooking cream — makes the cheesecake filling silky and helps it set smoothly.
- 400g cream cheese — the primary cheesecake body; full-fat gives best texture.
- 4 eggs — give structure and help the filling set cleanly.
- 150g sugar — sweetens the filling; keeps the flavor balanced with the cherries.
- 200g dark chocolate — melted into the filling for a deep chocolate-cheesecake flavor.
- 50ml milk — used to adjust crust moisture and to melt the chocolate.
- 100g sour cherries or cherries — for the layer inside the cheesecake, adding tart contrast.
- 1 teaspoon vanilla extract — rounds the filling with warm aromatics.
- 200g sour cherries or cherries — used to make the cherry jelly topping.
- 100ml water — part of the liquid for the cherry jelly.
- 6g gelatin — sets the cherry jelly so it stays glossy and sliceable.
- 4 tablespoons sugar — for cooking the cherries into a sweet-tart jelly.
- 200ml whipping cream — whipped and used as the final topping.
- 1 teaspoon vanilla sugar — sweetens and flavors the whipped cream.
- cherries or sour cherries — extra for decorating the top when serving.
From Start to Finish: Black Forest Cheesecake
- Put 250g biscuits (or graham crackers) in a food processor and grind to fine crumbs. Transfer to a bowl and stir in 40g cocoa.
- Melt 100g butter over low heat and pour it over the crumb mixture. Mix until the crumbs are sandy and hold together when pressed. If the dough is too dry, add 2–3 tablespoons of the 50ml milk (reserve any unused milk for the chocolate).
- Line an 18–20cm round baking pan with baking paper. Press the crumb mixture evenly and firmly into the bottom of the pan. Refrigerate the crust while you prepare the filling.
- Wash and pit 100g sour cherries (or cherries). Set them aside on a plate for step 6.
- Chop 200g dark chocolate. Place the chocolate in a heatproof bowl with the remaining milk (use whatever milk is left from the 50ml after step 2) and melt together over a double boiler or briefly in the microwave, stirring until smooth. Let the chocolate cool for about 10 minutes.
- Preheat the oven to 160°C (320°F).
- In a blender or food processor, combine 300ml sweet cooking cream, 400g cream cheese, 4 eggs, 150g sugar and 1 teaspoon vanilla extract. Blend until smooth and creamy. Add the cooled melted chocolate and blend until fully incorporated.
- Place the 100g prepared cherries evenly over the chilled crust (you do not need to arrange them precisely). Pour the chocolate-cheesecake filling over the cherries and level the top.
- Bake the cheesecake at 160°C for 1 hour. When baking is complete, turn off the oven and leave the cheesecake inside to cool (this helps reduce surface cracking). After about 2 hours, transfer the cheesecake (still in the pan) to the refrigerator.
- While the cheesecake cools, prepare the cherry jelly: wash and pit 200g sour cherries (or cherries). In a saucepan combine those cherries, 4 tablespoons sugar and 50ml of the 100ml water. Bring to a boil, then simmer 5–10 minutes until the cherries are soft. Turn off the heat.
- Put 6g gelatin into the remaining 50ml cold water and let it bloom for 5 minutes. Pour the bloomed gelatin into the hot cherry mixture and stir until the gelatin is fully dissolved. Let the mixture cool until it thickens slightly but remains pourable.
- After the cheesecake has been in the refrigerator at least 2 hours and the cherry jelly has cooled to a pourable but slightly thick consistency, pour the jelly over the cheesecake while it remains in the pan. Return the cheesecake to the refrigerator and chill overnight to set.
- The next day, whip 200ml whipping cream with 1 teaspoon vanilla sugar until firm.
- Remove the cheesecake from the pan, transfer to a serving plate, spread or pipe the whipped cream on top and decorate with additional cherries or sour cherries as desired. Serve.
Why It Deserves a Spot
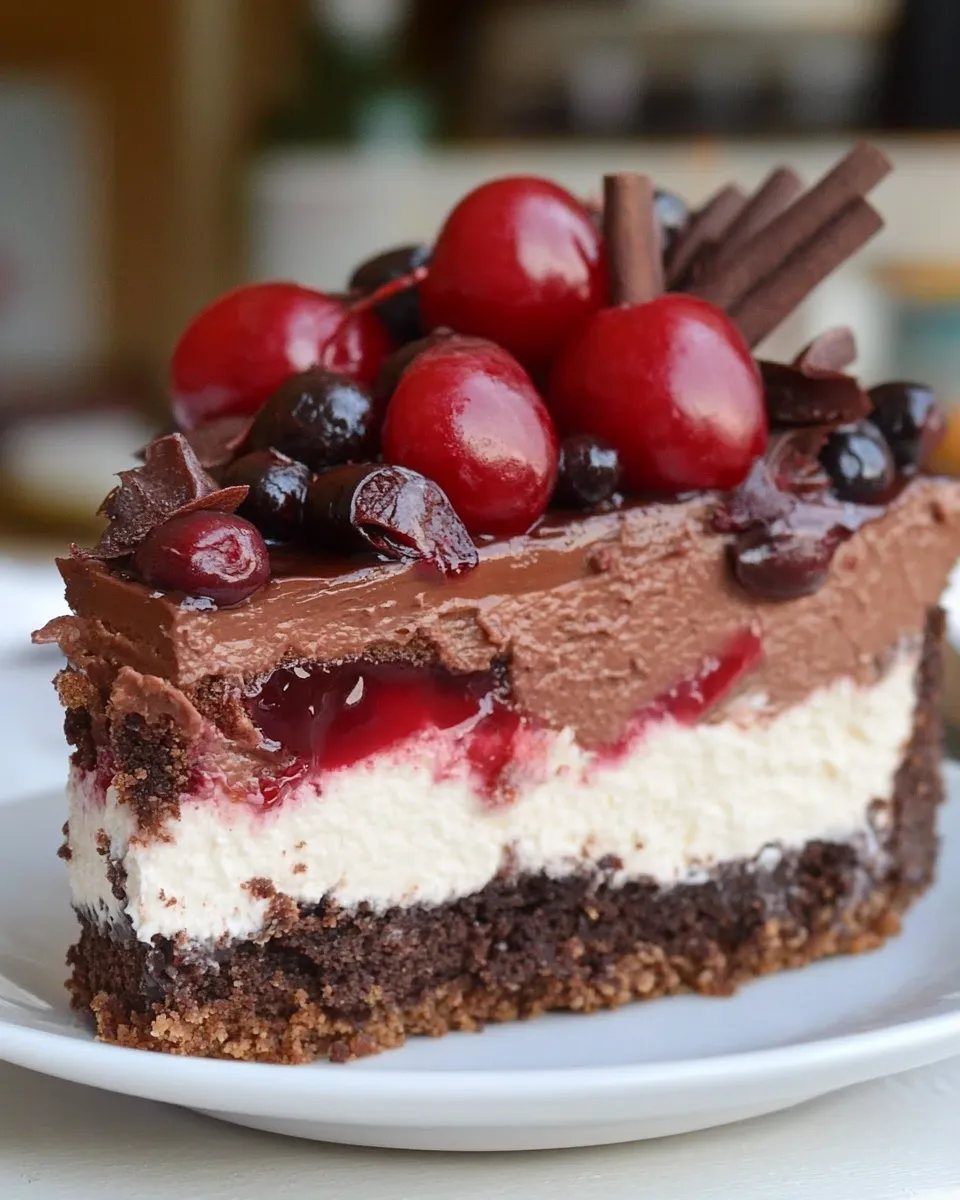
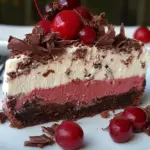
This cake combines two things people love: chocolate and cherries, but it balances them. The crust is crunchy and slightly bitter from cocoa. The filling is dense yet creamy, with chocolate folded through it so the tart cherries can sing rather than be overwhelmed. The cherry jelly adds brightness and a glossy finish that makes slices look clean and professional.
It’s also versatile. Make it for a celebration or a Sunday dinner. It transports well if chilled, slices neatly, and even leftovers (if you have any) taste better after a day as flavors meld. For home bakers wanting a showstopper without advanced pastry skills, this is a reliable option.
Quick Replacement Ideas
- Biscuits — swap graham crackers for plain tea biscuits or digestive biscuits if you prefer a lighter crumb.
- Dark chocolate — use chocolate with slightly less cocoa for a milder flavor; white chocolate will change the dessert entirely, so use cautiously.
- Sour cherries — if unavailable, use frozen cherries (thawed and drained), but reduce added sugar if they’re sweetened.
- Gelatin — agar-agar can replace gelatin, but adjust quantities per the packet instructions and note the texture will be slightly different.
- Sweet cooking cream — heavy cream or a mix of cream and milk can work; avoid very low-fat substitutes which thin the filling.
Gear Up: What to Grab
- 18–20cm round springform or removable-base pan — the recipe assumes this size for baking and presentation.
- Food processor or blender — speeds up crumb grinding and makes the filling ultra-smooth.
- Heatproof bowl for melting chocolate — a stainless-steel or glass bowl over simmering water works well.
- Saucepan for the cherry jelly — medium size to cook down the fruit evenly.
- Spatula, whisk, and an electric mixer or whisk for whipping cream.
- Fine sieve (optional) — for smoothing the cherry jelly if you want a completely seed-free topping.
Avoid These Traps
Underbaking or overbaking the filling are common issues. At 160°C for 1 hour, the center should still have a slight wobble when you gently shake the pan. Overbaked cheesecake becomes dry; underbaked one won’t set. The oven-off cooling step in the instructions helps prevent cracks—don’t skip it.
Don’t pour hot jelly over a cold, freshly baked cheesecake. The recipe calls for chilling the cake first and cooling the jelly until just pourable. Pouring hot liquid can melt the filling or create textural separation.
When melting chocolate, avoid water contact with the chocolate as it can seize. Stir patiently and let the melted chocolate cool before adding it to the cream cheese mix; hot chocolate can curdle or thin the filling.
Seasonal Ingredient Swaps
Summer: Use fresh, ripe cherries if you can find them. They’ll be juicier and more aromatic; reduce the added sugar if the cherries are especially sweet.
Winter: Canned sour cherries or jarred Morello cherries are reliable. Drain them well and adjust sugar because preserved cherries can be sweeter or syrupy.
Autumn: Try a splash of cherry liqueur or kirsch in the filling if you want a boozy accent—add no more than a tablespoon so the filling still sets well.
Cook’s Commentary
I like to press the crust mixture firmly and chill it; a cold, compact base supports the filling and keeps slices tidy. If your crust seems too soft after chilling, press it again before adding cherries and filling.
Blending the filling ingredients in a food processor ensures a lump-free texture. If you don’t have one, use a reliable electric mixer and scrape the bowl often so cream cheese incorporates smoothly. The cooling time for the melted chocolate is essential—add it when warm but not hot, otherwise it can affect the emulsion of the filling.
For a glossy cherry jelly, don’t overcook the fruit. Simmer just until soft so the gelatin can do its job of setting without needing too much extra thickening from reduction, which concentrates sweetness.
Cooling, Storing & Rewarming
Cool the cake gradually: oven off for two hours, then transfer to the refrigerator for at least two more hours before pouring the jelly. After adding the jelly, chill overnight to ensure a firm set.
Store the finished cheesecake in the refrigerator, loosely covered, for up to 3–4 days. If you need to freeze it, skip the whipped cream topping and the jelly. Freeze the unadorned cheesecake tightly wrapped for up to one month. Thaw in the refrigerator overnight before adding the jelly and whipped cream and finishing as instructed.
Rewarming is not necessary; serve chilled. If you prefer a slightly softer mouthfeel, leave slices at room temperature for 10–15 minutes before serving but don’t let them sit much longer or the structure will soften and the jelly may run.
Black Forest Cheesecake FAQs
Can I make this gluten-free?
Yes. Replace the biscuits with a certified gluten-free cookie of similar texture. The rest of the recipe remains the same.
My cheesecake cracked—what went wrong?
Cracks usually mean the top cooled too quickly or the cake was overbaked. Use the oven-off cooling step and avoid opening the oven during the bake. If it still cracks, cover the top with whipped cream and the cherry layer; the decoration hides imperfections nicely.
Can I skip the cherry jelly?
You can, but the jelly provides both flavor and a glossy finish. If you skip it, consider a simple cherry compote spooned on top just before serving.
How do I get neat slices?
Use a sharp knife dipped in hot water and wiped dry between cuts. Chill the cheesecake well before slicing so the layers hold together.
Time to Try It
Gather your ingredients, clear the counter, and set aside 30–45 minutes of hands-on time. The baking and chilling take longer, but most of that is passive. Follow the step-by-step directions, take your time melting the chocolate and cooling the jelly, and you’ll have a cake that looks and tastes like it came from a bakery.
Make it the day before you need it so it firms overnight and slices perfectly. When you serve it, take a moment to admire the glossy cherry top and the neat cream border—then enjoy. I’d love to hear how yours turned out and any small tweaks you made to suit your taste.
Black Forest Cheesecake
Ingredients
Ingredients
- 250 gbiscuits or graham crackers
- 40 gcocoa
- 100 gbutter
- 300 mlsweet cooking cream
- 400 gcream cheese
- 4 eggs
- 150 gsugar
- 200 gdark chocolate
- 50 mlmilk
- 100 gsour cherries or cherries
- 1 teaspoonvanilla extract
- 200 gsour cherries or cherries
- 100 mlwater
- 6 ggelatin
- 4 tablespoonssugar
- 200 mlwhipping cream
- 1 teaspoonvanilla sugar
- cherries or sour cherries
Instructions
Instructions
- Put 250g biscuits (or graham crackers) in a food processor and grind to fine crumbs. Transfer to a bowl and stir in 40g cocoa.
- Melt 100g butter over low heat and pour it over the crumb mixture. Mix until the crumbs are sandy and hold together when pressed. If the dough is too dry, add 2–3 tablespoons of the 50ml milk (reserve any unused milk for the chocolate).
- Line an 18–20cm round baking pan with baking paper. Press the crumb mixture evenly and firmly into the bottom of the pan. Refrigerate the crust while you prepare the filling.
- Wash and pit 100g sour cherries (or cherries). Set them aside on a plate for step 6.
- Chop 200g dark chocolate. Place the chocolate in a heatproof bowl with the remaining milk (use whatever milk is left from the 50ml after step 2) and melt together over a double boiler or briefly in the microwave, stirring until smooth. Let the chocolate cool for about 10 minutes.
- Preheat the oven to 160°C (320°F).
- In a blender or food processor, combine 300ml sweet cooking cream, 400g cream cheese, 4 eggs, 150g sugar and 1 teaspoon vanilla extract. Blend until smooth and creamy. Add the cooled melted chocolate and blend until fully incorporated.
- Place the 100g prepared cherries evenly over the chilled crust (you do not need to arrange them precisely). Pour the chocolate-cheesecake filling over the cherries and level the top.
- Bake the cheesecake at 160°C for 1 hour. When baking is complete, turn off the oven and leave the cheesecake inside to cool (this helps reduce surface cracking). After about 2 hours, transfer the cheesecake (still in the pan) to the refrigerator.
- While the cheesecake cools, prepare the cherry jelly: wash and pit 200g sour cherries (or cherries). In a saucepan combine those cherries, 4 tablespoons sugar and 50ml of the 100ml water. Bring to a boil, then simmer 5–10 minutes until the cherries are soft. Turn off the heat.
- Put 6g gelatin into the remaining 50ml cold water and let it bloom for 5 minutes. Pour the bloomed gelatin into the hot cherry mixture and stir until the gelatin is fully dissolved. Let the mixture cool until it thickens slightly but remains pourable.
- After the cheesecake has been in the refrigerator at least 2 hours and the cherry jelly has cooled to a pourable but slightly thick consistency, pour the jelly over the cheesecake while it remains in the pan. Return the cheesecake to the refrigerator and chill overnight to set.
- The next day, whip 200ml whipping cream with 1 teaspoon vanilla sugar until firm.
- Remove the cheesecake from the pan, transfer to a serving plate, spread or pipe the whipped cream on top and decorate with additional cherries or sour cherries as desired. Serve.
Equipment
- Food Processor
- Mixing Bowl
- Saucepan
- Heatproof Bowl
- Double Boiler or Microwave
- 18–20 cm round baking pan
- baking paper
- Oven
- Refrigerator
- Blender or food processor
- Electric Mixer or Whisk