Baked Chicken Tacos Recipe
These baked chicken tacos are my weekday hero: quick to pull together, forgiving on timing, and reliably crowd-pleasing. They mash up pantry staples with a little stovetop sauté and a short bake so the shells crisp, the filling is saucy but not soggy, and the cheese melts to golden goodness on top. If you want taco night with minimal fuss and maximum flavor, this is it.
I rely on rotisserie chicken and canned pantry items for speed, then finish everything in the oven so assembly is easy and the kitchen stays tidy. The result is portable, flavorful tacos with the texture contrast I want — a crunchy shell, creamy beans, warm seasoned chicken, and a melty cheese crown.
Below you’ll find the exact ingredient list and step-by-step directions I use every time, plus practical swaps, tools, troubleshooting tips, and storage advice from testing. No fussy techniques — just smart, reliable steps that work whether you’re feeding kids, friends, or yourself after a long day.
What Goes In

- 1 tablespoon olive oil — for sautéing the onion and building the base flavor.
- ½ pound shredded cooked chicken — we used Rotisserie chicken; it’s fast and flavorful.
- 1 ounce taco seasoning — seasoning packet or homemade blend; it seasons the filling quickly.
- ½ cup diced onion — softens and sweetens when sautéed, so don’t skip cooking it first.
- 14.5 ounces diced tomatoes, fully drained (1 can) — adds tomato flavor without watering down the filling.
- 4.5 ounces diced green chiles, fully drained (1 can) — mild heat and vegetal brightness; drain to avoid sogginess.
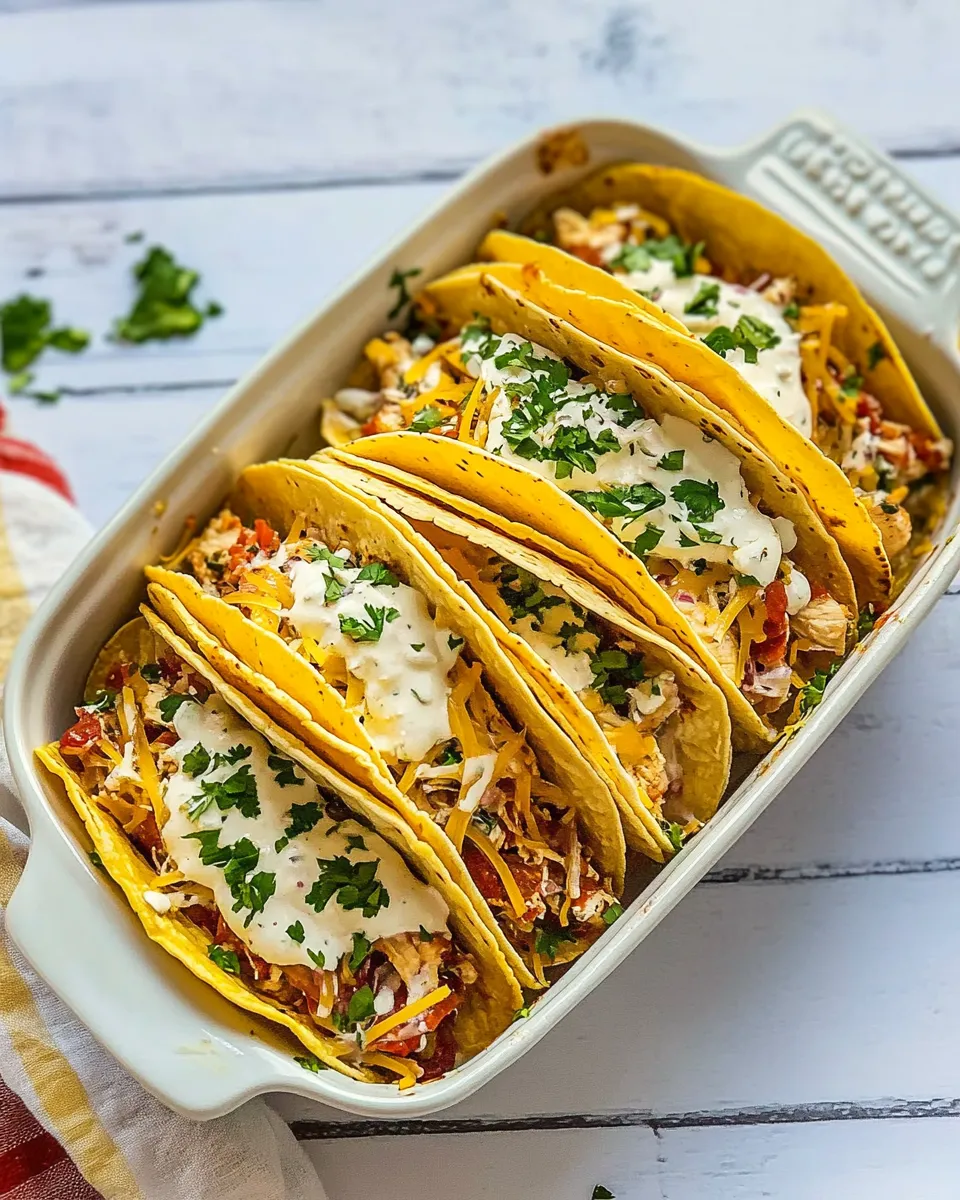
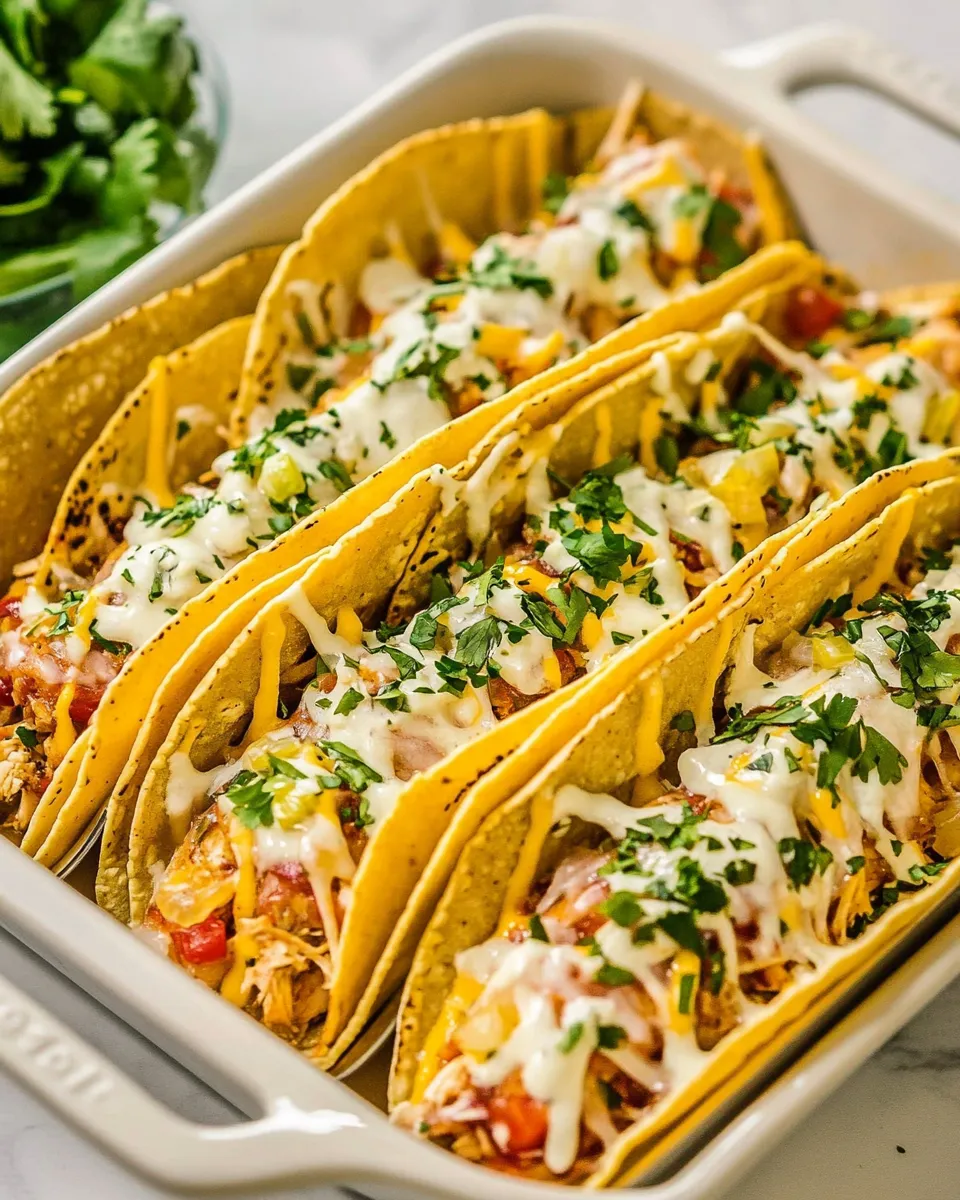
- 10 hard taco shells — we used Old El Paso Stand ‘N Stuff; they stand up in the pan for filling and baking.
- 8 ounces refried beans (½ can) — spread into the shells as a creamy base that buffers the filling.
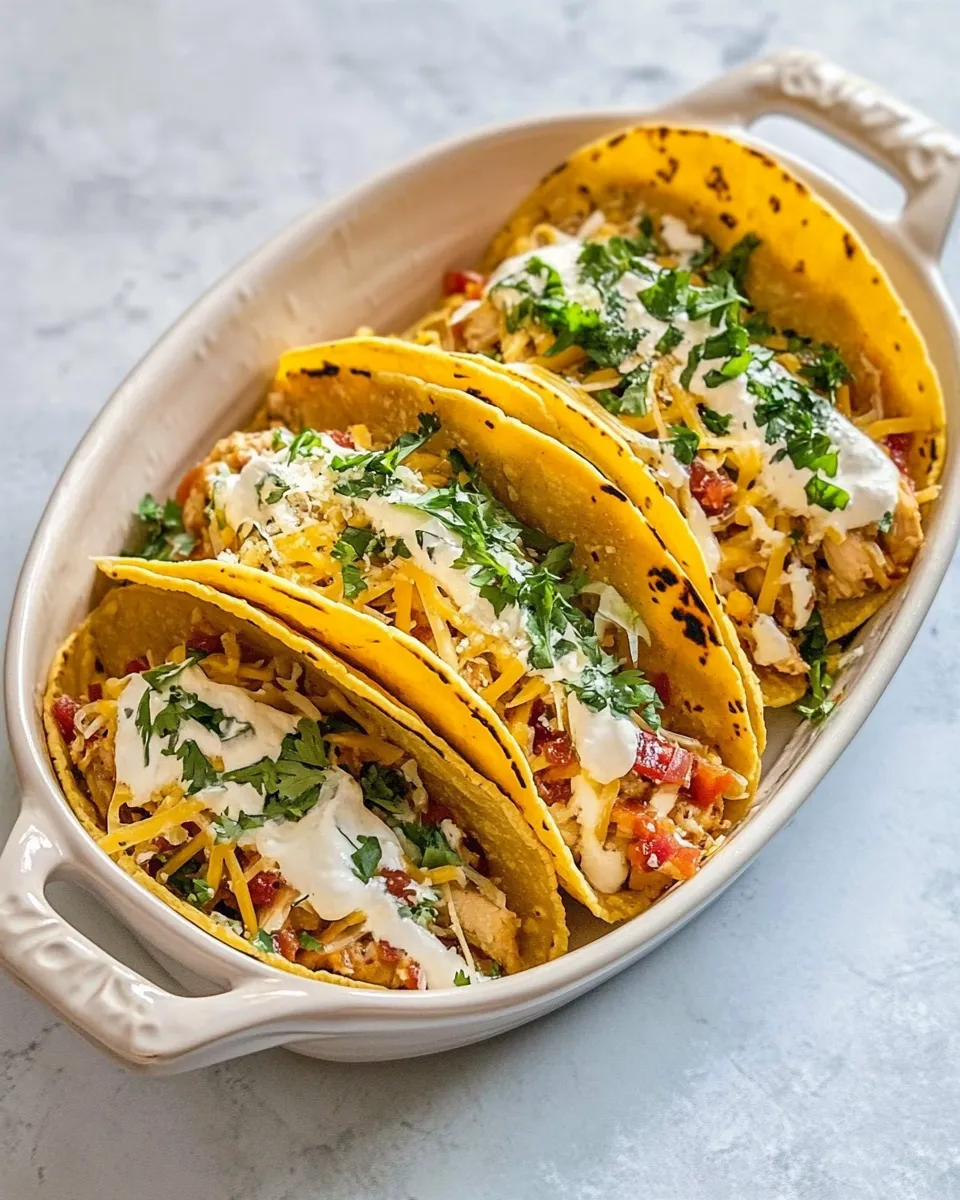
- 2 cups shredded Mexican blend cheese — melts and binds the filling; use a full-fat blend for best melt.
- Sliced jalapeños — for topping; adjust to taste.
- Sour cream — cool, tangy topper that balances heat.
- Salsa — adds brightness and extra seasoning at the table.
- Shredded lettuce — for crunch and a fresh contrast.
- Chopped fresh cilantro — aromatic finish; optional if you’re not a cilantro fan.
How to Prepare Baked Chicken Tacos
- Preheat oven to 400°F. Lightly spray a 9×13-inch baking dish with nonstick spray.
- In a medium skillet, heat 1 tablespoon olive oil over medium heat.
- Add ½ cup diced onion and cook 2–3 minutes, until the onion is translucent and fragrant.
- Add ½ pound shredded cooked chicken, 1 ounce taco seasoning, 14.5 ounces diced tomatoes (fully drained), and 4.5 ounces diced green chiles (fully drained). Stir to combine.
- Reduce heat to medium-low and simmer the chicken mixture 5–8 minutes, until heated through and excess liquid has reduced slightly. Remove from heat.
- Arrange the 10 hard taco shells standing up in the prepared baking dish (you should be able to fit all 10; add 2 on each side if needed).
- Bake the empty taco shells for 5 minutes to crisp. Remove the dish from the oven.
- Spoon about 1 tablespoon refried beans into the bottom of each taco shell (using the 8 ounces refried beans).
- Divide the chicken mixture evenly among the taco shells, filling them almost to the top.
- Sprinkle the 2 cups shredded Mexican blend cheese evenly over the filled shells.
- Bake 7–10 minutes, or until the cheese is fully melted and the edges of the shells are lightly browned.
- Remove from the oven and top with sliced jalapeños, sour cream, salsa, shredded lettuce, and chopped fresh cilantro before serving.
Why It’s My Go-To
Time and texture. Using shredded rotisserie chicken and canned items cuts hands-on time while still delivering real taco flavor. Baking the shells first ensures crunch; a quick melt at the end makes everything cohesive. It’s a technique that maximizes convenience without leaning on fast-food shortcuts.
This recipe scales well and adapts to what you already have. Need to feed a crowd? Double the filling and use two baking dishes. Feeding one or two? The filling stores well (see Keep-It-Fresh Plan) and reheats beautifully for a quick second meal.
Easy Ingredient Swaps
- Chicken — use leftover roasted turkey or chopped rotisserie dark meat if you prefer more fat and flavor.
- Refried beans — canned black beans (drained and slightly mashed) work as an alternative if you want a different texture.
- Taco seasoning — use a teaspoon each of chili powder, cumin, and paprika with a pinch of salt if you don’t have a packet.
- Cheese — Monterey Jack or sharp cheddar can replace Mexican blend; choose what melts best for you.
- Shells — if you prefer soft tacos, warm small flour or corn tortillas and assemble them after baking the filling under the broiler, rather than in shells.
Tools of the Trade
- 9×13-inch baking dish — the recipe is built around this size so shells stand and bake evenly.
- Medium skillet — to sauté the onions and warm the filling so excess liquid reduces.
- Spatula or wooden spoon — for stirring the filling without breaking the chicken apart too much.
- Can opener and colander/strainer — for draining the tomatoes and green chiles well.
- Measuring spoon — to measure the tablespoon of oil and the taco seasoning if you’re using loose spices.
Avoid These Traps
- Skipping the drain — not draining the diced tomatoes or green chiles will make the filling watery and the shells soggy. Drain well.
- Overfilling shells — filling shells to the brim can cause spillover and uneven baking. Fill almost to the top as directed.
- Not crisping the shells first — baking empty shells for 5 minutes prevents limp shells after the filling and cheese are added.
- Using cold shredded chicken — bring the chicken mixture to a simmer so it heats through; cold filling can prevent proper cheese melt and extend bake time.
- Baking too long — watch the cheese; once it’s fully melted and edges are lightly browned, remove immediately to avoid burnt shells.
Substitutions by Diet
- Vegetarian — skip the chicken and use extra refried beans or a high-quality plant-based shredded “chicken” alternative, seasoned the same way. Bake the same way for a meat-free version.
- Gluten-free — use certified gluten-free hard taco shells and verify canned products are labeled gluten-free.
- Dairy-free — omit the cheese and use a dairy-free shred or a sprinkle of nutritional yeast after baking; serve with avocado slices for creaminess.
- Lower-carb / Keto — serve the filling in lettuce cups or low-carb tortillas; omit the refried beans or replace with mashed avocado for a creamy base.
What I Learned Testing
Small steps make a big difference. Draining the canned components and simmering the filling for those 5–8 minutes concentrates the flavors and prevents soggy tacos. Baking the shells briefly before filling is non-negotiable for crispness. Also, using a full-fat shredded cheese gives the best melt; low-fat varieties don’t bind the filling the same way.
I tried stacking shells tightly versus spacing them out — a snug fit in the 9×13 is fine, but don’t cram them so they tip. If you only have a smaller dish, bake in batches or nest two shells on each side as the instructions note. Finally, toppings should be added right before serving: lettuce and cilantro lose their texture if baked.
Keep-It-Fresh Plan
Refrigerate any leftover chicken mixture in an airtight container for up to 3–4 days. Reheat gently in a skillet over medium-low until warmed through, then reassemble in fresh shells and finish under the broiler for a minute to crisp the shells and melt the cheese.
If you want to prep ahead: make the filling and store it, but keep shells, beans, and toppings separate. On the day you serve, crisp the shells and assemble as directed. You can freeze the cooked chicken mixture for up to 2 months; thaw overnight in the fridge and reheat before filling the shells.
Your Top Questions
- Can I use soft tortillas? — Yes. Warm them and assemble after the filling is fully heated; consider finishing under the broiler for 1–2 minutes to meld the cheese to the filling.
- Can I make this spicy? — Add sliced jalapeños as a topping or stir in chopped pickled jalapeños to the filling. Taste as you go to avoid overdoing heat.
- How do I scale this up? — Double the filling and prepare in two 9×13-inch dishes or use a larger oven-safe pan if your shells fit. Keep baking times about the same and watch for cheese melt.
- Will the shells get soggy if I make these ahead? — Yes, if assembled and stored. To avoid this, store filling and shells separately and assemble before serving.
Bring It Home
This baked chicken taco method is a simple blueprint that gives you big flavor with minimal fuss. It’s forgiving, quick to adapt, and perfect for fast weeknight dinners or casual gatherings. Follow the steps above, drain well, crisp the shells first, and don’t skip the final bake — those small details are what turn pantry ingredients into something that tastes like care went into it.
Try it once exactly as written to learn how the components interact, then tweak toppings and swaps to match your family’s tastes. If you make it, leave a note about your favorite topping combo — I love a generous swirl of sour cream, bright salsa, and a scatter of cilantro. Happy taco night.

Baked Chicken Tacos Recipe
Ingredients
Ingredients
- 1 tablespoonolive oil
- 1/2 poundshredded cooked chickenWe used Rotisserie chicken
- 1 ouncetaco seasoning click for recipe!
- 1/2 cupdiced onion
- 14.5 ouncesdiced tomatoesfully drained 1 can
- 4.5 ouncesdiced green chilesfully drained 1 can
- 10 hard taco shellsWe used Old El Paso Stand 'N Stuff
- 8 ouncesrefried beans 1/2 can
- 2 cupsshredded Mexican blend cheese
- Sliced jalapeños
- Sour cream
- Salsa
- Shredded lettuce
- Chopped fresh cilantro
Instructions
Instructions
- Preheat oven to 400°F. Lightly spray a 9×13-inch baking dish with nonstick spray.
- In a medium skillet, heat 1 tablespoon olive oil over medium heat.
- Add ½ cup diced onion and cook 2–3 minutes, until the onion is translucent and fragrant.
- Add ½ pound shredded cooked chicken, 1 ounce taco seasoning, 14.5 ounces diced tomatoes (fully drained), and 4.5 ounces diced green chiles (fully drained). Stir to combine.
- Reduce heat to medium-low and simmer the chicken mixture 5–8 minutes, until heated through and excess liquid has reduced slightly. Remove from heat.
- Arrange the 10 hard taco shells standing up in the prepared baking dish (you should be able to fit all 10; add 2 on each side if needed).
- Bake the empty taco shells for 5 minutes to crisp. Remove the dish from the oven.
- Spoon about 1 tablespoon refried beans into the bottom of each taco shell (using the 8 ounces refried beans).
- Divide the chicken mixture evenly among the taco shells, filling them almost to the top.
- Sprinkle the 2 cups shredded Mexican blend cheese evenly over the filled shells.
- Bake 7–10 minutes, or until the cheese is fully melted and the edges of the shells are lightly browned.
- Remove from the oven and top with sliced jalapeños, sour cream, salsa, shredded lettuce, and chopped fresh cilantro before serving.
Equipment
- Equipment used for Chicken Tacos
Notes
When I want to make them less spicy, I skip the jalapeños on top. The green chiles can be quite mild, but if you or the kids are sensitive to spice, simply skip over them when making the chicken filling.
Nutritional information does not include optional ingredients