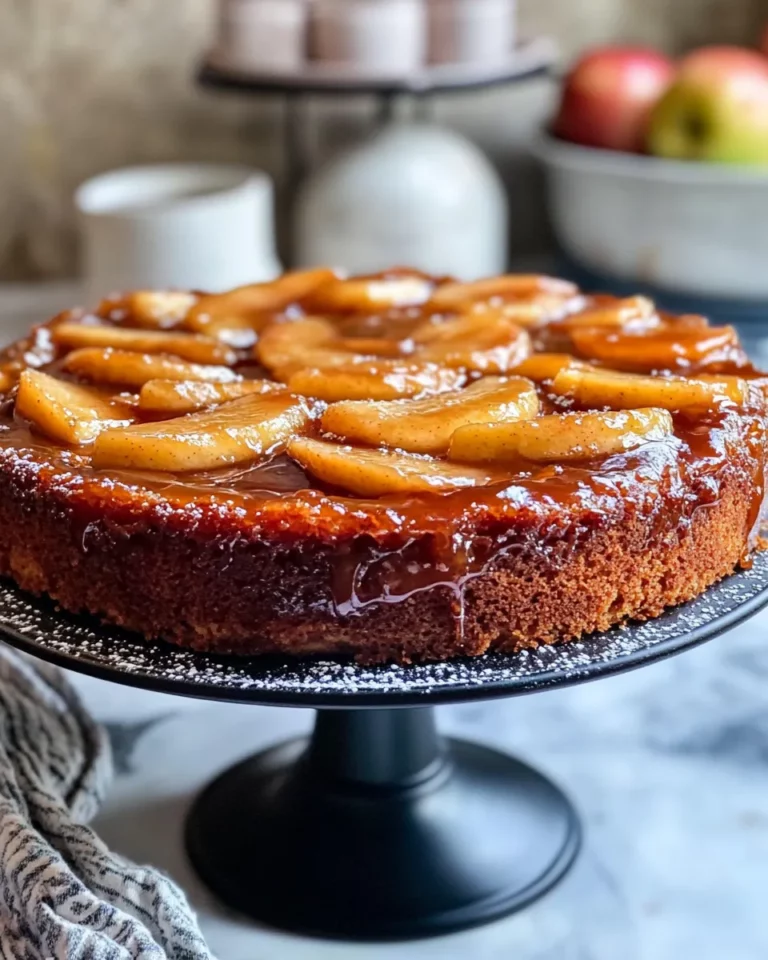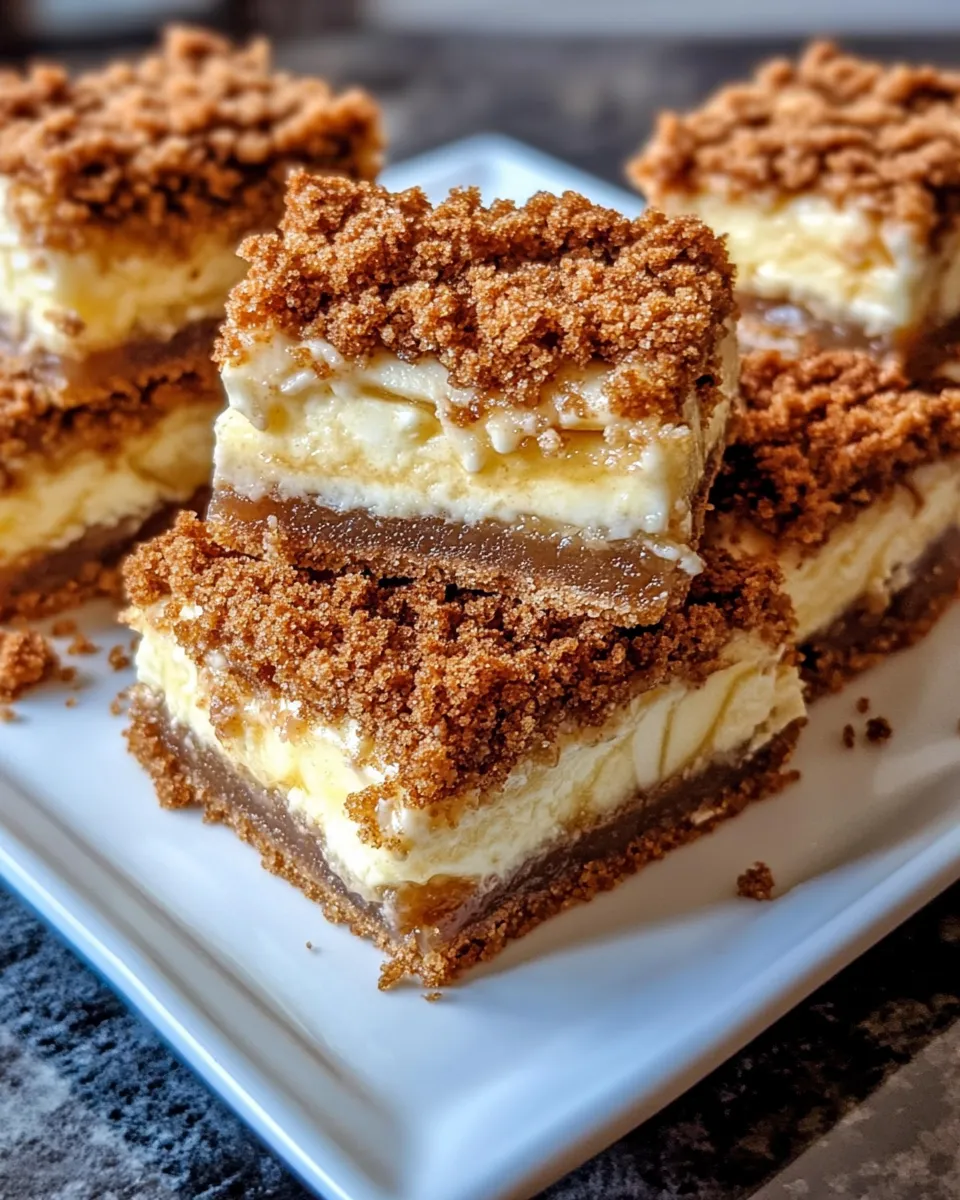
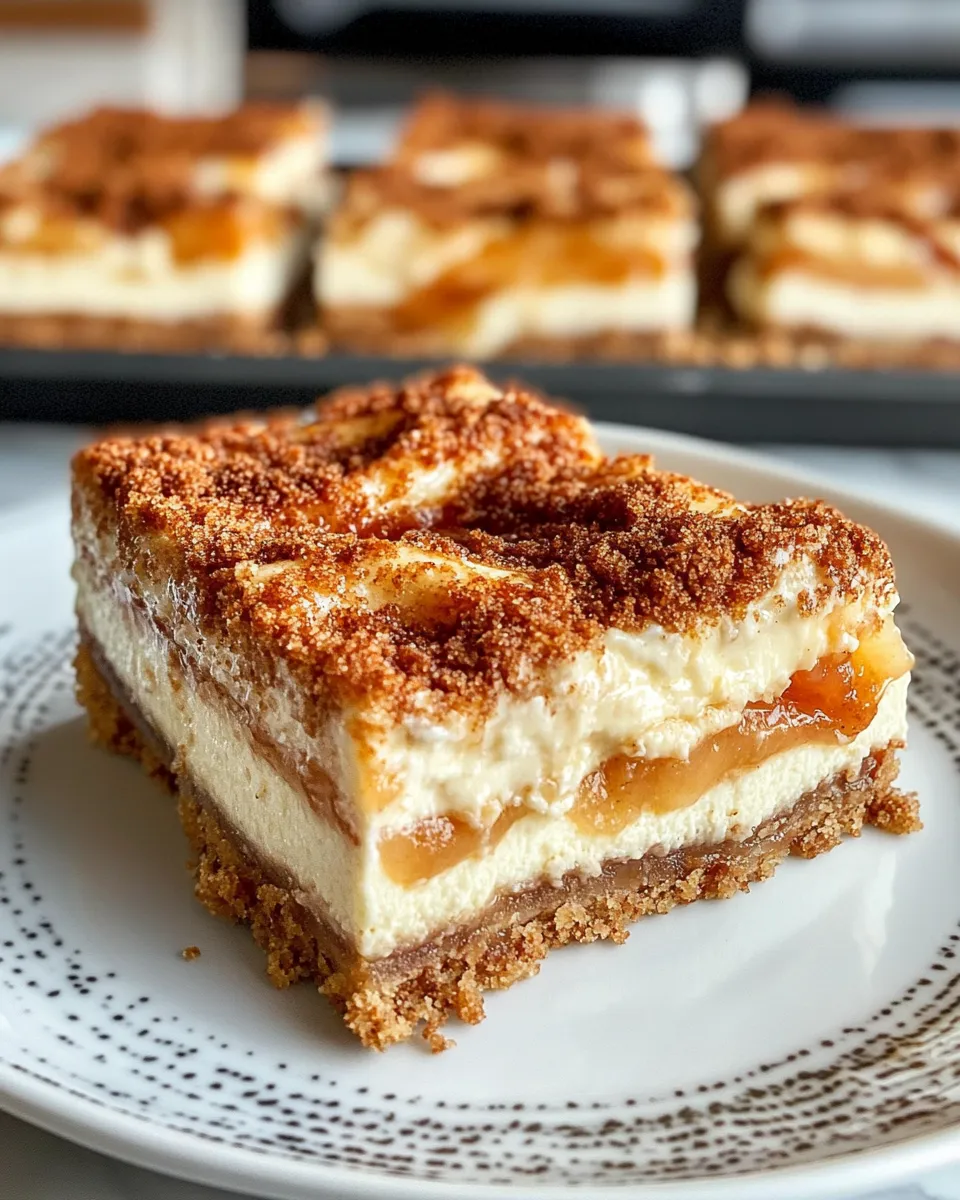
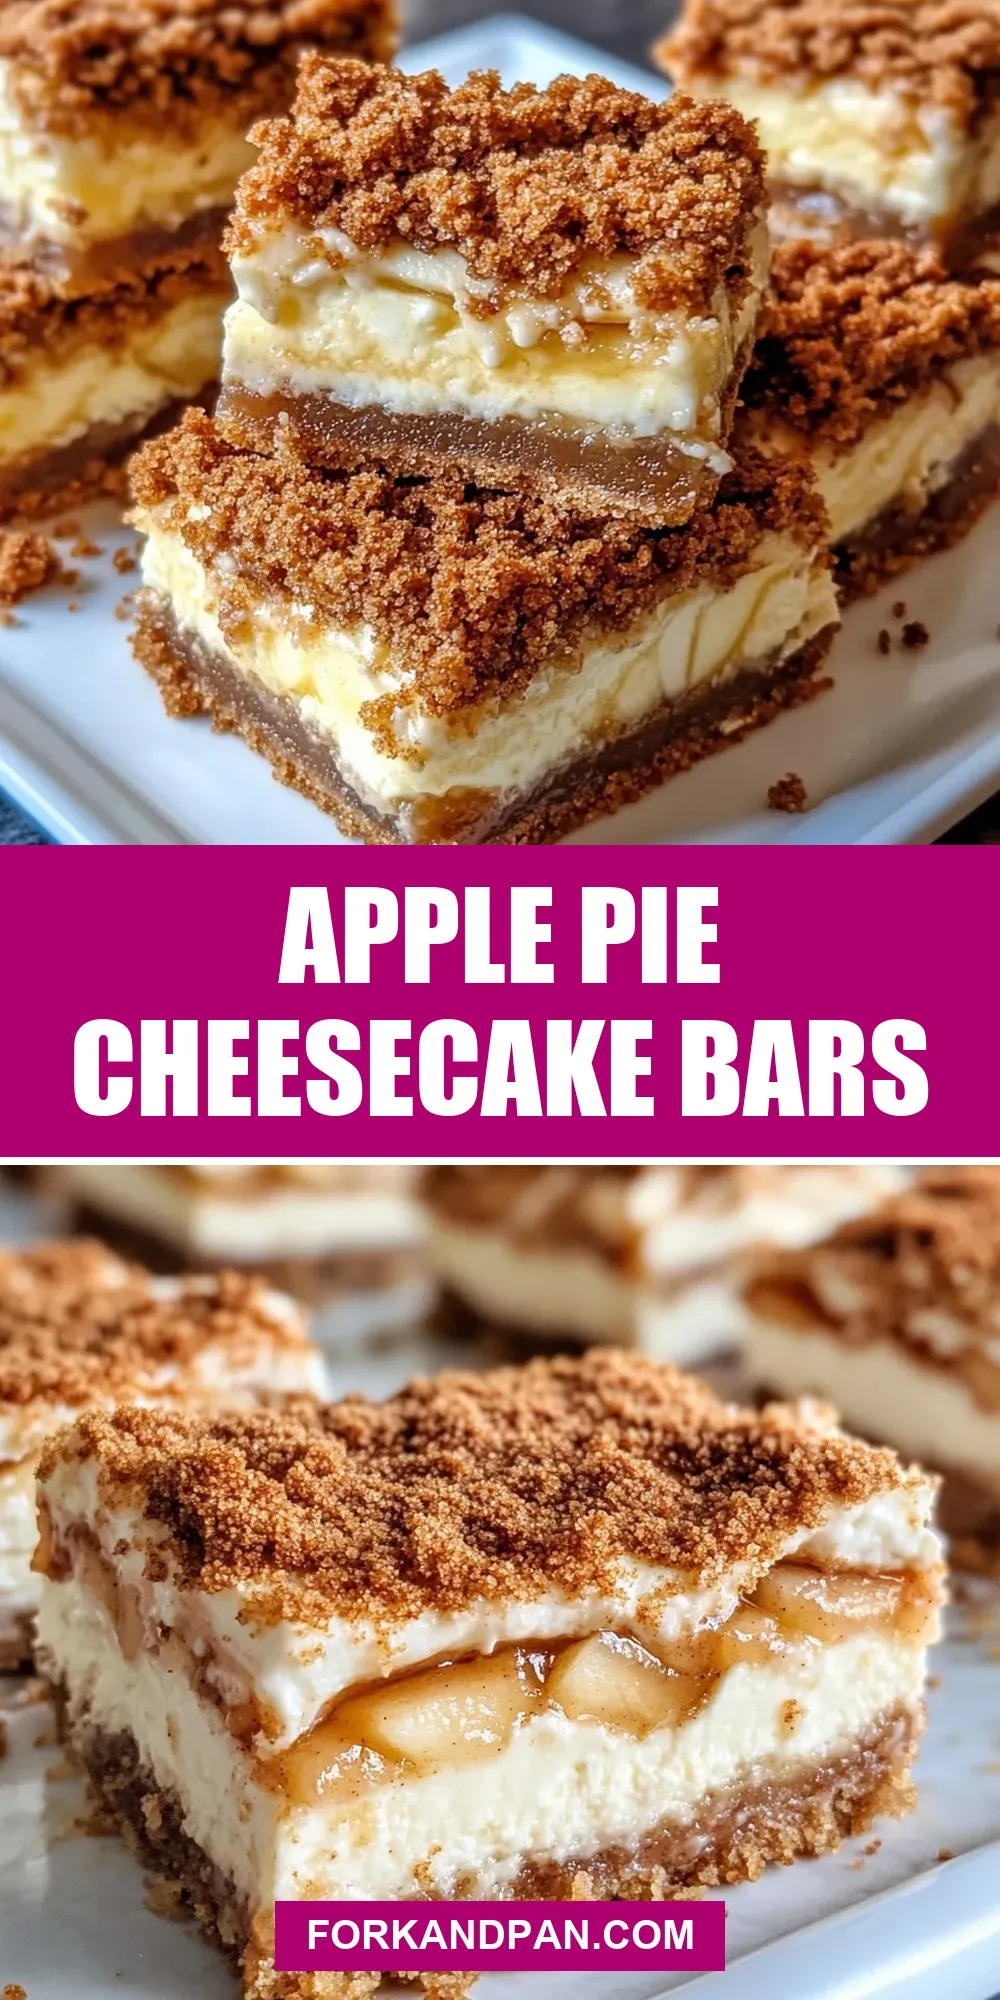
Apple Pie Cheesecake Bars
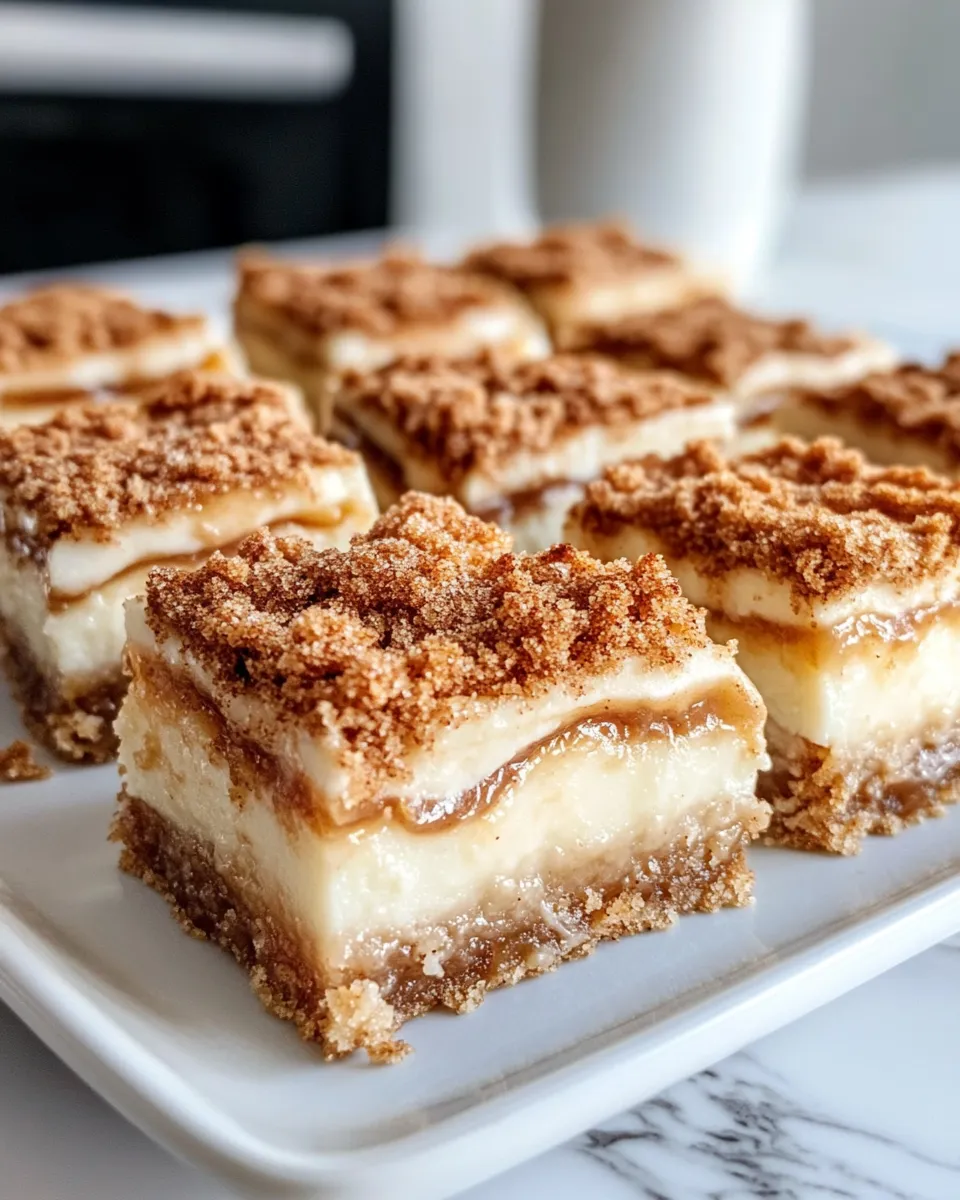
These bars are what happens when two excellent desserts decide to share a slice: a buttery graham crust, a silky cheesecake layer studded with tender, cinnamon-kissed apples, finished with a drizzle of caramel and a flake of sea salt. They’re sturdy enough to pick up at a bake sale and elegant enough to serve after a dinner party. No fancy techniques, just a few clear steps and a rewarding result.
I developed this version because I wanted the clean lines of a cheesecake with the nostalgia of apple pie—no lattice required. The apples stay slightly firm, giving texture against the creamy filling. Chill them right and you’ll get neat squares; skip chilling and you’ll still have a delicious (just messier) dessert.
This post will walk you through the exact recipe, equipment, common mistakes and small fixes that save the day. If you like practical tips and reliably delicious baking, you’re in the right place. Let’s bake.
Ingredients at a Glance

- 6 tablespoons butter (melted) — binds and flavors the graham crust; melt and cool slightly before mixing.
- 2 cups graham cracker crumbs — the base for the crust; press firmly for a compact foundation.
- 3 tablespoons sugar — used in the crust; adds just enough sweetness and helps with browning.
- ½ teaspoon cinnamon (ground) — folded into the crust; gives warm spice notes that echo the filling.
- 16 ounces cream cheese (at room temperature) — the main body of the filling; room temperature prevents lumps.
- 3 large eggs — provide structure and set the cheesecake; add one at a time if using a hand mixer.
- ¼ cup sugar — sweetens the cream cheese base without overpowering the apples.
- ¼ teaspoon salt — balances the richness and pulls flavors forward.
- 2 large apples (peeled, cored and sliced in small pieces) — the fruit element; small pieces distribute evenly through the filling.
- ½ teaspoon cinnamon — tossed with the apples; keeps the apple flavor classic and cozy.
- 3 tablespoons sugar — coats the apples; helps them soften slightly while baking.
- Caramel sauce (I used store bought) — a finishing touch; drizzle before serving for extra sweetness and shine.
- Sea salt — sprinkle lightly over caramel; the contrast makes the flavors pop.
Make Apple Pie Cheesecake Bars: A Simple Method
- Preheat the oven to 350°F. Line a 9×9-inch baking pan with parchment paper; spray the pan first so the parchment sticks. Set the pan aside.
- In a medium bowl, combine 6 tablespoons melted butter, 2 cups graham cracker crumbs, 3 tablespoons sugar, and ½ teaspoon ground cinnamon. Mix until evenly moistened.
- Press the crumb mixture evenly into the bottom of the prepared pan (use the bottom of a glass to get a compact, flat crust). Bake the crust for 10 minutes. Remove from the oven and let cool for 3–5 minutes while you prepare the filling.
- In a medium bowl, peel, core, and cut 2 large apples into small pieces. Add 3 tablespoons sugar and ½ teaspoon cinnamon to the apples and toss to coat. Set aside.
- In the bowl of a stand mixer (or using a hand mixer), add 16 ounces cream cheese (room temperature), ¼ cup sugar, 3 large eggs, and ¼ teaspoon salt. Beat on medium-high for about 5 minutes, or until the mixture is very smooth and free of lumps.
- Gently fold the prepared apple pieces into the smooth cream cheese mixture until evenly distributed.
- Pour the cream cheese–apple filling over the warm crust and level the top with a spatula.
- Bake uncovered at 350°F for about 1 hour, or until the edges are set and the center is mostly set with a slight jiggle (not liquid). If desired, test doneness by gently jiggling the pan—only the very center should have a slight wobble.
- Remove from the oven and let the bars cool completely in the pan at room temperature. For cleaner slices, chill in the refrigerator for at least 1–2 hours after cooling.
- Slice into squares. Drizzle with caramel sauce and sprinkle with sea salt before serving.
Why It’s My Go-To
This recipe is dependable. The components are simple and flexible: a compact graham crust, a creamy filling, and apples that hold up in the bake. I reach for this when I need something that feels special but doesn’t require babysitting. It’s forgiving—if your apples release a little extra moisture, the bake time handles it; if your crust isn’t pressed perfectly, the filling hides minor imperfections.
It also travels well. I’ve taken these to potlucks and family dinners. They stack, slice clean when chilled, and the caramel makes an immediate crowd-pleasing statement. Most importantly, the flavor balance is thoughtful: cinnamon in crust and apples, just enough sugar, and a touch of sea salt to cut through the richness.
If You’re Out Of…
This recipe is built on a few exact components, so I’ll keep this practical: if you’re out of the caramel sauce listed, don’t worry—these bars are still lovely plain or with an extra dusting of the cinnamon already in the recipe. If you don’t have sea salt, skip it; the bars will be sweeter but still delicious. The apples are central to the concept—if you’re missing them, you’ll change the character of the dessert entirely, so consider a different recipe if you don’t have apples on hand.
Tools & Equipment Needed
- 9×9-inch baking pan — for correct depth and baking time.
- Parchment paper and nonstick spray — makes lifting the bars effortless.
- Stand mixer or hand mixer — ensures a smooth, lump-free cream cheese filling.
- Medium bowls — one for crust, one for apples.
- Measuring cups and spoons — accurate sugar and spice measurements matter here.
- Spatula and glass (or other flat-bottomed tool) — for pressing the crust and leveling the filling.
Missteps & Fixes
Crust Too Loose or Falling Apart
Fix: Press the crumbs firmly with the bottom of a glass before baking. If you press lightly, crumbs won’t bind. The melted butter must be fully incorporated; if it separates, stir until evenly moistened.
Filling Has Lumps
Fix: Ensure the cream cheese is at room temperature before you start. Beat long enough—about five minutes as directed—until smooth. If lumps persist, scrape the bowl and continue mixing until they disappear.
Center Not Setting
Fix: The center should have a slight jiggle when done; if it’s soupy, bake another 5–10 minutes and check again. Oven temperatures vary, so use the jiggle test rather than strictly the clock. After baking, cool completely and then chill for the cleanest slices.
Soggy Apples
Fix: Cut the apples into small pieces as directed and toss with the sugar and cinnamon. Small pieces cook and integrate more cleanly into the filling. If your apples are very juicy, pat them lightly with a paper towel before folding into the batter.
Fresh Takes Through the Year
Because the core ingredients are simple, seasonally appropriate tweaks work well. The cinnamon already in the recipe makes these feel autumnal, which is perfect for apple season. In winter, the same bars are cozy and dessert-ready. In spring or summer, serve slightly chilled for a cleaner, lighter bite.
Keep the finishing touches in mind: a drizzle of the listed caramel sauce and a touch of sea salt transform texture and flavor without swapping ingredients. That little contrast elevates the whole bar and is one of my favorite ways to finish them year-round.
Testing Timeline
Plan about 20 minutes active prep and roughly 1 hour baking plus cooling time. Here’s a practical timeline that works in a real kitchen:
- 0–10 minutes: Preheat oven and prepare pan; mix and press crust, then bake crust (10 minutes).
- 10–20 minutes: Prep apples and beat the cream cheese filling while crust rests briefly.
- 20–80 minutes: Assemble and bake (about 60 minutes); times vary by oven—watch for the slight jiggle.
- 80–120 minutes: Cool on the counter until room temperature, then chill 1–2 hours for best slices.
Start the process about two and a half hours before you want to serve if you’ll be chilling. If you’re short on time, you can slice a bit sooner, but expect softer edges.
Make Ahead Like a Pro
These bars are among the easiest to make ahead. Bake and cool completely, then cover and refrigerate for up to 48 hours. Chill before slicing to get tidy squares. If you need to store longer, wrap tightly and freeze individual squares for up to a month; thaw in the refrigerator before serving and add the caramel and sea salt just before presenting.
Questions People Ask
- Can I use a different pan? — A 9×9-inch pan is recommended for the bake time and thickness. A slightly larger pan will produce thinner bars and reduce baking time; a smaller pan will need more time.
- Why are my bars cracking? — Cheesecake-type fillings can crack if overmixed with too much air or cooled too quickly. Beat until smooth but avoid whipping in lots of air. Cool gradually at room temperature before chilling.
- Can I skip the caramel? — Yes. The bars are fully flavored without it; caramel is an extra layer of sweetness and texture.
- How do I get clean slices? — Chill well, wipe your knife between cuts, and press straight down—don’t saw. A hot, clean knife (wiped between slices) also helps.
Serve & Enjoy
Serve these bars chilled or slightly cool, finished with the caramel drizzle and a tiny pinch of sea salt. The contrast between sweet caramel, cinnamoned apples, and the rich cream cheese is what makes this dessert sing. They pair well with coffee or a simple black tea; for a celebration, add a small scoop of vanilla ice cream alongside a warmed square.
Leftovers stay delicious in the fridge for several days. Bring them to room temperature for a few minutes before serving if you prefer softer texture, but I usually keep them chilled until ready to slice. If you try them, tell me what you thought—especially if you make them for a party. I love hearing which tweaks become your go-to.
Apple Pie Cheesecake Bars
Ingredients
Ingredients
- 6 tablespoonsbutter melted
- 2 cupsgraham cracker crumbs
- 3 tablespoonssugar
- 1/2 teaspooncinnamon ground
- 16 ouncescream cheese at room temperature
- 3 largeeggs
- 1/4 cupsugar
- 1/4 teaspoonsalt
- 2 largeapples peeled, cored and sliced in small pieces
- 1/2 teaspooncinnamon
- 3 tablespoonssugar
- caramel sauce I used store bought
- sea salt
Instructions
Instructions
- Preheat the oven to 350°F. Line a 9×9-inch baking pan with parchment paper; spray the pan first so the parchment sticks. Set the pan aside.
- In a medium bowl, combine 6 tablespoons melted butter, 2 cups graham cracker crumbs, 3 tablespoons sugar, and ½ teaspoon ground cinnamon. Mix until evenly moistened.
- Press the crumb mixture evenly into the bottom of the prepared pan (use the bottom of a glass to get a compact, flat crust). Bake the crust for 10 minutes. Remove from the oven and let cool for 3–5 minutes while you prepare the filling.
- In a medium bowl, peel, core, and cut 2 large apples into small pieces. Add 3 tablespoons sugar and ½ teaspoon cinnamon to the apples and toss to coat. Set aside.
- In the bowl of a stand mixer (or using a hand mixer), add 16 ounces cream cheese (room temperature), ¼ cup sugar, 3 large eggs, and ¼ teaspoon salt. Beat on medium-high for about 5 minutes, or until the mixture is very smooth and free of lumps.
- Gently fold the prepared apple pieces into the smooth cream cheese mixture until evenly distributed.
- Pour the cream cheese–apple filling over the warm crust and level the top with a spatula.
- Bake uncovered at 350°F for about 1 hour, or until the edges are set and the center is mostly set with a slight jiggle (not liquid). If desired, test doneness by gently jiggling the pan—only the very center should have a slight wobble.
- Remove from the oven and let the bars cool completely in the pan at room temperature. For cleaner slices, chill in the refrigerator for at least 1–2 hours after cooling.
- Slice into squares. Drizzle with caramel sauce and sprinkle with sea salt before serving.
Equipment
- 9-inch Square Baking Cake Pan
- Parchment Paper
- Glass Mixing Bowl Set (3 piece)
- KitchenAid Artisan 5 Quart Stand Mixer
- Keep Calm And Bake On Spatula
Notes
Cooked cheesecake also freezes really well, just place the bars fully cooled and uncovered on a pan in the freezer and allow to freeze entirely. Remove them and wrap fully in plastic wrap and aluminum foil till ready to eat. This method should ensure the cheesecake bars lasts3 months.