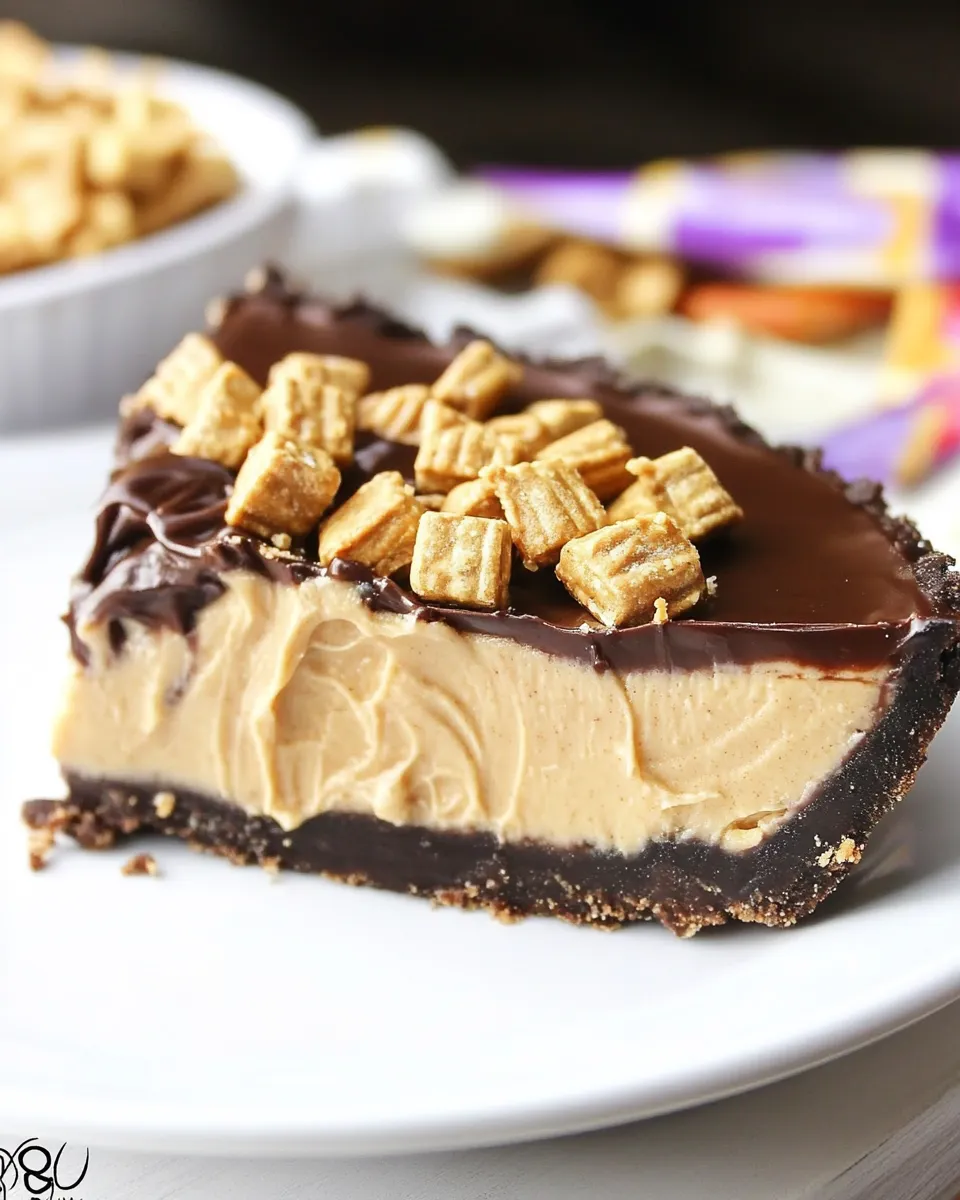
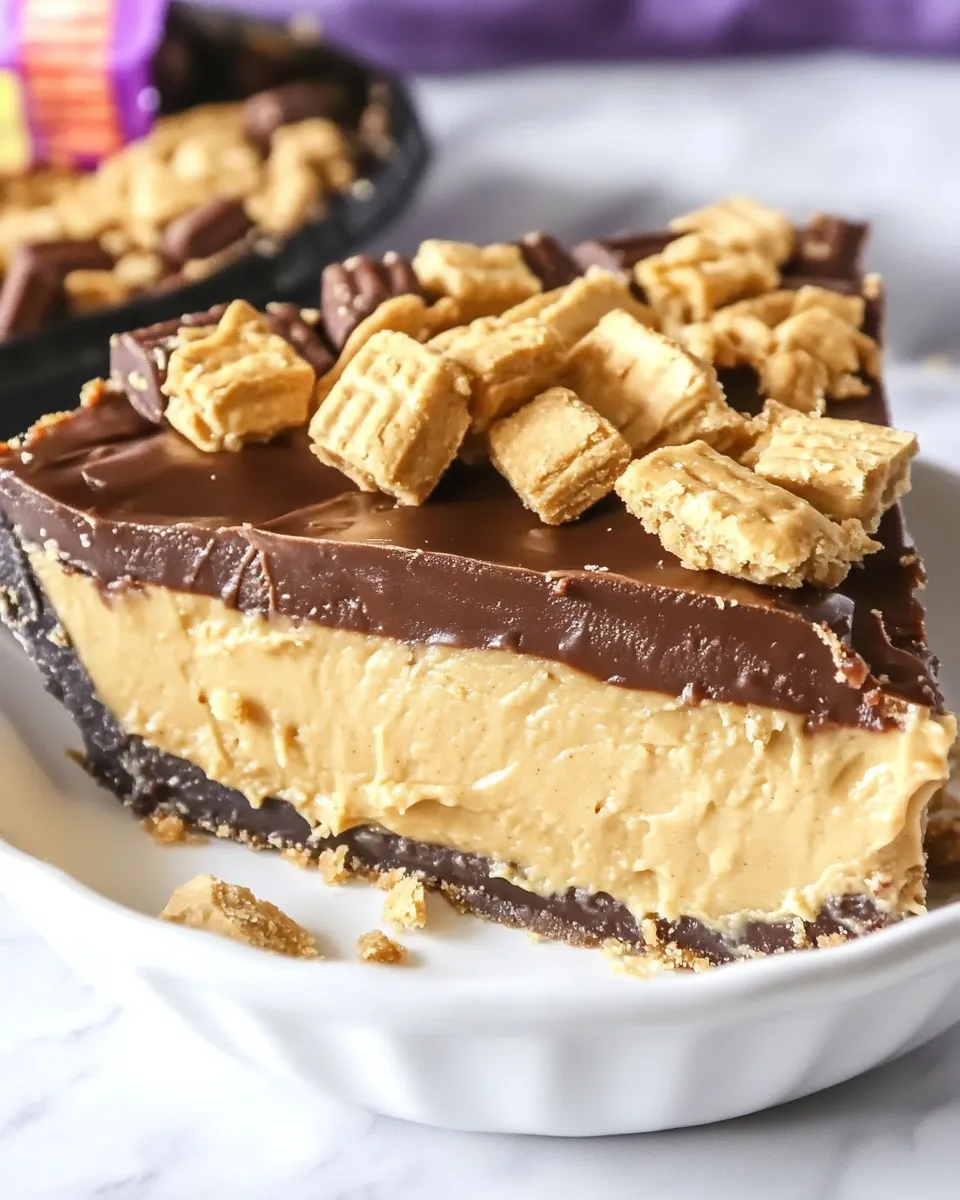
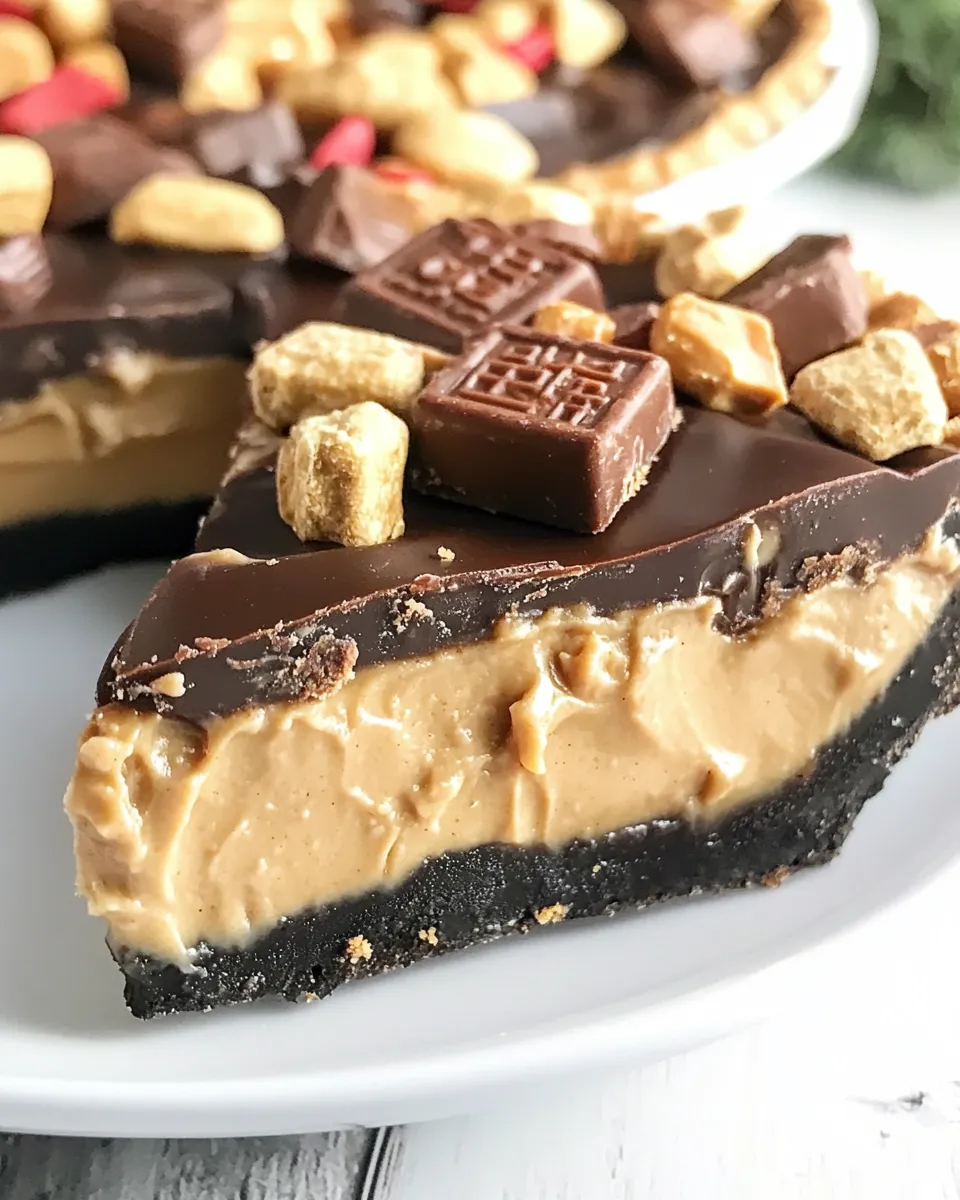
No-Bake Peanut Butter Twix Pie
This pie hits the sweet spot: crunchy shortbread crust, a peanut-buttery cream cheese center, and a glossy chocolate-cool whip layer on top. It’s dessert that looks impressive but requires almost no hands-on heat or fuss. If you want a simple, make-ahead treat that travels well to potlucks or finishes a weeknight dinner with minimal effort, this is it.
I test recipes with busy schedules in mind, so I designed this one to be forgiving. The components come together quickly; refrigeration does the firming. Follow the steps in order and you’ll have neat slices that hold up on a plate and taste like cookie-and-candy perfection.
Ingredients at a Glance

- 2 cups of shortbread cookie crumbs — like Lorna Doone; about 30 cookies; provides the crisp, sweet base that mimics Twix’s cookie layer.
- 6 tablespoons (84 g) butter — melted; binds the crumbs into a pressable crust and adds richness.
- 8 ounces (226 g) cream cheese — room temperature; gives the filling structure and tang.
- 1 cup peanut butter — I use Skippy Naturals, you can also use regular. If using reduced fat, you may need to lower the amount of sugar.
- ½ cup (100 g) granulated sugar — balances the savory peanut butter and stabilizes the filling.
- 1 teaspoon vanilla extract — rounds flavor and lifts the sweetness.
- 2 ounces (57 g) semi-sweet chocolate — melted and mixed with Cool Whip for the topping; gives the chocolate layer without tempering.
- 1 ½ containers (12 ounces) Cool Whip — fat-free, regular, or sugar-free; split between the filling and the chocolate topping for lightness and stability.
No-Bake Peanut Butter Twix Pie Cooking Guide
- In a medium bowl, stir 2 cups shortbread cookie crumbs and 6 tablespoons (84 g) melted butter with a fork until the crumbs are evenly moistened. Press the mixture firmly and evenly into the bottom and up the sides of a 9″ pie plate to form a crust. Chill in the refrigerator until the crust is firm (about 15 minutes) or until ready to fill.
- In a mixing bowl, beat 8 ounces (226 g) cream cheese at room temperature with a hand mixer until smooth.
- Add 1 cup peanut butter, 1/2 cup (100 g) granulated sugar, and 1 teaspoon vanilla extract to the cream cheese. Beat until the mixture is smooth and combined.
- Fold 1 container (8 ounces) Cool Whip gently into the peanut butter mixture until mostly combined; stir carefully—a few small lumps are fine. Spread the filling evenly into the chilled crust.
- Place 2 ounces (57 g) semi-sweet chocolate in a microwave-safe bowl. Microwave in 30-second increments, stirring between each, until the chocolate is melted and smooth (about 1 minute total). Do not overheat.
- Stir the melted chocolate into the remaining Cool Whip (the remaining 1/2 container, 4 ounces, about 1/2 cup) until evenly combined. Spread this chocolate mixture evenly over the peanut butter filling.
- Chill the pie in the refrigerator at least 4 hours or overnight until firm. Slice to serve. Optionally garnish individual slices with additional Cool Whip.
Why This Recipe Is Reliable
This pie is reliable because it uses stable, no-bake building blocks: a pressed cookie crust, a cream cheese–peanut butter base, and a stabilized whipped topping. Each layer has a clear role—structure, flavor, and finish—so small timing or stirring differences rarely ruin the outcome. The cream cheese gives the filling body and prevents it from becoming runny, while the Cool Whip lightens texture and helps the pie set in the fridge.
There’s also minimal margin for error with temperatures: keep the cream cheese at room temperature so it beats smoothly, and melt the chocolate gently. Because the chocolate is mixed into Cool Whip rather than poured over the whole pie, you avoid shiny but fragile ganache that can crack or weep. Refrigeration does the rest of the work, so once assembled you can trust the oven—or lack of one—to take a back seat.
Texture-Safe Substitutions
- Shortbread crumbs — swap for graham cracker crumbs if needed; they’ll be slightly less buttery but still press into a firm crust.
- Butter — can substitute with coconut oil in a 1:1 ratio for a mild coconut note; crust will firm well when chilled.
- Cream cheese — reduced-fat cream cheese will work but may be softer; chill the filling longer before slicing.
- Peanut butter — natural or regular both work; if using natural (oil-separated), stir well first so you keep ratios consistent.
- Cool Whip — if you prefer fresh whipped cream, fold stabilized whipped cream (with a bit of instant pudding or gelatin) in place of Cool Whip to keep the texture similar.
- Semi-sweet chocolate — you can use milk chocolate for a sweeter top or dark chocolate for more contrast; adjust to taste.
Equipment Breakdown
Keep the gear minimal. You need a 9″ pie plate, a medium bowl for the crust, a mixing bowl for the filling, a hand mixer, and a microwave-safe bowl for melting chocolate. A fork or pastry tamper helps press the crust evenly. If you own a springform or tart pan you can use it for cleaner edges, but a regular pie plate is perfectly fine.
Optional but helpful: a rubber spatula for folding the Cool Whip, an offset spatula to smooth layers, and a chilled countertop or baking sheet to rest the pie on while it’s chilling (especially useful if you plan to move it).
Troubles You Can Avoid
- Soggy crust — press the crumbs firmly and chill the crust before adding filling; this seals it and prevents moisture migration.
- Lumpy filling — beat the cream cheese until completely smooth before adding peanut butter and sugar. Room-temperature cream cheese blends easily.
- Separation in chocolate — melt chocolate slowly in short increments and stir between bursts; stirring the chocolate into Cool Whip at room temperature avoids firm, cracked layers.
- Slices that fall apart — chill at least 4 hours. Overnight is better. Use a sharp knife warmed briefly under hot water, wiped dry between cuts, for neat slices.
Spring–Summer–Fall–Winter Ideas
Spring: Add a handful of chopped toasted peanuts on top just before serving and a sprinkle of sea salt. The salt helps balance the sweetness and brightens flavors for spring gatherings.
Summer: Turn slices into icebox desserts—serve slightly chilled with fresh strawberries or drizzle with caramel sauce for a beach picnic vibe. Keep pies cold until serving.
Fall: Stir a pinch of cinnamon into the cookie crumbs or use spiced shortbread for a warm, autumnal twist. Top with chopped butter-toffee pieces for extra seasonal crunch.
Winter: Finish each slice with a dusting of cocoa powder and a small dollop of whipped cream. For holiday parties, add crushed candy cane on a few slices for a festive contrast to the peanut butter.
Pro Tips & Notes
- Room temperature cream cheese — this is the easiest way to get a smooth filling. Cold cream cheese traps lumps.
- Divide the Cool Whip — follow the recipe split exactly: 1 container into the filling, the remaining 1/2 container mixed with melted chocolate for the topping.
- Chocolate melting — use 30-second increments in the microwave and stir; residual heat finishes the job. Overheating chocolate makes it grainy.
- Slicing — chill the pie well, and warm your knife between slices for clean cuts. Wipe the blade between cuts if chocolate builds up.
- Make-ahead — this pie holds up well 24–48 hours refrigerated. For longer storage, freeze individual slices wrapped tightly; thaw in the fridge overnight.
Meal Prep & Storage Notes
Prepare the crust and filling up to a day ahead. Assemble and chill overnight for the best texture. Cover the pie with plastic wrap to prevent fridge odors or freezing of the Cool Whip surface.
Refrigerator: Store covered for up to 3 days for optimal texture. After that, the filling may start to weep slightly and the crust soften.
Freezer: For longer storage, wrap in two layers (plastic then foil) and freeze for up to 1 month. Thaw in the refrigerator overnight before serving. Note: texture may be a touch softer after freezing but still delicious.
FAQ
- Can I use natural peanut butter? Yes. Stir natural peanut butter until smooth before measuring. The filling may be slightly softer; extra chilling helps.
- Do I need to bake anything? No. This is a fully no-bake pie; the crust is made from pressed cookie crumbs bound with melted butter.
- Can I make this nut-free? If you substitute peanut butter, choose a neutral, similarly textured spread (sunflower seed butter behaves similarly), but note flavor will change.
- What’s the best way to get clean slices? Chill the pie well, run a sharp knife under hot water, dry it, then slice in a single straight motion. Wipe between cuts.
Make It Tonight
Plan 20 minutes of active work and at least 4 hours of chill time. Start by pressing the shortbread crust into your pie plate and pop it into the fridge. While that chills, beat the cream cheese and peanut butter filling, then fold in the Cool Whip and return to the fridge. Melt chocolate gently and fold into the remaining Cool Whip for the top layer. Assemble and refrigerate. By the time dinner is done, dessert will be set enough to slice for company—or stash it overnight and serve the next day for even cleaner slices.
This is a dessert you can rely on—fast to make, forgiving, and crowd-pleasing. Grab the shortbread, peanut butter, and Cool Whip and you’re fifteen minutes away from a pie that tastes like a Twix bar on a plate, without turning on the oven.
No-Bake Peanut Butter Twix Pie
Ingredients
Ingredients
- 2 cupsof shortbread cookie crumbslike Lorna Doone about 30 cookies
- 6 tablespoons 84 g buttermelted
- 8 ounces 226 g cream cheeseroom temperature
- 1 cuppeanut butterI use Skippy Naturals you can also use regular. If using reduced fat, you may need to lower the amount of sugar.
- 1/2 cup 100 g granulated sugar
- 1 teaspoonvanilla extract
- 2 ounces 57 g semi-sweet chocolate
- 1 1/2 containers 12 ounces Cool Whip(fat-free, regular, or sugar-free)
Instructions
Instructions
- In a medium bowl, stir 2 cups shortbread cookie crumbs and 6 tablespoons (84 g) melted butter with a fork until the crumbs are evenly moistened. Press the mixture firmly and evenly into the bottom and up the sides of a 9" pie plate to form a crust. Chill in the refrigerator until the crust is firm (about 15 minutes) or until ready to fill.
- In a mixing bowl, beat 8 ounces (226 g) cream cheese at room temperature with a hand mixer until smooth.
- Add 1 cup peanut butter, 1/2 cup (100 g) granulated sugar, and 1 teaspoon vanilla extract to the cream cheese. Beat until the mixture is smooth and combined.
- Fold 1 container (8 ounces) Cool Whip gently into the peanut butter mixture until mostly combined; stir carefully—a few small lumps are fine. Spread the filling evenly into the chilled crust.
- Place 2 ounces (57 g) semi-sweet chocolate in a microwave-safe bowl. Microwave in 30-second increments, stirring between each, until the chocolate is melted and smooth (about 1 minute total). Do not overheat.
- Stir the melted chocolate into the remaining Cool Whip (the remaining 1/2 container, 4 ounces, about 1/2 cup) until evenly combined. Spread this chocolate mixture evenly over the peanut butter filling.
- Chill the pie in the refrigerator at least 4 hours or overnight until firm. Slice to serve. Optionally garnish individual slices with additional Cool Whip.
Equipment
- Medium Bowl
- Fork
- 9-inch pie plate
- Mixing Bowl
- Hand Mixer
- Microwave-safe bowl
- Refrigerator
Notes
See how to make a
shortbread cookie crust
.