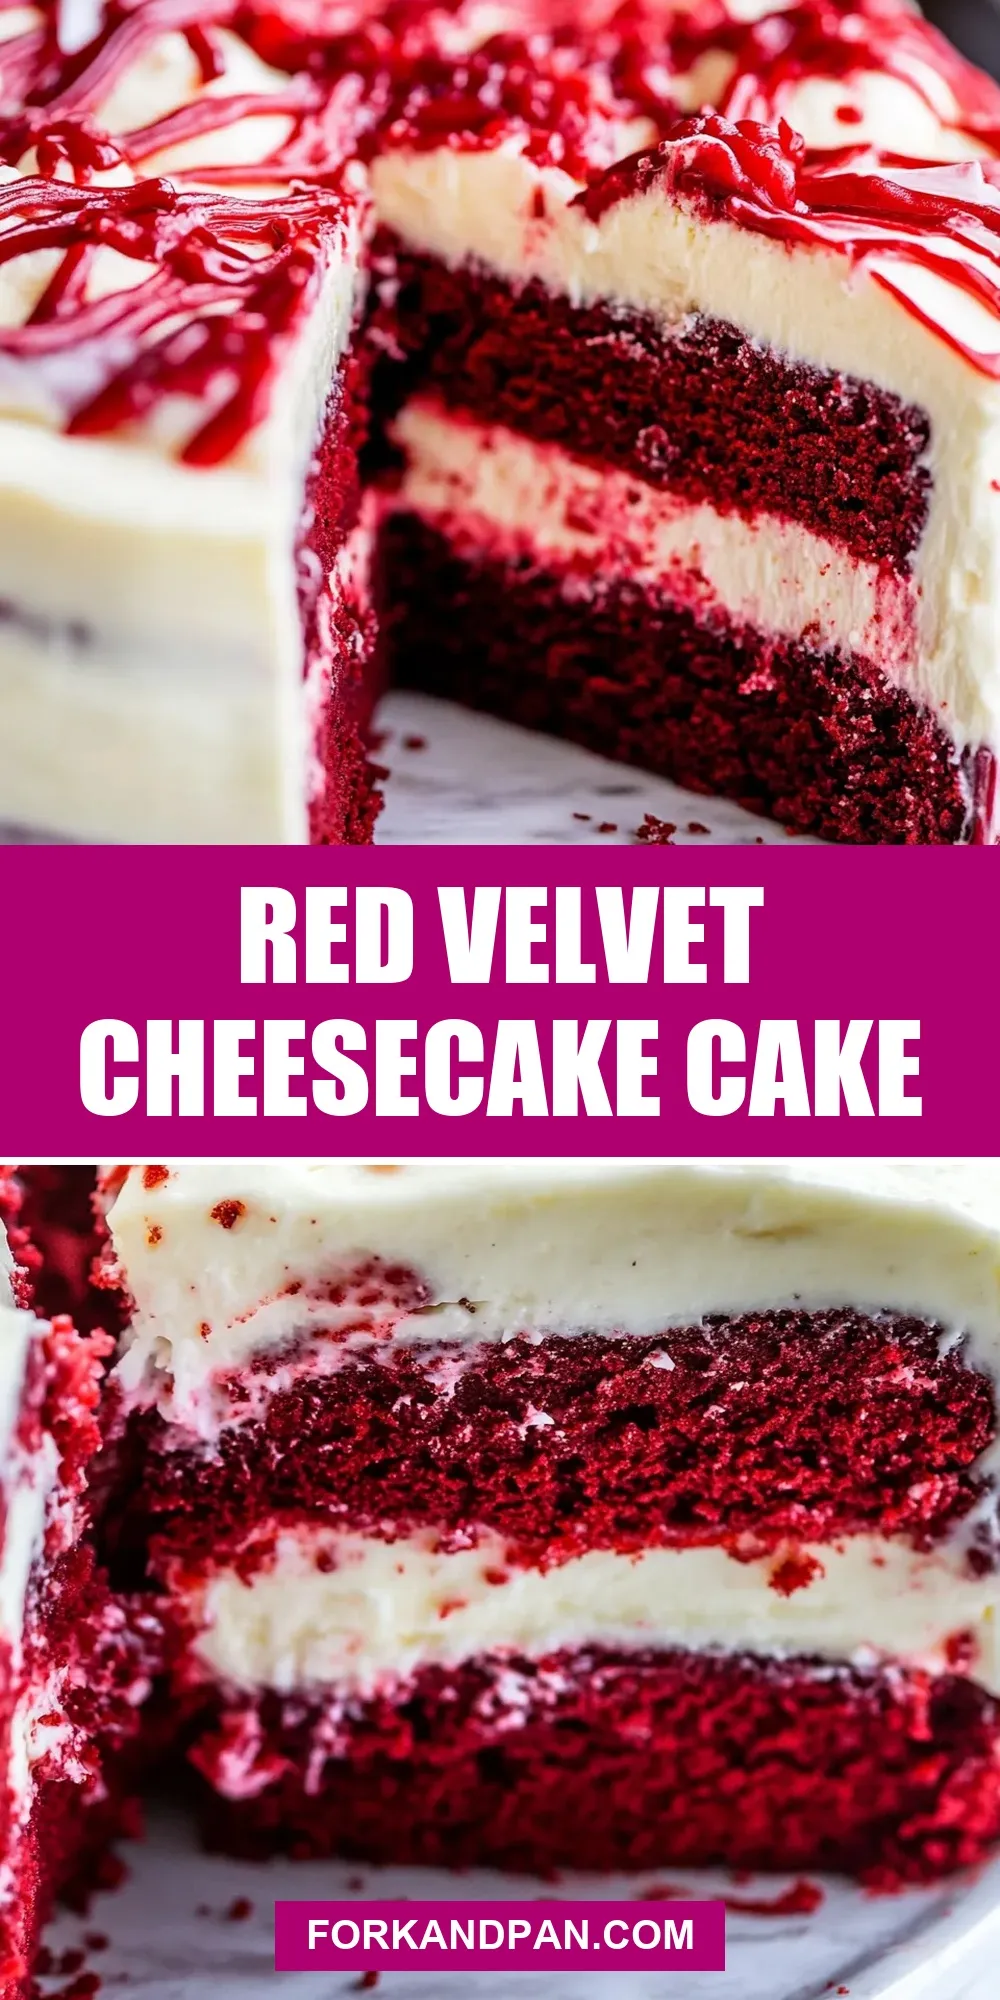
Red Velvet Cheesecake Cake
This Red Velvet Cheesecake Cake is one of those recipes that looks fancy but is genuinely approachable. It combines a classic boxed red velvet cake base with a tangy cream cheese swirl and a soft, classic cream cheese frosting. The result is a loaf-shaped showstopper that slices beautifully and travels well.
I like this for busy weekends, last-minute celebrations, or when you want something that feels special without a lot of fuss. The loaf format makes it easier to bake and portion than a multi-layer cake, and the cheesecake ribbon gives each slice a rich, velvety bite.
Ingredient Rundown

Ingredients
- 15-ounce box red velvet cake mix plus ingredients called for to make the cake (egg, water, oil) — the boxed mix keeps the process quick; use the eggs, water, and oil the box specifies for best texture.
- 8 ounces cream cheese, room temperature — for the cheesecake ribbon; soften it fully so the filling is smooth and swirls easily.
- 1/4 cup sour cream, room temperature — adds tang and keeps the cheesecake swirl tender.
- 1 egg, room temperature — binds the cheesecake filling and helps it set during baking.
- 1/4 cup granulated sugar — sweetens the cheesecake layer without overpowering the red velvet.
- 1 teaspoon vanilla extract — rounds the cheesecake flavor; use pure vanilla if you have it.
- 4 ounces cream cheese, room temperature — for the frosting; soft but still cool will give a smooth finish.
- 4 tablespoons unsalted butter, room temperature — helps the frosting whip light and spreadable; soften but do not melt.
- 2 cups powdered sugar — adds sweetness and structure to the frosting; add it in increments for an even texture.
- 1/4 teaspoon salt — balances sweetness in the frosting.
- 2 teaspoons vanilla — brightens the frosting; the second vanilla measure makes the frost sing with flavor.
Make Red Velvet Cheesecake Cake: A Simple Method
- Preheat oven to 350°F. Grease and flour two 9×5-inch loaf pans (or line with foil and spray with cooking spray). You can also bake in one 9×5 loaf pan plus about 8 cupcakes instead of two loaves.
- Prepare the red velvet cake batter according to the directions on the 15-ounce box of red velvet cake mix, using the egg, water, and oil called for on the box.
- Divide the prepared cake batter evenly among the pans you are using.
- Make the cheesecake filling: in a stand mixer or with a hand mixer, beat 8 ounces cream cheese and 1/4 cup sour cream (both at room temperature) until smooth.
- Add 1 egg, 1/4 cup granulated sugar, and 1 teaspoon vanilla extract to the cheesecake mixture and mix until combined and mostly smooth (a few small lumps are OK).
- Drop spoonfuls of the cheesecake mixture evenly over the top of the cake batter in each pan.
- Using a butter knife or the back of a wooden spoon, swirl the cheesecake into the cake batter gently to create a marbled effect. Do not over-swirl.
- Bake for 30–40 minutes, or until a toothpick inserted into the center comes out clean. (Note: the cheesecake swirl may settle slightly during baking.)
- Cool the loaves completely in the pans, then remove the loaves from the pans and allow to finish cooling before frosting.
- To make the frosting: beat 4 ounces cream cheese and 4 tablespoons unsalted butter (both at room temperature) until smooth.
- Add 2 cups powdered sugar, 1 cup at a time, mixing after each addition until combined. Add 1/4 teaspoon salt and 2 teaspoons vanilla extract and mix until smooth.
- Refrigerate the frosting until firm enough to spread if needed, then frost the cooled loaves. Store any leftover frosting in the refrigerator.
The Upside of Red Velvet Cheesecake Cake

This cake combines two beloved textures: tender, cocoa-kissed red velvet cake and creamy, tangy cheesecake. The contrast makes every bite interesting. Because you’re baking in loaf pans, you get even baking, easy slicing, and smaller serving sizes without the stress of stacking layers.
It’s forgiving. The cream cheese filling hides small mistakes in batter smoothing and the frosting is straightforward. The loaf format is also portable — wrap a loaf for a picnic or bring one to a potluck. Lastly, you get the visual wow of a marbled interior without elaborate decorating skills.
Quick Replacement Ideas

- Sour cream — Greek yogurt (full-fat) can be swapped 1:1 for similar tang and moisture.
- Unsalted butter in the frosting — if you only have salted butter, reduce added salt in the frosting or omit the 1/4 teaspoon salt.
- Boxed cake mix — if you prefer scratch, use your favorite red velvet cake batter, but adjust bake time for loaf pans and keep the cheesecake swirl step intact.
- Powdered sugar — for a less sweet frosting, start with 1 3/4 cups and add more to reach the texture you like.
- Frosting cream cheese — you can momentarily beat the frosting with a splash of milk to loosen it for spreading if it’s too firm after chilling.
Essential Tools for Success
- Two 9×5-inch loaf pans — the recipe is written for two loaves; one loaf plus cupcakes is an alternative.
- Stand mixer or hand mixer — helps get the cheesecake filling and frosting perfectly smooth.
- Rubber spatula and butter knife — the spatula folds batter cleanly; the butter knife creates the swirl easily.
- Cooling rack — cool the loaves completely before removing and frosting to avoid sweating the frosting.
- Toothpick or cake tester — for checking doneness.
- Parchment or foil — lining pans makes removing finished loaves easier and cleaner.
Troubleshooting Tips
Swirl and texture issues
If the cheesecake swirl sinks or separates from the cake, it’s usually because the cheesecake mixture was overbeaten or too loose. Mix the cheesecake filling until mostly smooth but not overly aerated. Also avoid pouring hot batter over the filling — maintain even temperatures by dividing batter evenly and swirling gently.
Frosting problems
If your frosting is too soft to spread, refrigerate it until it firms up. If it becomes too hard after chilling, let it sit at room temperature for a few minutes and re-whip briefly. If the frosting is grainy, you may have overbeaten the butter; keep a light hand when combining powdered sugar with fat.
Baking and doneness
If the top browns too quickly, tent the loaves loosely with foil for the final 10–15 minutes. If a toothpick shows a few moist crumbs near the cheesecake swirl, that’s okay — the swirl can remain slightly soft but should not be jiggly in the center when fully cooled.
Holiday & Seasonal Touches
Red Velvet Cheesecake Cake is inherently festive because of its color and cream cheese components. For winter holidays, I like to top slices with a whisper of cocoa and a few sugared cranberries. For Valentine’s Day, a drizzle of simple berry sauce or a scattering of chocolate-covered espresso beans brings contrast.
In warmer months, serve thin slices with fresh berries and a mint leaf for brightness. Small adjustments like toasted pecans or a light dusting of powdered sugar can shift the cake’s character to match the season without changing the core recipe.
Cook’s Commentary
I’ve made this cake many times in loaf pans because it’s the easiest way to get a consistently pretty interior. The boxed mix gets a bad rap but here it’s an ally: reliable crumb and familiar red velvet flavor that plays perfectly with the cheesecake. My pragmatic approach is to focus on technique — room-temperature dairy, gentle swirling, and patience while cooling. Those small steps make a big difference.
When I serve this, people assume I spent hours. The truth is about 10 minutes of hands-on swirling and 30–40 minutes in the oven. The rest is cooling and a simple frosting. Busy or not, this is one of my favorite “effort-reward” recipes.
Storage Pro Tips
- Refrigeration — Store frosted loaves covered in the refrigerator for up to 5 days. Cream cheese frosting and the cheesecake swirl both require refrigeration to stay safe and to keep structure.
- Freezing — You can freeze unfrosted, fully cooled loaves wrapped tightly in plastic and foil for up to 2 months. Thaw overnight in the refrigerator, then bring to room temperature before frosting.
- Frosting storage — Store any leftover frosting in an airtight container in the refrigerator, per the recipe instructions. It will keep for up to 5 days; re-whip briefly before using if it separates.
- Slice handling — For clean slices, chill the frosted loaf for 20–30 minutes and use a sharp knife wiped between cuts.
Handy Q&A
Can I make this as a single-layer round cake?
Yes. If you adapt the batter to a round pan, watch bake time closely and expect a different bake profile. Keep the cheesecake swirl technique the same and test for doneness with a toothpick.
Do I have to use a boxed mix?
No. A scratch red velvet batter will work. The boxed mix streamlines the process, but maintaining batter consistency and bake time adjustments are key if you go from-scratch.
Why are my swirls not visible after baking?
Sometimes the cheesecake ribbon settles a bit during baking, especially if it’s very soft. Try a slightly firmer filling (mix just until combined) and a gentler swirl to preserve visible marbling.
Can I omit the frosting?
Yes, you can skip frosting and serve plain or dust with powdered sugar. The frosting adds richness and a polished look, but the loaf is delicious unfrosted too.
Time to Try It
Ready to bake? Gather your pans and room-temperature dairy first — they make everything easier. Follow the method step by step, keep your swirl gentle, and give the loaves time to cool before frosting. You’ll end up with a beautiful, festive loaf that’s simple to slice and share.
When you do make it, take note of any small tweaks that suit your oven or taste. This recipe is flexible and forgiving, and once you’ve baked it a couple of times you’ll have a go-to for both everyday treats and celebrations. Enjoy the balance of rich cheesecake and velvety cake — it’s reliably lovely.

Red Velvet Cheesecake Cake
Ingredients
Ingredients
- 115 ouncebox red velvet cake mixplus ingredients called for to make the cake egg, water, oil
- 8 ouncescream cheeseroom temperature
- 1/4 cupsour creamroom temperature
- 1 eggroom temperature
- 1/4 cupgranulated sugar
- 1 teaspoonvanilla extract
- 4 ouncescream cheeseroom temperature
- 4 tablespoonsunsalted butterroom temperature
- 2 cupspowdered sugar
- 1/4 teaspoonsalt
- 2 teaspoonsvanilla
Instructions
Instructions
- Preheat oven to 350°F. Grease and flour two 9×5-inch loaf pans (or line with foil and spray with cooking spray). You can also bake in one 9×5 loaf pan plus about 8 cupcakes instead of two loaves.
- Prepare the red velvet cake batter according to the directions on the 15-ounce box of red velvet cake mix, using the egg, water, and oil called for on the box.
- Divide the prepared cake batter evenly among the pans you are using.
- Make the cheesecake filling: in a stand mixer or with a hand mixer, beat 8 ounces cream cheese and 1/4 cup sour cream (both at room temperature) until smooth.
- Add 1 egg, 1/4 cup granulated sugar, and 1 teaspoon vanilla extract to the cheesecake mixture and mix until combined and mostly smooth (a few small lumps are OK).
- Drop spoonfuls of the cheesecake mixture evenly over the top of the cake batter in each pan.
- Using a butter knife or the back of a wooden spoon, swirl the cheesecake into the cake batter gently to create a marbled effect. Do not over-swirl.
- Bake for 30–40 minutes, or until a toothpick inserted into the center comes out clean. (Note: the cheesecake swirl may settle slightly during baking.)
- Cool the loaves completely in the pans, then remove the loaves from the pans and allow to finish cooling before frosting.
- To make the frosting: beat 4 ounces cream cheese and 4 tablespoons unsalted butter (both at room temperature) until smooth.
- Add 2 cups powdered sugar, 1 cup at a time, mixing after each addition until combined. Add 1/4 teaspoon salt and 2 teaspoons vanilla extract and mix until smooth.
- Refrigerate the frosting until firm enough to spread if needed, then frost the cooled loaves. Store any leftover frosting in the refrigerator.
Equipment
- 9x5-inch loaf pan
- Mixing Bowl
- Stand mixer or hand mixer
- Butter Knife
- toothpick
Notes
Use ANY flavor cake mix!